Page 112 of 497
Locking or unlocking
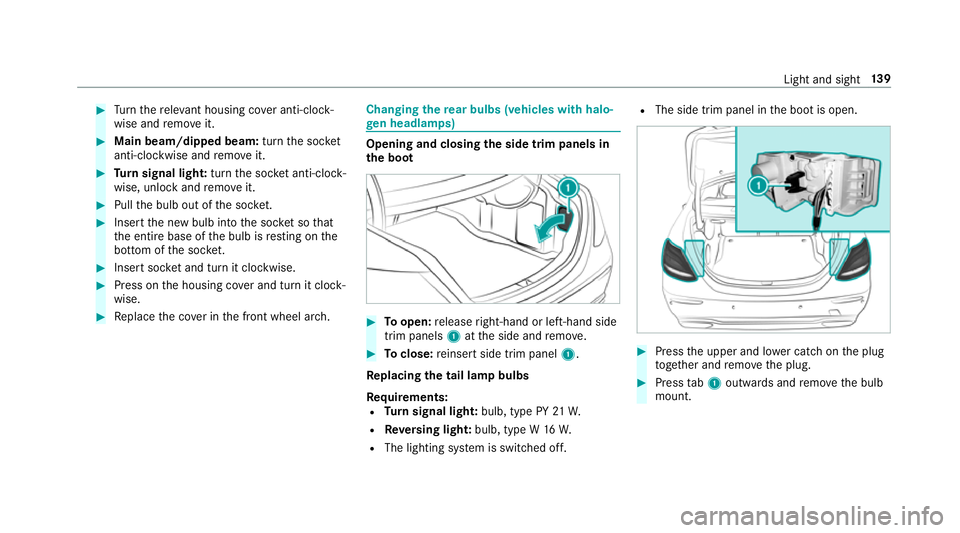
thegl ove box #
Turn the emer gency key a quarter turn clock‐
wise 2(to lock) or anti-clockwise 1(to
unlock). Opening
the spectacles compa rtment #
Press button 1. Opening the
stowage compa rtment in the
re ar armrest #
Press release cat ch1 and swing the co ver
of the armrest upwards. Seats and
stowing 109
Page 142 of 497

#
Turn there leva nt housing co ver anti-clock‐
wise and remo veit. #
Main beam/dipped beam: turnthe soc ket
anti-clockwise and remo veit. #
Turn signal light: turnthe soc ket anti-clo ck‐
wise, unlock and remo veit. #
Pull the bulb out of the soc ket. #
Inse rtthe new bulb into the soc ket so that
th e entire base of the bulb is resting on the
bottom of the soc ket. #
Inse rtsoc ket and turn it clo ckwise. #
Press on the housing co ver and turn it clock‐
wise. #
Replace the co ver in the front wheel ar ch. Changing
there ar bulbs (vehicles with halo‐
ge n headla mps) Opening and closing
the side trim panels in
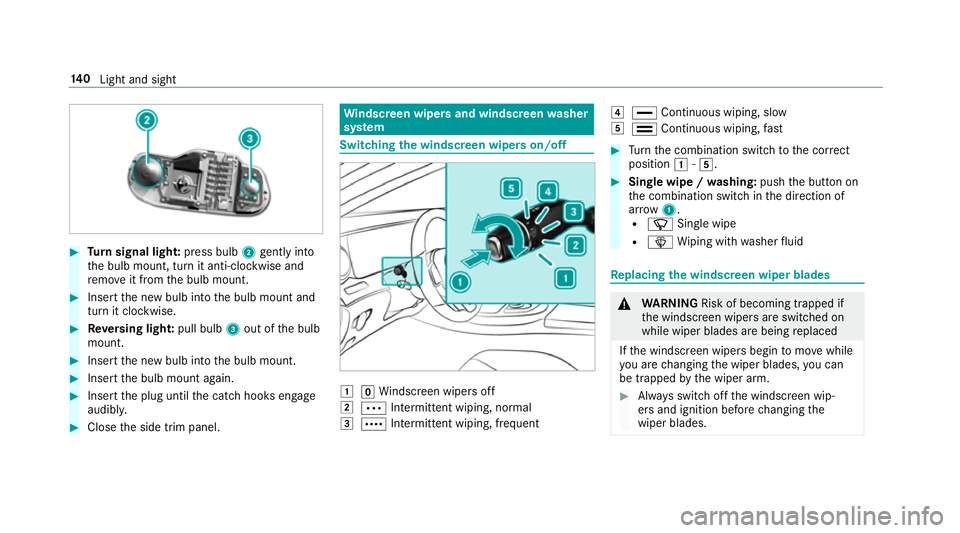
th e boot #
Toopen: release right-hand or left-hand side
trim panels 1atthe side and remo ve. #
Toclose: reinse rtside trim panel 1.
Re placing the tail lamp bulbs
Re quirements:
R Turn signal light: bulb, type PY 21W.
R Reversing light: bulb, type W 16W.
R The lighting sy stem is switched off. R
The side trim panel in the boot is open. #
Press the upper and lo wer catch on the plug
to ge ther and remo vethe plug. #
Press tab1 outwards and remo vethe bulb
mount. Light and sight
13 9
Page 143 of 497

#
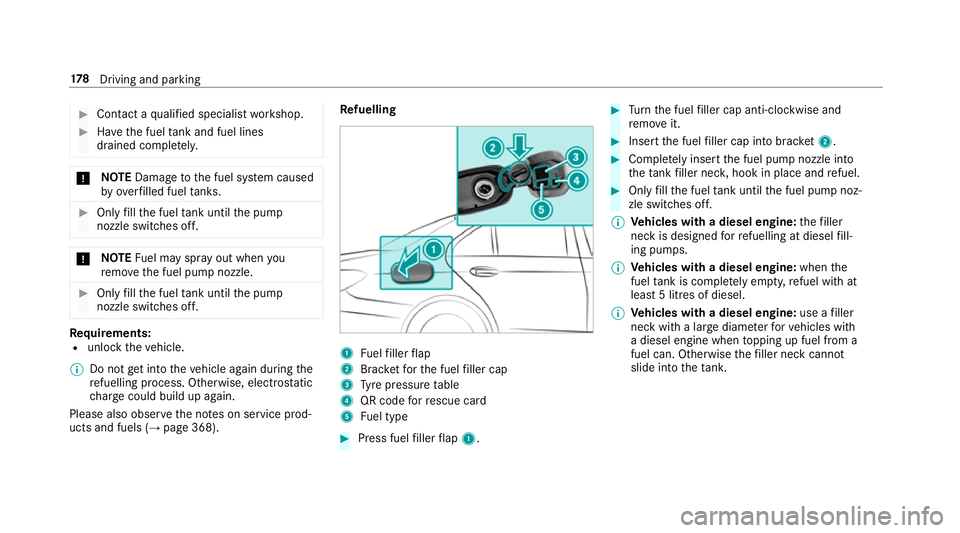
Turn signal light: press bulb2gently into
th e bulb mount, turn it anti-clockwise and
re mo veit from the bulb mount. #
Insert the new bulb into the bulb mount and
turn it clockwise. #
Reversing light: pull bulb3out of the bulb
mount. #
Insert the new bulb into the bulb mount. #
Insert the bulb mount again. #
Insert the plug until the catch hooks engage
audibl y. #
Close the side trim panel. Wi
ndscreen wipers and windscreen washer
sy stem Switching
the windscreen wipers on/off 1
gWindsc reen wipers off
2 Ä Intermittent wiping, normal
3 Å Intermittent wiping, frequent 4
° Continuous wiping, slow
5 ¯ Continuous wiping, fast #
Turn the combination switch tothe cor rect
position 1-5. #
Single wipe / washing: pushthe button on
th e combination switch in the direction of
ar row 1.
R í Single wipe
R î Wiping with washer fluid Re
placing the windsc reen wiper blades &
WARNING Risk of becoming trapped if
th e windscreen wipers are switched on
while wiper blades are being replaced
If th e windscreen wipers begin tomo vewhile
yo u are changing the wiper blades, you can
be trapped bythe wiper arm. #
Alw ays switch off the windscreen wip‐
ers and ignition before changing the
wiper blades. 14 0
Light and sight
Page 181 of 497

#
Con tact a qualified specialist workshop. #
Have the fuel tank and fuel lines
drained compl etely. *
NO
TEDama getothe fuel sy stem caused
by ove rfilled fuel tanks. #
Only fill th e fuel tank until the pump
nozzle switches off. *
NO
TEFuel may spr ayout when you
re mo vethe fuel pump nozzle. #
Only fill th e fuel tank until the pump
nozzle switches off. Re
quirements:
R unlock theve hicle.
% Do not get into theve hicle again during the
re fuelling process. Otherwise, electros tatic
ch arge could build up again.
Please also obser vethe no tes on service prod‐
ucts and fuels (→ page 368). Re
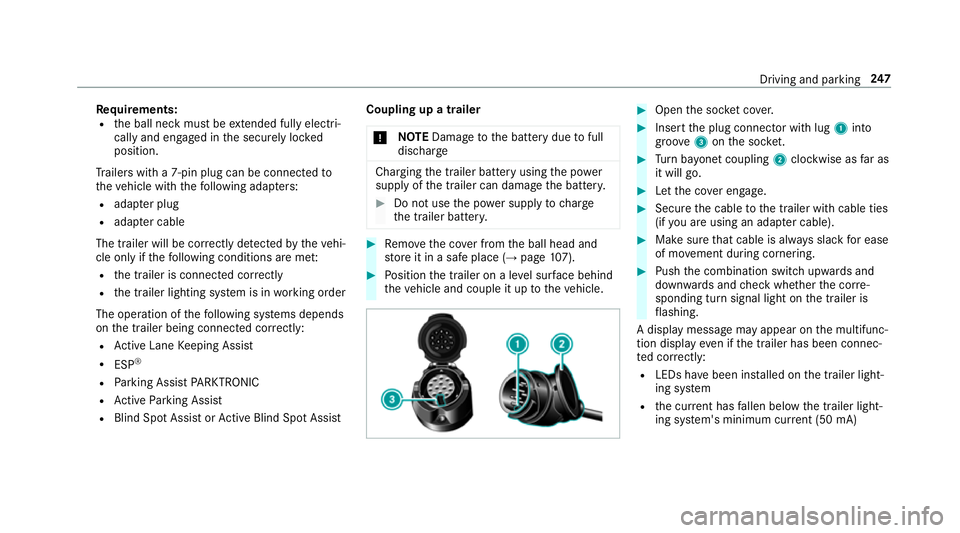
fuelling 1
Fuelfiller flap
2 Brac ketfo rth e fuel filler cap
3 Tyre pressure table
4 QR code forre scue card
5 Fuel type #
Press fuel filler flap 1. #
Turn the fuel filler cap anti-clockwise and
re mo veit. #
Insert the fuel filler cap into brac ket2. #
Comp lete ly inse rtthe fuel pump nozzle into
th eta nk filler nec k,hook in place and refuel. #
Only fill th e fuel tank until the fuel pump noz‐
zle switches off.
% Vehicles with a diesel engine: thefiller
neck is designed forre fuelling at diesel fill‐
ing pumps.
% Vehicles with a diesel engine: whenthe
fuel tank is compl etely em pty, refuel with at
lea st5 litres of diesel.
% Vehicles with a diesel engine: use afiller
neck with a lar gediame terfo rve hicles with
a diesel engine when topping up fuel from a
fuel can. Otherwise thefiller neck cannot
slide into theta nk. 17 8
Driving and pa rking
Page 183 of 497
The
following announcements appear in order in
th e multifunction display when theAd Blue ®
tank
requ iresrefilling:
R Refill AdBlue See Owner's Manual . The
Ad Blue ®
re ser voir is down tothere ser ve
le ve l.
R Refill AdBlue No start in XXX km .Yo u can
on lydrive theve hicle overth e dis tance
shown. Top up AdBlue ®
as soon as possible.
R Refill AdBlue Start not possible. The vehicle
can no longer be star ted. Opening
theAd Blue ®
filler cap #
Press fuel filler flap 1. #
Turn AdBlue ®
filler cap 2anti-clockwise and
re mo veit. Preparing
theAd Blue ®
re fill canis ter #
Screw onthefast ener of AdBlue ®
re fill canis‐
te r2. #
Screw disposable hose 1onto the opening
of Ad Blue ®
re fill canis ter2 until finger-tight. 18 0
Driving and pa rking
Page 250 of 497

Re
quirements:
R the ball neck must be extended fully electri‐
cal lyand engaged in the securely loc ked
position.
Tr ailers with a 7-pin plug can be connec tedto
th eve hicle with thefo llowing adap ters:
R adap ter plug
R adapte r cable
The trailer will be cor rectly de tected bytheve hi‐
cle only if thefo llowing conditions are me t:
R the trailer is connected cor rectly
R the trailer lighting sy stem is in working order
The operation of thefo llowing sy stems depends
on the trailer being connected cor rectly:
R Active Lane Keeping Assist
R ESP ®
R Parking Assist PARKTRONIC
R Active Parking Assist
R Blind Spot Assist or Active Blind Spot Assi stCoupling up a trailer
* NO
TEDama getothe battery due tofull
discharge Charging
the trailer battery using the po wer
supply of the trailer can damage the batter y. #
Do not use the po wer supp lyto charge
th e trailer batter y. #
Remo vethe co ver from the ball head and
st ore it in a safe place (→ page107). #
Position the trailer on a le vel sur face behind
th eve hicle and couple it up totheve hicle. #
Open the soc ket co ver. #
Insert the plug connector with lug 1into
groo ve3 onthe soc ket. #
Turn bayonet coupling 2clockwise as far as
it will go. #
Let the co ver engage. #
Secure the cable tothe trailer with cable ties
(if you are using an adap ter cable). #
Make sure that cable is alw ays slack for ease
of mo vement during cornering. #
Push the combination switch upwards and
down wards and check whe ther the cor re‐
sponding turn signal light on the trailer is
fl ashing.
A display message may appear on the multifunc‐
tion display even if the trailer has been connec‐
te d cor rectly:
R LEDs ha vebeen ins talled on the trailer light‐
ing sy stem
R the cur rent has fallen below the trailer light‐
ing sy stem's minimum cur rent (50 mA) Driving and pa
rking 247
Page 270 of 497

#
Touchpad with handwriting recognition:
select Touchpad . #
Swit chActivate touchpad onO or off ª.
Ope rating the touchpad
Re quirement:
The touchpad is swit ched on (→ page 266). 1
Touchpad
2 ò button
Calling up favo urites
3 ButtonD
Calls up the control menu of the last active
audio source
4 Button % Press brief
ly:re turns tothe pr evious display
Press and hold: calls up the basic menu
Yo u can navigate in menus and lists via touch-
sensitive sur face 1 byusing a single-finger
swipe. #
Toselect the menu item: swipe up, down,
left or right. #
Press theto uchpad. #
Toclose and open lists: swipe left orright. #
Tomo vethe digital map: swipe in any
direction.
Use thefo llowing functions with a two-finger
swipe: #
Toshow or hide the control menu: swipe
up or down with two fingers. #
Tozoom in and out of the map: movetwo
fi ngers apart or toget her. #
Toincrease or reduce the vehicle set‐
tings and tone settings: turn twofingers
clo ckwise or anti-clockwise. Multimedia sy
stem 267
Page 315 of 497

#
Follow the instructions in the service
inter val display rega rding the oil
ch ange. *
NO
TEDama gecaused bytopping up too
much engine oil To
pping up too much engine oil can cause
damage tothe engine or the catalytic con‐
ve rter. #
Have excess engine oil remo ved at a
qu alified specialist workshop. #
Turn cap 1anti-clockwise and remo veit. #
Top up the engine oil. #
Replace cap 1and turn it clockwise as far
as it will go. #
Check the oil le vel again (→ page310). Che
cking the coolant le vel &
WARNING Danger of bu rns from hot
component parts in the engine compart‐
ment
Cer tain component parts in the engine com‐
partment may be very hot, e.g. the engine,
th era diator and parts of theex haust sy stem. #
Let the engine cool down and only
to uch the component parts described
below: &
WARNING Danger of bu rns from hot
coolant
The engine cooling sy stem is pressurised,
particularly when the engine is warm. If you
open the cap, you could be scalded byhot
coolant spr aying out. #
Let the mo tor cool down before opening
th e cap. #
When opening the cap, wearglove s and
pr otective eyew ear. 312
Maintenance and care