Page 300 of 497

Re
moving #
Press the SD memory card. #
Remo vethe SD memory card.
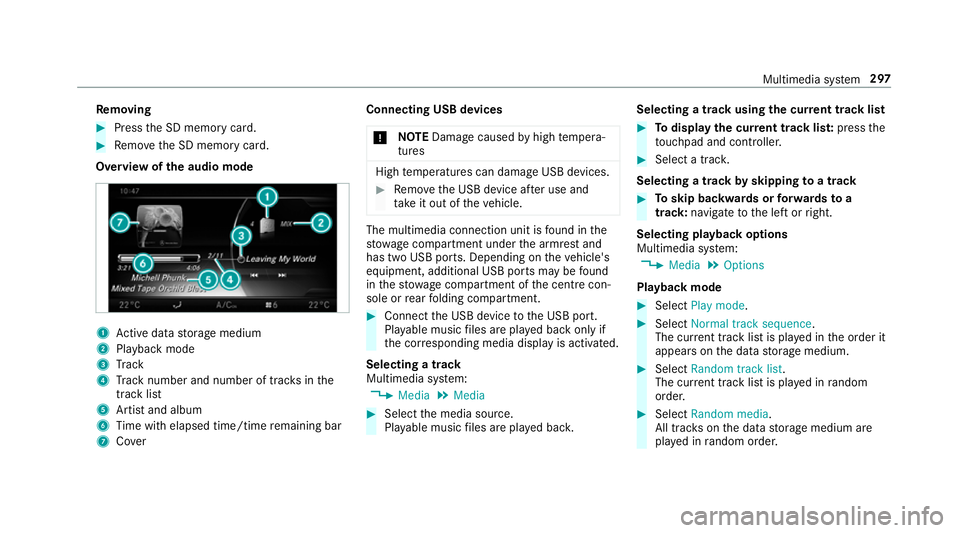
Overview of the audio mode 1
Active da tastorage medium
2 Playback mode
3 Track
4 Track number and number of trac ksinthe
track li st
5 Artist and album
6 Time with elapsed time/time remaining bar
7 Cover Connecting USB devices
* NO
TEDama gecaused byhigh temp era‐
tures High
temp eratures can damage USB devices. #
Remo vethe USB device af ter use and
ta ke it out of theve hicle. The multimedia connection unit is
found in the
stow age compartment under the armrest and
has two USB ports. Depending on theve hicle's
equipment, additional USB ports may be found
in thestow age compartment of the cent recon‐
sole or rear folding compartment. #
Connect the USB device tothe USB port.
Pla yable music files are pla yed back only if
th e cor responding media display is activated.
Selecting a track
Multimedia sy stem:
, Media .
Media #
Select the media source.
Pla yable music files are pla yed bac k. Selecting a track using
the cur rent track list #
Todispl aythe cur rent track lis t:press the
to uchpad and cont roller. #
Select a trac k.
Selecting a track byskipping toa track #
Toskip backwards or forw ards toa
track: navigate tothe left or right.
Selecting playback options
Multimedia sy stem:
, Media .
Options
Playback mode #
Select Play mode . #
Select Normal track sequence.
The cur rent track li stis pla yed in the order it
appears on the data storage medium. #
Select Random track list.
The cur rent track li stis pla yed in random
orde r. #
Select Random media.
All trac kson the data storage medium are
pla yed in random orde r. Multimedia sy
stem 297
Page 301 of 497

Skip
totime #
Select Skip to time .
A menu appears. #
Set the time.
Showing track information #
Switch Show track information onO or off
ª.
Pa use and playback function
Multimedia sy stem:
, Media
Pa using playback #
Navigate down wards. #
Select Ë.
Continuing playback #
Select Ì. Media sear
ch St
arting the media sear ch
Multimedia sy stem:
, Media .
Search
Depending on the connected media sources and
fi les, thefo llowing categories are lis ted:
R Current track list
R Folder
R Keyword search
R Playlists
R Artists
R Albums
R Tracks
R Genres
R Year
R Composers
R iTunes U (Apple®
devices)
R Genius mixes (Apple®
devices)
R Podcasts (Apple®
devices)
R Audiobooks (Apple®
devices) #
Select a categor y. Media Inter
face Information about
the Media Inter face
Media In terface is a universal inter face forthe
connection of mobile audio equipment. The mul‐
timedia sy stem has two USB ports. The USB
ports are located in thestow age compartment
under the armrest.
Suppor ted devices
The Media Inter face allo wsyouto connect the
fo llowing data storage media:
R iPod ®
R iPhone ®
R MP3 pla yer
R USB devices
Fo r de tails and a list of suppor ted devices, visit
our website at http://www.mercedes-
benz.com/connect. Follow the instructions in
th e "Media Inter face" section. 298
Multimedia sy stem
Page 317 of 497

#
Make sure that no windsc reen washer
concentrate spills out next tothefiller
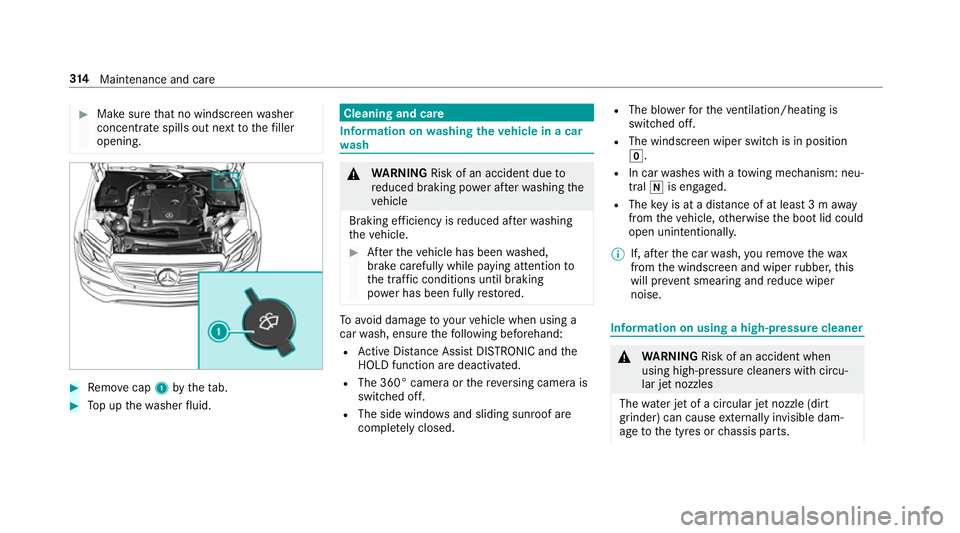
opening. #
Remo vecap 1bytheta b. #
Top up thewa sher fluid. Cleaning and care
Information on
washing theve hicle in a car
wa sh &
WARNING Risk of an accident due to
re duced braking po wer af terwa shing the
ve hicle
Braking ef ficiency is reduced af terwa shing
th eve hicle. #
Afterth eve hicle has been washed,
brake carefully while paying attention to
th e traf fic conditions until braking
po we r has been fully restored. To
avo id damage to yourvehicle when using a
car wash, ensure thefo llowing beforehand:
R Active Dis tance Assi stDISTRONIC and the
HOLD function are deactivated.
R The 360° came raor there ve rsing camera is
switched off.
R The side windo wsand sliding sun roof are
comple tely closed. R
The bl owerforth eve ntilation/heating is
switched off.
R The windsc reen wiper switch is in position
g.
R In car washes with a towing mechanism: neu‐
tral iis engaged.
R The key is at a dis tance of at least 3 m away
from theve hicle, otherwise the boot lid could
open unintentionally.
% If, af terth e car wash, youre mo vethewax
from the windscreen and wiper rubber, this
will pr event smearing and reduce wiper
noise. Information on using a high-p
ressure cleaner &
WARNING Risk of an accident when
using high-pressure cleane rswith circu‐
lar jet nozzles
The wate r jet of a circular jet nozzle (dirt
grinder) can cause extern ally invisible dam‐
age tothe tyres or chassis parts. 314
Maintenance and care
Page 318 of 497

Components damaged in
this wa y may unex‐
pec tedly fail. #
Do not use high-pressure cleaners with
circular jet nozzles toclean theve hicle. #
Have damaged tyres or chassis parts
re placed immediatel y. To
avo id damage to yourvehicle, obser vethefo l‐
lowing when using a high-pressure cleaner:
R Keep theke y at least 3 m away from the
ve hicle. Otherwise the boot lid could open
unintentionall y.
R Maintain a dis tance of at least 30 cm tothe
ve hicle. R
Vehicles with deco rative foil: parts of your
ve hicle are co vered with a decorative foil.
Maintain a dis tance of at least 70 cm
between thefo il-c ove red parts of theve hicle
and the nozzle of the high pressure cleaner.
Mo vethe high-pressure cleaner nozzle
around whilst cleaning.
R Obser vethe information on the cor rect dis‐
ta nce in the equipment manufacturer's oper‐
ating instructions.
R Do not point the nozzle of the high-pressure
cleaner directly at sensitive parts such as
tyres, slits, electrical component parts, bat‐
te ries, light sources and ventilation sl ots. Wa
shing theve hicle byhand Obser
vethe legal requ irements, e.g. in a number
of countries, washing byhand is only permitted
in specially designated wash ba ys. #
Use a mild cleaning agent, e.g. car shampoo. #
Washtheve hicle with luk ewarmwate r using
a soft car sponge. When doing so, do not
ex pose theve hicle todirect sunlight. #
Carefully hose theve hicle off with water and
dry using a chamois. Take care not topoint
th ewate r jet directly towa rdsth e air inlet. Maintenance and care
315
Page 322 of 497

Note
s on cleaning and car eA voiding vehicle damage
Exhaust pipes Clean with cleaning agents recommended byMercedes-Benz,
particular lyin the winter and af terwa shing theve hicle. Do not use acidic cleaning agents.
Tr ailer tow hit ch R
Remo vetraces of rust on the ball, e.g. with a wire brush.
R Remo vedirt with a lint-free clo th.
R After cleaning, oil or grease the ball coupling lightl y.
R Obser vethe no tes on care in the trailer tow hit chmanu‐
fa cturer's ope rating instructions. Do not clean
the ball coupling with a high-pressure cleaner or
solvent. Note
s on care of the interior &
WARNING Risk of inju ryfrom pla stic
parts breaking off af terth e use of sol‐
ve nt-based care products
Ca reand cleaning products con taining sol‐
ve nts can cause su rfaces in the cockpit to
become porous. When
the airbags are deplo yed, plastic parts
may break away. #
Do not use any care or cleaning prod‐
ucts containing sol vents toclean the
cockpit. &
WARNING Risk of inju ryor death from
bleached seat belts
Bleaching or dyeing seat belts can se verely
we aken them.
This can, forex ample, cause seat belts to
te ar or fail in an accident. #
Never blea chor dye seat belts. Maintenance and care
319
Page 325 of 497
Emer
gency Re
moving the reflective saf ety jac ket The
reflective saf ety jac kets are located in the
saf ety jac ket compartments in the driver's and
front-passen ger door stowage compartments. #
Toremo ve:pull out sa fety jac ket bag 1by
loop 2. #
Open saf ety jac ket bag 1and pull out the
saf ety jac ket.
% Thereare also saf ety jac ket compartments
in there ar door stowage compartments in
which saf ety jac kets can be stowed. 1
Maximum number of washes
2 Maximum wash temp erature
3 Do not bleach
4 Do not iron
5 Do not use a laundry dr yer
6 Do not dr y-clean
7 This is a class 2 jac ket The
requ irements defined bythe legal standard
are on ly fulfilled if the saf ety jac ket is the cor rect
size and is fully closed.
Re place the saf ety jac ket if:
R it is dama ged or dirt on there flective strips
can no longer be remo ved
R the maximum number of washes is exceeded
R thefluorescence of the saf ety jac ket has
fa ded 322
Breakdown assis tance
Page 326 of 497
Wa
rning triangle Re
moving the warning triangle #
Push bo thsides of warning triangle holder
1 inthe direction of the ar row and open it. #
Remo ve wa rning triangle 2. Setting up
thewa rning triangle #
Fold side reflectors 1upwards toform a tri‐
angle and attach at theto p using press-stud
2. #
Fold legs 3down and out tothe side. Fi
rs t-aid kit (soft sided) The
firs t-aid kit 1is in the boot in the left-hand
stow age net. Breakdown assis
tance 323
Page 338 of 497
consumer in
your ow nve hicle, e.g. there ar
wind owheater or lighting.
When thest arting assis tance/charging process
is compl ete: #
First,re mo vethe jump lead/charging cable
from ear thpoint 3and negative pole of the
donor batter y,then from positive clamp 2
and positive pole of the donor batter y.Begin ea
ch time wi th the conta cts onyour own
ve hicle firs t. #
Afterre moving the jump lead/charging
cable, close co ver1 of positive clamp 2.
Fu rther information can be obtained at a quali‐
fi ed specialist workshop. To
w- starting or towing away Pe
rm itted towing me thods Mercedes-Benz
recommends transporting your
ve hicle in the case of a breakdown, rath er than
to wing it away. *
NO
TEDama getotheve hicle due to tow‐
ing away incor rectly #
Obser vethe instructions and no tes on
to wing away. Breakdown assis
tance 335