Page 81 of 206

Traffic symbol information
:Affected roads with indication of direction
;Symbol for report type, e.g. traffic flow mes-
sage
XTo switch to navigation mode: press theØ
button.
XTo show the menu: slide 6the controller.
XTo select Traffic: turn and press the con-
troller.
XTo select Traffic Symbol Information:
turn and press the controller.
The map appears and shows the available
traffic information as icons. The first traffic
information is highlighted.
XTo highlight additional traffic symbols, select
Nextor Previous.
XTo move the map: selectMap.
You can move the map to enable further traf-
fic information to be displayed.
You can have the traffic report relevant to a traf-
fic icon shown.
XTo select Details: turn and press the con-
troller.
The report shows the following information:
RState/province, road and display of the affec-
ted direction
RSection of the road to which the traffic report applies
RTraffic icon and traffic report
XTo close the detailed display: press the %
button.
Displaying reports on the route
The function is only available while route guid-
ance is active. It shows the available traffic
reports affecting the current route.
If there are no reports for the route or the func-
tion is not supported in the selected language:
the Messages
OnRoutemenu item is gray and
cannot be selected.
XTo switch to navigation mode: press the Ø
button.
XTo show the menu: slide 6the controller.
XTo select Traffic: turn and press the con-
troller.
XTo select Messages On Route: turn and
press the controller.
The traffic report window appears. Several
traffic reports may be available for the calcu-
lated route, marked for example by 1/4.
The report shows the following information:
RState/province, road and display of the
affected direction
RSection of the road to which the traffic
report applies
RTraffic icon and traffic report
XTo display the next/previous traffic
report: turn the controller.
XTo close the display: press the %button.
Real-time traffic reports79
Navigation
Z
Page 82 of 206

Displaying all traffic reports
XTo switch to navigation mode: press theØ
button.
XTo sho wthemenu: slid e6 thecontroller .
XTo selectTraffi c:turn and press th econ-
troller.
XTo selec tAll Messages:turn and press th e
controller .
A list is shown containin gall roads, areas or
region saffecte dby traffic reports .Roads ,
areas or region sno ton th erout ealso appear
in th elist .
XTo selec tth eroad, are aor region :turn th e
controller and press to confirm .
The traffic repor tis displaye d (
Ypage 79).
There may be severa ltraffic reports fo rth e
affecte droad.
XTo close th edisplay: press th e% button.
Activating/deactivating traffic informa -
tion on th ema p
You can switch th efollowin gtraffic information
on th emap on/off :
RIncidents
RSpeed&Flo w
RFree Flo w
XTo switch to navigation mode: press th eØ
button.
XTo sho wthemenu: slid e6 thecontroller .
XTo selectTraffi c:turn and press th econ-
troller.
XTo selec tTraffi cInformation On Map:
turn and press th econtroller .
XSelectIncidents,Speed &Flo worFre eFlow.
The display is on Oor of fª .
Reading out traffic reports on th e
rout e
Introduction
The text reader function is only available whil e
rout eguidanc eis active .It reads out traffic
reports affecting th ecurren troute.
You can selec tfrom th efollowin gtext reader
properties:
RLanguag e (Ypage 40)
RTextreader speed (Ypage 36)
You can start th etext reader function manually
or set it to automatic .
Starting thetext reader function man-
ually
XTo switch to navigation mode: press th eØ
button.
XTo sho wthemenu: slid e6 thecontroller .
XTo selectTraffi c:turn and press th econ-
troller.
XSelec tRea dOutAllMessagesonRoute.
The multimedia system reads out th ereports
in sequential order .
If there are no reports fo rth eroute, th eRea d
Out All Messages on Routemen uitem is
gray and canno tbe selected.
XTo cance lth eread-aloud function :selec t
Cancel Read-Alou dFunction.
The multimedia system reads th ecurren t
repor taloud and then exit sth eread-aloud
function .
Automatic text reader function
XTo switch to navigation mode: press th eØ
button.
XTo sho wthemenu: slid e6 thecontroller .
XTo selectTraffi c:turn and press th econ-
troller.
XSelec tRea dTraffi cAnnouncement sAutomatically.
Dependin gon th eprevious state, switch th e
option on Oor of fª.
80Real-time traffic reports
Navigation
Page 83 of 206

Recalculating the route dynamically
Route typesDynamic Traffic Routeand
Dynamic TRF. Route After Requesttake
into account all of the traffic reports they receive for the current route when calculating the route
(
Ypage 54).
If you have selected Dynamic Traffic Route
as the route type, the multimedia system guides
you to your destination along the updated route.
If you have selected the route type Dynamic
TRF.RouteAfterRequest, a prompt will first
appear.
You can now decide whether to:
Raccept the detour proposed by the multime-
dia system or
Rcontinue your original route
XTo accept the proposed detour: press the
controller.
XTo reject the proposed detour and continue
with the original route: turn the controller and
press to confirm.
The original route is continued.
Storing destinations
General notes
In the "Last destinations" memory, the following
are stored:
Rdestinations and intermediate destinations
according to the route calculation
Rthe current vehicle position or the crosshair
position, if these are saved
Rpersonal routes
If the memory is full, the oldest destination is
overwritten.
You can save destinations permanently in the
address book (
Ypage 81) and on an SD mem-
ory card (Ypage 82). For instance, this is pos-
sible immediately after entering an address.
For further information on the address book, see
(
Ypage 106)
Storing the destination in the address
book
Storing as a new contact
The example shows a POI.
XTo select Save: turn and press the controller.
A menu appears.
XSelect As New Contact.
XSelectNot Classified,Homeor Work.
An input menu shows the destination
address.
XEnter a surname and first name. Character
entry (Ypage 28).
XTo select OK: turn and press the controller.
The Saving Successfulmessage appears.
The destination address is saved in the
address book as a navigable contact.
Adding to a contact
The example shows a POI.
Requirement: the address book contains con-
tacts.
XTo select Save: turn and press the controller.
A menu appears.
XSelect Add to Contact.
The address book appears.
XSearch for a contact (Ypage 107).
Storing destinations81
Navigation
Z
Page 84 of 206

XPress the controller.
TheSaving Successfulmessage appears.
The destination address is allocated to a con-
tact in the address book.
Telephone numbers are not transferred to the
telephone number fields of the address book. After selecting the destination address from
the address book for navigation, the associ-
ated telephone number will be displayed.
If the contact already has two destination
addresses, a prompt will appear asking if a
destination address should be overwritten.
XSelect YesorNo.
If you select Yes, a list showing both destina-
tion addresses appears.
XTo select the destination address: turn and
press the controller.
The destination address is overwritten.
Saving destination to the SD memory
card
XInsert the SD memory card (Ypage 154).
XDisplay a POI, for example.
XTo select Save: turn and press the controller.
A menu appears.
XSelect To Memory Card.
XSelectNotClassifiedor, if available, select
a category that you have created yourself.
An input menu appears.
XEnter a surname and first name. Character
entry (Ypage 29).
XSelect OK.
The Saving Successfulmessage appears.
The destination is saved to the SD memory
card.
Saving the current vehicle position
Using the map
XTo switch to navigation mode: press the
ß button.
XWhen the map is shown, press and hold the
COMAND controller until you hear a tone.
The current vehicle position is saved to the
"Last destinations" memory.
If an SD memory card is inserted, the current
vehicle position will also be saved in the Not
Classifiedcategory.
Using the menu
XTo switch to navigation mode:press the
ß button.
XTo show the menu: slide6the controller.
XTo select Position: turn and press the con-
troller.
XSelect Save.
XStore the destination in the address book
(Ypage 81).
XSave the destination to the SD card
(Ypage 82).
Saving the crosshair position
XTo switch to navigation mode: press the
ß button.
XTo display the crosshair: press the control-
ler.
XMove the map to the desired position
(Ypage 53).
XTo show the menu: press the controller.
XTo selectPosition: turn and press the con-
troller.
XSelect Save.
XStore the destination in the address book
(Ypage 81).
XSave the destination to the SD card
(Ypage 82).
Editing the last destinations
XTo switch to navigation mode: press the
ß button.
XTo show the menu: slide6the controller.
XTo select Destination: turn and press the
controller.
82Storing destinations
Navigation
Page 85 of 206

XSelectFrom Previous Destinations.
The "Last destinations" memory appears.
XTo save the destination: select the destina-
tion.
The destination address appears.
XStore the destination in the address book
(Ypage 81).
XSave the destination to the SD card
(Ypage 82).
XTo view the details: while in the "Last desti-
nations" memory, turn the controller and
highlight the entry.
XSlide 9the controller.
A menu appears.
XTo select Details: press the controller.
iThe destination address can be changed if
desired.
XTo delete one or all destinations: while in
the "Last destinations" memory, turn the con- troller and highlight the entry.
XSlide 9the controller.
A menu appears.
XTo select DeleteorDelete All: turn and
press the controller.
A prompt appears.
XSelect YesorNo.
Selecting Yesdeletes the selected destina-
tion or all destinations.
Map functions
General notes
Company logos displayed on the map are trade- marks of the respective companies and used
solely for the purpose of indicating the locations
of these companies. The use of such logos on
the map does not indicate approval of, support
of or advertising by these companies for the
navigation system itself.
Map settings
Setting the map scale
Requirement: the map is in full screen mode, the
menu is faded out (Ypage 53).
The lower left-hand section of the map shows
the currently set map scale and compass nee-
dle.
Right-hand-drive vehicles: the currently set map
scale and compass needle are displayed in the
lower right-hand section of the map.
XTo show the map in full screen mode: to
hide the menu, push the %button.
or
XSlide the controller to the center of the map
and press to confirm.
XTo set the map scale: as soon as you turn the
controller, the scale bar appears on the bot-
tom of the display.
XTurn the controller until the needle points to
the desired map scale.
Once you are finished selecting a map scale,
the new map scale will be shown.
Selecting map orientation
Map functions83
Navigation
Z
Page 86 of 206

XTo switch to navigation mode:press the
ß button.
XTo show the menu: slide6the controller.
XTo select Options: turn and press the con-
troller.
XSelect Map Orientation.
The #dot indicates the current setting.
XTurn and press the controller.
The map orientation is set.
The image is an example of the 3D map display
with crosshair.
Change
map direc-
tionExplanation
North Up0 The map view is displayed
so that north is always up.
Heading Up¤ The map view is aligned to
the direction of travel. The
direction of travel is always at
the top; the red tip of the sym-
bol points north.
3-D Map¤ The map view is aligned to
the direction of travel. The
map displays a 3D oblique
view with elevation; the red tip
of the symbol points north.
Selecting POI symbols on the map
POIs can be displayed as symbols in the map
display. POIs include, for example, gas stations,
hotels and restaurants.
XTo switch to navigation mode: press the
ß button.
XTo show the menu: slide6the controller.
XTo select Options: turn and press the con-
troller.
XSelect Map Content.
XSelectPOI Symbols On Map.
The #dot indicates the current setting.
XTurn and press the controller.
Default Symbolsshows symbols of prede-
fined categories in the map.
Custom
Symbolsallows symbols to be selec-
ted from other/all available categories.
XTurn and press the controller.
You have the option of selecting symbols to
be displayed Oor not displayed ªon the
map.
The list shows all symbols that are contained on
the digital map across all countries. However,
not all points of interest are available in all coun-
tries. As a result, certain point of interest sym-
bols may not be displayed on the map, even if
the symbol display is switched on.
Selecting text information on the map
At the bottom of the display, you can specify
whether to display geo-coordinates or not to
display text information for the street you are
currently on.
XTo switch to navigation mode: press the
ß button.
XTo show the menu: slide6the controller.
XTo select Options: turn and press the con-
troller.
84Map functions
Navigation
Page 87 of 206

XSelectMap Content.
XSelectText Information On Map.
The #dot indicates the current setting.
XTurn and press the controller.
CurrentStreetshows the current street at
the bottom of the display.
Geo-coordinates
shows the longitude and
latitude, elevation and number of satellites
received.
The elevation shown may deviate from the
actual elevation.
XTurn and press the controller.
Displaying the range on the map
The range can be displayed on the map for elec-
tric vehicles. A circle appears around the current
vehicle position.
For further information on range, see the vehicle
Operator's Manual.
XTo switch to navigation mode: press the
ß button.
XTo show the menu: slide6the controller.
XTo select Options: turn and press the con-
troller.
XSelect Map Content.
XSelectRange on Map.
Switch the display in the map on Oor off ª.
Switching highway information on/off
While driving on the highway, gas stations, rest
stops, rest areas and highway exits are dis-
played along with their immediate distances
from the current vehicle position (
Ypage 73).
XTo switch to navigation mode: press the
ß button.
XTo show the menu: slide6the controller.
XTo select Options: turn and press the con-
troller.
XSelect Map Content.
XSelectHighway Information.
Switch the display in the map on Oor off ª.
Traffic Sign Assist
The function is available depending on the
equipment installed in the vehicle.
The map shows traffic signs detected by Traffic
Sign Assist (see the vehicle Operator's Manual).
XTo switch to navigation mode: press the
ß button.
XTo show the menu: slide6the controller.
XTo select Options: turn and press the con-
troller.
XSelect Map Content.
XSelectTraffic Sign Assist.
Switch the display in the map on Oor off ª.
Displaying the next crossroads
If route guidance is not active, the next cross-
roads can be displayed at the upper edge of the
display.
XTo switch to navigation mode: press the
ß button.
XTo show the menu: slide6the controller.
XTo select Options: turn and press the con-
troller.
XSelect Map Content.
XSelectNext Intersecting Street.
Switch the display in the map on Oor off ª.
Showing the map version
The number of the map data version is shown.
Information about new versions of the digital
map can be obtained from an authorized
Mercedes-Benz Center.
XTo switch to navigation mode: press the
ß button.
XTo show the menu: slide6the controller.
XTo select Options: turn and press the con-
troller.
XSelect Map Content.
XSelectMap Version.
Information on the current map version is
shown.
Map functions85
Navigation
Z
Page 88 of 206

Rotating the 3D map
You can use this function to explore the vicinity
of the destination in a 3D view. The function is
available in all map scales.
XTo switch to navigation mode:press the
Ø button.
XTo show the menu: slide6the controller.
XTo select Position: turn and press the con-
troller.
XSelect 3D Map Rotation.
XTurn the controller to change to the 3D map
perspective.
Additional functions:
RMoving the map (Ypage 53)
Map display
Displaying the navigation map
The multimedia system shows the navigation
map in globe projection. This allows for a real-
istic map display free from distortion in all map
scales.
Satellite maps are shown in map scales from
2 miles to 1000 miles. Other functions:
RMoving the map (Ypage 53)
RChanging the map scale (Ypage 83)
Building images
In small map scales (1/32 mile, 1/16 mile),
important buildings are depicted realistically on
the map. Other buildings are shown as models.
Avoiding an area
General notes
The multimedia system enables you to avoid
areas you do not wish to drive through.
If you activate or deactivate a route block while
route guidance is active, the multimedia system
will calculate a new route. If you activate or
deactivate a route block while route guidance is
inactive, the multimedia system will use the new
setting for the next route guidance.
The calculated route may include an area to be
avoided if:
Ryour destination is located in such an area
Rthere is no alternative route available
Highways within blocked areas are always taken
into consideration in the route calculation.
86Map functions
Navigation
 1
1 2
2 3
3 4
4 5
5 6
6 7
7 8
8 9
9 10
10 11
11 12
12 13
13 14
14 15
15 16
16 17
17 18
18 19
19 20
20 21
21 22
22 23
23 24
24 25
25 26
26 27
27 28
28 29
29 30
30 31
31 32
32 33
33 34
34 35
35 36
36 37
37 38
38 39
39 40
40 41
41 42
42 43
43 44
44 45
45 46
46 47
47 48
48 49
49 50
50 51
51 52
52 53
53 54
54 55
55 56
56 57
57 58
58 59
59 60
60 61
61 62
62 63
63 64
64 65
65 66
66 67
67 68
68 69
69 70
70 71
71 72
72 73
73 74
74 75
75 76
76 77
77 78
78 79
79 80
80 81
81 82
82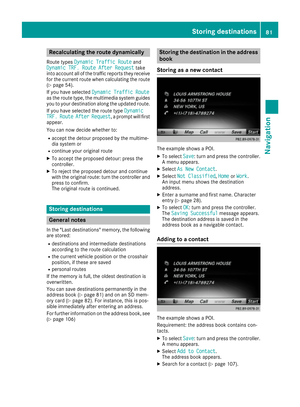 83
83 84
84 85
85 86
86 87
87 88
88 89
89 90
90 91
91 92
92 93
93 94
94 95
95 96
96 97
97 98
98 99
99 100
100 101
101 102
102 103
103 104
104 105
105 106
106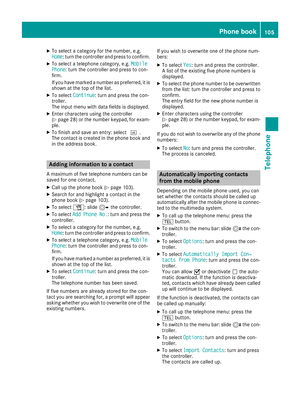 107
107 108
108 109
109 110
110 111
111 112
112 113
113 114
114 115
115 116
116 117
117 118
118 119
119 120
120 121
121 122
122 123
123 124
124 125
125 126
126 127
127 128
128 129
129 130
130 131
131 132
132 133
133 134
134 135
135 136
136 137
137 138
138 139
139 140
140 141
141 142
142 143
143 144
144 145
145 146
146 147
147 148
148 149
149 150
150 151
151 152
152 153
153 154
154 155
155 156
156 157
157 158
158 159
159 160
160 161
161 162
162 163
163 164
164 165
165 166
166 167
167 168
168 169
169 170
170 171
171 172
172 173
173 174
174 175
175 176
176 177
177 178
178 179
179 180
180 181
181 182
182 183
183 184
184 185
185 186
186 187
187 188
188 189
189 190
190 191
191 192
192 193
193 194
194 195
195 196
196 197
197 198
198 199
199 200
200 201
201 202
202 203
203 204
204 205
205