2017 KIA CARENS RHD tow
[x] Cancel search: towPage 10 of 723
17
Introduction
Biodiesel
Commercially supplied Diesel blends of no more than 7% biodiesel, com-
monly known as "B7 Diesel" may be
used in your vehicle if Biodiesel meets
EN 14214 or equivalent specifications.
(EN stands for "European Norm"). The
use of biofuels exceeding 7% made
from rapeseed methyl ester (RME),
fatty acid methyl ester (FAME), veg-
etable oil methyl ester (VME) etc. or
mixing diesel exceeding 7% with
biodiesel will cause increased wear ordamage to the engine and fuel sys-
tem. Repair or replacement of worn ordamaged components due to the use
of non approved fuels will not be cov-
ered by the manufactures warranty.
Biodiesel (for New Zealand)
Commercially supplied Diesel blends of no more than 7% biodiesel, com-
monly known as "B7 Diesel" may be
used in your vehicle if Biodiesel
meets EN 14214 or equivalent spec-
ifications. (EN stands for "European
Norm"). The use of biofuels exceed-
ing 7%, made from rapeseed methyl
ester (RME), vegetable oil methyl
ester (VME) etc. or mixing diesel
exceeding 7% with biodiesel will
cause increased wear or damage to
the engine and fuel system. Repair
or replacement of worn or damagedcomponents due to the use of non
approved fuels will not be covered by
the manufactures warranty.No special break-in period is needed.
By following a few simple precautions
for the first 1,000 km (600 miles) you
may add to the performance, econo-
my and life of your vehicle.
Do not race the engine.
Whilst driving, keep your engine
speed (rpm, or revolutions per
minute) between 2,000 rpm and
4,000 rpm.
Do not maintain a single speed for long periods of time, either fast or
slow. Varying engine speed is need-
ed to properly break-in the engine.
Avoid hard stops, except in emer- gencies, to allow the brakes to seat
properly.
Don't tow a trailer during the first 2,000 km (1,200 miles) of operation.
CAUTION
Never use any fuel, whether
diesel, B7 biodiesel or other-wise, that fails to meet the lat-est petroleum industry speci-fication.
Never use any fuel additives or treatments that are not rec-ommended or approved by thevehicle manufacturer.
CAUTION
Never use any fuel, whether diesel or B7 biodiesel or oth-erwise, that fails to meet the latest petroleum industryspecification.
Never use any fuel additives or treatments that are not rec-ommended or approved by the vehicle manufacturer.
VEHICLE BREAK-IN PROCESS
Page 24 of 723

Safety features of your vehicle
6
3
Front seat adjustment - manual
Forward and backward
To move the seat forward or backward:
1. Pull the seat slide adjustment
lever up and hold it.
2. Slide the seat to the position you desire.
3. Release the lever and make sure the seat is locked in place.
Adjust the seat before driving, and
make sure the seat is locked securely
by trying to move forward and back-
ward without using the lever. If the seat
moves, it is not locked properly.
Seatback angle
To recline the seatback:
1. Lean forward slightly and lift up the seatback recline lever.
2. Carefully lean back on the seat and adjust the seatback of the
seat to the position you desire.
3. Release the lever and make sure the seatback is locked in place.
(The lever MUST return to its orig-
inal position for the seatback to
lock.)
Seatback folding (for front pas-
senger’s seat, if equipped)
The front passenger’s seatbacks can
be folded to facilitate carrying longitems or to increase the luggage
capacity of the vehicle.
To fold the seatback :
1. Lower the front passenger’s seat headrests to the lowest position.
And slide the seat rearward.
2. Pull on the seatback folding lever (recline lever), then fold the seat
toward the front of the vehicle.
When you return the seatback to
its upright position, always be sure
it has locked into position by push-
ing on the top of the seatback.
ORP036002R
ORP036003R
ORP036071R
Page 29 of 723

311
Safety features of your vehicle
Adjusting the height up and down
To raise the headrest, pull it up to the
desired position (1). To lower theheadrest, push and hold the release
button (2) on the headrest support
and lower the headrest to the desiredposition (3).
Removal and installation
To remove the headrest:
1. Recline the seatback (2) with therecline lever or switch (1).
2. Raise headrest as far as it can go.
ORP032011
ORP034085R
ORP034087R
■ Type A
■Type B
OYFH034205
CAUTION
If you recline the seatback
towards the front with the headrest and seat cushion raised, the headrest may come in con-tact with the sunvisor or otherparts of the vehicle.
Page 35 of 723
317
Safety features of your vehicle
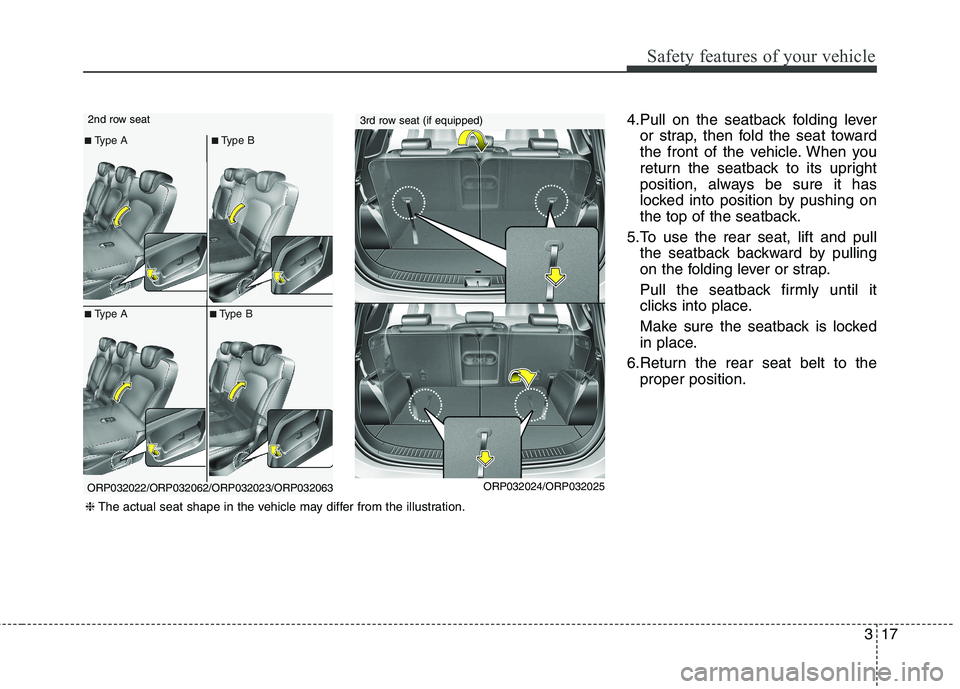
4.Pull on the seatback folding leveror strap, then fold the seat toward
the front of the vehicle. When you
return the seatback to its upright
position, always be sure it has
locked into position by pushing on
the top of the seatback.
5.To use the rear seat, lift and pull the seatback backward by pulling
on the folding lever or strap.
Pull the seatback firmly until it
clicks into place.
Make sure the seatback is locked
in place.
6.Return the rear seat belt to the proper position.2nd row seat
ORP032022/ORP032062/ORP032023/ORP032063
❈The actual seat shape in the vehicle may differ from the illustration.
■Type A■ Type B
3rd row seat (if equipped)
ORP032024/ORP032025
■Type A ■
Type B
Page 36 of 723

Safety features of your vehicle
18
3
To fold down the rear centre seat-
back (for 2nd row seat, if equipped)
1. Lower the rear headrests to the lowest position.
2. Pull the centre seatback folding lever up, then fold the seat toward
the front of the vehicle.
When you return the seatback to its
upright position, always be sure it
has locked into position by pushing
on the top of the seatback.
ORP032016
WARNING - 2nd row cen-
tre seat folding (if equipped)
Do not fold the 2nd row centre seat, if the occupants in the
3rd row seats, It may cause the
injury to occupants by the seat
device. If occupants in the 3rd
row seats, Fix the upright posi-
tion of the 2nd row centre seat.
If you use the 2nd row centre seat back folding function to
carry long objects, you should
fix the long object to prevent it
from being thrown about the
vehicle in a collision and caus-
ing injury to vehicle occupants.WARNING - Uprighting seat
When you return the seatback
to its upright position, hold the
seatback and return it slowly. If
the seatback is returned with-
out holding it, the back of the
seat could spring forward
resulting in injury caused by
being struck by the seatback.
Page 61 of 723
343
Safety features of your vehicle
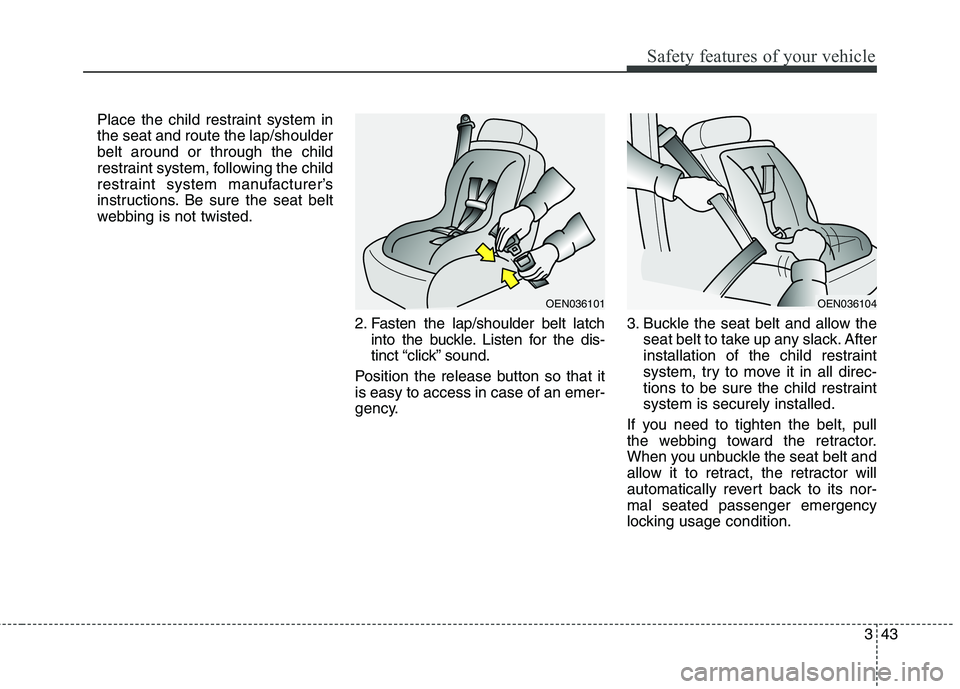
Place the child restraint system in the seat and route the lap/shoulderbelt around or through the child
restraint system, following the child
restraint system manufacturer’s
instructions. Be sure the seat belt
webbing is not twisted.2. Fasten the lap/shoulder belt latchinto the buckle. Listen for the dis-
tinct “click” sound.
Position the release button so that itis easy to access in case of an emer-
gency. 3. Buckle the seat belt and allow the
seat belt to take up any slack. After
installation of the child restraint
system, try to move it in all direc-
tions to be sure the child restraintsystem is securely installed.
If you need to tighten the belt, pull
the webbing toward the retractor.
When you unbuckle the seat belt and
allow it to retract, the retractor will
automatically revert back to its nor-mal seated passenger emergency
locking usage condition.
OEN036101OEN036104
Page 110 of 723
Features of your vehicle
14
4
Unlocking
1. Carry the smart key.
2. Press the button of the front out-
side door handle.
3. All doors will unlock and the hazard warning lights will blink twice. Also,
the outside rearview mirror will
automatically unfold if the outside
rearview mirror folding switch is in
the AUTO position (if equipped).
✽✽ NOTICE
The button will only operate when the smart key is within 0.7 m (28
in.) from the outside door handle.
When the smart key is recognized in the area of 0.7 m (28 in.) from
the front outside door handle, other
people can also open the doors.
After unlocking all doors, the doors will lock and the outside
rearview mirror will unfold if the
outside rearview mirror folding
switch is in the AUTO position (if
equipped) unless a door is opened
within 30 seconds.
Tailgate unlocking
1. Carry the smart key.
2. Press the tailgate handle switch.
3. The tailgate will unlock.
✽✽ NOTICE
Once the tailgate is opened and then closed, the tailgate will lock
automatically.
The button will only operate when the smart key is within 0.7 m (28
in.) from the tailgate handle.
Smart key precautions
✽✽ NOTICE
If, for some reason, you happen to lose your smart key, you will not
be able to start the engine. Tow
the vehicle, if necessary, we recom-
mend that you contact an autho-
rised Kia dealer.
A maximum of 2 smart keys can be registered to a single vehicle. If
you lose a smart key, we recom-
mend that you contact an autho-
rised Kia dealer.
The smart key will not work if any of the following occurs:
- The smart key is close to a radiotransmitter such as a radio sta-
tion or an airport which can
interfere with normal operation
of the smart key.
- The smart key is near a mobile two-way radio system or a
mobile phone.
- Another vehicle’s smart key is being operated close to your
vehicle. (Continued)
Page 111 of 723
415
Features of your vehicle
(Continued)When the smart key does not work
properly, open and close the door
with the mechanical key. If you
have a problem with the smart
key, we recommend that you con-
tact an authorised Kia dealer.
If the smart key is in close proximity to your cell phone or smart phone,
the signal from the smart key could
be blocked by normal operation of
your cell phone or smart phone. This
is especially important when the
phone is active such as making call,
receiving calls, text messaging,
and/or sending/receiving emails.
Avoid placing the smart key and
your cell phone or smart phone in
the same pants or jacket pocket and
maintain adequate distance between
the two devices.Door lock/unlock in an emer-
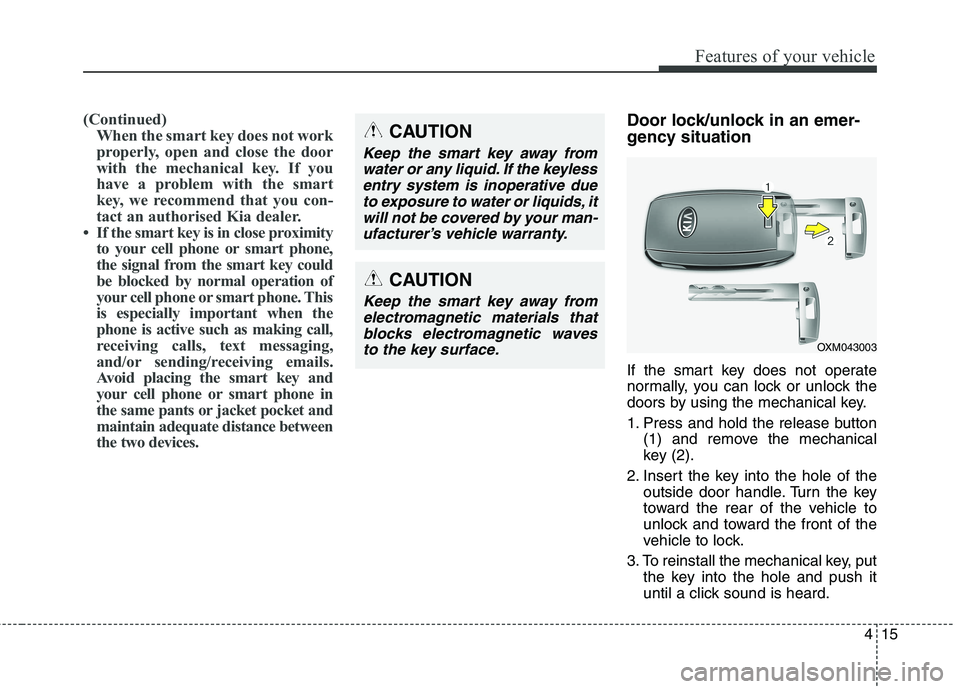
gency situation
If the smart key does not operate
normally, you can lock or unlock the
doors by using the mechanical key.
1. Press and hold the release button (1) and remove the mechanical
key (2).
2. Insert the key into the hole of the outside door handle. Turn the key
toward the rear of the vehicle to
unlock and toward the front of the
vehicle to lock.
3. To reinstall the mechanical key, put the key into the hole and push it
until a click sound is heard.CAUTION
Keep the smart key away from
water or any liquid. If the keylessentry system is inoperative due to exposure to water or liquids, itwill not be covered by your man-ufacturer’s vehicle warranty.
OXM043003
CAUTION
Keep the smart key away fromelectromagnetic materials thatblocks electromagnetic waves to the key surface.