Page 485 of 571
7-15
7
Maintenance
EEXXPPLLAANNAATTIIOONN OOFF SSCCHHEEDDUULLEEDD MMAAIINNTTEENNAANNCCEE IITTEEMMSS
Engine oil and filter
The engine oil and filter should be
changed at the intervals specified in
the maintenance schedule. If the
vehicle is being driven in severe con-
ditions, more frequent oil and filter
changes are required.
Drive belts
Inspect all drive belts for evidence of
cuts, cracks, excessive wear or oil
saturation and replace if necessary.
Drive belts should be checked peri-
odically for proper tension and
adjusted as necessary.
Fuel filter (cartridge)
A clogged filter can limit the speed at
which the vehicle may be driven,
damage the emission system and
cause multiple issues such as hard
starting. If an excessive amount of
foreign matter accumulates in the
fuel tank, the filter may require
replacement more frequently.
After installing a new filter, run the
engine for several minutes, and
check for leaks at the connections.
We recommend that the fuel filter be
replaced by an authorised HYUNDAI
dealer.
Fuel lines, fuel hoses and con-
nections
Check the fuel lines, fuel hoses and
connections for leakage and dam-
age. We recommend that the fuel
lines, fuel hoses and connections be
replaced by an authorised HYUNDAI
dealer.
Va p o u r h o s e a n d f u e l f i l l e r c a p
The vapour hose and fuel filler cap
should be inspected at those inter-
vals specified in the maintenance
schedule. Make sure that a new
vapour hose or fuel filler cap is cor-
rectly replaced.
When you are inspecting the
belt, place the ignition switch to
the LOCK/OFF or ACC position.
CAUTION
Page 491 of 571
7-21
7
Maintenance
EENNGGIINNEE CCOOOOLLAANNTT
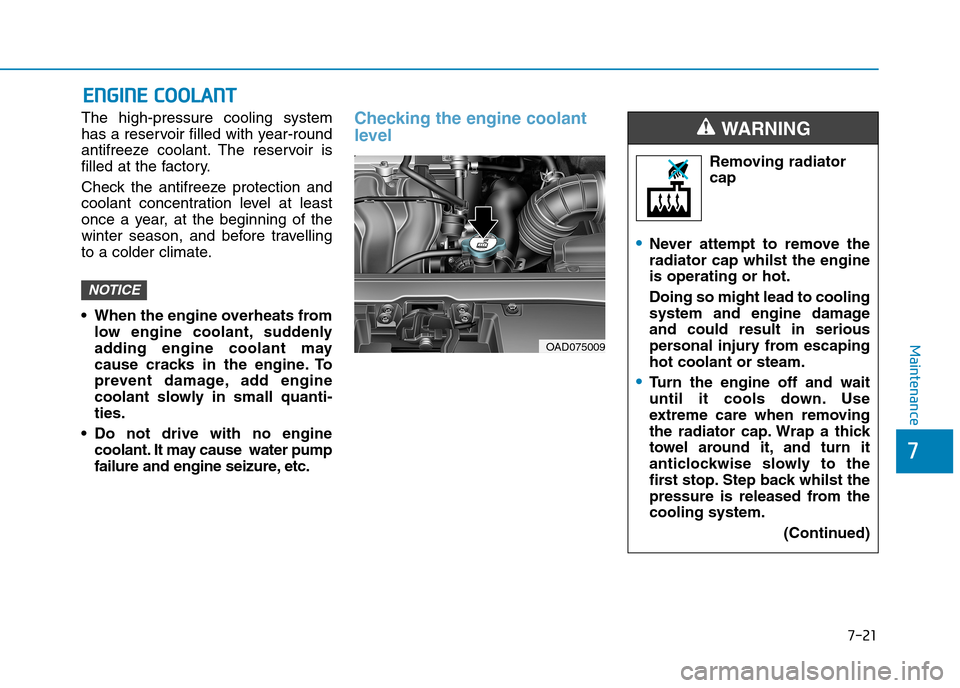
OAD075009
The high-pressure cooling system
has a reservoir filled with year-round
antifreeze coolant. The reservoir is
filled at the factory.
Check the antifreeze protection and
coolant concentration level at least
once a year, at the beginning of the
winter season, and before travelling
to a colder climate.
•When the engine overheats from
low engine coolant, suddenly
adding engine coolant may
cause cracks in the engine. To
prevent damage, add engine
coolant slowly in small quanti-
ties.
•Do not drive with no engine
coolant. It may cause water pump
failure and engine seizure, etc.
Checking the engine coolant
level
NOTICE
Removing radiator
cap
•Never attempt to remove the
radiator cap whilst the engine
is operating or hot.
Doing so might lead to cooling
system and engine damage
and could result in serious
personal injury from escaping
hot coolant or steam.
•Tu r n t h e e n g i n e o f f a n d w a i t
until it cools down. Use
extreme care when removing
the radiator cap. Wrap a thick
towel around it, and turn it
anticlockwise slowly to the
first stop. Step back whilst the
pressure is released from the
cooling system.
(Continued)
WA R N I N G
Page 492 of 571
7-22
Maintenance
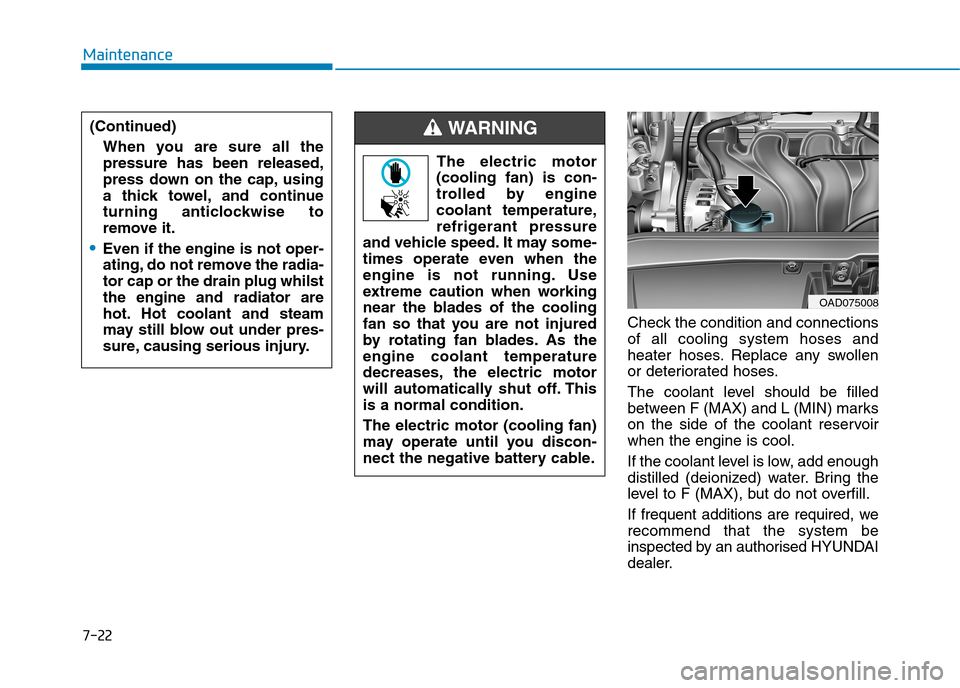
Check the condition and connections
of all cooling system hoses and
heater hoses. Replace any swollen
or deteriorated hoses.
The coolant level should be filled
between F (MAX) and L (MIN) marks
on the side of the coolant reservoir
when the engine is cool.
If the coolant level is low, add enough
distilled (deionized) water. Bring the
level to F (MAX), but do not overfill.
If frequent additions are required, we
recommend that the system be
inspected by an authorised HYUNDAI
dealer.
The electric motor
(cooling fan) is con-
trolled by engine
coolant temperature,
refrigerant pressure
and vehicle speed. It may some-
times operate even when the
engine is not running. Use
extreme caution when working
near the blades of the cooling
fan so that you are not injured
by rotating fan blades. As the
engine coolant temperature
decreases, the electric motor
will automatically shut off. This
is a normal condition.
The electric motor (cooling fan)
may operate until you discon-
nect the negative battery cable.
WA R N I N G
OAD075008
(Continued)
When you are sure all the
pressure has been released,
press down on the cap, using
a thick towel, and continue
turning anticlockwise to
remove it.
•Even if the engine is not oper-
ating, do not remove the radia-
tor cap or the drain plug whilst
the engine and radiator are
hot. Hot coolant and steam
may still blow out under pres-
sure, causing serious injury.
Page 498 of 571
7-28
Maintenance
AAIIRR CCLLEEAANNEERR
Filter replacement
The air cleaner filter can be cleaned
for inspection using compressed air.
Do not attempt to wash or to rinse it,
as water will damage the filter.
If soiled, the air cleaner filter must be
replaced.
1. Loosen the air cleaner cover
attaching clips and open the cover.
2. Wipe the inside of the air cleaner.
3. Replace the air cleaner filter.
4. Lock the cover with the cover
attaching clips.
OAD075015OAD075016
OAD075014
Page 500 of 571
7-30
Maintenance
CCLLIIMMAATTEE CCOONNTTRROOLL AAIIRR FFIILLTTEERR
Filter inspection
If the vehicle is operated in severely
air-polluted cities or on dusty rough
roads for a long period, it should be
inspected more frequently and
replaced earlier. When you, the
owner, replace the climate control air
filter, replace it performing the follow-
ing procedure, and be careful to
avoid damaging other components.
Replace the filter according to the
Maintenance Schedule.
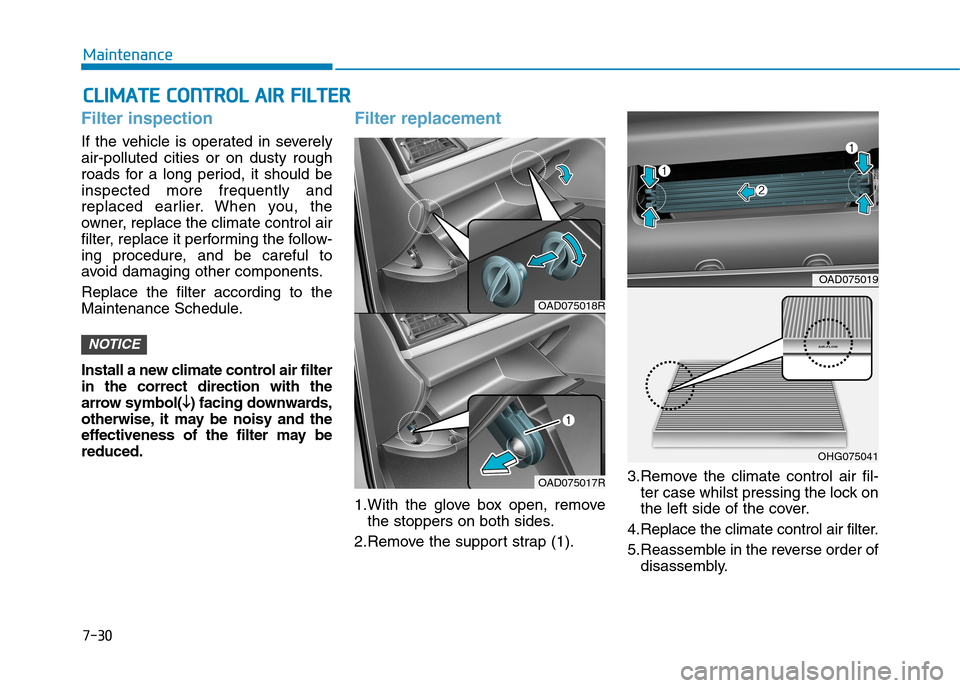
Install a new climate control air filter
in the correct direction with the
arrow symbol(↓↓) facing downwards,
otherwise, it may be noisy and the
effectiveness of the filter may be
reduced.
Filter replacement
1.With the glove box open, remove
the stoppers on both sides.
2.Remove the support strap (1).
3.Remove the climate control air fil-
ter case whilst pressing the lock on
the left side of the cover.
4.Replace the climate control air filter.
5.Reassemble in the reverse order of
disassembly.
NOTICE
OAD075018R
OAD075017R
OAD075019
OHG075041
Page 502 of 571
7-32
Maintenance
Ty p e A
1. Raise the wiper arm and turn the
wiper blade assembly to expose
the plastic locking clip.
2. Compress the clip and slide the
blade assembly downward.
3. Lift it off the arm.
4. Install the blade assembly in the
reverse order of removal.
Ty p e B
1. Raise the wiper arm.
OLMB073020/H
OLMB073021R
OLMB073022/H
OLF074017/H
Page 503 of 571
7-33
7
Maintenance
2. Lift up the wiper blade clip (1).
Then lift up the wiper blade (2).
3. Whilst pushing the lock (3), pull
down the wiper blade (4).
4. Remove the wiper blade from the
wiper arm (5).
5. Install a new wiper blade assem-
bly in the reverse order of removal.
6. Return the wiper arm on the wind-
screen.
OAD075074ROAD075075ROAD075076R
Page 513 of 571
7-43
7
Maintenance
Compact spare tyre replace-
ment (if equipped)
A compact spare tyre has a shorter
tread life than a regular size tyre.
Replace it when you can see the
tread wear indicator bars on the tyre.
The replacement compact spare tyre
should be the same size and design
tyre as the one provided with your
new vehicle and should be mounted
on the same compact spare tyre
wheel. The compact spare tyre is not
designed to be mounted on a regular
size wheel, and the compact spare
tyre wheel is not designed for mount-
ing a regular size tyre.
(Continued)
•The use of any other tyre size
or type may seriously affect
ride, handling, ground clear-
ance, stopping distance, body
to tyre clearance, snow tyre
clearance, and speedometer
reliability.
•It is best to replace all four
tyres at the same time. If that
is not possible, or necessary,
then replace the two front or
two rear tyres as a pair.
Replacing just one tyre can
seriously affect your vehicle’s
handling.
•The ABS works by comparing
the speed of the wheels. Tyre
size can affect wheel speed.
When replacing tyres, all 4
tyres must use the same size
originally supplied with the
vehicle. Using tyres of a dif-
ferent size can cause the ABS
(Anti-lock Brake System) and
ESC (Electronic Stability
Control) (if equipped) to work
irregularly.
•Driving on worn-out tyres is
very hazardous and will
reduce braking effectiveness,
steering accuracy, and trac-
tion.
•Yo u r v e h i c l e i s e q u i p p e d w i t h
tyres designed to provide for
safe ride and handling capa-
bility. Do not use a size and
type of tyre and wheel that is
different from the one that is
originally installed on your
vehicle. It can affect the safety
and performance of your vehi-
cle, which could lead to han-
dling failure or rollover and
serious injury. When replacing
the tyres, be sure to equip all
four tyres with the tyre and
wheel of the same size, type,
tread, brand and load-carrying
capacity.
(Continued)
WA R N I N G