2017 Hyundai Elantra remote start
[x] Cancel search: remote startPage 96 of 571
3-4
Convenient features of your vehicle
Remote key (if equipped)
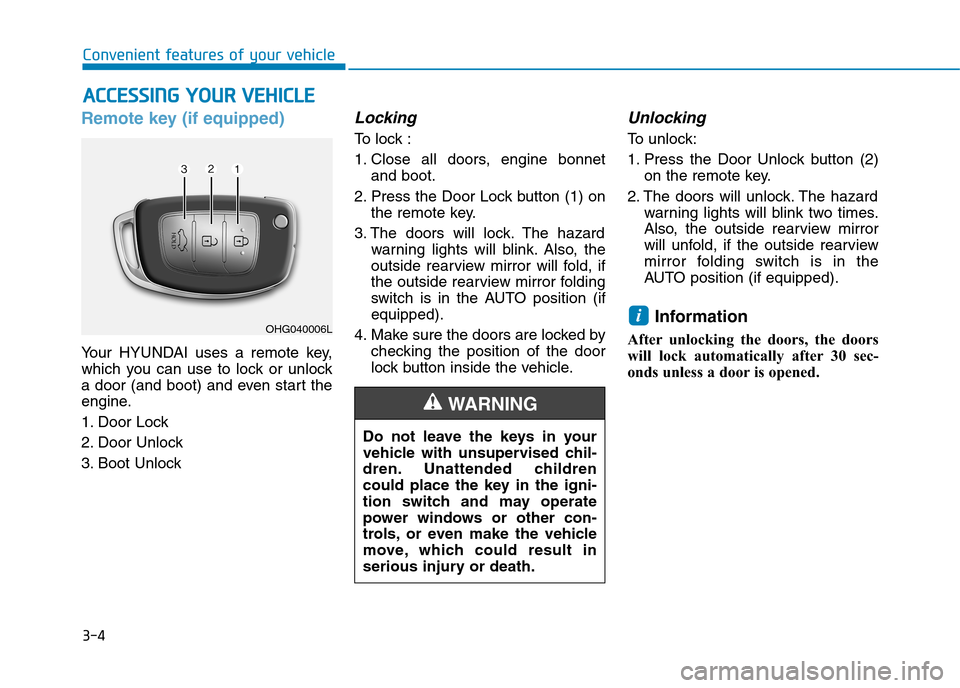
Yo u r H Y U N D A I u s e s a r e m o t e k e y,
which you can use to lock or unlock
a door (and boot) and even start the
engine.
1. Door Lock
2. Door Unlock
3. Boot Unlock
Locking
To l o c k :
1. Close all doors, engine bonnet
and boot.
2. Press the Door Lock button (1) on
the remote key.
3. The doors will lock. The hazard
warning lights will blink. Also, the
outside rearview mirror will fold, if
the outside rearview mirror folding
switch is in the AUTO position (if
equipped).
4. Make sure the doors are locked by
checking the position of the door
lock button inside the vehicle.
Unlocking
To u n l o c k :
1. Press the Door Unlock button (2)
on the remote key.
2. The doors will unlock. The hazard
warning lights will blink two times.
Also, the outside rearview mirror
will unfold, if the outside rearview
mirror folding switch is in the
AUTO position (if equipped).
Information
After unlocking the doors, the doors
will lock automatically after 30 sec-
onds unless a door is opened.
i
AACCCCEESSSSIINNGG YYOOUURR VVEEHHIICCLLEE
Do not leave the keys in your
vehicle with unsupervised chil-
dren. Unattended children
could place the key in the igni-
tion switch and may operate
power windows or other con-
trols, or even make the vehicle
move, which could result in
serious injury or death.
WA R N I N G
OHG040006L
Page 97 of 571
3-5
Convenient features of your vehicle
Boot unlocking
To u n l o c k :
1. Press the Boot Unlock button (3)
on the remote key for more than
one second.
2. The hazard warning lights will
blink two times. Once the boot is
opened and then closed, the boot
will lock automatically.
Information
• After unlocking the boot, the boot
will lock automatically.
• The word "HOLD" is written on the
button to inform you that you must
press and hold the button for more
than one second.
Start-up
For detailed infor mation refer to “Key
Ignition Switch” in chapter 5.
To p r e v e n t d a m a g i n g t h e r e m o t e
key:
•Keep the remote key away from
water or any liquid and fire. If the
inside of the remote key gets
damp (due to drinks or mois-
ture), or is heated, internal cir-
cuits may malfunction and may
void the vehicle warranty.
•Avoid dropping or throwing the
remote key.
•Protect the remote key from
extreme temperatures.
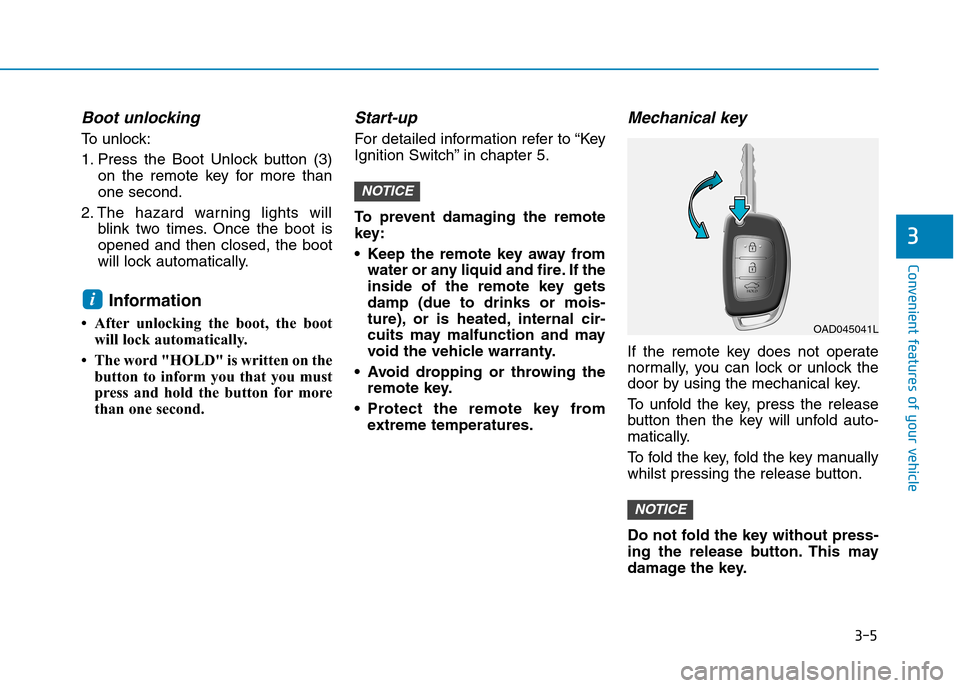
Mechanical key
If the remote key does not operate
normally, you can lock or unlock the
door by using the mechanical key.
To u n f o l d t h e k e y, p r e s s t h e r e l e a s e
button then the key will unfold auto-
matically.
To f o l d t h e k e y, f o l d t h e k e y m a n u a l l y
whilst pressing the release button.
Do not fold the key without press-
ing the release button. This may
damage the key.
NOTICE
NOTICE
i
3
OAD045041L
Page 112 of 571
3-20
Convenient features of your vehicle
This system helps to protect your
vehicle and valuables. The horn will
sound and the hazard warning lights
will blink continuously if any of the
following occur :
-A door is opened without using the
remote key or smart key.
-The boot is opened without using
the remote key or smart key.
-The engine bonnet is opened.
The alarm continues for 30 seconds,
then the system resets. To turn off
the alarm, unlock the doors with the
remote key or smart key.
The Theft Alarm System automati-
cally sets 30 seconds after you lock
the doors and the boot. For the sys-
tem to activate, you must lock the
doors and the boot from outside the
vehicle with the remote key or smar t
key or by pressing the button on the
outside of the door handles with the
smart key in your possession.
The hazard warning lights will blink
and the chime will sound once to
indicate the system is armed.
Once the security system is set, open-
ing any door, the boot, or the bonnet
without using the remote key or smart
key will cause the alarm to activate.
The Theft Alarm System will not set if
the bonnet, the boot, or any door is
not fully closed. If the system will not
set, check the bonnet, the boot, or
the doors are fully closed.
Do not attempt to alter this system or
add other devices to it.
Information
• Do not lock the doors until all pas-
sengers have left the vehicle. If the
remaining passenger leaves the
vehicle when the system is armed,
the alarm will be activated.
• If the vehicle is not disarmed with
the remote key or smart key, open
the doors by using the mechanical
key and place the ignition switch in
the ON position (for remote key) or
start the engine (for smart key) and
wait for 30 seconds.
•When the system is disarmed but a
door or boot is not opened within 30
seconds, the system will be rearmed.
Information
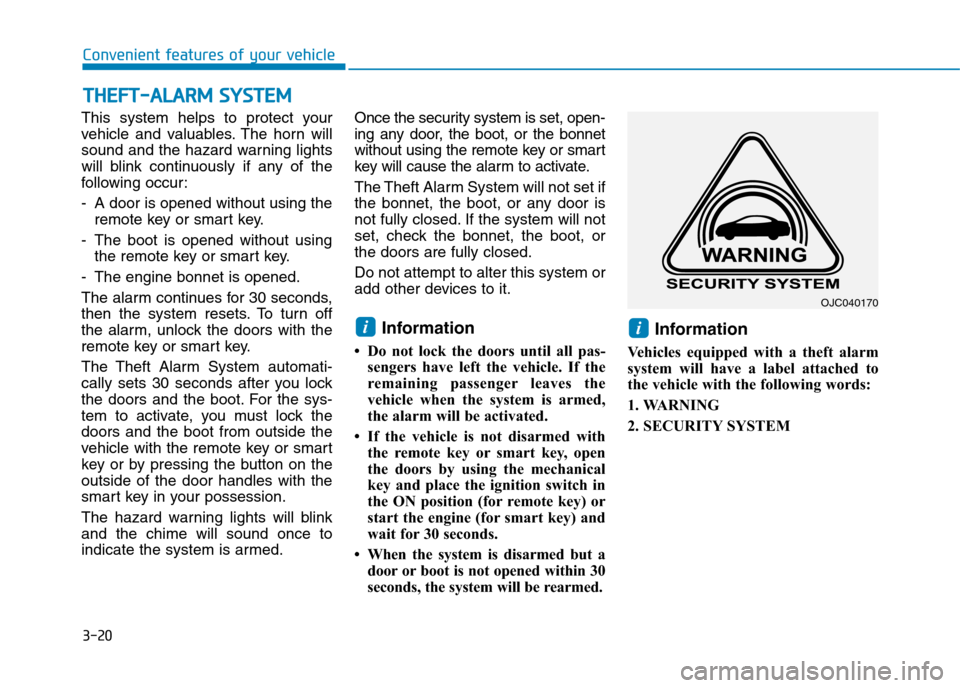
Vehicles equipped with a theft alarm
system will have a label attached to
the vehicle with the following words:
1. WARNING
2. SECURITY SYSTEM
ii
TTHHEEFFTT--AALLAARRMM SSYYSSTTEEMM
OJC040170
Page 177 of 571
3-85
Convenient features of your vehicle
3
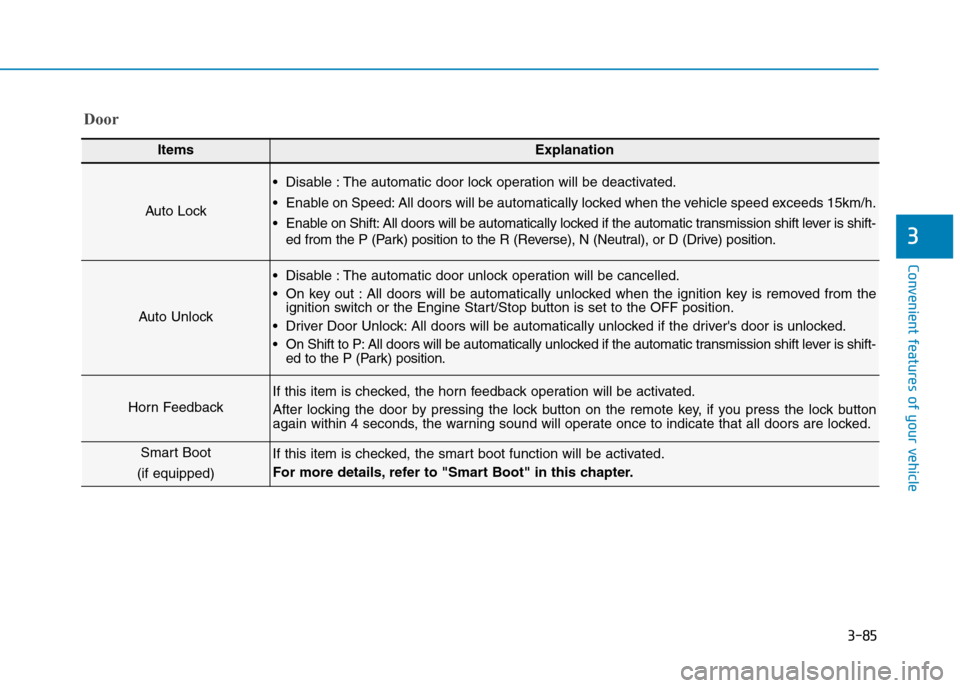
Door
ItemsExplanation
Auto Lock
•Disable :The automatic door lock operation will be deactivated.
•Enable on Speed:All doors will be automatically locked when the vehicle speed exceeds 15km/h.
•Enable on Shift:All doors will be automatically locked if the automatic transmission shift lever is shift-
ed from the P (Park) position to the R (Reverse), N (Neutral), or D (Drive) position.
Auto Unlock
•Disable :The automatic door unlock operation will be cancelled.
•On key out :All doors will be automatically unlocked when the ignition key is removed from theignition switch or the Engine Start/Stop button is set to the OFF position.
•Driver Door Unlock:All doors will be automatically unlocked if the driver's door is unlocked.
•On Shift to P:All doors will be automatically unlocked if the automatic transmission shift lever is shift-ed to the P (Park) position.
Horn Feedback
If this item is checked, the horn feedback operation will be activated.
After locking the door by pressing the lock button on the remote key, if you press the lock buttonagain within 4 seconds, the warning sound will operate once to indicate that all doors are locked.
Smart Boot
(if equipped)
If this item is checked, the smart boot function will be activated.
For more details, refer to "Smart Boot" in this chapter.
Page 322 of 571
4-73
Multimedia System
4
Information
-Usingthe Bluetooth®Wireless
Te ch n o l o g y Au d i o M o d e
•Bluetooth®Wireless Technology
Audio Mode can be used only when
a Bluetooth®Wireless Technology
phone has been connected.
•Bluetooth®Wireless Technology
Audio Mode will not be available
when connecting mobile phones that
do not support this feature.
•Whilst Bluetooth®Wireless
Technology Audio is playing, if the
Bluetooth®Wireless Technology
phone is connected, then the music
will also stop.
• Moving the Track up/down whilst
playing Bluetooth®Wireless
Technology audio mode may result
in pop noises in some mobile
phones.
•Bluetooth®Wireless Technology
streaming audio may not be sup-
ported in some mobile phones.
(Continued)
(Continued)
•When returning to Bluetooth®
Wireless Technology Audio mode
after ending a call, the mode may
not automatically restart in some
mobile phones.
• Receiving an incoming call or mak-
ing an outgoing call whilst playing
Bluetooth®Wireless Technology
Audio may result in audio interfer-
ence.
Information
-Using the Bluetooth®Wireless
Te ch n o l o g y M o b i l e P h o n e
•Bluetooth®Wireless Technology
Handsfree refers to a device which
allows the user to conveniently
make phone calls with Bluetooth®
Wireless Technology mobile phones
through the audio system.
•Bluetooth®Wireless Technology
allows devices to be connected over
a short distance, including hands-
free devices, stereo headsets, wire-
less remote controllers, etc. For
more information, visit the
Bluetooth®Wireless Technology
website at www.Bluetooth.com
before using Bluetooth®Wireless
Technology audio features.
•The Bluetooth®word mark and
logos are registered trademarks
owned by Bluetooth®SIG, Inc. and
any use of such marks by Hyundai is
under licence. Other trademarks
and trade names are those of their
respective owners. A Bluetooth®
enabled mobile phone is required to
use Bluetooth®Wireless Technology.
(Continued)
ii
Page 458 of 571
6-14
The TPMS Malfunction Indicator
may illuminate after blinking for
one minute if the vehicle is near
electric power supply cables or
radio transmitters such as police
stations, government and public
offices, broadcasting stations,
military installations, airports,
transmitting towers, etc.
Additionally, the TPMS Malfunction
Indicator may illuminate if snow
chains are used or electronic
devices such as computers, charg-
ers, remote starters, navigation,
etc. are used in the vehicle.
This may interfere with normal
operation of the TPMS.
Changing a tyre with TPMS
If you have a flat tyre, the Low Tyre
Pressure and Position telltales will
come on. Have the flat tyre repaired
by an authorised HYUNDAI dealer
as soon as possible or replace the
flat tyre with the spare tyre.
The spare tyre (if equipped) does not
come with a tyre pressure monitoring
sensor. When the low pressure tyre
or the flat tyre is replaced with the
spare tyre, the Low Tyre Pressure
Te l l t a l e w i l l r e m a i n o n . A l s o , t h e T P M S
Malfunction Indicator will illuminate
after blinking for one minute if the vehi-
cle is driven at speed above 25 km/h
for approximately 20 minutes.
Once the original tyre equipped with
a tyre pressure monitoring sensor is
reinflated to the recommended pres-
sure and reinstalled on the vehicle,
the Low Tyre Pressure Telltale and
TPMS Malfunction Indicator will go
off within a few minutes of driving.
If the indicators do not extinguish
after a few minutes, please visit an
authorised HYUNDAI dealer.
Each wheel is equipped with a tyre
pressure sensor mounted inside the
tyre behind the valve stem (except
for the spare tyre). You must use
TPMS specific wheels. It is recom-
mended that you always have your
tyres serviced by an authorised
HYUNDAI dealer.
Yo u m a y n o t b e a b l e t o i d e n t i f y a t y r e
with low pressure by simply looking
at it. Always use a good quality tyre
pressure gauge to measure. Please
note that a tyre that is hot (from
being driven) will have a higher pres-
sure measurement than a tyre that is
cold.
NOTICE
What to do in an emergency
Never use a puncture-repairing
agent not approved by a
HYUNDAI dealer to repair and/or
inflate a low pressure tyre. Tyre
sealant not approved by a
HYUNDAI dealer may damage
the tyre pressure sensor.
CAUTION