Page 121 of 216
 56)
147)
Proceed as follows:
Position the vehicle in a safe and
suitable area and engage the
handbrake. Take the kit. Open the
cover D (fig. 116) of")
TYRE REPAIRING AND
PRESSURE RESTORING
PROCEDURE
55) 56)
147)
Proceed as follows:
Position the vehicle in a safe and
suitable area and engage the
handbrake. Take the kit. Open the
cover D (fig. 116) of the compressor B
and insert the sealant cartridge A in
its compartment, pressing firmly
downwards. Remove the adhesive
speed label and apply it in a visible
position. Wear the protective gloves
provided. Remove the valve cap E from
the punctured tyre and connect and
firmly tighten the transparent sealing
fluid tube C.
Ensure that the on-off button A (fig.
117) is in the off0position. Insert the
electrical connector D fig. 115 in the
car’s 12V socket.
Move the on-off button A fig. 117 to
the onIposition to switch on the
compressor. When the pressure gauge
F fig. 116 indicates the right pressure
for the car, switch off the compressor
by moving the on-off button A to the
0position. If the pressure gauge F
indicates a pressure lower than 1.8 bar
/ 26 psi 5 minutes after starting the
compressor, switch off the compressor,
disconnect the sealing fluid tube C
(fig. 116) from the tyre valve, retighten
the valve cap and move the car about
10 metres to distribute the sealing
fluid in the tyre. Stop the car safely and
repeat the operation above until the
required pressure is reached. If after
other 5 min. from the compressor
ignition, the pressure gauge F
still indicates a pressure lower than 1.8
bar / 26 psi, the TYRE IS TOO
DAMAGED AND CANNOT BE
REPAIRED. Disconnect, put the kit
back in its compartment and call
roadside assistance.
115F1D0147
B
D
A
C
E
F
116F1D0148
117F1D0149
119
Page 122 of 216

If the required pressure is reached,
continue driving. Do not exceed
80 km/h. Avoid sudden acceleration or
braking. After driving for about 8 km /
5 miles, position the vehicle in a safe
and suitable area and engage the
handbrake. Take the kit, ensure that the
on-off button A (fig. 117) is in the0
position and insert the electrical
connector in the car’s 12V socket.
Remove the repaired tyre’s valve cap,
take out the black inflation tube and
screw it firmly onto the valve. Inspect
the pressure gauge F to check the tyre
pressure.
If the pressure is lower than 1.8 bar /
26 psi, the TYRE IS TOO DAMAGED
AND CANNOT BE REPAIRED.
Disconnect, put the kit back in its
compartment and call roadside
assistance.
If the pressure is equal to or higher
than 1.8 bar / 26 psi, switch on the
compressor to reach the required
pressure. Disconnect and replace the
kit in the specific compartment. Drive
carefully to a specialist or the
manufacturer’s dealership as soon as
possible.PRESSURE RESTORING
Take out the black inflation tube and
screw it firmly onto the tyre valve. Press
the button B fig. 118 to adjust any
tyre overpressure.
CARTRIDGE
REPLACEMENT
Only use Fix&Go original cartridges
which can be purchased at Fiat
Dealership. Press the release button C
and lift it to remove the cartridge A
fig. 118. Insert the new cartridge and
press it firmly downwards.
WARNING
147)The information required by the
applicable regulation is indicated on the
Fix&Go kit package label. Compliance with
the indications on the label is an essential
condition to ensure the safety and the
effectiveness of the Fix&Go kit. Carefully
read the label before use, avoid improper
use. Fix&Go is subject to expiration and
must be replaced periodically. The kit
should be used by adults and cannot be
used by children.
WARNING
55)Show the package and the label to the
personnel charged with handling the tyre
treated with the tyre repair kit.
56)Fix&Go provides a temporary repair,
therefore the tyre must be examined and
repaired by a specialist as soon as
possible. The sealing fluid is effective at
temperatures between -40°C and +50°C. It
is possible to repair tyres which have
been damaged on tread up to a diameter
of 4mm; however, tyres damaged on
their side cannot be repaired. Before using
Fix&Go kit, ensure that the tyre isn't
excessively damaged and that the rim is in
good condition, otherwise do not use it
and call roadside assistance. Do not
remove foreign bodies from the tyre. Do
not let the compressor turned on for more
than 20 consecutive minutes - overheating
hazard.
118F1D0150
120
IN AN EMERGENCY
Page 123 of 216

JUMP STARTING
If the battery is flat, a jump starting can
be performed using the battery and
the cables of another vehicle, or using a
booster battery.
IMPORTANT
When a booster battery is used, comply
with the utilisation and precaution
instructions specified by the producer.
Do not use the booster battery or
any other source of external supply with
a voltage above 12 V: the battery, the
starter, the alternator and the electrical
system of the vehicle could be
damaged.
Do not attempt jump starting if the
battery is frozen. The battery could
break and explode!
PREPARATION TO JUMP
STARTING
148) 149)
57) 58)
IMPORTANT The positive terminal (+) of
the battery is shielded by a protective
cover. Lift the cover to access the
positive terminal.
Proceed as follows:
engage the handbrake, move the
Dualogic gear lever to P (Park) or,
for versions with manual gearbox, to
neutral and bring the ignition key to
STOP;
switch off all the other electrical
devices in the vehicle;
if another vehicle is ready for jump
starting, park the vehicle within the
reach of the cables to be used for
starting, operate the handbrake and
make sure that the ignition is
deactivated.
IMPORTANT Avoid contact between
the two vehicles since this could cause
a connection to earth and may result
in serious injury to any people nearby.
PROCEDURE FOR JUMP
STARTING
IMPORTANT If the procedure below is
carried out incorrectly, it can cause
severe injury to people or damage the
recharging system of one or both
vehicles. Carefully follow the
instructions given below.
Cable connection
Proceed as follows to carry out a jump
starting:
connect one end of the cable used
for positive (+) to the positive terminal
(+) of the vehicle with flat battery;
connect the other end of the cable
used for positive (+) to the positive
terminal (+) of the auxiliary battery;
connect one end of the cable used
for negative (–) to the negative terminal
(–) of the auxiliary battery;
Connect the other end of the cable
used for negative (–) to an engine
earth (the visible metal part of
the vehicle engine with flat battery)
away from the battery and the fuel
injection system;
start the vehicle engine with the
auxiliary battery, let it run for a few
minutes at idling. Start the engine of the
vehicle with flat battery.
Cable disconnection.
Once the engine has been started,
remove the cables proceeding as
follows:
disconnect the end of the cable
used for negative (–) from the engine
earth of the vehicle with flat battery;
disconnect the other end of the
cable used for negative (–) from the
negative terminal (–) of the auxiliary
battery;
disconnect the end of the cable
used for positive (+) from the positive
terminal (+) of the auxiliary battery;
121
Page 124 of 216
 from the positive
terminal (+) of the vehicle with flat
battery;
If it is often necessary to perform a
jump starting, have the vehicle battery
and")
disconnect one end of the cable
used for positive (+) from the positive
terminal (+) of the vehicle with flat
battery;
If it is often necessary to perform a
jump starting, have the vehicle battery
and the recharging system checked
by a Fiat Dealership.
IMPORTANT Any accessories (e.g.
mobile phones, etc.) connected to the
vehicle power sockets draw current
even if they are not used. These
devices, if left connected too much time
with engine off, may cause the battery
to drain with following reduction of
its life and/or failure to start the engine.
WARNING
148)This procedure must be performed by
qualified personnel as incorrect actions
may cause high-intensity electrical
discharge. Furthermore, battery fluid is
poisonous and corrosive: avoid contact
with skin and eyes. Keep naked flames and
lighted cigarettes away from the battery
and do not cause sparks.
149)Remove any metal objects (e.g. rings,
watches, bracelets), that might cause an
accidental electrical contact and cause
serious injury.
WARNING
57)Do not connect the cable to the
negative terminal (–) of the flat battery. The
following spark could lead to battery
explosion and cause serious harm. Only
use the specific earth point; do not use any
other exposed metallic part.
58)Never use a fast battery-charger to
start the engine as this could damage the
electronic systems of your vehicle,
particularly the ignition and engine fuel
supply control units.
FUEL CUT-OFF
SYSTEM
150)
This intervenes in the case of an impact
causing:
the interruption of the fuel supply
with the engine consequently cutting
out;
the automatic unlocking of the
doors;
the automatic switching on of the
interior lights
the switching on of the hazard
warning lights.
IMPORTANT Carefully check the car for
fuel leaks, for instance in the engine
compartment, under the car or near the
tank area. After an impact, turn the
ignition key to STOP to prevent the
battery from running down.
To restore the correct operation of the
car, proceed as follows:
turn the ignition key to the MAR
position;
activate the right direction indicator;
deactivate the right direction
indicator;
activate the left direction indicator;
deactivate the left direction indicator;
activate the right direction indicator;
122
IN AN EMERGENCY
Page 125 of 216

deactivate the right direction
indicator;
activate the left direction indicator;
deactivate the left direction indicator;
turn the ignition key to STOP and
then to MAR.
LPG versions: in the event of an
impact, petrol supply is immediately
cut-off, the LPG safety valves are
closed and the injection is interrupted,
switching off the engine.
Natural Power versions: in the event
of an impact, the power supply is
immediately cut off, causing engine
switching off.
WARNING
150)If, after an impact, you smell fuel or
notice leaks from the fuel system, do
not reactivate the system to avoid the risk
of fire.
TOWING THE
VEHICLE
151) 152) 153) 154) 155)
The tow hook, which is supplied with
the vehicle, is housed in the tool box,
under the carpet in the luggage
compartment.
ATTACHING THE TOW
HOOK
Manually remove cap A fig. 119 (front
bumper) or A fig. 120 (rear bumper),
pressing the lower part, take the tow
hook B from its housing in the tool box
and tighten it completely on the front
or rear threaded pin.Versions with Dualogic gearbox
Make sure that the gearbox is in neutral
(N) (checking that the vehicle moves
when pushed) and proceed in the same
way as for towing a normal vehicle
with a manual gearbox. If the gearbox
cannot be put in neutral, do not tow the
vehicle and contact a Fiat Dealership.
Panda Cross and Panda 4x4
versions
The vehicle can only be towed in one of
the following ways (and always with
the engine off, gear set to neutral and
handbrake released):
with all the wheels on the road
surface;
with the front (or rear) wheels raised
or resting on an emergency vehicle
and the rear (or front) wheels resting on
a specific trolley;
119F1D0094
120F1D0095
123
Page 126 of 216

loaded on the flatbed of the rescue
vehicle with all the wheels on the
flatbed.
IMPORTANT For Panda Cross versions,
the tow hooks A fig. 121 the vehicle is
equipped with can only be used for
towing it in an emergency.
WARNING
151)Before starting towing operations,
turn the ignition key to MAR and then
to STOP, without extracting it. The steering
column will automatically lock when the
key is removed and the wheels cannot be
steered.
152)Before tightening the ring clean the
threaded housing thoroughly. Make sure
that the ring is fully fastened in the housing
before towing the vehicle.153)Whilst towing, remember that as the
assistance of the brake servo and the
electric power steering is not available,
greater force needs to be exerted on the
brake pedal and more effort is required on
the steering wheel. Do not use flexible
cables when towing and avoid jerky
movements. While towing, make sure that
the trailer hitch does not damage any
components it is touching. When towing
the vehicle, you must comply with all
specific traffic regulations, both in terms of
the towing device and behaviour on the
road. Do not start the engine while towing
the vehicle.
154)The front and rear tow hooks should
be used only for emergencies on the road.
You are allowed to tow the vehicle for
short distances using an appropriate
device in accordance with the highway
code (a rigid bar), to move the vehicle on
the road in readiness for towing or
transporting via a breakdown vehicle. Tow
rings MUST NOT be used to tow vehicles
off the road or where there are obstacles
and/or for towing operations using cables
or other non-rigid devices. In compliance
with the above conditions, towing must
take place with the two vehicles (one
towing, the other towed) aligned as much
as possible along the same centre line.
155)Do not use tow hooks for securing the
vehicle on ships.
121F1D0120
124
IN AN EMERGENCY
Page 127 of 216
SERVICING AND CARE
Correct maintenance permits the
performance of the vehicle to be
maintained over time, as well as limited
running costs and safeguarding the
efficiency of the safety systems.
This chapter explains how.SCHEDULED SERVICING ...............126
BATTERY RECHARGING ................135
ENGINE COMPARTMENT ...............137
WINDSCREEN / REAR WINDOW
WIPERS ..........................................142
LIFTING THE VEHICLE....................143
WHEELS AND TYRES.....................143
BODYWORK ...................................144
INTERIOR .......................................144
125
Page 128 of 216

SCHEDULED
SERVICING
Correct servicing is crucial for
guaranteeing a long life for the vehicle
under the best conditions. For this
reason, Fiat has planned a series of
checks and services at fixed distance
intervals and, where provided, at fixed
time intervals, as described in the
Scheduled Servicing Plan.
Before each service, it is always
necessary to carefully follow the
instructions in the Scheduled Servicing
Plan (e.g. periodically check level of
fluids, tyre pressure, etc.).
Scheduled Servicing is offered by all
Fiat Dealerships according to a set time
schedule. If, during each operation, in
addition to the ones scheduled, the
need arises for further replacements or
repairs, these may be carried out with
the owner's explicit agreement only.
If your vehicle is used frequently for
towing, the interval between one
service operation and the next should
be reduced.IMPORTANT Scheduled Servicing
interventions are set out by the
Manufacturer. Failure to have them
carried out may invalidate the warranty.
It is advisable to inform a Fiat
Dealership of any small operating
irregularities without waiting for the next
service.
PERIODIC CHECKS
Every1,000km or before long
journeys, check and if necessary, top
up: engine coolant level; brake fluid
level; screen washer fluid level; tyre
inflation pressure and condition; lighting
system operation (headlights, direction
indicators, hazard warning lights, etc.);
screen washer/wiper system operation
and positioning/wear of windscreen/
rear window wiper blades.
Every3,000km, check and top up if
required: engine oil level.DEMANDING USE OF THE
CAR
If the vehicle is used under one of the
following conditions: towing a trailer
or motorhome; dusty roads; short (less
than 7-8 km) and repeated journeys
with sub-zero outside temperatures;
engine often idling or driving long
distances at low speed or long periods
of inactivity, the following checks must
be carried out more often than
indicated in the Scheduled Servicing
Plan:
check front disc brake pad condition
and wear;
check cleanliness of bonnet and
luggage compartment locks,
cleanliness and lubrication of linkage;
visually inspect conditions of:
engine, gearbox, transmission, pipes
and hoses (exhaust/fuel system/brakes)
and rubber elements (gaiters/sleeves/
bushes, etc.);
check battery charge and battery
fluid level (electrolyte);
visually inspect conditions of the
accessory drive belts;
check and, if necessary, change
engine oil and replace oil filter / pollen
filter / air cleaner.
126
SERVICING AND CARE
 1
1 2
2 3
3 4
4 5
5 6
6 7
7 8
8 9
9 10
10 11
11 12
12 13
13 14
14 15
15 16
16 17
17 18
18 19
19 20
20 21
21 22
22 23
23 24
24 25
25 26
26 27
27 28
28 29
29 30
30 31
31 32
32 33
33 34
34 35
35 36
36 37
37 38
38 39
39 40
40 41
41 42
42 43
43 44
44 45
45 46
46 47
47 48
48 49
49 50
50 51
51 52
52 53
53 54
54 55
55 56
56 57
57 58
58 59
59 60
60 61
61 62
62 63
63 64
64 65
65 66
66 67
67 68
68 69
69 70
70 71
71 72
72 73
73 74
74 75
75 76
76 77
77 78
78 79
79 80
80 81
81 82
82 83
83 84
84 85
85 86
86 87
87 88
88 89
89 90
90 91
91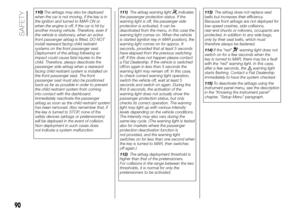 92
92 93
93 94
94 95
95 96
96 97
97 98
98 99
99 100
100 101
101 102
102 103
103 104
104 105
105 106
106 107
107 108
108 109
109 110
110 111
111 112
112 113
113 114
114 115
115 116
116 117
117 118
118 119
119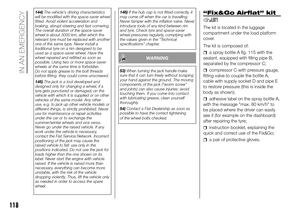 120
120 121
121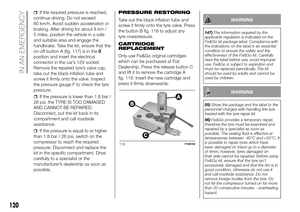 122
122 123
123 124
124 125
125 126
126 127
127 128
128 129
129 130
130 131
131 132
132 133
133 134
134 135
135 136
136 137
137 138
138 139
139 140
140 141
141 142
142 143
143 144
144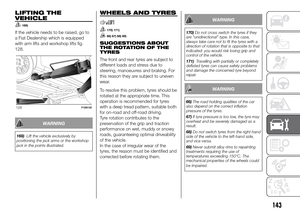 145
145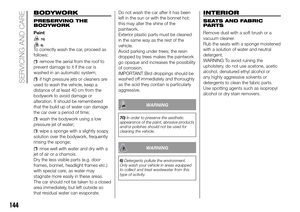 146
146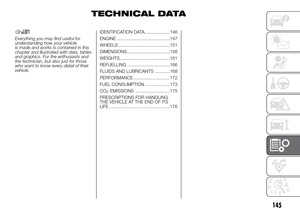 147
147 148
148 149
149 150
150 151
151 152
152 153
153 154
154 155
155 156
156 157
157 158
158 159
159 160
160 161
161 162
162 163
163 164
164 165
165 166
166 167
167 168
168 169
169 170
170 171
171 172
172 173
173 174
174 175
175 176
176 177
177 178
178 179
179 180
180 181
181 182
182 183
183 184
184 185
185 186
186 187
187 188
188 189
189 190
190 191
191 192
192 193
193 194
194 195
195 196
196 197
197 198
198 199
199 200
200 201
201 202
202 203
203 204
204 205
205 206
206 207
207 208
208 209
209 210
210 211
211 212
212 213
213 214
214 215
215