Page 233 of 280

co
co
.... N
" N .... 0 0 <..:l '
Care and cleaning
General information
Regular, proper care helps to maintain your vehi
cle's value.
It can a lso be a requirement when
submitting warranty claims for corrosion damage
and paint defects on the body.
The necessary care products can be obtained
from an authorized Audi dealer or authorized
Audi Service Facility . Read and follow the instruc
tions for use on the packaging.
A WARNING
- Us ing clean ing and care products incorrectly
can be dangerous to your health.
- Always store clean ing and care products out
of reach of children to reduce the r isk of po i
son ing .
@ For the sake of the environment
- Preferably purchase env ironmenta lly-friend
l y cleaning products.
- Do not d ispose of leftover cleaning and care
products with household trash.
Car washes
T he longer that deposits remain on the vehicle,
the more the surface may be damaged. High
temperatures such as those caused by sunlight
increase the damag ing effect.
Befor e washing, rinse
off heavy depos its with
p lenty of water.
S tubborn depos its such as bird droppings or tree
sap are best removed with plenty of water and a
microfiber cloth.
A lso, wash t he un derside of yo ur vehicle once
road sa lt stops being used for the season .
Pressure washers
When washi ng your ve hicle w ith a pressure wash
e r, a lways fo llow the operating instructions pro
vided wi th the p ressure washer. This is especially
i mportant in rega rd to the pressure and sp raying
d istance . Do not aim the spray directly at the
sea ls on the side windows , doors, lids or the sun-
Ca re and cleaning
roo f* or at tires, r ubber hoses, insulat ing mater i
al, sensors* or camera lenses* . Keep a distance of
at least 16 in (40 cm) .
Do not remove snow and ice with a pressure
washer.
Never use cone noz zles o r high pressu re noz zles .
The water temperature must not be above 140 °F
(60 °().
Automat ic car washe s
Spray off t he vehicle befo re washing .
Make s ure that the wi ndows and roo f* are closed
and the windsh ie ld wipers are
off . Follow instruc
tions from the car wash operator, especially if
there are accessories attached to your vehicle .
If possible, use car washes that do not have
brushes .
Washing
by hand
Clean the ve hicle starting from the top and work
i ng down using a soft sponge o r cleaning br ush.
U se solven t-free cleaning p rod ucts.
Washing vehicles with matte finish paint
by
hand
T o avo id damag ing the pa int w hen washi ng, fi rst
remove d ust and large p articl es from you r vehi
cl e. Insects, grease spo ts and f ingerprints are
best removed with a special cleaner for matte
finish paint.
Apply t he p roduct using a microfiber cloth. To
avo id damag ing the pa int surfa ce, do not use too
much pressure.
Rinse the ve hicl e thorough ly w ith wate r. Then
clean usi ng a neutral shampoo and a soft m ic ro
fiber clo th .
Rinse the ve hicle thorough ly agai n and let it air
dry. Remove a ny wate r residue using a chamois .
A WARNING
- Onl y wash the vehicle when the ign ition is
off and follow t he instr uctions from the car
wash operator to reduce the risk of acci -
-
dents. .,.
231
Page 234 of 280

Care and cleaning
-To reduce the risk of cuts, protect yourself
from sharp metal components when was h
ing the underbody or the inside of the wheel
housings .
- After washing the vehicle, the braking effect
may be delayed due to mo isture on the
brake rotors or ice in the winter . This in
creases the risk of an acc ident. The bra kes
must be d ried first w ith a few careful brake
applica tions.
0 Note
- If you wash the ve hicle in an automatic car
wash, you must fold the exterior m irrors in
to reduce the risk of damage. Power fo ld ing
ex ter ior mirro rs* m ust only be folded in and
out using the power folding function.
- To reduce the risk of paint damage, do not
wash the vehicle i n dire ct sunlig ht.
- T o reduce t he risk of damage to the surface,
do not use i nsec t remov ing sponges, ki tchen
s ponges or similar items. - Matte finish painted vehicle components:
-To reduce the r isk of damage to the sur-
face, do not use polis hing agents or hard
wax.
- Never use protective wax. It can destroy
the matte finish effect .
- Do not place any stickers or magnetic
signs on vehicle parts painted with matte
finish paint. The paint could be damaged
when the stickers or magnets are re
moved. @ For the sake of the environment
Only wash t he ve hicle in facilities spec ially de
signed for that pu rpose. This will reduce the
r isk of dirty wate r contaminated with o il from
ente ring the sewe r system.
Cleaning and care information
W hen clean ing and c aring for ind ividua l vehicle
com ponents, refer to the fo llow ing tables. The
info rmation conta ined there is simply recom
mendations. Fo r quest ions or for components that are
not listed, cons ult an autho rized Audi
dealer or au thor ized A udi Service Fac il ity. Also
fo llow the information found in ¢ &. .
Ext erior cleaning
Component Situation Solution
Windshield wiper
Deposits ¢ page 48, Cleaning windshield wiper blades
blades
Headlights/
Deposits S
oft sponge with a m ild soap solutiona)
Tail light s
Sensors /
Deposits Sensors: soft cloth w ith solvent-free cleaning solut ion
camera lenses Camera lenses: soft cloth with alcohol-free cleaning solu-
tion
Snow/ice Hand br
ush/solvent-free de-icing spray
Wheels Road salt Water
Bra ke dust Acid-free special cleaning solution
E
xhau st tail pipes Road salt Water, clean ing solution su itab le for s tainless stee l, if nee-
essary
232
Page 235 of 280

co
co
.... N
" N .... 0 0 <..:l '
Care and cleaning
Component Situation Solution
De corat ive p art s/
Deposits Mild
soap solution al, a cleaning so lution suitable for stain-
less stee l, if necessary
tri m
P aint
Paint damage Refer to the paint number on the vehicle data label, repair
with touch up paint
q page 255
Spilled fuel Rinse with water immediately
Surface rust Rust remover,
then protect with hard wax; for questions,
consult an authorized Audi dealer or authorized Audi Serv-
ice Facility.
Corrosion Have it removed by an authorized Audi dealer or author-
ized A udi Se rvice Fac il ity.
Water no longer Protect with hard wax (at least twice per year)
beads on the surface
of clean pa int
No shine even though Treat with suitable polish; then apply paint protectant if
paint has been pro- the polish that was used does not contain any protectant
tected/paint looks
poor
Deposits such as in - Dampen w ith water immediately and remove wit h a m icro-
sects, bird droppings, fiber cloth
tree sap and road salt
Grease-based con- Remove immediately with a m ild soap solution al and a
tam inants such as soft cloth
cosmetics or sunb lock
C arb on p art s Deposits clean
the same way as painted parts q page 231
a} Mild soap solution: maximum two tab lespoons of neutral soap in 1 quart (1 lite r) of water
Inte rio r clea ning
Component Situation Solution
W indo ws
Deposits Glass cleaner, then wipe dry
Decor ati ve p art s/ Deposits Mild
soap solution al
tri m
Pla stic part s
Deposits Damp cloth
Heavier depos its Mild soap solution al, detergent-free plastic cleaning solu-
tion, if necessary
D ispla ys Deposits Soft cloth with LCD cleaner
C ont ro ls Deposits Soft brush, then a soft cloth with a m ild soap solutional
Saf ety be lt s Deposits Mild
soap solution al, allow to dry before letting them re-
tract
2 33
Page 236 of 280

Care and cleaning
Component Situation Solution
Te xtil es
Deposits adhering to Vacuum cleaner
a rt ifici al le ather , the surface
Alcant ara Water-based deposits Absorben
t cloth and mild soap solutiona>
such as coffee, tea,
blood, etc.
O il-based deposits Apply a m ild soap solution a), blot away the dissolved oil or
such as oil, make-up, dye, treat afterward with water, if necessary
etc.
Special deposits such Special stain remover, b lot with absorbent material, treat
as ink, na il polish, la- afterward with mild soap solution, if necessary a)
tex paint, shoe pol-
ish, etc.
Natural leather Fresh stains Cotton cloth with a mi
ld soap solutiona>
Water-based deposits Fresh sta ins : absorbent cloth
such as coffee, tea, Dried sta ins: stain remover suitable fo r leather
blood, etc.
Oil-based deposits Fresh stains: absorbent cloth and stain remover suitable
such as oil, make-up, for leather
etc. Dried sta ins : grease dissolv ing spray
Special deposits such Spot remover suitab le for leather
as ink, nai l polish, la -
tex paint, shoe pol-
ish, etc.
Ca re Regularly apply cond ition ing cream that protects from
light and penet rates into the materia l. Use specia lly-co l-
ored conditioning cream, if necessary.
Carbon parts Deposits clean the same way as plastic parts
a) Mild soap solution: maximum two tablesp oons of neutral soap in 1 quart (l liter) of water
_& WARNING
The windshie ld may not be trea ted with wa
ter-repelling windshield coating agents. Un
favorable conditions s uch as wetness, dark
ness, or low sun can result in increased glare .
Wiper blade chatter is also possible.
(D Note
- Headlights /tail light s
-Never clean headlights or tail lights with a
dry cloth or sponge.
- Do not use any cleaning product that con
tains alcohol, because they could cause
cracks to form.
- Wheels
234
-
- Never use any paint polish or other abra
sive materials.
- Damage to the protect ive layer on the
rims such as stone chips or scratches must
be repaired immediately.
- Sensors /camera l enses
- Neve r use wa rm or ho t water to remove
snow or ice from the camera lens . This
could cause the lens to crack .
- Neve r use ab rasive cleaning materials or
a lcohol to clea n the camera lens . This
could cause scratches and cracks .
-Doo r window s
-Remove snow and ice on windows and ex-
terior mirrors with a plast ic scraper. To
Page 237 of 280

co
co
.... N
" N .... 0 0 <..:l '
avoid scratches, move the scraper only in
one direction and not back and forth.
- Never remove snow or ice from door win
dows and mirrors using warm or hot water
because this could cause cracks to form.
- To avoid damage to the rear window de
fogger, do not apply any stickers on the
heating wires on the inside of the window.
- Decorative part .s/trim
- Never use chrome care or cleaning prod-
ucts .
-Paint
- To reduce the risk of scratches, the vehicle
must be free of dirt and dust before pol
ishing or waxing.
- To prevent paint damage, do not polish or
wax the vehicle in direct sunlight .
- To reduce the risk of paint damage, do not
polish away rust spots .
- Remove cosmetics and sunscreen immedi
ately- these could damage the paint.
-Displays
-To avoid scratches, do not use dry cleaning
methods on displays.
-Controls
- Make sure that no fluids enter the con-
trols, because this could cause damage.
- Safety belts
- Do not remove the safety belts to clean
them.
- Never clean safety belts or their compo
nents chemically or with corrosive fluids
or solvents and never allow sharp objects
to come into contact with the safety belts.
This could cause damage to the belt web
bing.
- If there is damage to the webbing, the
connections, the retractors or the buckles,
have them replaced by an authorized Audi
dealer or authorized Audi Service Facility.
- Textiles/artificial leather/ Alcantara
- Never treat artificial leather/ Alcantara
with leather care products, solvents, floor
polish, shoe polish, spot remove or similar
products .
- Have a specialist remove stubborn stains
to prevent damage.
Care and cleaning
-Never use steam cleaners, brushes, hard
sponges, etc. when cleaning.
- Do not turn on the seat heating* to dry the
seat.
- Objects with sharp edges, such as zippers
or rivets on clothing or belts, can cause
damage to the surface.
- Open hook and loop fasteners, for exam
ple on clothing, can damage seat covers.
Make sure hook and loop fasteners are
closed.
- Natural leather
- Never treat leather with solvents, floor
polish, shoe polish, spot remover or simi
lar products.
- Objects with sharp edges, such as zippers or rivets on clothing or belts, can cause
damage to the surface.
- Never use steam cleaners, brushes, hard
sponges, etc . when cleaning.
- Do not turn on the seat heating* to dry the
seat.
- To help prevent the leather from fading,
do not leave the vehicle in direct sunlight
for long periods of time. If leaving the ve
hicle parked for long periods of time, you
should cover the leather to protect it from
direct sunlight.
(D Tips
-Insects are easier to remove from paint that
has been freshly waxed.
- Regular waxing can prevent rust spots from
forming.
Placing your vehicle out
of service
If you would like to take your vehicle out of serv
ice for a longer period of time, contact an author
ized Audi dealer or authorized Audi Service Facili
ty. They will advise you of important measures,
such as corrosion protection, service and storage procedures . Also follow the information about
the vehicle battery~
page 206.
235
Page 238 of 280

Emergency assistance
Emergency assistance
General information
... Park the vehicle as far as possible from moving
traffic in the event of a breakdown. In the event
of a flat tire, park the vehicle on a level surface .
It you are on a steep hill, be especially careful.
.,. Set the parking brake .
.,. Switch the emergency flashers on .
... Set up the warning triangle
r=;, page 236 .
... Have the passengers exit the vehicle . They
should move to a safe place, for example be
hind a guard rail.
A WARNING
Follow the steps given above. This is for your
protection and the for the safety of other driv
ers.
Equipment
Warning triangle
A ppl ies to: ve hicles w ith warning triangle
Fig. 193 Luggage co mpartment lid : wa rnin g triangle
The warning triangle placed in the vehicle at the
factory is located in the luggage compartment.
... To remove the warning triangle, press the re-
tainer in the direction of the arrow
r=;, fig . 193
and fold the holder down.
The luggage compartment lid is only designed to
hold the warning triangle offered by the Audi
Genuine Accessories program.
236
Vehicle tool kit
Fig. 194 Luggage compartment: vehicle tool kit
The vehicle tools and vehicle jack* are stored in
the luggage compartment under the floor cover.
... Lift the cargo floor by the plastic handle.
.,. Hook the handle into the luggage compartment
weather strip.
.,. Turn the handle counter-clockwise and remove
the cover or the spare tire* .
.,. Unhook the cargo floor before closing the rear
lid .
A WARNING
Improper use of the vehicle jack can cause se
rious personal injuries.
- Never use the screw driver hex head to
tighten wheel bolts, since the bolts cannot
attain the necessary tightening torque if yo u
use the hex head, potentially causing an ac
cident.
- The factory-supplied jack is intended only
for your vehicle model. Under no circum
stances should it be used to lift heavy
vehicles or other loads; you risk injuring
yourself.
- Never start the engine when the vehicle is
raised, which cou ld cause an accident .
- Support the vehicle securely with appropri ate stands if work is to be performed under
neath the vehicle; otherwise, there is a po
tential risk for injury .
- Never use the jack supplied with your Audi
on another vehicle, particularly on a heavier
one. The jack is only su itable for use on the
vehicle it came wi th.
Page 239 of 280

co
co
.... N
" N .... 0 0 <..:l '
@ Tips
The vehicle jack* in your vehicle is mainte
nance-free.
Replacing wheels
Before changing a wheel
Observe the following precautions for your own
and your passenger's safety when changing a
wheel .
.,. After you experience a tire failure, pull the car
well away from moving traffic and try to reach
level ground before you stop¢,&. .
.,. All passengers should
leave the car and move
to a safe location (for instance, beh ind the
guardrail)¢ ,&..
.. Engage the
parking brake to prevent your vehi
cle from rolling unintentionally ¢,&. .
.. Move
selector lever to position P ¢ ,&. .
.,. If you are towing a trailer, unhitch the trailer
from your vehicle.
.,. Take the
jack and the spare tire* out of the lug
gage compartment c:> page 236.
A WARNING
You or your passengers could be inju red wh ile
changing a wheel if you do not follow these
safety precautions:
- If you have a flat tire, move a safe distance
off the road. Turn off the engine, turn the
emergency flashers on and use other warn
ing devices to alert other motorists .
- Make sure that passengers wait in a safe
place away from the vehicle and well away
from the road and traffic.
- T o help prevent the vehicle from moving
sudden ly and possibly slipping off the jack,
always fully set the parking brake and block
the wheel diagonally opposite the wheel be ing changed. When one front wheel is lifted
off the ground, plac ing the Automatic
Transmission in P (Park) will
not prevent the
vehicle from mov ing.
- Before you change a wheel, be sure the
ground is level and firm. If necessary, use a
sturdy board under the jack .
Emergency assistance
-Always store the vehicle too l kit, the jack
and the replaced tire in the luggage com
partment
¢page 134.
@ Tips
Before changing the wheel, you must activate
the jacking mode, so that the automatic con
tro ls for the Adaptive Air Suspension* do not
make it more difficult to lift the vehicle with
the jack
c> page 239.
Changing a wheel
When you change a wheel, follow the sequence
described below step-by-step and in exactly that
order .
l. Activate the vehicle jack mode* ¢ page 239 .
2. Remove the decorative wheel cover* or the
wheel bolt caps* . For more details see also
¢ page 238, Decorative wheel covers or
¢ page 238, Wheels with wheel bolt caps .
3. Loosen the wheel bolts¢ page 238 .
4. Locate the proper mounting point for the
jack and align the jack below that point
¢page 239.
5. Raise the car with the jack c> page 239 .
6. Remove the wheel with the flat tire and then
install
the spare ¢ page 241.
7. Tighten all wheel bolts lightly.
8.
Lower the vehicle with the jack .
9 . Use the wheel bolt wrench and
firmly tighten
all wheel bolts
c> page 238.
10. Replace the decorative wheel cover* or the
wheel bolt caps*.
11. Deactivate the vehicle jack mode* in the
MMI:
I CARI function button > ( Car)* systems
control button > Servicing & checks > Air
susp.: jack mode > Off.
The vehicle jack mode* switches off automatica l
ly at speeds above 6 mph (10 km/h).
A WARNING
--
Always read and follow all WARNINGS and in
formation
¢ .&. in Raising the vehicle on
page 240
and c> page 242 .
237
Page 240 of 280

Emergency assistance
After changing a wheel
A wheel change is not complete without the do
ing the following .
• Always store the vehicle tool kit, the jack* and
the replaced tire in the luggage compartment
<=>page 134.
• Check the tire pressure on the spare wheel im
mediate ly after mounting it.
• As soon as possible, have the
tightening tor
ques
on all wheel bolts checked with a torque
wrench. The correct tightening torque is 90 ft
lb (120 Nm).
• Have the flat tire
replaced as soon as possible.
@ Tips
- If you notice that the whee l bolts are cor
roded and difficu lt to turn while changing a
tire, they should be replaced before you
check the tightening torque .
- Drive at reduced speed until you have the
tightening torques checked.
- After changing a wheel, the tire pressure in
a ll four tires must be checked/corrected and
the tire pressure mon itor ing indicator must
be stored in the MMI
c> page 230.
Decorative wheel covers
App lies to: vehicles with decorative wheel covers
The decorative wheel covers must be removed
first to access the wheel bolts .
Fig. 195 Chan gin g a w hee l: Removing the whee l cover
Removing
• Insert the hook (provided with the ve hicle tool
kit) in the hole in the wheel hub cover.
• Pull off the
decorative wheel cover c> fig. 195.
238
Wheels with wheel bolt caps
Applies to: vehicles with wheel bo lts with caps
The caps must be removed first from the wheel
bolts before the bolts can be unscrewed .
Fig. 196 Changing a whee l: removing the wheel bolt caps
Removing
• Push the plastic clip (provided with the vehicle
tool k it) over the wheel bolt cap until the inner
retainers on the clip align with the edge of the
cover .
• Remove the cap with the
plastic clip (vehicle
tool kit)¢
fig. 196.
Refitting
• Place the caps over the wheel bolts and push
them back on.
The caps are to protect and keep the wheel bolts
clean.
Loosening and tightening the wheel bolts
The wheel bolts must be loosened before raising
the vehicle.
Fig. 197 Chang ing a wheel : loosen ing the whee l bo lts
 1
1 2
2 3
3 4
4 5
5 6
6 7
7 8
8 9
9 10
10 11
11 12
12 13
13 14
14 15
15 16
16 17
17 18
18 19
19 20
20 21
21 22
22 23
23 24
24 25
25 26
26 27
27 28
28 29
29 30
30 31
31 32
32 33
33 34
34 35
35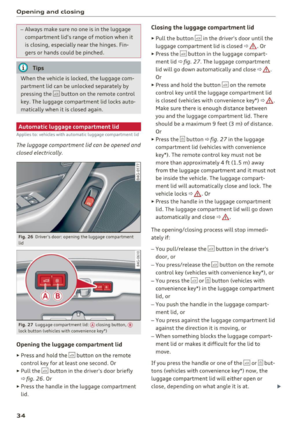 36
36 37
37 38
38 39
39 40
40 41
41 42
42 43
43 44
44 45
45 46
46 47
47 48
48 49
49 50
50 51
51 52
52 53
53 54
54 55
55 56
56 57
57 58
58 59
59 60
60 61
61 62
62 63
63 64
64 65
65 66
66 67
67 68
68 69
69 70
70 71
71 72
72 73
73 74
74 75
75 76
76 77
77 78
78 79
79 80
80 81
81 82
82 83
83 84
84 85
85 86
86 87
87 88
88 89
89 90
90 91
91 92
92 93
93 94
94 95
95 96
96 97
97 98
98 99
99 100
100 101
101 102
102 103
103 104
104 105
105 106
106 107
107 108
108 109
109 110
110 111
111 112
112 113
113 114
114 115
115 116
116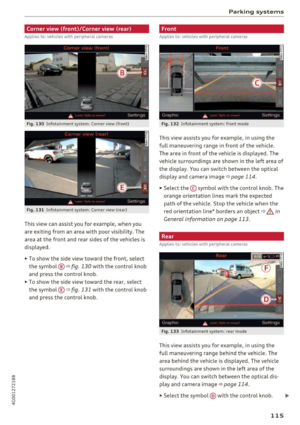 117
117 118
118 119
119 120
120 121
121 122
122 123
123 124
124 125
125 126
126 127
127 128
128 129
129 130
130 131
131 132
132 133
133 134
134 135
135 136
136 137
137 138
138 139
139 140
140 141
141 142
142 143
143 144
144 145
145 146
146 147
147 148
148 149
149 150
150 151
151 152
152 153
153 154
154 155
155 156
156 157
157 158
158 159
159 160
160 161
161 162
162 163
163 164
164 165
165 166
166 167
167 168
168 169
169 170
170 171
171 172
172 173
173 174
174 175
175 176
176 177
177 178
178 179
179 180
180 181
181 182
182 183
183 184
184 185
185 186
186 187
187 188
188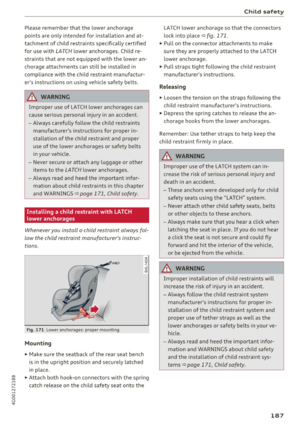 189
189 190
190 191
191 192
192 193
193 194
194 195
195 196
196 197
197 198
198 199
199 200
200 201
201 202
202 203
203 204
204 205
205 206
206 207
207 208
208 209
209 210
210 211
211 212
212 213
213 214
214 215
215 216
216 217
217 218
218 219
219 220
220 221
221 222
222 223
223 224
224 225
225 226
226 227
227 228
228 229
229 230
230 231
231 232
232 233
233 234
234 235
235 236
236 237
237 238
238 239
239 240
240 241
241 242
242 243
243 244
244 245
245 246
246 247
247 248
248 249
249 250
250 251
251 252
252 253
253 254
254 255
255 256
256 257
257 258
258 259
259 260
260 261
261 262
262 263
263 264
264 265
265 266
266 267
267 268
268 269
269 270
270 271
271 272
272 273
273 274
274 275
275 276
276 277
277 278
278 279
279