Page 49 of 280

co
co
.... N
" N .... 0 0 <..:l 'SI'
Sunshade on the rear window
Applies to: vehicles with a sunshade on the rear window
Applies to: sedan
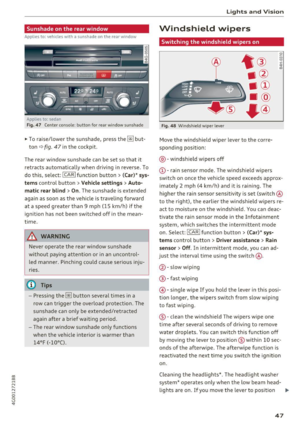
F ig. 4 7 Center console: button for rear window su nshade
~ To raise/lower the sunshade, press the~ but-
ton
¢ fig. 47 in the cockpit .
The rear window sunshade can be set so that it
retracts automatically when driving in reve rse. To
do this, select: ICARlfunction button>
(Ca r)* sys
tems
control button > Vehicle settings > Auto
matic rear blind > On .
The sunshade is extended
again as soon as the vehicle is trave ling forward
at a speed greater than
9 mph (15 km/h) if the
ignition has not been switched off in the mean
time.
& WARNING
-
N ever operate the rear window sunshade
w ith out paying attention or in an uncon trol
led manner. Pinching could cause serious inju
r ies .
(0 Tips
-Pressing the~ button several times in a
row can trigger the overload protection . The
sunshade can on ly be extended/retracted
again after a brief waiting period.
- The rear window sunshade only functions
when the vehicle interior is warmer than
14° F (-1 0°C) .
Lights and V ision
Windshield wipers
Switching the windshield wipers on
Fig. 48 W inds hield w iper leve r
Move the windshie ld wiper lever to the corre
sponding position:
@ -windsh ield wipers off
@ -rain sensor mode. The windsh ield wipers
switch on once the vehicle speed exceeds approx imately 2 mph (4 km/h) and it is raining . The
higher the rain sensor sensit ivity is set (switch @
to the right), the earlier the windshield wipers re
act to moisture on the windshie ld. You can deac
tivate the rain sensor mode in the Infota inment
system, which switches the intermittent mode
on. Select: ICARI function button>
(Car)* sys
tems
con trol button > Driver assistance > Rain
sensor> Off.
In intermittent mode, you can ad
just the interval time using the switc h@ .
@-slow wiping
®-fast w iping
@ -single wipe If you hold the lever in this posi
t ion longer, the wipers switch from slow wip ing
to fast wiping.
® -clean the windshield The wipers wipe one
time after several seconds of driving to remove
water droplets. You can sw itch this function off
by moving the lever to posit ion ® within
10 sec
onds of the afterwipe . The afterwipe function is
reactivated the next time you switch the ignit ion
o n .
Cleaning the headlights*. The headlight washer
system* operates only when the low beam head- lights are on. If you move the lever to posit ion
II>-
47
Page 50 of 280

Lights and Vi sion
® , the headlights and the night vision assist
camera* are cleaned at intervals.
A WARNING
-The rain sensor is only intended to assist the
driver. The driver may still be responsible
for manually switching the wipers on based on visibility conditions.
- The windshield may not be treated with wa
te r-repell ing windsh ield coating agents. Un
favorable conditions, such as wetness, dark
ness or low sun, can result in increased
glare, which increases the risk of an acc i
dent. Wiper blade chatter is also poss ible.
- Properly functioning windsh ield wiper
blades are required for a clear view and safe
dr iv ing¢
page 48, Replacing windshield
wiper blades.
(D Note
- If there is frost, make sure the w indshie ld
wiper blades a re not frozen to the wind
s hi eld. Sw itching on the winds hield wipers
when the blades are frozen to the wind
shield can damage the wiper blades.
- Prior to using a car wash, the windshield
wiper system must be switched off (lever in
position 0) . This prevents the wipers from
switching on unintentiona lly and causing
damage to the w indshield wiper system.
(D Tips
- The windshield wipers switch off when the
ignition is switched off. You can activate the
windsh ield wipers after the ign ition is
switched back on by moving the windsh ield
wiper lever to any pos it ion.
- Worn or dirty windshield wiper blades result
i n streak ing. This can affect the rain sensor
funct ion . Check your winds hield wiper
blades regularly.
- The washer fluid nozzles for the windshie ld
washer system are heated at low tempera
tures when the ignition is on .
- When stopp ing temporarily, such as at a
traffic l ight, the speed of the windshield
wipers automat ically reduces by one level.
48
· Cleaning windshield wiper blades
Clean the wiper b lades when yo u see w iper
streaks. Use a soft cloth and a g lass cleaner.
.. Place the w indshield w iper arms in the service
position ¢
page 48.
" Fold the windsh ie ld w iper arms away from the
w indshie ld.
A WARNING
D irty windshie ld w iper blades can impa ir vi
sion, which increases the r isk of an accident .
Replacing windshield wiper blades
Fig. 49 Removi ng w inds hield w ipe r blades
Windshield wiper service position /blade
replacement po sition
-
-
-M 0 :i: V m
" Sw itch the ignit ion off and move the windshield
wiper lever to position © briefly ¢
page 47,
fig. 48 .
The winds hield wipers move into the
serv ice position .
.. To br ing the wiper b lades back into the original
position, switch the ignition on and operate the
w indshield wiper lever.
You can also turn the service posit ion on or off in
the Infotainment system:
.. Switch the windshie ld w ipers off (posit ion @
¢page 47, fig. 48).
" Select: the I CARI funct ion button > (Car )* Sys
tems
control button > S ervice & ch ecks > Wip
er chang e po sition .
> On/Off
Remo ving the wiper blade
.. Fold the windshield w iper arm away from the
w indshield .
1111>
Page 51 of 280

co
co
.... N
" N .... 0 0 <..:l -
~ Press the locking knob(!)¢ fig. 49 on the wiper
blade. Hold the wiper blade firm ly.
~ Remove the wiper blade in the direct ion of the
arrow .
Install ing th e wiper blad e
~ Insert the new wiper b lade into the mount on
the wiper arm@ unti l it clicks into place .
~ Place the wiper arm back on the windshie ld .
~ Turn the service position off.
A WARNING -
For safety reasons, the windsh ield wiper
blades should be replaced once or tw ice each
year.
0 Note
- Only fo ld the windshield wipers away when
they are in the serv ice position. Otherwise,
you r isk damaging the paint on the hood or
the windshield w iper motor.
- You should not move your vehicle or operate
the windshield w iper lever when the wiper
arms are folded away from the w indshield .
The windshield wipers would move back in
to their o rig inal position and could damage
the hood and wi ndshield.
(D Tips
- You can also use the service position, fo r ex
ample, if yo u want to p rotect the windsh ield
from icing by using a cover.
- You cannot activate the service pos ition
whe n the hood is open.
Light s and Vision
49
Page 52 of 280

Sea ts and stor age
Seats and storage
General information
A WARNING
Refer to c::> page 128, Driving safety for im
portant information, tips, suggestions and
warnings that you should read and follow for
your own safety and the safety of you r pas
sengers.
Front seats
Power seat adjustment
App lies to veh icles with power adjustable seats
F ig. SO Front seat: adj usting the seat
@ -Movi ng the seat fo rwa rd/back: p ress the but
ton forwa rd/back .
@ -Moving the seat up/down: press the button
up/dow n. To adjust the front seat cush ion, press
the front button up/dow n. T o adjus t the rear sea t
cushion, press the rear button up/down.
@ - Switching the massage function * on/off. Se
lec t the type of massage with the multif unct ion
button
c::> page 50.
© - adjusting the backrest angle: press the but
ton fo rwa rd/back.
CD -lumbar support or multifunct ion button*
c::> page 50 . To adjust the lumbar support, press
the button in the applicable location .
A WARNING
- The power fro nt seats can also be adjusted
when the ign ition is swi tc h ed off. For this
reason, children should never be left una t
tended in the vehicle -they could be injured!
50
- To reduce the r isk of an accident, only adjust
the driver's seat when the vehicle is station ary.
- Exercise caution when adjusting the seat
height. Unsupervised or careless seat ad
justment can pinch fingers or hands causing
injuries.
- The front seat backrests must not be re
clined too far back when driving, because
this impa irs the effect iveness of the safety
be lts and airbag system, which increases
the risk of i nju ry.
Multifunction button
App lies to: vehicles wit h mult ifunct ion b utto n
You can adjust the massage function, lumbar
support, side bolsters and upper thigh support using the multifunction button.
Fig . 51 Infotainme nt system: seat settings
Operating
.,. If you t urn the mult ifunct ion b utton CD
c::> page 50, fig. 50 to the lef t or to the r igh t,
the poss ible seat settings @are shown in the
Infotainment system
c::> fig. 51.
.,. To select a seat sett ing, turn the multifunction
button
CD in the corresponding direction until
the desired seat setting is outlined in red .
.,. The arrows @ represent the possible adjust
ments . To lower the lumbar support, for exam
ple, press the mult ifunct ion button
CD down
ward. The corresponding arrow © lights up.
The following seat settings @are poss ible:
Ma ssa ge fun ctio n* -select the W ave, Pulse ,
Stretch, Lumbar or Shoulder
massage type or
off. You can adjust the intensity of each massage IIJ,,
Page 53 of 280

from 1 through 5. You can switch the selected massage on/off using the button @~
page 50,
fig.
so.
Lumbar support -you can ad just the lumbar sup
port up/down and to be stronge r/weaker .
Side section seat * -you can inc rease/decrease
the latera l s u pport in the seat using the side bol
sters a t the seat su rface and the back res t.
Upp er thigh support * -yo u can increase/de
crease the upper t high suppo rt.
@ Tips
- The massage function switches off a uto
matically after approx imately 10 minutes.
- The air in the s ide bolsters* is released as
soon as the driver's door opens. This makes i s possibl e to enter and exit the vehicl e
more comfortab ly. As soon as you s tart driv
i ng the ve hicle, the s ide bo lsters fi ll.
Center armrest
There is a storage compartment under the arm
rest.
F ig. 52 Center armrest between the driver 's/fron t pas
se nge r's seats.
Adjusting the center armr est
... To adjust the ang le, raise the armrest from the
sta rt ing pos it ion .
... To bri ng the armrest bac k into t he starting po
s it ion, ra ise it o ut of the top notch and fold it
back down.
co Opening the storage compartment co ....
~ ... Press the b utton -a rrow- upward . N .... 0 0 <.,;) 'SI"
Seats and storag e
Head restraints
Front head restraints
Applies to: vehicles with adjustable head restraints
Fig. 5 3 Front seat: adj ust ing the head restra int
Adjust the head restraints so t he upper edge is as
even as possible with the top of yo ur head . If that
is not possible, try to adjust as close to th is posi
t ion as poss ible. Push the head restraint as close
as possible to the back of the head.
" To
move the head restraint up or forward
~ fig . 53, s lide it un til it locks into place .
" To
move the head restra int down or back, press
t he button on the side -ar row- and s lide the
head rest raint until it locks into pla ce.
A WARNING
- Always read and follow the app licab le warn
ings~
& in Proper adjustment of head re
straints on page 132 .
-Driving w ith the head restra ints no t in the
up right position increases the r is k of se rious
in jury.
51
Page 54 of 280

Sea ts and stor age
Rear head restraints
Applies to: ve hicles w ith adj ustable head restra ints
Fig. 54 Re ar seat: adju stin g th e head restra int
.. , ,.
F ig . 5 5 Re ar seat: remov ing the head res traint , rele ase
poin t
The rea r seat head restraints must be ra ised to
the highest posit io n when passenge rs ride in the
r e ar seats ¢
A in Proper adjustment of h ead re
straints on page 132
Adjusting the head rest raints
"' To move the head rest rai nt up, ho ld it at the
s ides wi th both hands a nd slide i t upward unt il
yo u fee l it click into place.
"' To move the head restraint down, press the
button (a rrow)
¢ fig . 54 and slide the head re
straint downward.
Remov ing th e head re st ra ints
"' Move the head restraint upward as far as it can
go .
"' Press the release point¢
fig. 55 using the me
chanical key and p ress the button ¢
fig. 54. Pull
the he ad restraint out of the ba ckrest at the
same time¢,&. .
Install ing the head restra ints
"' Slide the posts on the head restraint dow n into
the guides unti l the posts click into place.
52
"' Press the button (arrow) ¢ fig . 54 and slide the
head restra int all the way down . You should not
be able to pull the head restraint out of the
backres t wi thout pressing the button.
A WARNING
- Always read and follow the applicab le warn
ings
¢ .&. in Proper adjustment of head re
straints on page 132.
- Only remove t he rear seat head restra ints
when necessary in order to install a ch ild
seat . Install the head restraint again imme
dia tely once the child sea t is removed . D riv
ing with the he ad restraints remove d or no t
in the upright posi tion increases the risk of
serious injury.
Memory function
Description
App lies to: vehicles with memory funct ion
Using the memory function, you can quick ly and
easily store a persona l seat profile fo r the d river
and front passenge r and recall the sett ings. The
memory funct ion is contro lled using the remote
contro l key and the memory but tons in the dr iv
er's/front passenger's door *.
The driver's seat profi le is stored again and as
s igned to the remote cont rol key each time the
vehicle is locked. W hen you open the door, the
seat profile is automatically recalled. If two peo
ple use the vehicl e, it is recommend ed that each
person always uses the ir "own" remote control
key.
Two sea t profiles can be s tored using the memo
ry buttons in t he driver's/front passenge r's
door *. Once they are stored, these seat profi les
can be selected at any time.
The following se ttings are stored :
Iii>
Page 55 of 280

co
co
.... N
" N .... 0 0 <.,;) 'SI"
Remote Memory button control key
Driver D river Front
passen-ger
Seat X X X
Steering wheel* X X
Both
exterior X X
mirrors*
Remote control key
Applies to: vehicles with memory function
The driver's seat profile can be assigned to the
remote control key when the vehicle is locked.
• Select: the ICARI function button > (Car)* Sys
tems
control button > Vehicle settings > Driv
er's seat
> Remote control key > On .
(D Tips
If you do not wish to have the seat profile for
another driver assigned to the remote control
key, switch the memory function off in the In
fotainment system or using the
IOFFI button
¢page 53.
Memory buttons
Applies to: vehicles with memory function
Fig. S6 Driver 's door: memory function buttons
The memory buttons are located in the driver's/
front passenger's* door.
Switching the memory function on/off
• Press the IOFFI button to switch the memory
function on/off. The LED in the button turns on
Seats and storage
when the memory function is off . Seat profiles
are neither stored nor recalled.
Storing a seat profile
• Press the ISET I button. When the word SET
lights up, the memory is ready to store set
tings .
• Now press a memory button briefly. A tone
confirms that the settings were stored.
Accessing a seat profile
• If the driver's door is open and the ignition is
sw itched off, press the memo ry button.
.. If the driver's door is closed or the ignition is
switched on, press and hold the memory but
ton until the seat adjustment is complete .
A WARNING
-For safety reasons, the seat setting can only
be recalled when the vehicle is stationary,
otherwise the re is a risk of an accident.
- If necessary, you can stop the recall process
by press ing the
IOFFI button or any memory
button.
Adjusting the front passenger's seat in the
Infotainment system
Applies to: vehicles with memory function
The driver can move the front passenger's seat
into various positions.
Adjusting the front passenger's seat from
the driver's seat
• Select: the I CAR I funct ion button > (Car) * Sys
tems
contro l button > Vehicle settings > Seats
> Front passenger's seat > Adjust seat posi
tion .
• You can now adjust the front passenger's seat
using the driver's seat buttons
¢ page SO,
fig.
so.
Align with driver's seat
• To transfer the settings from the driver's seat
to the front passenger's seat, select: the
I CAR I
function button > (Car)* Systems control but
ton
> Vehicle settings> Seats > Front passeng-
er 's seat > Align with driver 's seat. ..,.
53
Page 56 of 280

Sea ts and stor age
.. Press and hold the control knob until the ad
justing process is complete.
@ Tips
The lumbar support and upper th igh support
settings a re not transferred when aligning
the front passenger's seat with the driver's
seat.
Ashtray
A pp lies to: ve hicles w ith ashtray
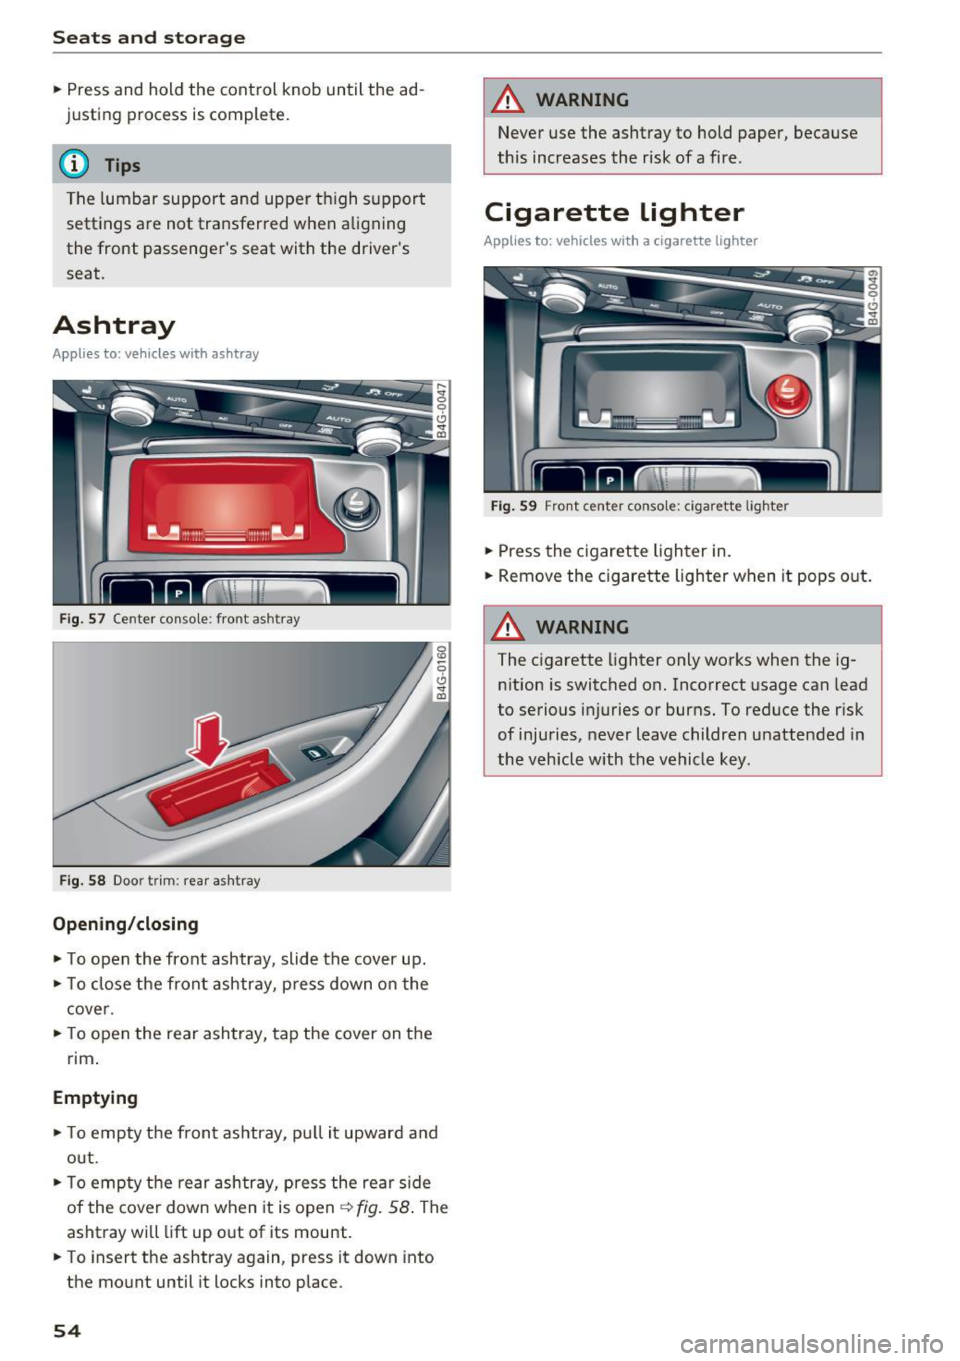
F ig . 57 Center conso le : front ashtray
F ig. 58 Doo r tr im: rea r asht ray
Opening /closing
.. To open the front ashtray, slide the cover up .
.. To close the front ashtray, press down on the
cover .
.. To open the rear ashtray, tap the cover on the
rim .
Emptying
.. To empty th e front ashtray, pu ll it upward and
out .
.. To empty the rear ashtray, press the rear side
of the cover down when it is open ¢ fig. 58 . The
ashtray will lift up out of its mount .
.. To insert the ashtray again, press it down into
the mount until it locks into place.
54
A WARNING
Never use the ashtray to hold paper, because
this increases the risk of a fire .
Cigarette lighter
Applies to: vehicles wi th a ci gare tte lighter
F ig . 59 Front center conso le: cigarette lighter
.. Press the c igarette lighter in .
.. Remove the cigarette lighter when it pops out.
A WARNING
The cigarette lighter only works when the ig
n ition is switched on. Incorrect usage can lead
to serious injuries or burns. To reduce the risk
of injuries, never leave children unattended in
the vehicle with the vehicle key.