Page 25 of 280
 SI
Unlike the short-term memory, the long -term
memory is not erased automatica lly. Yo u can se
l ect the time period for evaluat ing trip inform")
co
co
.... N
" N .... 0 0 <.,;) 'SI'
Unlike the short-term memory, the long -term
memory is not erased automatica lly. Yo u can se
l ect the time period for evaluat ing trip informa
tion yourself .
F or some veh icle functions, you can access the
driving information from the short -term memory
i n the
line @¢poge21, fig. 5.
Fuel consumption
The cu rrent fue l co nsu mption c an be shown us
i ng a ba r g rap h
¢fig . 8 . The aver age consum p
tion stored in the short -term memory is also dis
p layed . If the bar is green, your vehicle is saving
fuel throug h one of the following functions:
-Re cuperation : electr ical ene rgy can be store d in
the vehicle battery when t he vehicle is coasting
or driving downhill. The bar will move toward
0 .
-Cylinder on demand system* : the engine auto
matically switches four cylinde rs off when low
er powe r output is required and other condi
tions are met. This change is not noticeab le to
t h e passengers.
(]} Tips
The date, time of day and t ime and date for
mat can be set in the Infotainment system
¢page 24.
Efficiency program
Applies to: ve hicles with effic ie ncy p rogram
F ig. 9 In str ume nt cluste r: ot her equ ipment
Driver in forma tion system
Fig. 10 Instrument cluster: econo my t ip
T he eff ic iency p rogram can help you to use less
fuel. It shows o ther cons umers th at are using
f uel and e co nomy tip s give a dvice on how to drive
efficie ntly. The eff ic ien cy pr ogr am receives dis
tance and consumption data from the on -board
computer.
To dis play the eff icien cy p rogram, o pen the
Vehi
cle functions
m enu and select the Efficiency pro
gram
menu item.
Other consumers
The Energy con sumers view lists other equip
ment that is c urren tly affe cting f ue l cons ump
tio n. Th e displ ay shows up to three o ther eq uip
ment items @¢
fig. 9. The equipment using the
most power is listed first. If more than three
items using power are switched on, the equip
ment that is current ly using the most power is
displayed.
A ga uge @ also shows the c urrent tota l con
s u mption of all othe r consumers.
Economy tips
In c ertai n sit ua tio ns, economy tips appe ar auto
ma tic ally for a short t ime in the e ffic iency pro
gram
¢ fig . 10 . If you follow these economy tips,
yo u can red uce your vehicle's fuel cons umption.
T o turn an e cono my tip off immedia tely afte r it
appea rs, p ress any button o n the mu ltifun ction
stee ring wheel.
© Tips
- If you era se the d ata in t he eff ic ien cy pr o
gram, t he v alues in the on -boar d compu te r
wi ll also be reset .
23
Page 26 of 280

Driver information system
-Once you have turned an economy tip off, it
will only appear again after you turn the ig
nit ion on again .
- The economy tips are not displayed in every
instance, but rather in intervals over a peri
od of t ime .
Odometer
Fig. 11 Inst rume nt cluster : odometer and reset butto n
The display of d istance dr iven is shown in miles
"m i" or kilometers "km". The units of measure
ment (kilometers/m iles) can be changed in the
I nfotainment system.
Trip odometer and odometer
The trip odometer shows the distance driven
since it was last reset . It can be used to measure
short distances.
The trip odometer can be reset to zero by press
ing the ~ reset button.
The odometer shows the total distance that the
veh icle has been driven.
Malfunction indicator
If there is a malfunction in the instrument clus
ter,
DEF will appear in the trip odometer display.
H ave the malfunction corrected as soon as possi
ble.
Time/date display
The date, time of day and time and date format
can be set in the Infota inment system. Refer to
the Infota inment system operating manual for
instructions .
24
When you open the driver's door, the date and
time appear in the instrument cluster display for
30 seconds .
Head-up display
Applies to: vehicles with Head-up Display
Fig. 12 Example: indicators in the Head -up display
Fig. 13 Instrument panel: knob for t he head -up di splay
The Head-up display projects certain warn ings or
selected information from the assist systems* or
navigation* on the windshield. The display ap
pears within the driver's field of vision.
Switching on/off
"" To switch the head-up dis play on or off, press
the knob~
q fig. 13.
Adjusting the height
The height of the d isplay can be adjusted to the
i ndividual driver.
"" Make sure you are seated correctly
qpage 129.
"" Turn the knob~ to adjust the display.
Settings in the Infotainment system
""Select: the I CARI function button > (Car)* Sys-
tems
contro l button > Driver assistance > .,.
Page 27 of 280

Hea d-u p di spl ay> Head- up di spla y conten ts or
Displ ay brigh tn ess.
Di spla y content
In the Infotainment system, you can specify
which information should be displayed: For ex
ample, th is can include navigation informat ion *,
Adaptive cruise control* or night vision assist*.
The display of certa in info rmation and some of
the red indicator lights cannot be h idden in the
I nfotainment system.
Displ ay brightness
You can adjust the display br ightness in the Info
tainment system. The display brightness decreas
es automatically as the amount of light decreas
es. The backgro und brightness is adjusted with
the instrument il lumination
c::> page 44 .
(D Note
To prevent scratches on the g lass cove ring the
head- up d isplay, do not place any objects in
the projection opening.
(D Tips
- Sunglasses w ith polar izat ion fi lters and u n
favorab le lighting conditions can have a
negative effect on the display.
- An optim um display depends on the seat
pos ition and the height adjustment of the
head -up display.
- A specia l windshield is needed for the head
up display function.
- Fo r information on cleaning, refer to
c::> ta
ble on page 233.
On Board Diagnostic
System (OBD)
Malfunction Indicator Lamp (MIL)
The Malfunction Ind icator Lamp (MIL) a in the
instr ument cluster is part of the On-Board Diag
nostic (OBD II) system.
~ The warning/indicator light i lluminates when the ....
~ ign it ion is switched on and goes ou t after the en-N .... 0 0 <.,;) 'SI"
Driver info rm atio n sys tem
gine starts and the idle has stab ilized. This indi
cates that the MIL is working properly.
If th e light does not go ou t after the eng ine is
sta rted, or i llum inates while you are driving, a
malfunction may exist in the engine system. If
the light illuminates, the catalytic converter
could be damaged.
Cont inue driving
with redu ced p ower (avoiding
sustained high speeds and/or rapid accelera
tions) and have the condition corrected. Contact
your authorized Audi dealer.
If the ligh t illum ina tes, the electronic speed lim
iter may also be malfunctioning. For more infor
mation
c::> page 26, Electronic speed limiter.
An impro perl y close d fuel fi ller cap may al so
ca use the
MIL li g ht to illuminate c::> page 192.
On-Board Diagnostics
Fig. 14 Locat ion of Data L ink Connector (DLC)
On-Board Diagnostics monitors the components
of your emission control system. Each monitored
component in your engine system has been as
s igned a code . In case of a malfunction, the com
ponent will be identified and the fault stored as a
code in the contro l module memory.
T he M IL light may also illum inate if there is a
leak in the on-board fuel vapor recovery system.
If the light i lluminates after a refuelling, stop
the vehicle and make sure the fue l filler cap is
properly closed
c::> page 192.
In order to make an accurate diagnosis, the stor
ed data can only be displayed using special diag-
nostic equipment (generic scan tool for OBD).
IJI,-
25
Page 28 of 280
. The DLC is located to the rig ht of the hoo")
Driver information s ystem
In order to connect the specia l diagnostic equip
ment, push the plug into the Data Link Connector
(DLC). The DLC is located to the rig ht of the hood
release
c:> fig. 14.
Your author ized Audi dealer or a qualified service
station can interpret the code and perform the necessary repa ir.
A WARNING
Do not use the diagnostic connector for pe r
sonal use. Incorrect usage can cause malfunc
tions, which can increase the risk of a colli
sion!
Electronic speed limiter
-
Your veh icle may be factory equipped wi th t ires
that a re rated for a maximum speed of 130 mph
(2 10 km/h) . This is less than the maxim um speed
of yo ur vehicle. To reduce t he risk of s udden tire
fa ilu re and loss o f control if the veh icle is operat
e d at excessive speeds, yo ur vehicle a lso has an
electronic speed limiter . The electronic speed
lim ite r prevents your veh icle from going faster
than the t ire speed rating. For more information
c:>page 217.
I f the en gine contro l unit receives faulty vehicle
road speed s ignals, the Malfunction Indicator
Lamp (MIL)
II will illuminate. If this occurs,
contact the nearest authorized Aud i dealer for
assis tance .
S models
Your veh icle's top speed is e lectron ica lly limited
to 155 mph (250 km/h).
If th e engine contro l unit receives faul ty vehi cle
roadspeed signa ls, the Malfunct io n Indicator
Lamp (MIL)
¢4 will illuminate. If this occurs,
contact the nearest autho rized Audi dealer for
assistance .
A WARNING
Always observe the posted speed limits and
adjust you r speed to s uit prevailing road, traf
fic and weathe r con ditions. Never driv e you r
vehicle fa ster t han t he maximum spee d rat ing
o f t he ti re s inst alled.
26
-
Page 29 of 280

Opening and closing
Central locking
Description
You can lock and unlock the veh icle centrally . You
have the following options:
- Remote control key¢
page 30,
-Sensors in the door handles* ¢ page 30,
-Lock cylinder on the driver's door c::> page 32,
or
- Interior central locking switch
c::> page 31.
Turn signals
The turn s ignals flash twice when you unlock the
veh icle and flash once when you lock the veh icle.
If the blinking continues, one of the doors or the
luggage compartment lid/hood is not closed or
the ignition is still switched on.
Auto Lock
The Auto Lock function locks all doors and the
l uggage compartment lid once the speed has ex
ceeded approximately 9 mph (15 km/h).
The vehicle can be unlocked if the opening func
tion in the central locking system sw itch is used
or one of the door handles is pulled.
I n the event of a crash with airbag deployment,
the doors will also automatically unlock to allow
access to the vehicle.
Selective door unlocking
The doors and luggage compartment lid will lock
when they close . You can set in the Infotainment
system whether
only the driver's door or the en
tire vehicle should be unlocked when unlocking
c::> page 32.
Unintentionally locking yourself out
The follow ing cond it ions prevent you from lock
ing your remote control key in the vehicle :
-If the driver's door is open, the vehicle cannot
be locked by pressing the
lil button on the re-
~ mote control key or touching the locking sen-,...,
~ sor* on a door. N .... 0 0 <..:l '
Opening and closing
-When locking using the lil button in the central
locking switch, the vehicle will not lock if a door
is open
¢ page 31.
-On vehicles with a convenience key*, the lug
gage compartment lid unlocks again after clos
ing if the most recent ly used key is in the lug
gage compartment. The emergency flashers
blink four times.
Do not lock your vehicle with the remote control
key or convenience key* until all doors and the
luggage compartment lid are closed. This helps
to prevent you from locking yourself out acciden
tally .
Closing aid on the doors*
The vehicle doors are equipped with closing aids.
When closing a door, you only have to let it fall
lightly into the latch. It then closes automatically
c::> &..
A WARNING "----When you lock your vehicle from outs ide,
nobody -especially children -should rema in
inside the vehicle. Remember, when you
lock the vehicle from the outside the win
dows cannot be opened from the inside.
- When you leave the vehicle, always take the
ignit ion key with yo u. This will prevent pas
sengers (children, for examp le) from acci
dentally being locked in the vehicle should
they accidentally press the power locking
switch in the doors.
- Do not leave children inside the vehicle un
supervised. In an emergency it would be im
possible to open the doors from the outside
without the key.
- Applies to vehicles with power side door
closer*:
- When closing a door, make sure nothing
can interfere with the door. Th is could
cause serious personal inj ury.
- You can stop the door from closing at any
time by pulling on the inside or outside
doo r handle.
27
Page 30 of 280

Opening and clo sin g
@ Tips
- Do not leave valuables unattended in the ve
hicle . A locked vehicle is not a safe!
- The LED in the driver 's door rail blinks when
you lock the vehicle . If the LED lights up for
approximately 30 seconds after locking,
there is a ma lfunction in the central locking
system. Have the problem corrected by an
authorized Audi dealer or authorized Audi Service Fac ility.
Key set
Fig. 15 You r veh icle key set
@ Remote control ke y with integr ated
mechanica l key
You can unlock/lock your veh icle w ith the remote
control key . A mechan ical key is integrated in the
remote control key~
page 29.
@ Separate mechanical ke y
This key is not intended for constant use. It
should only be used in an emergency . Do not car
ry it on your key ring and do not store it in the ve
h icle.
Replacing a ke y
If a key is lost, see an authorized Audi dealer or
authorized Audi Service Facility. Have
this key de
activated . It is important to bring all keys with
you . If a key is lost, you should report it to your
insurance company.
Number of key s
You can check the number of keys ass igned to
your veh icle in the Infotainment system. Select:
the !CAR !function button>
(C ar )* S yst e m s con
trol button
> Service & che cks > Programmed
28
k ey s. T his way, you can make sure that you have
all the keys when purchasing a used vehicle.
El ectronic immobiliz er
The immobilizer p revents unauthorized use of
the ve hicle.
Under certain circumstances, the vehicle may not
be able to start if there is a key from a d ifferent
vehicle manufacturer on the key chain.
Da ta in th e master key
When dr iving, service and maintenance-relevant
data is cont inuous ly stored in your remote con
trol key. Your A udi se rvice advisor can read out
th is data and tell you about the work yo ur vehicle
needs . This applies also to veh icles with a con
venience key *.
Personal convenience sett ings
If two people use one vehicle, it is recommended
that each person always uses "their own" master k ey. When the ign ition is turned off o r whe n the
vehicle is locked, personal conve nience set tings
for the following systems are stored and as
s igned to the remote maste r key .
- Climate cont rol system
- Central lock ing
- Windows
- Interior lighting*
- Memory function*
- Park ing aid*
- Ad aptive cru ise con trol *
- Ac tive lane assist*
- Side ass ist*
- Drive select
- Night vision assistant*
- Steering wheel heating *
The stored settings a re a utomat ica lly recalled
whe n you unlock t he vehi cle, open the doors or
turn on the ignition.
A WARNING
A lways take the vehicle key with you when
leaving the vehicle, even for a short period of
time. This applies particularly when child ren
rema in in the vehicle . Otherwise the children
-
Page 31 of 280

co
co
.... N
" N .... 0 0 <..:l 'SI'
could start the engine or operate electrical
equipment such as power windows.
(D Tips
- The operation of the remote control key can
be temporarily disrupted by interference
from transmitters near the vehicle working
i n the same frequency range (such as a cell
phone or radio equipment).
- Using the mechanical key, you can:
- Lock/unlock the glove compartment.
- Manually lock/unlock the vehicle
¢ page 32 .
-Mechanically lock the doors¢ page 32.
-For an explanation on conformity with the
FCC regulations in the United States and the
Industry Canada regulations, see
¢ page 262.
Removing the integrated mechanical key
Fig. 16 Remote contro l maste r key : remov ing t he mech ani
cal key
• Press the release button@¢ fig. 16.
• Pull the mechanica l key @ out of the remote
contro l key.
Open ing and closing
LED and batteries in the remote control key
Fig. 17 Remote control key: removing the battery holder
LED in the remote control key
The LED @ informs you about the function of the
remote control key.
• If you press a button briefly, the LED b links
once .
• If you press and hold a button longer (conven
ience opening), the LED blinks several times.
"' If the LED does not blink, the remote control
key battery is dead . The
1:1 indicator light and
the message
Please change key battery ap
pear . Replace the battery in the remote control
key.
Replacing the remote control key battery
"'Remove the mechanical key ¢page 29 .
"' Press the release button @ on the battery
holder and pull the battery ho lder out of the re
mote control key in the di rect io n of the arrow
at the same time.
• Insert the new battery with the"+" symbol fac
ing down.
• Slide the battery holder carefully into the re
mote control key.
"' Insert the mechanical key.
@) For the sake of the environment
Discharged batter ies must be disposed of us
ing methods that w ill not harm the environ
ment . Do not dispose of them in household
trash.
29
Page 32 of 280

Opening and clo sin g
@ Tips
The replacement battery must meet the same
specifications as the orig inal battery in the re
mote control key.
Unlocking/locking by remote control
F ig . 18 Rem ote contro l key : bu tton prog ra mmin g
• To unlock the vehicle, press the~ button
¢fig. 18.
• To lock the vehicle, press the lil button one
tim e¢ ,& .
• To unlock the luggage compartment lid, press
the
1£1 button br iefly .
• To trigger the alarm, press the
I PANIC I button.
T he vehicle horn and emergency flashers are
activated.
• To turn the alarm off , press the red
I PANIC I
button again .
If the vehicle is unlocked and none of the doors,
the rear lid or hood are opened within 60 se c
onds, the veh icle locks again automatically. This
feature prevents the vehicle from being acciden
tally left unlocked over a long p eriod of t ime.
The settings in the Infotainment system deter mine if the entire veh icle or only the driver 's door
is unlocked when unlocking the vehicle
¢ page 32.
A WARNING
Read and heed all WARNINGS¢.& in Descrip
tion on page 2
7 .
@ Tips
- Only use the remote control key when you
are within view of the vehicle.
30
- The vehicle can only be locked when the se
lector lever is in the P position.
- Do not use the remote control when you are
inside the vehicle. Otherwise, you could un
intentionally lock the vehicle. If you then
tried to start the engine or open a door, the alarm would be tr iggered. If this happens,
press the@ unlock button.
- Only use the pan ic function in an emergen
cy.
Locking and unlocking with the
convenience key
Applies to: vehicles with convenience key
T he doors and luggage compartment lid can be
unlocked/locked without using the remote con
trol key.
F ig . 19 Door han d le : locking t he vehicle
Unlocking the vehicl e
• Grip the door hand le . T he door un locks auto-
matically.
• Pull on the door handle to open the doo r.
Locking the vehicle
• Place the selec to r l eve r in the P position (auto
matic t ransmiss ions), or else the veh icle wi ll
not be ab le to lock .
• To lock the vehi cle, close the door and touch
the sensor in the door handle
once ¢ fig . 19,
¢ ,& . Do not hold the door handle while doing
this.
You can unlock/lock the ve hicle at every door .
T he remote control key cannot be more than ap
proximately 4 ft (1.5 m) away from the door han
dle. It makes no difference whether the master ..,.
 1
1 2
2 3
3 4
4 5
5 6
6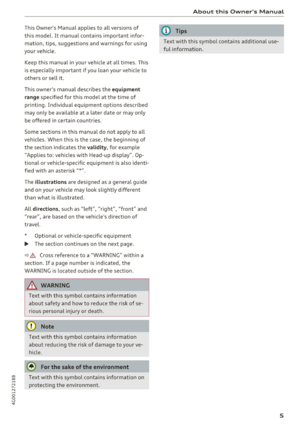 7
7 8
8 9
9 10
10 11
11 12
12 13
13 14
14 15
15 16
16 17
17 18
18 19
19 20
20 21
21 22
22 23
23 24
24 25
25 26
26 27
27 28
28 29
29 30
30 31
31 32
32 33
33 34
34 35
35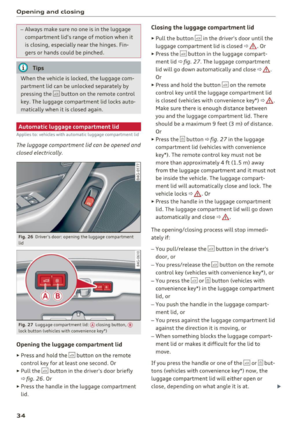 36
36 37
37 38
38 39
39 40
40 41
41 42
42 43
43 44
44 45
45 46
46 47
47 48
48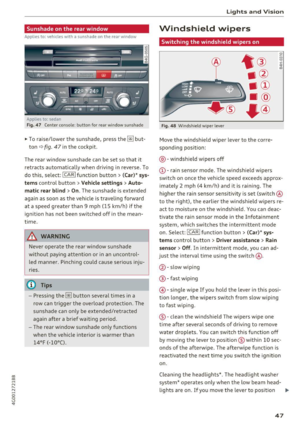 49
49 50
50 51
51 52
52 53
53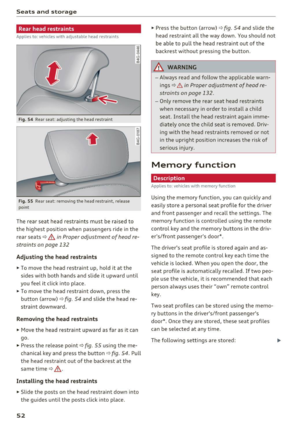 54
54 55
55 56
56 57
57 58
58 59
59 60
60 61
61 62
62 63
63 64
64 65
65 66
66 67
67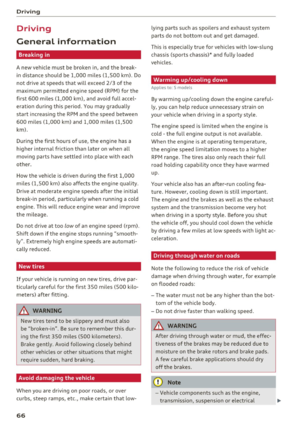 68
68 69
69 70
70 71
71 72
72 73
73 74
74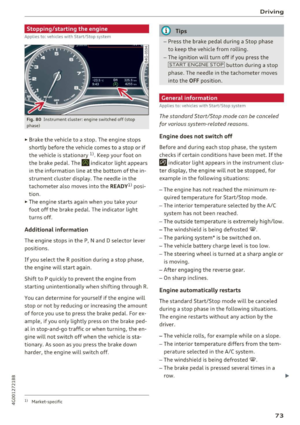 75
75 76
76 77
77 78
78 79
79 80
80 81
81 82
82 83
83 84
84 85
85 86
86 87
87 88
88 89
89 90
90 91
91 92
92 93
93 94
94 95
95 96
96 97
97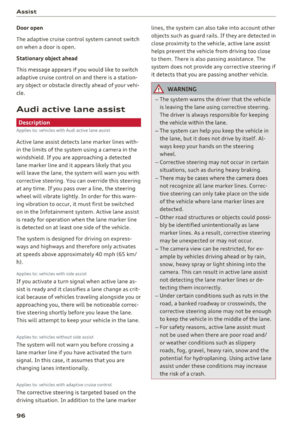 98
98 99
99 100
100 101
101 102
102 103
103 104
104 105
105 106
106 107
107 108
108 109
109 110
110 111
111 112
112 113
113 114
114 115
115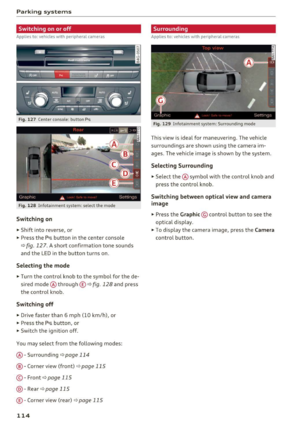 116
116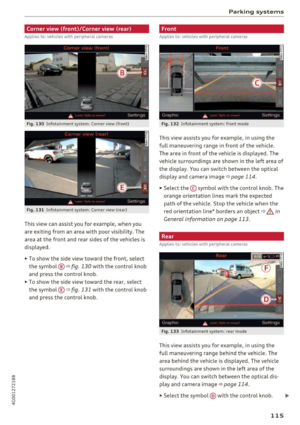 117
117 118
118 119
119 120
120 121
121 122
122 123
123 124
124 125
125 126
126 127
127 128
128 129
129 130
130 131
131 132
132 133
133 134
134 135
135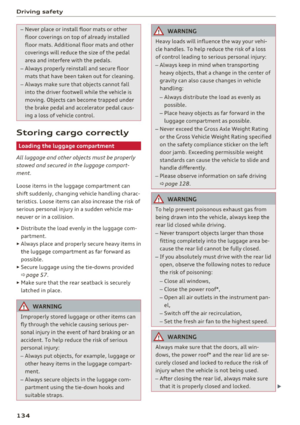 136
136 137
137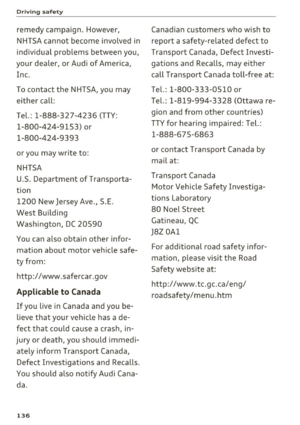 138
138 139
139 140
140 141
141 142
142 143
143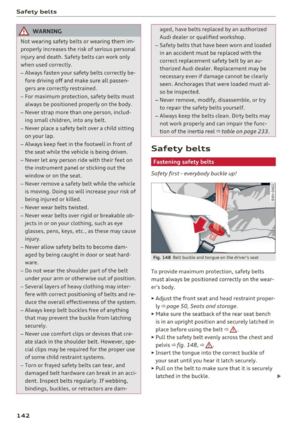 144
144 145
145 146
146 147
147 148
148 149
149 150
150 151
151 152
152 153
153 154
154 155
155 156
156 157
157 158
158 159
159 160
160 161
161 162
162 163
163 164
164 165
165 166
166 167
167 168
168 169
169 170
170 171
171 172
172 173
173 174
174 175
175 176
176 177
177 178
178 179
179 180
180 181
181 182
182 183
183 184
184 185
185 186
186 187
187 188
188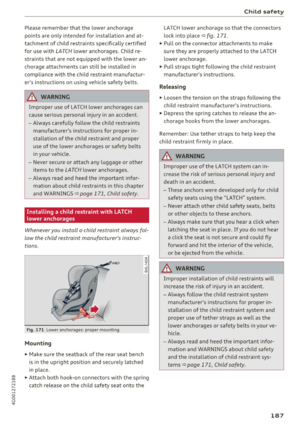 189
189 190
190 191
191 192
192 193
193 194
194 195
195 196
196 197
197 198
198 199
199 200
200 201
201 202
202 203
203 204
204 205
205 206
206 207
207 208
208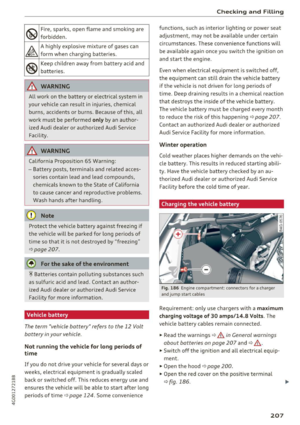 209
209 210
210 211
211 212
212 213
213 214
214 215
215 216
216 217
217 218
218 219
219 220
220 221
221 222
222 223
223 224
224 225
225 226
226 227
227 228
228 229
229 230
230 231
231 232
232 233
233 234
234 235
235 236
236 237
237 238
238 239
239 240
240 241
241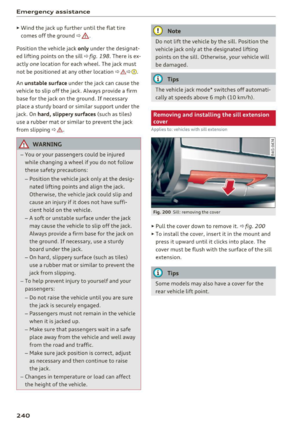 242
242 243
243 244
244 245
245 246
246 247
247 248
248 249
249 250
250 251
251 252
252 253
253 254
254 255
255 256
256 257
257 258
258 259
259 260
260 261
261 262
262 263
263 264
264 265
265 266
266 267
267 268
268 269
269 270
270 271
271 272
272 273
273 274
274 275
275 276
276 277
277 278
278 279
279