Page 17 of 90
17
1
2
3
4
5
6
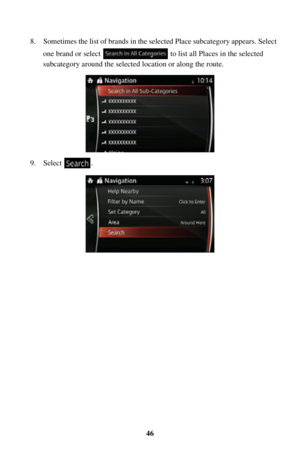
2.4.3.4 Junction view
If you are approaching a highway/freeway exit or a complex intersection and the
needed information exists, the map is replaced with a 3D view of the junction. The
optimum driving lane is indicated by an arrow, and road signs are displayed as
additional information at the top of the screen.
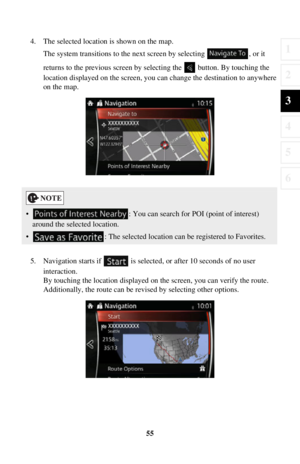
2.4.3.5 Highway/Freeway exit services
You may need a gasoline station or a restaurant during your journey. This feature
displays a new button on the map when you are driving on highways/freeways.
Page 18 of 90
18
Select this Open button to open a panel with the details of the next few exits or
service stations.
Applicable only when the setting is “Only when menu is open”.
Select any of them to display the exit area
on the map. You can now easily add this
exit as a waypoint to your route if needed.
There are two types of settings for disp laying the next expressway exit; one which
constantly displays the next expressway ex it while traveling on an expressway, or the
other which displays the next expressway exit only when the menu panel is open.
You can change the settings in Vi sual Guidance settings (page 83).
Page 19 of 90
 19
1
2
3
4
5
6
2.4.3.6 Elements of the active route
The navigation system shows the route in the following way:
SymbolNameDescription
Current car position
marker If there is a road close
by, a blue-")
19
1
2
3
4
5
6
2.4.3.6 Elements of the active route
The navigation system shows the route in the following way:
SymbolNameDescription
Current car position
marker If there is a road close
by, a blue-colored arrow
symbol moves to the road which is the closest.
The red mark present around a blue-colored
arrow symbol indicates the correct GPS
information. It may be indicated away from the
road because there is no existing road
information.
Waypoint
(intermediate
destination) An intermediate destination of the route before
reaching the fina
l destination.
Destination (end
point) The final destination of the route.
Route color The route always stands out with its color on the map, both in daytime and in nighttime
mode.
Streets and roads that
are excluded from the
navigation You can choose whether you want to use or
avoid certain road types (page 80). However,
when the navigation system cannot avoid such
roads, the route will include them and it will
show them in a color that
is different from the
route color.
Streets and roads that
are affected by traffic
events Road segments may be affected by traffic
events received. These streets and roads are
displayed in an alternate color, and small
symbols displayed along the route show the
type of traffic event.
Some functions are not available depending on some countries and regions.
Page 20 of 90
20
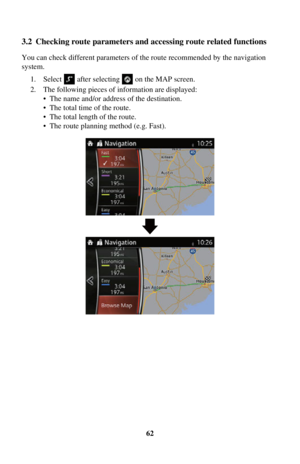
2.4.4 Manipulating the map
By touching and dragging any part of the map screen, it can be moved to a location
close to the currently displayed map.
In addition, the map operation button is
displayed, and by touching each of the
buttons, you can zoom in and out of maps, change the map perspective and select a
destination.
ActionButton(s)Description
Map movement
using touch and
drag No buttons You can move the map in any direction: select and
hold the map, and move your finger towards the
direction you want to move the map.
Zooming in
and out , Changes how much of the map is displayed on the
screen.
The navigation system uses high-quality vector
maps that let you examine the map at various
zoom levels, always with optimized content.
Map scaling has a limit in 3D map view mode. If
you zoom out further, the map switches to 2D view
mode.
Select the button once to mo
dify the view in large
steps, or select and hold the button to modify it
continuously and smoothly.
Page 21 of 90
 21
1
2
3
4
5
6
Tilting up and
down, Changes the vertical view
angle of the map in 3D
mode.
Select the button once to mo dify the view in large
steps, or select and hold the button to modify it
c")
21
1
2
3
4
5
6
Tilting up and
down, Changes the vertical view
angle of the map in 3D
mode.
Select the button once to mo dify the view in large
steps, or select and hold the button to modify it
continuously and smoothly.
Rotating left
and right , Changes the horizontal view angle of the map.
Select the button once to mo
dify the view in large
steps, or select and hold the button to modify it
continuously and smoothly.
Compass The direction of the compass shows North. Select
the button to switch to North-up view, and then
select again to rotate the map in the previous
direction.
Open/close , The UMP (menu bar) is displayed on the lower
part of the screen.
Hides the displayed UMP if the UMP has been
displayed.
Select
destination Select this button to select the Cursor as a new
destination. The route is automatically calculated.
Return to
normal
navigation Select this button to move the map back to follow
the current GPS position. Automatic map rotation
is also re-enabled.
The map manipulation buttons disappear and
navigation continues.
ActionButton(s)Description
Page 22 of 90
22
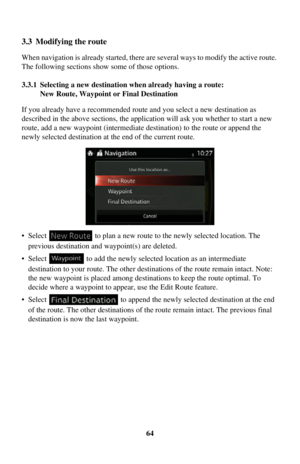
2D or 3D view
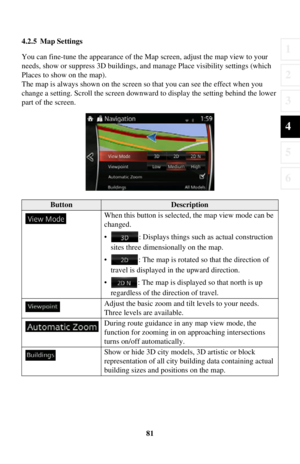
, , When this button is selected, the map view mode
can be changed.
• : The map is displayed so that north is up
regardless of the direction of travel.
• : The map is rotated so that the direction of travel is displayed in the upward direction.
• : Displays things such as actual construction sites three dimensionally on the map.
Zoom-in/
zoom-out mode You can zoom-in/zoom-out of maps.
Rotate mode Rotates maps.
Perspective
angle mode You can change the angle of perspective on a map.
ActionButton(s)Description
Page 23 of 90
23
1
2
3
4
5
6
2.4.5 Checking the details of the current position (Where Am I?)
This screen contains information about the current position (or about the last known
position if GPS receptio n is not available).
You can access this screen from the map in one of the following ways:
1. Select after selectin g on the MAP screen.
2. Select the Where Am I? screen.
Page 24 of 90
24
3 On-road navigation
You can set up your route in different ways:
If you need a route for immediate navigation, you can select the destination and start
navigating to it right away (normal navigation).
You can plan routes with multiple destinations. Select the first destination. Then
select a second destination and add it to your route to create a mu lti-point route. You
can add as many destinations to your route as you like.
3.1 Selecting the destination of a route
The navigation system offers you seve ral ways of choosing your destination:
• Enter a full address or a part of an address (page 25).
• Select a POI (point of interest) from a database as your destination (page 38).
• Searches the destination from the map (page 54).
• Use a previously saved Favorite destination (page 56).
• Select a location from the History of previously used destinations (page 58).
• Enter the coordinate of the destination (page 60).
There are other convenient functions.


 17
1
2
3
4
5
6
2.4.3.4 Junction view
If you are approaching a highway/freeway exit or a complex intersection and the
needed information exists, the map is replaced with a 3D view of the junction. The")
 18
Select this Open button to open a panel with the details of the next few exits or
service stations.
Applicable only when the setting is “Only when menu is open”.
Select any of them to display")
 20
2.4.4 Manipulating the map
By touching and dragging any part of the map screen, it can be moved to a location
close to the currently displayed map.
In addition, the map operation button is
displa")
 22
2D or 3D view
, , When this button is selected, the map view mode
can be changed.
• : The map is displayed so that north is up
regardless of the direction of travel.
• : The map is rotated so")
 23
1
2
3
4
5
6
2.4.5 Checking the details of the current position (Where Am I?)
This screen contains information about the current position (or about the last known
position if GPS receptio n is not")
 24
3 On-road navigation
You can set up your route in different ways:
If you need a route for immediate navigation, you can select the destination and start
navigating to it right away (normal navigat")