Page 17 of 100
. The spoken instructions")
Introduction
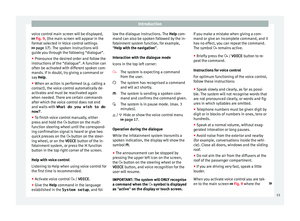
voice control main screen will be displayed,
› ›
› Fig. 9, (the main screen will appear in the
format selected in Voice control settings
››› page 17). The spoken instructions will
guide you through the following “dialogue”.
● Pronounce the desired order and follow the
ins
tructions of the “dialogue”. A function can
often be activated with different spoken com-
mands. If in doubt, try giving a command or
say Help.
● When an action is performed (e.g. calling a
cont
act), the voice control automatically de-
activates and must be reactivated again
when needed. There are certain commands
after which the voice control does not end
and waits with What do you wish to do
now? .
● To finish voice control manually, either
pre
ss and hold the button on the multi-
function steering wheel until the correspond-
ing confirmation signal is heard or give two
quick presses on the button on the steer-
ing wheel, or on the VOICE button of the in-
fotainment system, or press the function
button in the top right corner of the screen.
Help with voice control
Listening to Help when using voice control for
the first time is recommended.
● Activate voice control / VOICE.
● Give the Help comm
and in the language
established in the System setup , and fol-low the dialogue instructions. The
Help com-
m
and can also be spoken followed by the in-
fotainment system function, for example,
“Help with the navigation”.
Interaction with the dialogue mode
Icons in the top left corner:
The system is expecting a command
from the user.
The system has recognised a command
and will act shortly.
The system is sending a spoken com-
mand and confirms the command given.
The system is in pause mode. (max. 3
minutes).Hide or show the voice control menu
››› page 17.
Operation during the dialogue
While the infotainment system transmits a
spoken indication, the display will show the
symbol .
● The announcement can be stopped by
pre
ssing the upper left icon on the screen,
the button on the steering wheel or the
VOICE button, and voice recognition for the
user will resume.
IMPORTANT: The system will ONLY recognise
a command when the symbol is displayed
as “active” on the display or touch screen.
/
If you make a mistake when giving a com-
mand or giv
e an incomplete command, and it
has no effect, you can repeat the command.
The symbol remains active.
● Briefly press the / VOICE butt
on to re-
peat the command.
Instructions for voice control
For optimum functioning of the voice control,
follow these instructions:
● Speak slowly and clearly, as far as possi-
bl
e. The system will not recognise words that
are not pronounced clearly, or words and fig-
ures in which syllables are omitted.
● Telephone numbers must be given digit by
digit or in b
locks of numbers in ones, tens or
hundreds.
● Speak at a normal volume, without exag-
ger
ated intonation or long pauses.
● Avoid noise from the exterior and nearby
(for e
xample, conversations inside the vehi-
cle). Close all doors, windows and the sliding
roof.
● Do not aim the air from the diffusers at the
roof
of the passenger compartment.
● If you are driving very fast, speak a little
louder.
When
you activate voice control you are tak-
en to the main screen ››› Fig. 9 where the »
15
Page 18 of 100

Introduction
main commands and the modes in which
sy s
tem works are shown.
From here, you can tell the system which
mode you want to activate or directly give a
voice command.
When you select any of the modes (Naviga-
tion, Telephone, Radio, Media, Voice control)
a menu will appear listing the main com-
mands and, in each one, brief explanations
to help understand how they work.
Voice control (RADIO)
LISTEN TO THE RADIOListen to the radio
SELECT STATIONStation NAME STATION 1
Set station
SELECT FREQUENCYFrequency 87.9
Set frequency
CHANGING BANDSBand FM
Change band Voice control (MEDIA)
SELECT A SOURCEPlay Jukebox
a)
Listen to CD
SELECTING MUSICSelect track / album / ar-
tist / genre
PLAY MORE LIKE THIS a)Play more like this
a)
Only available for the model: “Navi System Plus”
Voice control (PHONE)
CALL CONTACTS
Call Forename Surname
Landline
Call Forename Surname
Mobile
CALL NUMBERSCall 01234
Call number
CALL LISTShow all calls
Missed calls
REDIALRedial
CALL MAILBOXCall mailbox
SMSRead out text message
SERVICEAssistance call
INFORMATIONInformation call Voice control (NAV)*
ENTER AN ADDRESS
Enter address
Navigate to City, Street,
Number
SEARCH FOR POIs
a)
Nearest car park
Search for restaurants
near destination.
HOME ADDRESSHome address
LAST DESTINATIONSLast destinations
NAVIGATE TO CONTACTSNavigate to Forename Sur-
name
ROUTE GUIDANCEStart route guidance
Route information
a)
Only available for the model: “Navi System Plus”
Voice control
VOICE CONTROL
Pardon?
Back
Main menu
Cancel voice control
Pause voice control
HELPHelp
What can I say?
PUSH-TO-TALK Note
Voice control is unavailable during parking
m anoeu
vres16
Page 19 of 100
Introduction
Voice control settings ●
Press the Infotainment button MENU to
open the m ain menu
System setup .
● Press the function button SETUP to access
the sy s
tem setup.
● Press the function button Voic
e control .
When y
ou close a menu, the changes will
take effect automatically.
Summary of the indications and function
buttons
Function button: function
Example commands (Infotainment syst.): displays voice control
examples.
Hide/show /
Voice control session start tone: when you activate voice
control a signal will be emitted. Press to deactivate the
signal.
Voice control session end tone: when you deactivate voice
control a signal will be emitted. Press to deactivate the
signal.
Input tone in voice dialogue: the input tone to confirm a
command is activated.
End tone in voice dialogue: the end tone to confirm a com-
mand is deactivated. 17
Page 20 of 100
.
› ›
›
table on page 2 Press the Infotainment
RADI")
Audio and Media Mode
Audio and Media Mode
R a
dio Mode
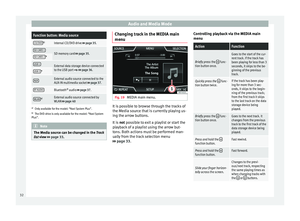
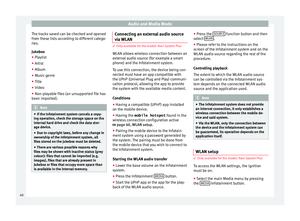
RADIO main menu Fig. 10
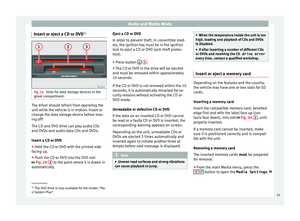
RADIO main menu Fig. 11
Radio mode: station list (FM).
› ›
›
table on page 2 Press the Infotainment
RADIO button to open
the RADIO m ain menu
›
›› Fig. 10.
RADIO main menu function buttons
Function button: function
1To change the group of memory buttons
slide a finger over the memory buttons
from left to right or vice-versa
BAND*Allows you to select the frequency band.
STATION
LISTOpens the list of currently receivable ra-
dio stations ››› page 22.
MANUALAllows you to select the frequency man-
ually ››› page 22.
VIEW
Allows you to select the information
shown on the screen ››› page 21. The
function button is only available in DAB
mode.
SETUPOpens the setup menu of the active fre-
quency band (FM, AM or DAB)
››› page 24.
/
Selects the previous or next stored sta-
tion (or available station). Adjustment of
the arrow buttons in the Settings menu
(FM, AM, DAB).
1 to 18
a)Memory buttons
››› page 21.
SCANStops the scan function (only visible
when the function is under way).
a)
1 to 15 for 6.5" screens.
Possible messages and symbols
Display: Meaning
A
View the frequency or the name of the sta-
tion and, where applicable, the radio text.
The name of the radio station and the radio
text will only be displayed if equipped with
RDS and if it is active ››› page 19.
RDS OffThe RDS radio data service is deactivated.
TPTraffic news is available ››› page 23.
No stations with traffic news are available.
The radio station is stored on a memory
button.
AF offThe tracking of alternative frequencies is
disabled.
Note
● The av ai
lability of AM and DAB bands de-
pends on the country and/or equipment. In
the event that the AM and DAB bands are not
available, the BAND function button text will
not be shown.
● Bear in mind that being underground, in
tu
nnels, in areas with tall buildings or moun-
tains can interfere with radio signals.
● Foil or metal-coated stickers attached to
the windo
ws may affect reception on vehicles
with a window aerial. 18
Page 21 of 100
 The RDS (Radio Data System) offers addition-
al
inf
ormation in FM such as the visualisation
of the station name, automatic station track-
ing (")
Audio and Media Mode
RDS radio data services (FM band) The RDS (Radio Data System) offers addition-
al
inf
ormation in FM such as the visualisation
of the station name, automatic station track-
ing (Alternative Frequencies AF), text emitted
by radio (Radio Text), traffic reports (TP) and
station types (PTY).
Due to matters of infrastructure, RDS func-
tions may be limited in certain countries, and
you may not be able to receive traffic an-
nouncements, automatic station tracking (AF)
or programme types (PTY).
Depending on the country and the unit in
question, the RDS can be deactivated in the FM setup menu ›››
page 24.
Without RDS it is not possible to use radio
data services.
Name of the station and automatic station
tracking
If equipped with the RDS function, the names
of the stations can be displayed in the main
RADIO menu and in the FM station list .
FM radio stations may occasionally or contin-
uously broadcast different content on differ-
ent regional frequencies under the same sta-
tion name (e.g. Station 3). By default, automatic station tracking always
sw
it
ches to the currently selected station's
frequency that offers the best reception, as
the vehicle travels from one area to the next.
As a result, this may cause the regional sig-
nal to be lost.
Automatic frequency changing and automatic
station tracking can be deactivated in FM setup ››› page 24.
Set a station name 1)
In some cases the name of the station is too
long. This text may be blocked/unblocked by
pressing on the station name for 3 seconds
until hearing an audible signal (a dot will ap-
pear/disappear on the left and right of the
station name).
Radio text
Some RDS-enabled stations also broadcast
additional text information known as radio
text.
Radio Text is displayed in the upper half of
the screen above the memory buttons
››› Fig. 10 A .
The R a
dio Text display can be deactivated in
FM setup ››› page 24. Note
Radio stations are responsible for the content
of the inf
ormation they transmit. Station list order
Fig. 12
Standard representation: FM station
li s
t menu Stations that are available at a certain time
ar
e di
splayed on the station list screen ( STA-
TION LIST function button). This list may
be arranged by station group, by genre or al-
phabetically. 1)
Depends on the market and unit in question.
19
Page 22 of 100
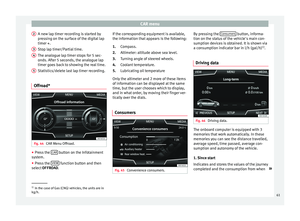
 Fig. 13
Display of memory buttons in DAB
mode. Fig. 14
Display of station information in DAB
mode. The DAB radio receiver supports t")
Audio and Media Mode
Digital radio mode (DAB, DAB+ and
audio DMB) Fig. 13
Display of memory buttons in DAB
mode. Fig. 14
Display of station information in DAB
mode. The DAB radio receiver supports the DAB,
D
AB+ and DMB-Audio br
oadcasting stand-
ards. In Europe, digital radio is transmitted via
Band III fr
equencies (174 MHz to 240 MHz)
and the L Band (1452 MHz to 1492 MHz).
The frequencies of the two bands are referred
to as “channels” and each has a channel
name (e.g. 12 A ).
Several available DAB stations are combined
into one channel in an “ensemble”.
Starting Digital radio mode ● From the RADIO main menu pr
ess the BAND function button and select
D
AB .
The D AB r
adio station that was last selected
will be played if it can still be received at the
current location.
The selected DAB station is displayed in the
upper bar of the screen; the group of selec-
ted stations is displayed below ››› Fig. 13.
Additional DAB stations (Secondary Service
Components)
Some DAB stations temporarily or perma-
nently offer additional stations , (for example,
for broadcasting sports events).
DAB stations containing additional stations
are identified in the station list by means of
the symbol . Selecting additional stations
From the main screenPress the name of the main
station
Press the memory button of
the main station
From the station listSelect the additional station
from the list
The DAB main menu shows the name of the
a
d
ditional selected station on the right
alongside the abbreviated name of the main
DAB station.
The additional stations cannot be stored.
Automatic station tracking: change from DAB
to FM
DAB is currently not available in all areas . In
areas without DAB,
is displayed in DAB ra-
dio mode.
Automatic station tracking can be activated
in DAB settings to change to the FM fre-
quency band ›››
page 25.
If reception of the currently selected DAB sta-
tion is lost (e.g. no DAB reception available),
the Infotainment system attempts to find the
station on the FM frequency band and tune to
it. Automatic station tracking between fre-
quency bands only works if the DAB station
and the FM station transmit the same station
identifier or the DAB signal indicates a corre-
sponding station on the FM frequency band.
20
Page 23 of 100
 is displayed after the station
name. When reception for the corresponding
DAB station returns, the unit will switch back")
Audio and Media Mode
Once the corresponding FM station has been
f ou
nd, (FM) is displayed after the station
name. When reception for the corresponding
DAB station returns, the unit will switch back
to DAB mode after a short time. The (FM)
display is hidden.
If the reception of the selected DAB station is
too weak and the station can no longer be
found on the FM frequency band, the radio
will be muted.
Automatic station tracking: “Soft linking ”1)
This allows service providers to indicate alter-
native stations with similar content. This way,
if the radio loses reception of a DAB station
and cannot find an alternative frequency for
it on FM or DAB, there is a possibility of tun-
ing in to a station with similar content.
Screen view menu
The function buttons refer to the menu that
appears when the View button is pressed
› ›
› Fig. 13.
Function button: function
Preset list: Memory buttons display ››› Fig. 13.
Station information: Simultaneous display of radio text and
slideshows instead of the memory buttons ››› Fig. 14.
Function button: function
Radio text: Radio text is displayed instead of memory
buttons.
Presentation: The slideshows are displayed in full screen. Note
● Not a
ll DAB stations support Radio Text and
slideshows.
● Radio stations are responsible for the con-
tent
of the information they transmit. Memory buttons
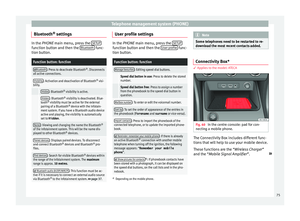
Fig. 15
RADIO main menu The stations of the currently selected fre-
quency r
ange can be stored on the numbered
function buttons in the RADIO main menu. These function buttons are called “memory
butt
ons”.
Functions of the memory buttons
Selecting the
station from the
memory but-
tonsPress the memory button corre-
sponding to the desired station.
The stored stations can only be
played by pressing the correspond-
ing memory button provided it can
be received at your current location.
Switching be-
tween memory
banks
Move your finger over the screen
from left to right or vice-versa.
OR: Press one of the function buttons
››› Fig. 15 A
The memory buttons are displayed in
three memory banks.
Storing the sta-
tion on the
memory but-
tonsSee: Storing stations
››› page 22.
Storing the sta-
tion logo on the
memory but-
tonsA station logo can be assigned to the
stations stored on the memory but-
tons ››› page 22. 1)
Only available for the model: Navi System Plus.
21
Page 24 of 100

When a s
t
ation is stored the station logo is
automatically assigned.
If there are 2 or more logos in the data")
Audio and Media Mode
Storing station logos Store automatically (only in FM and DAB
mode)
When a s
t
ation is stored the station logo is
automatically assigned.
If there are 2 or more logos in the database,
it gives the option to choose the correct one.
Store manually
The station logos can be imported from a
compatible data medium (for example, mem-
ory card or memories with USB port).
● Press the function button Set
up and then
St ation log
os .
● Press the station button where you wish to
s t
ore the logo of a station.
● Select the source where the logo is stored
(for e
xample, SD card 1 ). We recommend sav-
in g log
os in the memory unit’s root directory.
● Select the station logo.
● Repeat the process to assign other logos;
pre
ss the infotainment button RADIO to re-
t urn t
o the RADIO main menu.
● If you wish to change the logo of a memory
butt
on that already has one assigned to it, it
must first be deleted from the button in ques-
tion. Note
Not all stations are stored in the database
and ther ef
ore it is not always possible to as-
sign logos automatically. Select, tune and store stations
Selecting stations
Select stations
with the arrow
buttonsPress either the function button or
››› Fig. 10.
This will change between available
stations ››› page 24.
Selecting sta-
tions from the
station list
Press the Station
››› Fig. 10 function
button to open the station list.
Search through the list and press the
required station to select it.
To close the station list, press the BACK function button ››› Fig. 11.
The station list closes automatically
after a period of inactivity.
Manually tuning in a station frequency.
Viewing the fre-
quency dialPress the Manual function button
››› Fig. 10.
Changing the
frequency in
stepsTurn the adjustment knob.
OR: Press the + or – keys on the di-
al that appears on the screen.
Manually tuning in a station frequency.
Browsing the
frequency band
quickly
Press and hold one of the arrow but-
tons on the left of the multifunction
steering wheel. After releasing the ar-
row button, the unit automatically
tunes to the next available radio sta-
tion.
OR: Place your finger on the slider in
the frequency range and drag it to
move the button.
Hiding the fre-
quency band
Briefly press the adjustment knob
››› Fig. 1 12
Manual frequency selection is also
closed if you select a station with a
memory button. If no operation is
performed, the frequency range will
disappear after a period of inactivity.
Storing stations
Storing the sta-
tion that is cur-
rently being lis-
tened to.Press and hold
the desired memory
button ››› Fig. 10 until an audible sig-
nal is heard.
The station tuned in will be stored on
this memory button. 22