Page 41 of 100

).
Compressed audio files (MP3 and WMA) and
some video files (Podcasts, AVIs, etc.) can be
impo")
Audio and Media Mode
The “jukebox” is located on the hard drive of
the Inf ot
ainment system (SSD 1)
).
Compressed audio files (MP3 and WMA) and
some video files (Podcasts, AVIs, etc.) can be
imported from different data storage devices
to the jukebox and this used to play them.
The files will only be copied when the engine
is running. Copying copy-protected CDs and
DVDs is prohibited
Importing files
● In Media mode, press the SETUP function
b utt
on and then select Manage jukebox .
● Press the IMPOR
T function button.
● Select the desired source from the Select
source menu.
The d at
a storage device is prepared. This op-
eration may take a few seconds.
● Activate the checkboxes to the right of the
fil
es or folders to be imported.
● If Select
all is activated, all files and folders
on the d at
a storage device will be imported.
● Press the IMPORT function button.
D ependin
g on the selection, all files and fold-
ers will be imported with the indicated name
to the Jukebox . If no track information is available, the audio
fil
es will be placed in the following folders:
Audio data CD
■ Album
■ Unknown albums
■ Track. mp32)
■ Artists
■ Unknown artists
■Unknown albums
■ Track. mp32)
Functions and progress display during the
copying operation
While copying, an animation is displayed
along with the progress percentage on the
import screen.
Audio data CD: It is not possible to copy and
play files at the same time.
● Press the Canc
el function button to end the
impor t
of the whole track that is currently be-
ing imported.
● To obtain information on the status of the
import, pr
ess the Information function button.
● Press the B
A
CK function button to close
the impor t
screen with the progress informa-
tion. ●
When the fil
e import ends, a message will
appear.
Deleting files
● In Media mode, press the SETUP function
b utt
on and then select Manage jukebox .
● Press the DELETE
function button.
● Activate the checkboxes to the right of the
fi l
es or folders to be deleted.
● If Select
all is activated, all the files and
f o
lders on the data storage device will be de-
leted.
● Press the DELETE
function button. The
fi l
es and folders will be deleted according to
the selection made.
● When the files have been deleted, a mes-
sag
e will appear.
● Press the BA
CK function button to close
the menu.
Openin g s
tored audio and video files
● Change to Jukebox (SSD) c
ontent
››› page 33.
When storing the tracks, they are stored un-
der different categories and lists according to
the information available. »1)
Solid-State-Drive (SSD).
2) The name and extension of the file are examples.
39
Page 42 of 100

Audio and Media Mode
The tracks saved can be checked and opened
fr om the
se lists according to different catego-
ries.
Jukebox
● Playlist
● Artist
● Album
● Music genre
● Title
● Video
● Non-playable files (an unsupported file has
been import
ed). Note
● If the Inf
otainment system cancels a copy-
ing operation, check the storage space on the
internal hard drive and check the data stor-
age device.
● Due to copyright laws, before any change in
owner
ship of the Infotainment system, all
files stored on the jukebox must be deleted.
● There are various possible reasons why
fil
es may be shown with inactive status (grey
colour): files that cannot be imported (e.g.
images), files that are already present in
Jukebox or files that occupy more space than
is available in the internal memory. Connecting an external audio source
v
i
a WLAN 3 On
ly available for the model: Navi System Plus
WLAN al
lows wireless connection between an
external audio source (for example a smart
phone) and the Infotainment system.
To use this connection, the device being con-
nected must have an app compatible with
the UPnP (Universal Plug and Play) communi-
cation protocol, allowing the app to provide
the system with the available media content.
Conditions
● Having a compatible (UPnP) app installed
on the mo b
ile device.
● Having the mobile hotspot fou
nd in the
wireless connection configuration active
››› page 40, WLAN setup.
● Pairing the mobile device to the Infotain-
ment sy
stem using a password generated by
the system. The pairing must be done from
the mobile device that you wish to connect to
the Infotainment system.
Starting the WLAN audio transfer
● Lower the base volume on the Infotainment
sys
tem.
● Press the Infotainment MEDIA button.
● Start the UPnP app or the app for the play-
b ac
k of the WLAN audio source. ●
Pre
ss the SOURCE function button and then
sel ect
WLAN .
● Please refer to the instructions on the
s c
reen of the Infotainment system and on the
WLAN audio source regarding the rest of the
procedure.
Controlling playback
The extent to which the WLAN audio source
can be controlled via the Infotainment sys-
tem depends on the connected WLAN audio
source and the application used. Note
● The Inf ot
ainment system does not provide
an internet connection, it only establishes a
wireless connection between the mobile de-
vice and said system.
● Via the WLAN, only the connection between
the devic
e and the Infotainment system can
be guaranteed, its operation depends on the
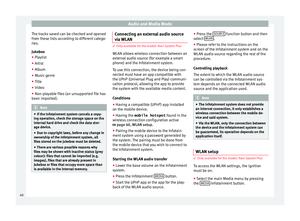
application itself. WLAN setup
3 On
ly
available for the model: Navi System Plus
To access the WLAN settings, the ignition
must be on.
● Select the main Media menu by pressing
the MEDIA Infotainment button.
40
Page 43 of 100
 butt
on will ap-
pear, together wi")
Audio and Media Mode
● Pr e
ss the SETUP function button to open
the Media Settings menu.
● Press the WLAN function button, then the
Ntwrk settings (WLAN) butt
on will ap-
pear, together with a text with information
about using the WLAN.
● Press the Ntwrk settings (WLAN)
fu
nction button, and then you will be able to
switch on/off the mobile hotspot and ac-
cess the Configuration of the WLAN net-
work.
● Press the Configuration fu
nction button
to configure the WLAN network.
Function button: function
Mobile hotspot: To switch the WLAN network on/off.
Security level: To select the code type (encryption)
WAP2 or No security . An 8-character network key
is automatically generated.
Network key: Network key automatically generated.
Press the function button to manually change the
network key. The network key must have a minimum
of 8 characters and a maximum of 63.
SSID: Name of the Infotainment system WLAN net-
work.
Do not send network name (SSID): Activate the check-
box to deactivate the visibility of the WLAN network. To save the changes made to the mobile hot-
s
pot
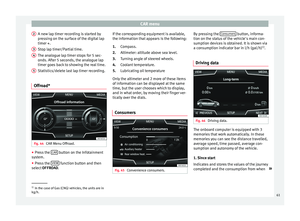
configuration, press the STORE button.DVD video mode 3 On
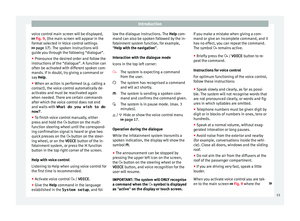
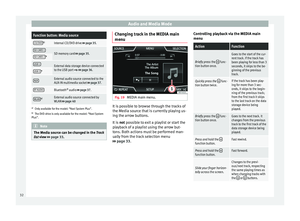
ly available for the model: Navi System Plus Fig. 26
DVD main menu. Fig. 27
DVD mode control menu. DVD video regional code
Quit
e of
ten, the playback of DVD video is
limited to certain regions (for example, to the
US and Canada) by so-called “region codes”.
These DVDs can only be played on units that
are coded for the same region. The unit's DVD drive is configured to read the
re
gional code for the region in which the ve-
hicle was originally sold.
Start DVD mode
● Insert a compatible DVD in the DVD drive.
The re
ading of DVD data may take a few sec-
onds.
The DVD's “intro” (short initial sequence) is
played. Next, the different DVD menus are
displayed.
Controlling the DVD menu
● Briefly touch the screen to activate the
fu
nction buttons in the DVD mode main
menu ››› Fig. 26.
Function button: function
SOURCEDisplay and selection of the source.
DVD
MENUTo display the control menu and return to the
main DVD screen ››› Fig. 27.
AChapter display.
BDisplays play time duration and remaining
play time.
C
: Move the control menu window.
: Minimise the control menu window.
: Maximise the control menu window.
: Close the control menu.»
41
Page 44 of 100

Audio and Media ModeFunction button: function
DUse the arrow buttons to browse the DVD
menu. Confirm the selection by pressing
OK.
EPress to open the DVD main menu.
/ To move to the next or previous chapter.
Playback stops. The function button
changes to .
Playback is resumed. The function button
changes to .
SETUPThis menu contains the Video (DVD) settings
››› page 42. Note
● The v
isual appearance of the DVD film me-
nus and the menu options which it offers are
the responsibility of the DVD manufacturer.
● The difference in behaviour of some films
when us
ing the same mode is the responsi-
bility of the DVD manufacturer.
● You may not be able to play video DVDs
which
you have burned yourself.
● The Infotainment system screen only dis-
pl
ays the image when the vehicle is stopped.
Whilst in motion, the screen disconnects (the
image), but the audio remains active. Video settings (DVD)
3 On
ly available for the model: Navi System Plus
In the
DVD mode main menu, press the
SETTINGS function button and then select the
option V
ideo settings (DVD).
Function button: function
Format: To select the screen format. If Automatic is se-
lected, it adjusts automatically to the optimal format for
the screen.
Audio channel: select language for acoustic voice output.
Subtitles: To select the subtitle language.
Enter/change PIN for parental settings: Parental settings pass-
word.
Parental settings: To select the level of protection for DVD
playback. The options in the Video setup (DVD) menu
m
a
y vary depending on the DVD or the chap-
ter currently being played.
The available audio language channels and
subtitles depend on the inserted DVD.
All or a part of the DVD video content may be
protected by means of a password (PIN) if the
DVD is compatible with parental settings. Fur-
thermore, the level of protection can be set
according to age with 1 being the least re-
strictive (appropriate for all audiences) and
8, the most restrictive (adults). Media settings ●
Select the MEDIA main menu b
y pressing
the Infotainment MEDIA button.
● Press the S
ETUP function button to open
the Media Settings menu.
Function button: function
Sound: Sound settings ››› page 87.
Manage jukeboxa)
: To import files to the jukebox or delete
stored files ››› page 38.
Mix/Repeat including subfolders: Subfolders will be inclu-
ded in the selected playback mode ››› page 26.
Bluetooth: Bluetooth ®
settings ››› page 75
WLANa)
: WLAN settings ››› page 40.
Video settings: Settings for playback of DVD videos or
files.
Remove safely: In order to prepare the external data stor-
age devices for their removal or disconnection. See also
››› page 35, Insert or eject a memory card and
››› page 36, External data storage device connected to
USB port
.
Traffic Program (TP): The TP function (traffic news station
tracking) is active ››› page 23.
a)
Only available for the model: “Navi System Plus”.
42
Page 45 of 100
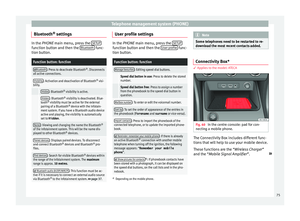
 individually or as a sli-
deshow.
The image files must be stored on a compati-
b")
Audio and Media Mode
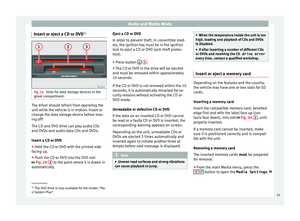
Images Fig. 28
Images main menu. Using the Ima
ge
s menu, image files can be
viewed (e.g. photos) individually or as a sli-
deshow.
The image files must be stored on a compati-
ble data storage device (e.g., a CD or an SD
card).
● Press the Infotainment MENU button and
then pr e
ss the Images function button.
● Press the SOURC
E function button to select
the sour c
e where the pictures in question are
located.
Function button: function
SOURCEViewing and selecting the source.
SELEC-
TIONOpens a list of image files.
Function button: function
The image viewed was obtained via GPS lo-
calisation and upon pressing this function
button, the navigator menu opens to start a
route to this destination.
/ Rotate the view of the image to the left or
the right.
Reset the view of the image.
To stop the playback of a slideshow. The function button changes to .
To continue the playback of a slideshow.
The function button changes to .
/
To change to the PREVIOUS
or NEXT im-
age.
The same function can be performed by
sliding your finger horizontally across the
screen.
SETUPOpen the Image settings menu. Enlarging or reducing the view
T
o en
large or reduce the view of the image
displayed:
● Turn the adjustment knob.
● OR: Stretch or reduce the image on the
s
creen using 2 fingers.
Rotating the view/image
To rotate an image, in addition to the buttons
provided for this ( / ), you can also press on the screen (e.g. with your thumb) and,
whil
e continuing to press with your thumb,
slide another finger (e.g. your index finger)
around it like a compass either clockwise (to
rotate the image to the right) or anti-clock-
wise (to turn the image to the left). This will
rotate the image 90° with respect to its cur-
rent position.
Requirements for viewing images
Image filesMaximum resolution
BMP4MP
JPEG4MP (Progressive Mode)
JPG64MP
GIF4MP
PNG4MP Image settings
Open the Image settings
menu
● In the Ima ges main menu, press the S
ETUP function button.
Function button: function
Image view: To adjust the viewing format of the image.
Automatic
: The images are shown in scale in rela-
tion to the size of the screen (the image may not be
displayed in its entirety).
» 43
Page 46 of 100
Audio and Media ModeFunction button: function
Full
: The full images are displayed on the screen.
Display time: To adjust the display time of the images
during a slideshow.
Repeat slideshow: The active slideshow will be repeated
indefinitely. 44
Page 47 of 100

Nav ig
ation, entry and control
Introduction
› ›
›
table on page 2
General information
The current vehicle position is determined by
means of the GPS satellite s")
Navigation
Navigation 1)
Nav ig
ation, entry and control
Introduction
› ›
›
table on page 2
General information
The current vehicle position is determined by
means of the GPS satellite system (Global Po-
sitioning System). Sensors in the vehicle
measure distances that have been driven.
The measurement values are compared with
the detailed map data and the road informa-
tion stored therein. Traffic reports, if any, will
also be taken into account in the route calcu-
lation (dynamic route guidance
››› page 53). Using all the data available,
the Infotainment system calculates the opti-
mum route to the destination.
The destination is defined by entering an ad-
dress or a point of interest, e.g. a petrol sta-
tion or hotel.
Spoken instructions and visual guidance on
the navigation unit and on the instrument
panel will direct you to your destination.
Depending on the country, some infotain-
ment system functions can no longer be se- lected when the vehicle is travelling above a
c
er
tain speed. This is not a malfunction, but
simply a legal requirement.
Navigation messages When the Infotainment system is unable to
r
ec
eive any data from GPS satellites (due to a
dense tree canopy, underground car park),
navigation can still continue using the vehi-
cle sensors.
Possible navigation limitations
In areas that are not or are only partially digi-
tised on the data storage device (e.g. insuffi-
cient definition of one-way streets and road
categories), the Infotainment system will still
attempt to provide route guidance.
If navigation data are unavailable or incom-
plete, the navigation system may be unable
to determine the exact vehicle position. As a
result, the navigation may not be as exact as
usual.
Navigation area and updating of navigation
data
Roads and streets are subject to constant
change (e.g. new roads, changes to street
names and building numbers). Therefore, if the navigation data is not updated, then er-
r
or
s or inaccuracies may occur during guid-
ance.
SEAT recommends updating navigation data
on a regular basis. Up to date navigation da-
ta can be acquired at a SEAT dealer.
Use navigation data from a memory
car
d. 3 On
ly available for the model: Navi System
The
SD card is initially to be found inserted in
SD card slot 2.
To update navigation data visit our website:
www.seat.com.
● Insert the memory card ››
› page 35 .
● Do not remove the memory card while test-
ing.
Wait for the testing icon to disappear.
If the inserted memory card contains valid
navigation data, the following message ap-
pears: “The source contains a valid naviga-
tion database”. It is now possible to navigate
with the memory card data. When the memo-
ry card is no longer needed by the hardware,
it will be prepared for removal ›››
page 35. »1)
Valid for: Navi System and Navi System Plus.
45
Page 48 of 100

Navigation
Note
● The in ser
ted memory card must be pre-
pared before it is ejected ››› page 35.
● Press the Infotainment button MENU ; then,
pr e
ss Setup to open the System settings
menu.
● Navigation is not possible without the SD
car
d.
● Do not remove the memory card while the
nav
igation data is in use. This could damage
the memory card!
● The navigation memory card may not be
used a
s memory for other files. The infotain-
ment system will not recognise the files
saved.
● SEAT recommends only using original SEAT
memory
cards to use navigation data. The
use of other memory cards could limit its op-
eration. Updating and installing navigation
d
at
a 3 On
ly
available for the model: Navi System Plus
The Infotainment system is equipped with an
internal navigation data memory. The re-
quired navigation data are already installed
on the system. The Infotainment system always requires the
n
av
igation data that is currently valid for this
unit in order to allow all functions to be used
in full. Using an old version may lead to er-
rors during navigation.
Updating navigation data
To update navigation data visit our website:
www.seat.com.
The navigation data must be installed after
downloading. Navigation is not possible from
the memory card.
Installing navigation data
The installation process takes about 2 hours.
If the Infotainment system is switched off, the
installation process is paused and will auto-
matically resume when switched back on.
● Switch the ignition on.
● Insert the memory card containing the navi-
gation d
ata ››› page 35.
● Press the Infotainment MENU button and
then sel ect
Setup .
● In the System settings menu, pre
ss the
System information function button.
● Press U
pd
ate software to import the stored
n av
igation data. ●
Fo
llow the instructions displayed on the
screen.
Once installed, the memory card can be re-
moved. The memory card must be prepared
for removal ››› page 35. CAUTION
Do not remove the memory card while the
n av
igation data is being installed. The memo-
ry card may be irreparably damaged! Note
● The n av
igation memory card may not be
used as memory storage for other files. The
Infotainment system will not recognise the
files saved on it.
● SEAT recommends a CLASS 10 1)
memory
c
ard for the use of navigation data. The use of
other memory cards could limit its operation. 1)
The speed class of an SD card.
46