Page 33 of 100

Audio and Media Mode
Messages and symbols on the MEDIA main
menuDisplay: Meaning
A
Displays information about the artist name,
album name and song title (CD text , ID3
tag on compressed audio files).
Audio CD: displays track information if
available via Gracenote ®a)
. If no data is
available, it only displays Track and the
number corresponding to the position it oc-
cupies on the data storage device.
B
Viewing the album cover: If there are vari-
ous covers within the same folder/album,
the system only displays one of them.
It prioritizes displaying the covers in the fol-
lowing manner:
1. Cover embedded in the file(s).
2. Image in file folder.
3. Image provided by the Gracenote ®a)
da-
tabase.
4. Default icon for the connected device.
If playing a video file, by pressing the icon
(cover) it can be played on full screen.
C
The playing time so far and time remaining
in minutes and seconds. In the case of au-
dio files with variable bit rates (VBR) the re-
maining time may vary.
RDS
Off b)The RDS radio data service is deactivated.
The RDS can be activated in the
FM setup
menu ››› page 24.
TP b)The TP function is active and can be tuned
in
››› page 23.
Display: Meaning
b)There is no traffic news station available
››› page 23.
b)DAB not available
››› page 20.
a)
Gracenote ®
is a database available on the Infotainment sys-
tem hard drive that contains information on the tracks of differ-
ent artists and albums. In order for the user to benefit from the
functions offered by Gracenote ®
, the tracks must contain the ar-
tist and/or album data (only available for the model: “Navi Sys-
tem Plus”.
b) Depends on the market and unit in question. Note
● When the medi a sour
ce is inserted, playing
will not start automatically; it is necessary for
the user to select the source. Nor will the me-
dia source change when it is ejected.
● In order to see the different covers inside of
the same a
lbum/folder, make sure that the
tracks contain different information about the
Artist or Album in its metadata. If not, you
will see the same cover for all of tracks con-
tained in the same album/folder. Change the media source
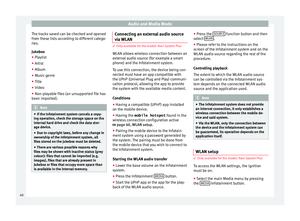
Fig. 18
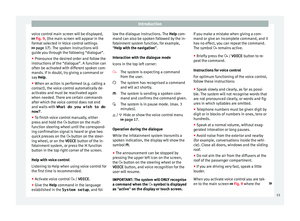
MEDIA mode: change media source. ●
From the MEDIA m ain menu, pr
ess the
MEDIA Infotainment button repeatedly to cy-
c l
e through the available media sources.
● OR: From the MEDIA main menu, press the
SOURC
E function button
››
› Fig. 18 and select
the desired media source.
In the pop-up window, the Media sources not
selected are shown as deactivated (in grey).
When a Media source that has already been
played is selected again, playback is re-
sumed from the point at which it was stop-
ped.
Optionally selectable media playback sour-
ces
Function button: Media source
JUKEBOXa)Internal hard drive (SSD) ››› page 38.» 31
Page 34 of 100
Internal CD/DVD drive
››› page 35.
SD CARD 1SD memory card ››› page 35.SD CARD 2*
USB 1External data storage device connected
to")
Audio and Media ModeFunction button: Media source
CD/DVDb)Internal CD/DVD drive
››› page 35.
SD CARD 1SD memory card ››› page 35.SD CARD 2*
USB 1External data storage device connected
to the USB port ››› page 36.USB 2*
AUXExternal audio source connected to the
AUX-IN multimedia socket ››› page 37.
BT AUDIOBluetooth ®
audio ››› page 37.
WLANa)External audio source connected by
WLAN ››› page 40
a)
Only available for the model: “Navi System Plus”.
b) The DVD drive is only available for the model: “Navi System
Plus”. Note
The Media source can be changed in the T r
ack
list view ››› page 33. Changing track in the MEDIA main
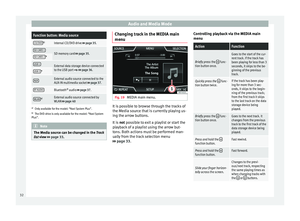
menu
Fig. 19
MEDIA main menu. It is possible to browse through the tracks of
the M
edi
a source that is currently playing us-
ing the arrow buttons.
It is not possible to exit a playlist or start the
playback of a playlist using the arrow but-
tons. Both actions must be performed man-
ually from the track selection menu
››› page 33. Controlling playback via the MEDIA main
menu
ActionFunction
Briefly press
the func-
tion button once.
Goes to the start of the cur-
rent track. If the track has
been playing for less than 3
seconds, it skips to the be-
ginning of the previous
track.
Quickly press the func-
tion button twice.If the track has been play-
ing for more than 3 sec-
onds, it skips to the begin-
ning of the previous track;
from the first track it skips
to the last track on the data
storage device being
played.
Briefly press the func-
tion button once.Goes to the next track. It
changes from the previous
track to the first track of the
data storage device being
played.
Press and hold the function button.Fast rewind.
Press and hold the function button.Fast forward.
Slide your finger horizon-
tally across the screen.
Changes to the previ-
ous/next track, respecting
the same playing times as
when changing tracks with
the
or buttons.32
Page 35 of 100

Audio and Media Mode
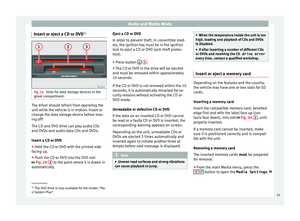
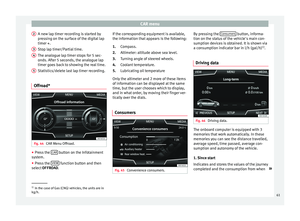
Selecting an album by its cover Fig. 20
Selecting by cover. When pressing the current cover
››
› Fig. 19
1 , it displays all the album covers available
in the activ e medi
a source. ››› Fig. 20.
It is possible to browse through all the al-
bums by sliding the covers left or right, by
using the bottom horizontal slide bar, or by
using the adjustment knob ››› Fig. 1 12 .
The sel ection b
y cover view will close after
approximately 5 seconds of inactivity and will
return to the main Media menu. Selection of a track from a list of
trac
ks Fig. 21
Media mode: list of folders on a me-
di a sour
ce. Fig. 22
Media mode: list of tracks on a Media
sour c
e. Opening a track list
● From the MEDIA m ain menu, pr
ess the
SELECTION
› ››
Fig. 19 function button to open the track list. The track that is currently play-
ing i
s highlighted ››› Fig. 22.
● Search through the track list and press the
des
ired track.
If there is information available on the track,
the track is displayed (for audio CDs) or the
name of the file (MP3), rather than Track +
number .
Overview of the function buttons on the track
list
Function button: function
AOpen the Sources menu. Select another
media source by pressing.» 33
Page 36 of 100

: Internal hard drive of")
Audio and Media ModeFunction button: function
B
Indicates the media source being explored.
If pressed it goes to the root folder of the
device indicated on the icon.
JUKEBOXa)
: Internal hard drive of the Info-
tainment system (SSD) ››› page 38.
CD/DVDb)
: Internal CD and DVD drive
››› page 35.
SD CARD 1, SD CARD 2*: SD memory card
››› page 35.
USB 1, USB 2*: External data storage device
connected to the USB port ››› page 36.
BT AUDIO: External media player connected
by Bluetooth ®
››› page 37.
AUX: Audio source connected to the AUX-IN
socket ››› page 37
WLANa)
: External audio source connected
by WLAN ››› page 40
CPress the function button to open the top
folder of the media source.
Starts playback of the first track.
Function button: function
Repeat all tracks.
Repeats all the tracks that are on the same
memory level as the track being played at
that moment. If in the
Media Settings
menu
Mix/Repeat including subfolders is acti-
vated, it also includes the subfolders
››› page 42.
Random play.
Includes all the tracks that are on the same
memory level as the track being played at
that moment. If in the
Media Settings
menu
Mix/Repeat including subfolders is acti-
vated, it also includes the subfolders
››› page 42.
CLOSE ×To close the track list.
a)
Only available for the model: “Navi System Plus”.
b) The DVD drive is only available for the model: “Navi System
Plus”. Note
The tracks, folders and playlists can also be
sel ect
ed by turning the setup button, and can
be played or opened by pressing it. Database view
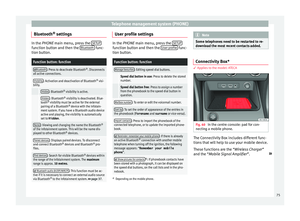
Fig. 23
Media mode: database view From the track list, press the
Sho w d
atabase view option. The content of the
c urr
ent Media source will be displayed classi-
fied by Playlists ,
Ar
ti
sts ,
A
l bums ,
M u
sical genres ,
T
r acks and
V
ideo s
› ››
Fig. 21.
When selecting one of the Artists ,
A
l
bums or
T r
acks folders, a search button appears in the
t op right
(magnifying glass) which allows a
search to be carried out in the selected cate-
gory. ››› page 12, Input masks with on-screen
keypad.
To return to the folder view, press the Show folder view option from the
S
ELE
CTION Menu.
34
Page 37 of 100
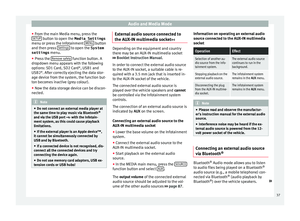
Fig. 24
Slots for data storage devices in the
glo v
e compartment. The driver should refrain from operating the
u
nit
while the vehicle is in moti")
Audio and Media Mode
Insert or eject a CD or DVD 1)Fig. 24
Slots for data storage devices in the
glo v
e compartment. The driver should refrain from operating the
u
nit
while the vehicle is in motion. Insert or
change the data storage device before mov-
ing off!
The CD and DVD drive can play audio CDs
and DVDs and audio data CDs and DVDs.
Insert a CD or DVD
● Hold the CD or DVD with the printed side
fac
ing up.
● Push the CD or DVD into the DVD slot
››
› Fig. 24 3 to the point where it is drawn in
aut om
atically. Eject a CD or DVD
In order t
o prevent theft, in convertible mod-
els, the ignition key must be in the ignition
lock to eject a CD or DVD (anti-theft protec-
tion).
● Press button
1 .
● The CD or DVD in the drive will be ejected
and mu s
t be removed within approximately
10 seconds.
If the CD or DVD is not removed within the 10
seconds, it is automatically retracted for se-
curity reasons without activating the CD or
DVD mode.
Unreadable or defective CD or DVD
If the data on an inserted CD or DVD cannot
be read or a faulty CD or DVD is inserted, the
corresponding warning appears on screen.
Depending on the unit, unreadable CDs or
DVDs are ejected 3 times automatically and
inserted again to initiate another three at-
tempts before said message is displayed. Note
● Unev en r
oad surfaces and strong vibrations
can cause playback to jump. ●
When the t emper
ature inside the unit is too
high, loading and playback of CDs and DVDs
is disabled.
● If after inserting a number of different CDs
or DVD
s and receiving the CD drive error
every time, contact a qualified workshop. Insert or eject a memory card
Depending on the features and the country,
the
v
ehicle may have one or two slots for SD
cards.
Inserting a memory card
Insert the compatible memory card, bevelled
edge first and with the label face up (con-
tacts face down), into slot ››› Fig. 24 2 , until
pr operly
inserted.
If a memory card cannot be inserted, make
sure it is positioned correctly and is compati-
ble with the unit.
Removing a memory card
The inserted memory cards must be prepared
for removal.
● From the main Media menu, press the
SETUP button to open the Media Settings
»1)
The DVD drive is only available for the model: “Na-
v i
System Plus”. 35
Page 38 of 100

Audio and Media Mode
menu or press the Infotainment MENU button
and then pr e
ss Settings to open the System
settings menu.
● Press the R
emo
ve safely function button. A
dr opdo
wn menu appears with the following
options: SD1 Card, SD2 Card*, USB1 and
USB2*. After correctly ejecting the memory
card from the system, the function button be-
comes inactive (grey colour).
● Press the inserted memory card. The mem-
ory
card “jumps” to the eject position.
● Remove the memory card.
Unre
adable memory card
If a memory card is inserted and the data
cannot be read, the relevant warning ap-
pears.
External data storage device connec-
ted t
o USB port Depending on the features and the country,
the
v
ehicle may have one or two USB connec-
tions. For their location consult the ›››
Book-
let Instruction Manual.
Audio files on an external data storage de-
vice connected to the USB port can be
played and controlled via the Infotainment
system.
Where this manual refers to external data
storage devices, this means USB mass stor- age devices containing supported audio
fil
es, such as MP3 players, iPods™ and USB
sticks.
Only supported audio files are displayed and
played. Other files are ignored.
Further operation of the external data medi-
um (changing track, selecting tracks and
playback modes) is described in the appro-
priate chapters of this manual ››› page 26.
Instructions and restrictions
Compatibility with Apple™ devices and other
media players depends on the unit.
The USB port supplies the usual USB volt-
age of 5 volts for a USB connection.
External hard disks with a capacity greater
than 32 GB must be reformatted for the
FAT32 file system in some circumstances. You
will find the necessary software and informa-
tion on the Internet.
Take into account all other instructions and
limitations regarding requirements for media
sources ››› page 26.
iPod™, iPad™ and iPhone™
Depending on the country and the equip-
ment, iPods™, iPads™ or iPhones™ can be
connected using the device's USB cable to
the USB port of the vehicle and used as
audio sources. After connecting an iPod™, iPad™ or
iPhone™, the spec
ific list views of the iPod
are displayed in the upper selection level
( Playlists , Artists, Albums ,
Tracks , Podcasts etc.).
Possible error messages after connecting an
external data storage device
Error mes-
sageCauseProcedure
The device
is not
compatibleThe external
data carrier
cannot be
played or com-
munication is
not possible
with the adapt-
er cable being
used.Check the connec-
tion and make sure
the external data
medium is working
correctly.
If possible, update
the data storage de-
vice software.
The device
does not
workCommunication
fault.Check the connec-
tion and make sure
the external data
medium is working
correctly.
Due to the large number of different data storage devi-
ces and various iPod™, iPad™ and iPhone™ genera-
tions available, it is not possible to guarantee fault-free
operation of all functions described here. Disconnecting
An
y
connected data storage devices must be
prepared before their disconnection in order
to remove them.
36
Page 39 of 100

Audio and Media Mode
● From the m
ain Media menu, press the
SETUP button to open the Media Settings
menu or pr e
ss the Infotainment MENU button
and then pr e
ss Settings to open the System
settings menu.
● Press the R
emo
ve safely function button. A
dr opdo
wn menu appears with the following
options: SD1 Card, SD2 Card*, USB1 and
USB2*. After correctly ejecting the data stor-
age device from the system, the function but-
ton becomes inactive (grey colour).
● Now the data storage device can be discon-
nected. Note
● Do not c
onnect an external media player at
the same time to play music via Bluetooth ®
and via the USB port with the Infotain-
ment system, as this could cause playback
limitations.
● If the external player is an Apple device™,
it c
annot be simultaneously connected by
USB and by Bluetooth.
● If a connected device is not recognised, dis-
connect
all the connected devices and try
connecting the device again.
● Do not use memory card adaptors, USB ex-
ten
sion cords or USB hubs! External audio source connected to
the A
UX
-IN multimedia socket Depending on the equipment and country
ther
e m
ay be an AUX-IN multimedia socket
››› Booklet Instruction Manual.
In order to connect the external audio source
to the AUX-IN socket, a suitable cable is re-
quired with a 3.5 mm jack that is inserted in-
to the AUX-IN socket of the vehicle.
The connected external audio source is
played over the vehicle speakers and cannot
be controlled via the Infotainment system
controls.
The connection of an external audio source is
indicated by AUX on the screen.
Connecting an external audio source to the
AUX-IN multimedia socket ● Lower the base volume on the Infotainment
sy s
tem.
● Connect the external audio source to the
AUX
-IN multimedia socket.
● Start playback on the external audio
sourc
e.
● In the MEDIA main menu, press the SOURCE function button and select
A
UX .
The outp ut
volume of the connected external
audio source should be adjusted to the vol-
ume of the other audio sources ›››
page 87. Information on operating an external audio
sourc
e connected to the AUX-IN multimedia
socket
OperationEffect
Selection of another au-
dio source from the Info-
tainment system.The external audio source
continues to run in the
background.
Stopping playback on the
external audio source.The infotainment system
remains in the AUX menu.
Disconnecting the plug
from the AUX-IN multime-
dia socket.The infotainment system
remains in the AUX menu. Note
● Ple
ase read and observe the manufactur-
er's instruction manual for the external audio
source.
● Interference noise may be heard if the ex-
tern
al audio source is powered from the 12-
volt power socket of the vehicle. Connecting an external audio source
v
i
a Bluetooth ® Bluetooth
®
Audio mode al lo
ws you to listen
to audio files being played on a Bluetooth ®
audio source (e.g., a mobile telephone) con-
nected via Bluetooth ®
(audio playback by
Bluetooth ®
) over the vehicle speakers. »
37
Page 40 of 100
 function")
Audio and Media Mode
Conditions
● The Bluetooth ®
audio sour c
e must support
the A2DP Bluetooth ®
profile.
● In the Bluetooth settings menu, the
Bluetooth Audio (A2DP/A
VRCP) function must
be activ at
ed ››› page 75.
Starting Bluetooth ®
audio transfer
● Activate Bluetooth ®
vi
sibility on the exter-
nal Bluetooth ®
audio source (e.g., mobile tel-
ephone).
● Lower the base volume on the Infotainment
sys
tem.
● Press the Infotainment MEDIA button.
● Press the SOURC
E function button and then
sel ect
BT audio .
● Press Find new dev
ic
e in order to connect an
e xt
ernal Bluetooth ®
audio source for the first
time ››› page 66.
● OR: Select a Bluetooth ®
e
xternal audio
source from the list.
● Please refer to the instructions on the
sc
reen of the Infotainment system and on the
Bluetooth ®
audio source regarding the rest
of the procedure.
You may still need to manually start playback
on the Bluetooth ®
source.
When playback on the Bluetooth ®
audio
source is stopped, the Infotainment system
remains in Bluetooth ®
Audio mode. Controlling playback
The ext
ent to which the Bluetooth ®
audio
source can be controlled via the Infotainment
system depends on the connected Blue-
tooth ®
audio source.
The available functions will depend on the
Bluetooth ®
Audio profile that the connected
external player supports.
With media players that support the AVRCP
Bluetooth ®
profile, playback on the Blue-
tooth ®
audio source can be automatically
started or stopped when the unit is switched
to Bluetooth ®
Audio mode or to a different
audio source. In addition, it is possible to
view or change the track via the Infotainment
system. Note
● Due t
o the large number of possible Blue-
tooth ®
audio sources, it is not possible to
guarantee fault-free operation of all descri-
bed functions.
● Always switch off the warning and service
tone
s on a connected Bluetooth ®
audio
source, e.g. key tones on a mobile telephone,
to prevent possible interference noise and
malfunctions.
● To play music, do not link the external me-
dia p
layer simultaneously to Bluetooth and
the USB interface of the infotainment system,
as this can cause limitations during playback. ●
Dependin
g on the external player connec-
ted, the response time of the system can
vary.
● Do not connect an external media player to
pl
ay music via Bluetooth ®
and via the USB
port ››› page 36 at the same time with the
Infotainment system, as this could cause playback limitations.
● If the external player is an Apple device™,
it
cannot be simultaneously connected by
USB and by Bluetooth. Jukebox (SSD)
3 On
ly
available for the model: Navi System Plus Fig. 25
Manage Jukebox38