Page 73 of 100
Possible functions
Enter telephone
numberEntering a phone number with the
keypad.
Press the function button to
make a call.
Select a contact
from the list
Enter")
Telephone management system (PHONE)Possible functions
Enter telephone
numberEntering a phone number with the
keypad.
Press the function button to
make a call.
Select a contact
from the list
Enter the first letters of the contact
to find using the keypad. The avail-
able entries appear in the phone-
book.
Select the desired contact from the
phonebook to make the call.
Redial
Press button 1
››› Fig. 54 and the
last number dialled will be shown
on the display. To make a call,
press the 1
button again.
Enter the country
code
To enter a country code, instead of
the first two digits (international
access code e.g. “00
”) you can en-
ter the character “+”.
Press the 0 button for approx. 2
seconds to add the +.
Assistance callPress the function button to obtain
help in the event of breakdown.
For this the network of SEAT deal-
erships is available to you with
their Mobile Service.
Possible functions
Information call Press the function button to obtain
information on the SEAT brand and
the additional services contracted
related to traffic and travel.
Call mailbox
Press the Voicemail function but-
ton to make the call.
OR: Press the function button
for approx. 2 seconds to make the
call.
If the number for the mailbox has
not yet been stored, enter it and
confirm with OK
. Note
Breakdown service and information calls can
inc ur an a
dditional cost on your telephone
bill. Phonebook Menu (contacts)
Fig. 55
Contacts Menu. Fig. 56
Search window. As soon as the first pairing is performed, it
m
a
y take some time for the phonebook 1)
da-
ta from the paired mobile telephone to be »1)
Depending on the device, only the contacts from
the t el
ephone memory are loaded. 71
Page 74 of 100

available on the Infotainment system. De-
pendin g on the
volume of data to be transfer-
red, the process can take several minutes. It
may be necessary to confirm")
Telephone management system (PHONE)
available on the Infotainment system. De-
pendin g on the
volume of data to be transfer-
red, the process can take several minutes. It
may be necessary to confirm the data transfer
on the mobile telephone.
The phonebook can also be opened during a
telephone call.
If the name stored in the phonebook has an
assigned photo, it can be displayed in the list
next to the name ››› page 74, Telephone
settings. For this purpose the option Show pictures for contacts must be activated in
the Phone settin g
s and your mobile phone
must support this function (check the com-
patibility list).
In the PHONE main menu, press the Contactsfunction button to access the phonebook.
Possible functions
Select a con-
tact from the
list
Search the list and press the desired
contact to make the call.
OR: If the contact has several tele-
phone numbers, first press the con-
tact and then the number to be used
to make the call.
Possible functions
Searching for a
contact in the
search window
Press the
Search function button
››› Fig. 55 to open the search window.
Enter the name of the contact to be
searched for in the window ››› Fig. 56.
As the characters are entered, a con-
tact is displayed in the input field.
The number of matching results is
displayed to the right of the input
field. Press the function button to
change to the list.
Search the list and press the desired
contact to make the call.
Opening the
detailed view
of a contact
Press the ››› Fig. 55 function but-
ton located next to the entry in the
phonebook.
All the telephone numbers are dis-
played in the detailed view, and
where applicable, the address recor-
ded for the contact in question.
Read contact
namePress the function button on the
detailed list for the voice control sys-
tem to say the contact name.
Dialling a con-
tact
Press the desired telephone number
on the detailed list to make the call.
Press the (pencil) icon to edit the
number before calling.
Send an SMS
to a contactPress the function button in the
detailed list.
Possible functions
Starting route
guidance to
the address of
a contact a)If the address details of a contact
have been stored, route guidance can
be started for the address of the con-
tact. Press the address data on the
detailed view to start route guidance.
a)
A system with a navigation function is required. Note
If you edit the number before calling, this will
on ly
be used for the call and will not be stor-
ed in the phonebook. Short messages menu (SMS)
Fig. 57
Short messages menu (Text messag-
e s). If the mobile phone connected to the HFP
pr
ofi
le also supports the SMS profile, a new
function button will appear in the top left-
hand corner of the PHONE menu, which will
72
Page 75 of 100

allow SMS messages to be received, viewed
and sent b
y the Infotainment system.
The proper operation of the functions men-
tioned above will depend on the compatib")
Telephone management system (PHONE)
allow SMS messages to be received, viewed
and sent b
y the Infotainment system.
The proper operation of the functions men-
tioned above will depend on the compatibili-
ty of the connected mobile telephone.
Buttons on the Short messages (SMS) menu
● From the PHONE main menu, pr
ess the
SMS function button.
Function button: function
New text mes-
sageTo write and send a text message (in-
cludes the possibility of accessing
templates with predefined messag-
es).
InboxTo open the received text messages
folder.
OutboxTo open the outbox folder. This is
where any unsent text messages are
stored.
SentTo open the sent text messages fold-
er.
DraftsTo select a stored unsent message.
Send contact
detailsTo send the details of a contact from
the phonebook. Possible function buttons for the submenus
Function button: function
ReadIn order for the speech control
system to play the text message.
OptionsOpen the Options
menu.
Reply with tem-
plateTo select a text template from a
list.
Delete current
text messageDeletes the text message from
the Inbox.
Display tele-
phone numberDisplays the sender's telephone
number.
ForwardTo forward a text message.
ReplyTo reply to an incoming text mes-
sage.
Enter number
To enter a telephone number or to
select a recipient from the phone-
book.
Press the Recipients function but-
ton to select multiple recipients.
RecipientsTo select multiple recipients from
the phonebook.
DeleteTo delete a text message. Call Menu (call lists)
Fig. 58
Call lists menu. ●
In the PHONE m ain menu, pr
ess the Call list function button.
● Press the FIL
TER function button.
● Select the desired call list: A
l
l ,
Mi
s sed ,
Di al
led or
R
ec eived .
If a phone number h
as been stored in the
phonebook, the call list will display the name
stored instead of the number.
If the name stored in the phonebook has an
assigned photo, it can be displayed in the
call list next to the name ››› page 74.
Possible displays in the Calls menu
Display: Meaning
Missed calls: Displays the numbers of missed and
unanswered calls.» 73
Page 76 of 100
Display: Meaning
Dialled numbers: Indicates the numbers dialled on
the mobile telephone and on the Infotainment
system telephone management system.
Received")
Telephone management system (PHONE)Display: Meaning
Dialled numbers: Indicates the numbers dialled on
the mobile telephone and on the Infotainment
system telephone management system.
Received calls: Indicates the numbers of the calls
received on the mobile telephone and on the Info-
tainment system telephone management system. Note
The availability of the call lists will depend on
the mo b
ile phone used. Speed dial buttons
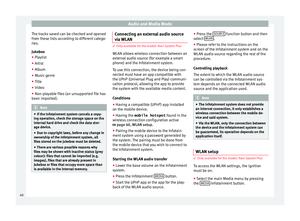
Fig. 59
PHONE main menu The speed dial buttons
››
›
Fig. 59 1 may
e ac
h be used to store a telephone number
from the phonebook. If the name stored in the phonebook has an
as
signed photo, it can be displayed on the
speed dial button ››› table on page 74.
All the speed dial buttons must be manually
edited and will be assigned to a user profile.
Up to 12 contacts can be added to the speed
dial buttons (15 in systems with the 6.5"
screen).
Possible functions
Assigning speed
dial buttons
Press a free speed dial button from
the PHONE main menu.
Select the desired contact from the
list. If the selected contact has
several telephone numbers, select
the desired number.
Editing assigned
speed dial but-
tons
Press and hold a used speed dial
button in the PHONE main menu
until the Contacts menu opens.
Select the desired contact from the
list. If the selected contact has
several telephone numbers, select
the desired number.
To close the Contacts menu with-
out applying the changes, press
the BACK
function button.
Deleting assigned
speed dial but-
tonsThe telephone numbers stored in
the speed dial buttons can be de-
leted in the User profile set-
tings
> Manage favourites
menu ››› table on page 74.
Possible functions
Dialling with
speed dial but-
tonsBriefly press an assigned speed di-
al button from the PHONE main
menu to call the telephone number
that has been stored on it. Note
The contacts stored on the speed dial buttons
DO NO T upd
ate automatically. If a contact
stored on a speed dial button is modified on
the mobile telephone, the speed dial button
will need to be reassigned. Telephone settings
Press the
S
ETUP function button from the
PHONE m ain menu.
Function button: function
Select phone: From the list, select the mobile telephone
to be connected to the hands-free profile with the Info-
tainment system.
OR: Press Find telephone to connect a new mobile tele-
phone.
Bluetooth: Open the Bluetooth setup menu
››› page 75.
User profile: Open the User profile settings menu
››› page 75. 74
Page 77 of 100

Bluetooth ®
settin g
sIn the PHONE m
ain menu, pr
ess the SETUP function button and then the
Bluet
ooth func-
tion b utt
on.
Function button: function
Blue")
Telephone management system (PHONE)
Bluetooth ®
settin g
sIn the PHONE m
ain menu, pr
ess the SETUP function button and then the
Bluet
ooth func-
tion b utt
on.
Function button: function
Bluetooth: Press to deactivate Bluetooth
®
. Disconnects
all active connections.
Visibility: Activation and deactivation of Bluetooth ®
visi-
bility.
Visible: Bluetooth ®
visibility is active.
Hidden: Bluetooth ®
visibility is deactivated. Blue-
tooth ®
visibility must be active for the external
pairing of a Bluetooth ®
device with the Infotain-
ment system. If you have a Bluetooth audio device
active and playing, the visibility is automatically
set to Hidden .
Name: Viewing and changing the name the Bluetooth ®
of the Infotainment system. This will be the name dis-
played to other Bluetooth ®
devices.
Paired devices: Displays paired devices. To disconnect
and connect Bluetooth ®
devices and Bluetooth ®
pro-
files.
Find devices: Search for visible Bluetooth ®
devices within
the range of the Infotainment system. The maximum
range is approx. 10 metres.
Bluetooth audio (A2DP/AVRCP): This function must be ac-
tive if it is necessary to connect an external audio source
via Bluetooth ®
to the Infotainment system. ››› page 37. User profile settings
In the PHONE m
ain menu, pr
ess the SETUP function button and then the
U
ser pr ofile func-
tion b utt
on.
Function button: function
Manage favourites: Editing speed dial buttons.
Speed dial button in use : Press to delete the stored
number.
Speed dial button free : Press to assign a number
from the phonebook to the speed dial button in
question.
Mailbox number: To enter or edit the voicemail number.
Sort by: To set the order of appearance of the entries in
the phonebook ( Forename and surname or vice-versa).
Import contacts: Press to import the phonebook of the
connected telephone, or to update the imported phone-
book.
Reminder: remember your mobile phone: If there is already
an active Bluetooth ®
connection with another mobile
telephone when turning off the ignition, the following
message appears: “Remember your mobile
phone ”.
Show pictures for contactsa)
: If phonebook contacts have
been stored with a photograph, it can be displayed on
the speed dial buttons, on the call lists and in the pho-
nebook.
a) Depending on the mobile phone. Note
Some telephones need to be restarted to re-
do wn
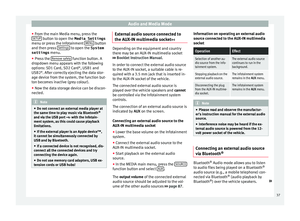
load the most recent contacts added. Connectivity Box*
3 Ap
plies to the model: ATECA Fig. 60
In the centre console: pad for con-
nectin g a mo
bile phone. The Connectivity Box includes different func-
tion
s
that will help to use your mobile device.
These functions are the “Wireless Charger ”
and the “Mobile Signal Amplifier”. »
75
Page 78 of 100

The “W ireless Charger
” al lows mobile devi-
ces with Qi technology 1)
to be charged with-
out a cable.
The “Mobile Signal Amplifier” allows you to
reduce")
Telephone management system (PHONE)
The “W ireless Charger
” al lows mobile devi-
ces with Qi technology 1)
to be charged with-
out a cable.
The “Mobile Signal Amplifier” allows you to
reduce the radiation in the vehicle and enjoy
better reception.
For safety reasons, it is recommended that
you pair the radio and the mobile device us-
ing Bluetooth and place the mobile phone on
the Connectivity Box pad, so as to have bet-
ter reception without having to handle the
mobile phone.
“Wireless Charger”
To charge your mobile phone wirelessly:
● Place your mobile device with Qi technolo-
gy 1)
in the mid
dle of the pad with the screen
facing up ››› Fig. 60.
When you do so, make sure there are no ob-
jects between the pad and the mobile phone.
The mobile phone will start charging auto-
matically. For further information about
whether your mobile device uses Qi technolo-
gy, please check your mobile phone's user
manual. “Mobile Signal Amplifier”
To e
stablish a connection with the vehicle's
external aerial:
● Place your mobile device in the middle of
the pa
d with the screen facing up ››› Fig. 60.
When you do so, make sure there are no ob-
jects between the pad and the mobile phone.
Your mobile phone will automatically be
ready to make use of the external aerial. WARNING
The mobile phone may heat up due to the
w ir
eless charging. Think about the tempera-
ture of your device before you pick it up, and
take care when removing it. Note
● Your mo
bile device must support the Qi
wireless inductive charging interface stand-
ard for proper operation.
● If your mobile phone has a cover or a pro-
tectiv
e casing, this may affect the Connectivi-
ty Box functions.
● There must be no metallic objects between
the pa
d and the mobile device that might af-
fect the wireless charging or the connection
with the external aerial. ●
The c h
arging time and the temperature
vary in accordance with the device used.
● To avoid malfunction, ensure that the mo-
bi
le phone is correctly placed on the pad.
● The maximum charging capacity is 5 W.
● Qi technology does not allow you to charge
more th
an one mobile device simultaneously.
● No improvement in the transmission quali-
ty c
an be guaranteed if there is more than
one mobile phone on the pad. 1)
Qi technology allows you to charge your mobile
phone w ir
elessly.
76
Page 79 of 100

Full Link*
Full Link* F u
ll Link technology descrip-
tion
Introduction
› ›
›
table on page 2
The Full Link system provides a way of bring-
ing together technologies that allow commu-
nication between the Infotainment System
and mobile devices:
● MirrorLink ®
● Android Auto™
● Apple CarPlay™
Dat a tr
ansfer
This communication can allow data to be
read and/or written.
From the SETTINGS ,
Dat
a tr
ansfer for SEAT apps menu, there is a checkbox to activate/deacti-
v
at
e the function, and a dropdown menu
called Use apps to operate which controls the
l ev
el of interaction between the Apps and the
System ›››
table on page 86: Deactivate,
Confirm, and Allow. Interfaces
The connection t
o Full Link is made through a
USB interface. WARNING
If a mobile terminal is not secured or is incor-
r ectly
secured in the vehicle, it could move
around the passenger compartment in the
event of a sudden driving manoeuvre, emer-
gency stop or accident, resulting in injury.
● While driving, mobile terminals must be se-
cur
ely fastened in position, outside the air-
bag deployment zones, or safely stowed
away. WARNING
Any applications that are not suitable or exe-
c ut
e incorrectly may cause damage to the ve-
hicle, accidents and serious injuries.
● SEAT recommends the use of the Apps that
SEA
T provides for this vehicle.
● To make full use of SEAT Apps, you must ac-
tivat
e the option Setup , “Data transfer for
SEAT apps” ››› page 86.
● The interaction level of the Apps on the
sys
tem must be: ALLOW.
● Protect the mobile terminal with its appli-
cation
s from improper use.
● Never make modifications to the applica-
tions.
● C
onsult the instruction manual for the mo-
bi
le terminal. WARNING
The use of applications while driving can dis-
tr act
your attention from the traffic. Distract-
ing the driver in any way can lead to an acci-
dent and cause injuries.
● Always drive carefully and responsibly. CAUTION
● In ar e
as where special regulations apply or
the use of mobile terminals is forbidden, the
mobile terminal must be switched off at all
times. The radiation produced by the mobile
terminal when switched on may interfere with
sensitive technical and medical equipment,
possibly resulting in malfunction or damage
to the equipment.
● SEAT cannot be held liable for any damage
cau
sed to the vehicle as a result of the use of
applications that are of poor quality or are
defective, the inadequate programming of
the applications, the insufficient coverage of
the network, the loss of data during trans-
mission or the improper use of mobile termi-
nals. Note
● Use of
Full Link technology may result in
high consumption of your 3G/4G data plan.
● SEAT recommends having a high battery
ch
arge on the device when connected to Full
Link. » 77
Page 80 of 100
Full Link*
●
SEA
T recommends that to use Full Link, the
“Date and time” should be correctly
configured ››› page 86.
● SEAT applications are designed to commu-
nicat
e with the vehicle and interact with it via
the Full Link connection, therefore its func-
tionality is linked to the mobile device being
connected via USB.
● You can find further information on the
tec
hnical requirements, compatible devices,
suitable applications and availability at
www.seat.com or at SEAT dealers. Is Full Link blocked?
Fig. 61
Message on Infotainment system
s c
reen. To unblock this feature, you must obtain the
ac
c
essory from your SEAT dealer. Otherwise,
a message like this will appear on the screen
whenever you select the feature ››› Fig. 61.78