2016 NISSAN NOTE radiator
[x] Cancel search: radiatorPage 2331 of 3641
MA-16
< PERIODIC MAINTENANCE >
ENGINE MAINTENANCE
ENGINE COOLANT : Draining Engine Coolant
INFOID:0000000012432253
WARNING:
Do not remove the radiator cap when the engine is hot. Serious burns could occur from high-pressure
engine coolant escaping from the radiator. Wrap a th ick cloth around the cap. Slowly push down and
turn it a quarter turn to allow built-up pressure to escape. Carefully remove the cap by pushing it down
and turning it all the way.
1. Remove front under cover. Refer to EXT-39, "
FRONT UNDER COVER : Removal and Installation".
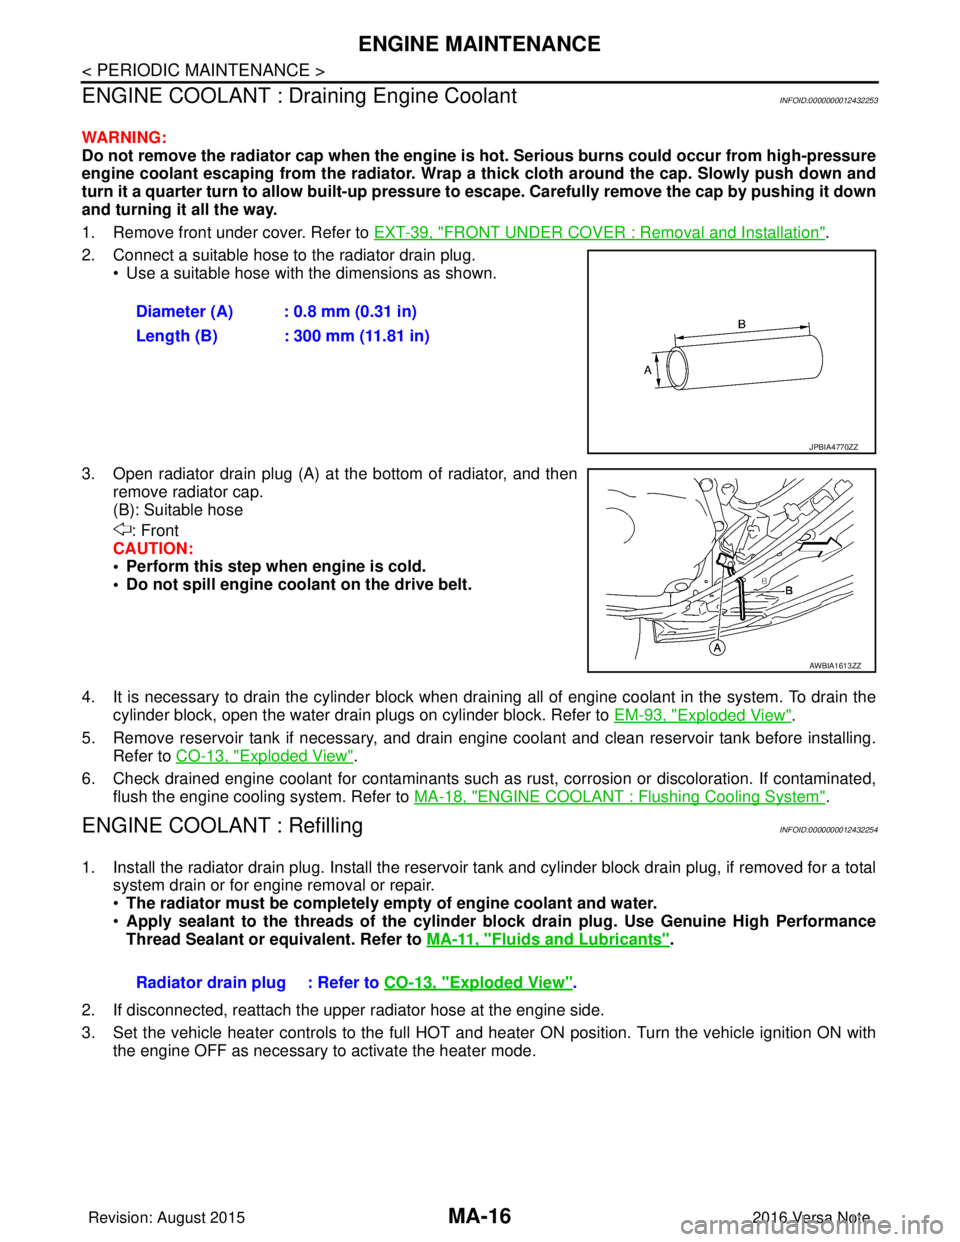
2. Connect a suitable hose to the radiator drain plug. • Use a suitable hose with the dimensions as shown.
3. Open radiator drain plug (A) at the bottom of radiator, and then remove radiator cap.
(B): Suitable hose
: Front
CAUTION:
• Perform this step when engine is cold.
• Do not spill engine coolant on the drive belt.
4. It is necessary to drain the cylinder block when drai ning all of engine coolant in the system. To drain the
cylinder block, open the water drain plugs on cylinder block. Refer to EM-93, "
Exploded View".
5. Remove reservoir tank if necessary, and drain engine coolant and clean reservoir tank before installing. Refer to CO-13, "
Exploded View".
6. Check drained engine coolant for contaminants such as rust, corrosion or discoloration. If contaminated, flush the engine cooling system. Refer to MA-18, "
ENGINE COOLANT : Flushing Cooling System".
ENGINE COOLANT : RefillingINFOID:0000000012432254
1. Install the radiator drain plug. Install the reservoir tank and cylinder block drain plug, if removed for a total
system drain or for engine removal or repair.
• The radiator must be completely empty of engine coolant and water.
• Apply sealant to the threads of the cylinder block drain plug. Use Genuine High Performance
Thread Sealant or equivalent. Refer to MA-11, "
Fluids and Lubricants".
2. If disconnected, reattach the upper radiator hose at the engine side.
3. Set the vehicle heater controls to the full HOT and heat er ON position. Turn the vehicle ignition ON with
the engine OFF as necessary to activate the heater mode. Diameter (A) : 0.8 mm (0.31 in)
Length (B) : 300 mm (11.81 in)
JPBIA4770ZZ
AWBIA1613ZZ
Radiator drain plug : Refer to
CO-13, "Exploded View".
Revision: August 2015 2016 Versa Note
cardiagn.com
Page 2332 of 3641
ENGINE MAINTENANCEMA-17
< PERIODIC MAINTENANCE >
C
DE
F
G H
I
J
K L
M B
MA
N
O A
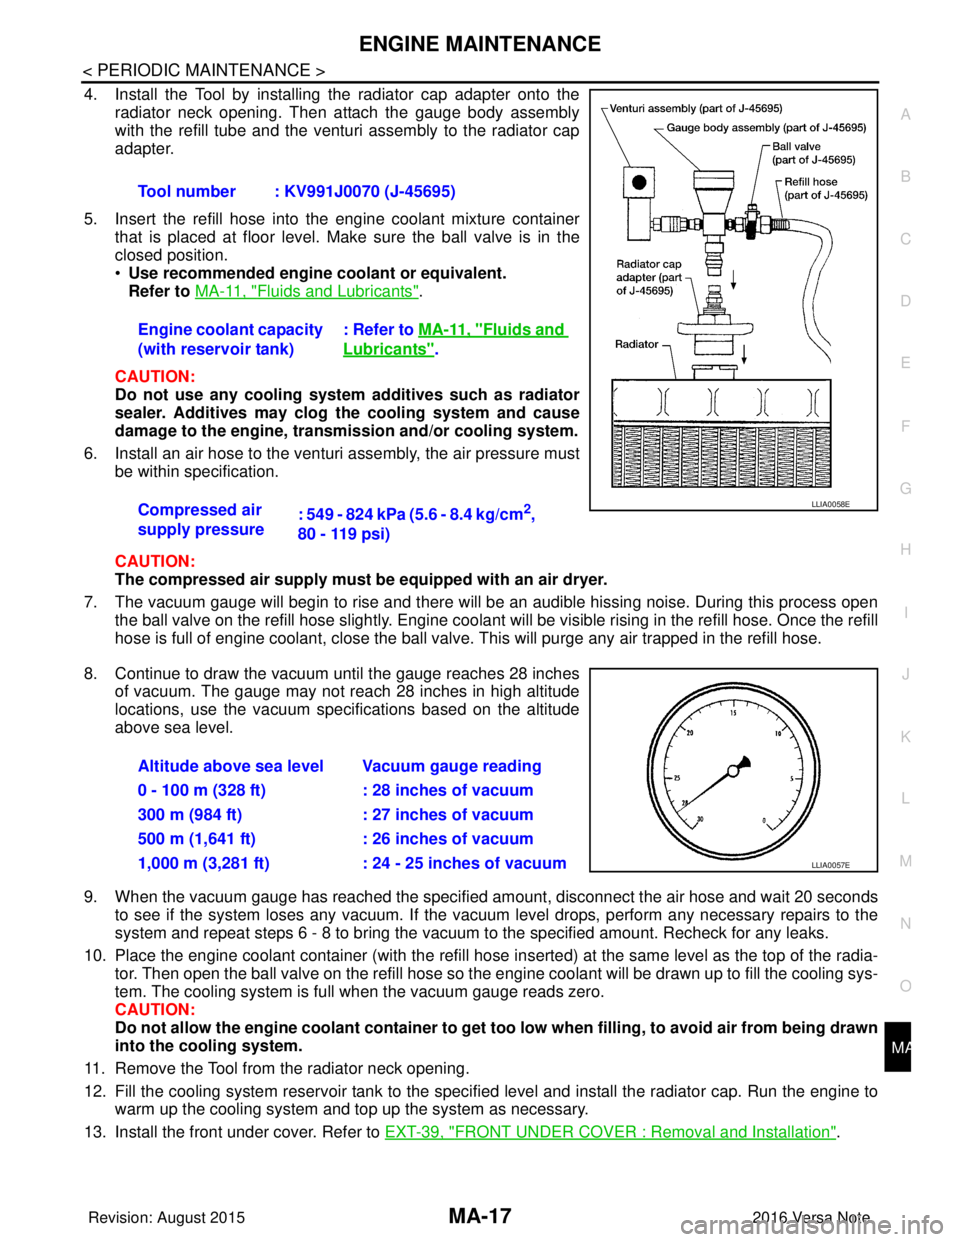
4. Install the Tool by installing the radiator cap adapter onto the
radiator neck opening. Then attach the gauge body assembly
with the refill tube and the venturi assembly to the radiator cap
adapter.
5. Insert the refill hose into the engine coolant mixture container that is placed at floor level. Make sure the ball valve is in the
closed position.
•Use recommended engine coolant or equivalent.
Refer to MA-11, "
Fluids and Lubricants".
CAUTION:
Do not use any cooling system additives such as radiator
sealer. Additives may clog the cooling system and cause
damage to the engine, transmission and/or cooling system.
6. Install an air hose to the venturi assembly, the air pressure must be within specification.
CAUTION:
The compressed air supply must be equipped with an air dryer.
7. The vacuum gauge will begin to rise and there will be an audible hissing noise. During this process open the ball valve on the refill hose slightly. Engine coolant will be visible rising in the refill hose. Once the refill
hose is full of engine coolant, close the ball valve. This will purge any air trapped in the refill hose.
8. Continue to draw the vacuum until the gauge reaches 28 inches of vacuum. The gauge may not reach 28 inches in high altitude
locations, use the vacuum specifications based on the altitude
above sea level.
9. When the vacuum gauge has reached the specified amount, disconnect the air hose and wait 20 seconds
to see if the system loses any vacuum. If the vacuum level drops, perform any necessary repairs to the
system and repeat steps 6 - 8 to br ing the vacuum to the specified amount. Recheck for any leaks.
10. Place the engine coolant container (with the refill hose in serted) at the same level as the top of the radia-
tor. Then open the ball valve on the refill hose so the engine coolant will be drawn up to fill the cooling sys-
tem. The cooling system is full when the vacuum gauge reads zero.
CAUTION:
Do not allow the engine coolant co ntainer to get too low when filling, to avoid air from being drawn
into the cooling system.
11. Remove the Tool from the radiator neck opening.
12. Fill the cooling system reservoir tank to the specif ied level and install the radiator cap. Run the engine to
warm up the cooling system and top up the system as necessary.
13. Install the front under cover. Refer to EXT-39, "
FRONT UNDER COVER : Removal and Installation".
Tool number : KV991J0070 (J-45695)
Engine coolant capacity
(with reservoir tank)
: Refer to
MA-11, "
Fluids and
Lubricants".
Compressed air
supply pressure : 549 - 824 kPa (5.6 - 8.4 kg/cm
2,
80 - 119 psi)LLIA0058E
Altitude above sea level Vacuum gauge reading
0 - 100 m (328 ft) : 28 inches of vacuum
300 m (984 ft) : 27 inches of vacuum
500 m (1,641 ft) : 26 inches of vacuum
1,000 m (3,281 ft) : 24 - 25 inches of vacuum
LLIA0057E
Revision: August 2015 2016 Versa Note
cardiagn.com
Page 2333 of 3641
MA-18
< PERIODIC MAINTENANCE >
ENGINE MAINTENANCE
ENGINE COOLANT : Flushing Cooling System
INFOID:0000000012432255
1. Install radiator drain plug and reservoir tank, if removed.
CAUTION:
Be sure to clean drain plug and install with new O-ring.
2. If water drain plugs on cylinder block were removed, close and tighten them. Refer to EM-93, "
Exploded
View".
3. Remove air duct from between air cleaner case and electric throttle control actuator. Refer to EM-26,
"Removal and Installation".
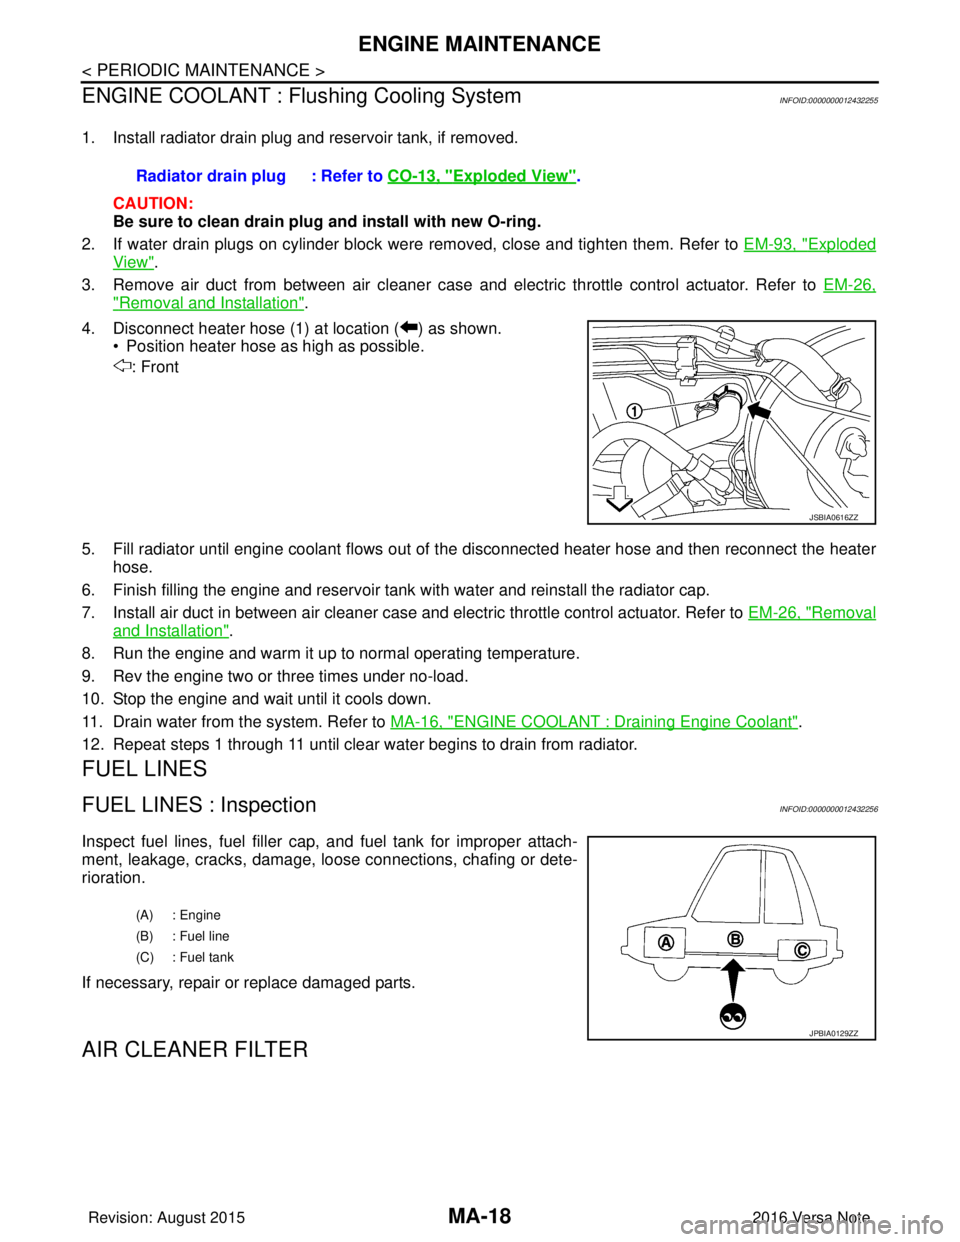
4. Disconnect heater hose (1) at location ( ) as shown. • Position heater hose as high as possible.
: Front
5. Fill radiator until engine coolant flows out of the disconnected heater hose and then reconnect the heater
hose.
6. Finish filling the engine and reservoir tank with water and reinstall the radiator cap.
7. Install air duct in between air cleaner case and electric throttle control actuator. Refer to EM-26, "
Removal
and Installation".
8. Run the engine and warm it up to normal operating temperature.
9. Rev the engine two or three times under no-load.
10. Stop the engine and wait until it cools down.
11. Drain water from the system. Refer to MA-16, "
ENGINE COOLANT : Draining Engine Coolant".
12. Repeat steps 1 through 11 until clear water begins to drain from radiator.
FUEL LINES
FUEL LINES : InspectionINFOID:0000000012432256
Inspect fuel lines, fuel filler cap, and fuel tank for improper attach-
ment, leakage, cracks, damage, l oose connections, chafing or dete-
rioration.
If necessary, repair or replace damaged parts.
AIR CLEANER FILTER
Radiator drain plug : Refer to CO-13, "Exploded View".
JSBIA0616ZZ
(A) : Engine
(B) : Fuel line
(C) : Fuel tank
JPBIA0129ZZ
Revision: August 2015 2016 Versa Note
cardiagn.com
Page 2485 of 3641

SQUEAK AND RATTLE TROUBLE DIAGNOSESMIR-11
< SYMPTOM DIAGNOSIS >
C
DE
F
G H
I
J
K
M A
B
MIR
N
O P
1. Loose harness or harness connectors.
2. Front console map/reading lamp lens loose.
3. Loose screws at console attachment points.
SEATS
When isolating seat noise it's important to note the position the seat is in and the load placed on the seat when
the noise is present. These conditions should be duplicated when verifying and isolating the cause of the
noise.
Cause of seat noise include:
1. Headrest rods and holder
2. A squeak between the seat pad cushion and frame
3. The rear seatback lock and bracket
These noises can be isolated by moving or pressing on the suspected components while duplicating the con-
ditions under which the noise occurs. Most of thes e incidents can be repaired by repositioning the component
or applying urethane tape to the contact area.
UNDERHOOD
Some interior noise may be caused by components under the hood or on the engine wall. The noise is then
transmitted into the passenger compartment.
Causes of transmitted underhood noise include:
1. Any component installed to the engine wall
2. Components that pass through the engine wall
3. Engine wall mounts and connectors
4. Loose radiator installation pins
5. Hood bumpers out of adjustment
6. Hood striker out of adjustment
These noises can be difficult to isolate since they cannot be reached from the interior of the vehicle. The best
method is to secure, move or insulate one component at a time and test drive the vehicle. Also, engine rpm or
load can be changed to isolate the noise. Repairs can usually be made by moving, adjusting, securing, or
insulating the component causing the noise.
Revision: August 2015 2016 Versa Note
cardiagn.com
Page 2824 of 3641

SQUEAK AND RATTLE TROUBLE DIAGNOSESSE-11
< SYMPTOM DIAGNOSIS >
C
DE
F
G H
I
K L
M A
B
SE
N
O P
1. Loose harness or harness connectors.
2. Front console map/reading lamp lens loose.
3. Loose screws at console attachment points.
SEATS
When isolating seat noise it's important to note the position the seat is in and the load placed on the seat when
the noise is present. These conditions should be duplicated when verifying and isolating the cause of the
noise.
Cause of seat noise include:
1. Headrest rods and holder
2. A squeak between the seat pad cushion and frame
3. The rear seatback lock and bracket
These noises can be isolated by moving or pressing on the suspected components while duplicating the con-
ditions under which the noise occurs. Most of thes e incidents can be repaired by repositioning the component
or applying urethane tape to the contact area.
UNDERHOOD
Some interior noise may be caused by components under the hood or on the engine wall. The noise is then
transmitted into the passenger compartment.
Causes of transmitted underhood noise include:
1. Any component installed to the engine wall
2. Components that pass through the engine wall
3. Engine wall mounts and connectors
4. Loose radiator installation pins
5. Hood bumpers out of adjustment
6. Hood striker out of adjustment
These noises can be difficult to isolate since they cannot be reached from the interior of the vehicle. The best
method is to secure, move or insulate one component at a time and test drive the vehicle. Also, engine rpm or
load can be changed to isolate the noise. Repairs can usually be made by moving, adjusting, securing, or
insulating the component causing the noise.
Revision: August 2015 2016 Versa Note
cardiagn.com
Page 3023 of 3641
SRC-6
< SYSTEM DESCRIPTION >
COMPONENT PARTS
Driver Air Bag Module
INFOID:0000000012430590
The driver air bag module is single or dual stage and located in the steering wheel assembly. It operates with
the SRS system in a frontal collision exceeding a specified level.
Front Passenger Air Bag ModuleINFOID:0000000012430591
The front passenger air bag module is dual stage and is located
behind the instrument panel assembly. It operates with the SRS sys-
tem in a frontal collision exceeding a specified level. Refer to SRC-
10, "SRS AIR BAG SYSTEM : System Description" for more infor-
mation.
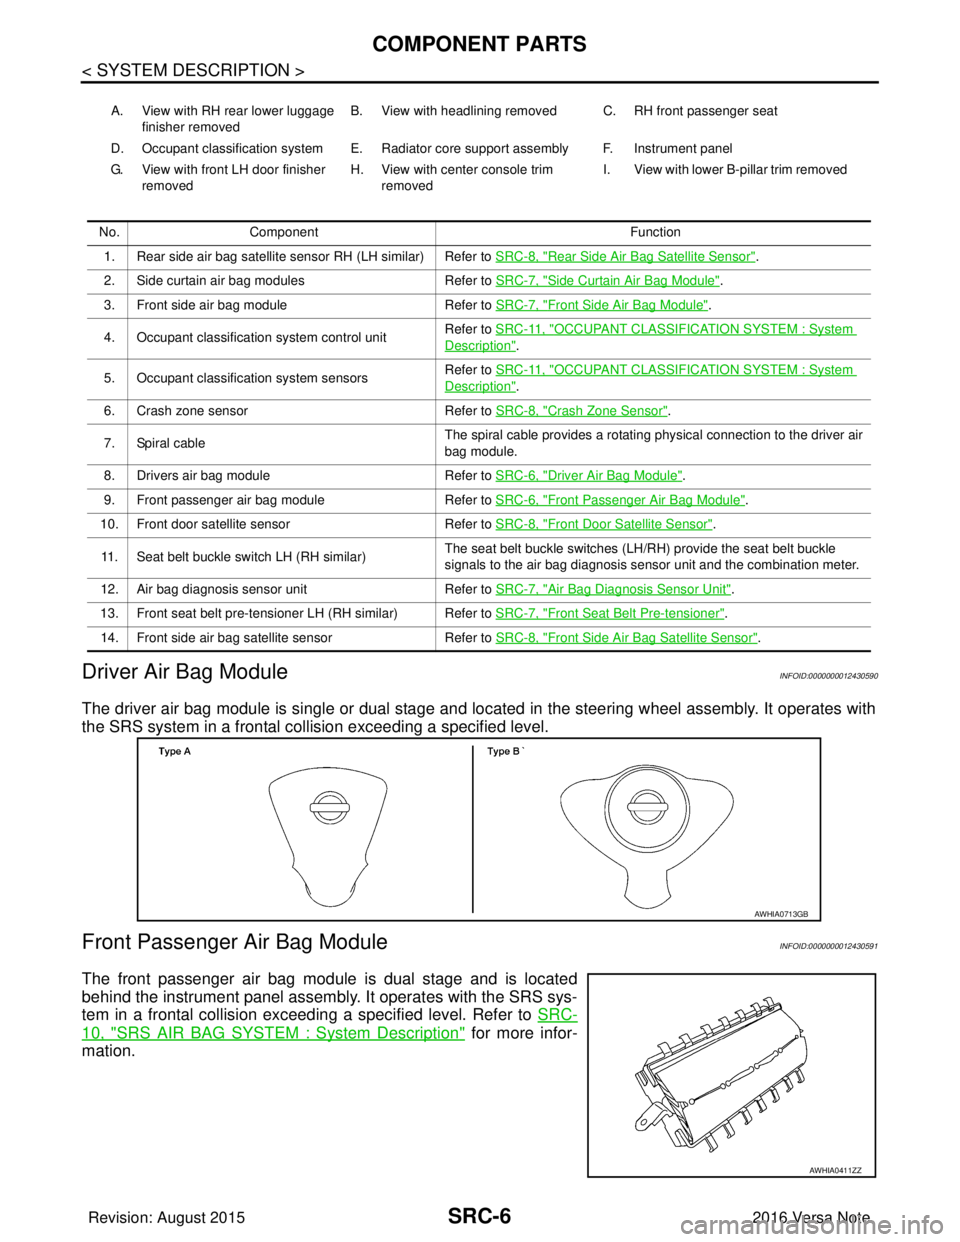
A. View with RH rear lower luggage
finisher removed B. View with headlining removed C. RH front passenger seat
D. Occupant classification system E. Radiator core support assembly F. Instrument panel
G. View with front LH door finisher removed H. View with center console trim
removed I. View with lower B-pillar trim removed
No. Component Function
1. Rear side air bag satellite sensor RH (LH similar) Refer to SRC-8, "
Rear Side Air Bag Satellite Sensor".
2. Side curtain air bag modules Refer to SRC-7, "
Side Curtain Air Bag Module".
3. Front side air bag module Refer to SRC-7, "
Front Side Air Bag Module".
4. Occupant classification system control unit Refer to SRC-11, "
OCCUPANT CLASSIFICATION SYSTEM : System
Description".
5. Occupant classification system sensors Refer to SRC-11, "
OCCUPANT CLASSIFICATION SYSTEM : System
Description".
6. Crash zone sensor Refer to SRC-8, "
Crash Zone Sensor".
7. Spiral cable The spiral cable provides a rotating physical connection to the driver air
bag module.
8. Drivers air bag module Refer to SRC-6, "
Driver Air Bag Module".
9. Front passenger air bag module Refer to SRC-6, "
Front Passenger Air Bag Module".
10. Front door satellite sensor Refer to SRC-8, "
Front Door Satellite Sensor".
11. Seat belt buckle switch LH (RH similar) The seat belt buckle switches (LH/RH) provide the seat belt buckle
signals to the air bag diagnosis sensor unit and the combination meter.
12. Air bag diagnosis sensor unit Refer to SRC-7, "
Air Bag Diagnosis Sensor Unit".
13. Front seat belt pre-tensioner LH (RH similar) Refer to SRC-7, "
Front Seat Belt Pre-tensioner".
14. Front side air bag satellite sensor Refer to SRC-8, "
Front Side Air Bag Satellite Sensor".
AWHIA0713GB
AWHIA0411ZZ
Revision: August 2015 2016 Versa Note
cardiagn.com
Page 3025 of 3641

SRC-8
< SYSTEM DESCRIPTION >
COMPONENT PARTS
Crash Zone Sensor
INFOID:0000000012430596
The crash zone sensor is located in front of the radiator. The crash
zone sensor sends signals to the air bag diagnosis sensor unit dur-
ing a frontal collision. This sensor may be identified by a yellow con-
nector.
Front Side Air Bag Satellite SensorINFOID:0000000012430597
The front side air bag satellite sensors are located on the front center
pillar LH and RH next to the seat belt pretensioners. The front side
air bag satellite sensors send signals to the air bag diagnosis sensor
unit during a side collision. These sensors may be identified by yel-
low connectors.
Rear Side Air Bag Satellite SensorINFOID:0000000012430598
The rear side air bag satellite sensors are located behind the lug-
gage side lower finisher LH and RH. The rear side air bag satellite
sensors send signals to the air bag diagnosis sensor unit during a
side collision. These sensors may be identified by yellow connec-
tors.
Front Door Satellite SensorINFOID:0000000012430599
The front door satellite sensors are located in the driver and passen-
ger doors. The front door satellite sensors send signals to the air bag
diagnosis sensor unit during a side collision. These sensors may be
identified by yellow connectors.
SRS Component ConnectorsINFOID:0000000012430600
DIRECT CONNECT
The following SRS components use direct-connect style harness connectors.
AWHIA0537ZZ
AWHIA0544ZZ
AWHIA0543ZZ
AWHIA0546ZZ
Revision: August 2015 2016 Versa Note
cardiagn.com
Page 3183 of 3641
STARTER MOTORSTR-31
< REMOVAL AND INSTALLATION >
C
DE
F
G H
I
J
K L
M A
STR
NP
O
REMOVAL AND INSTALLATION
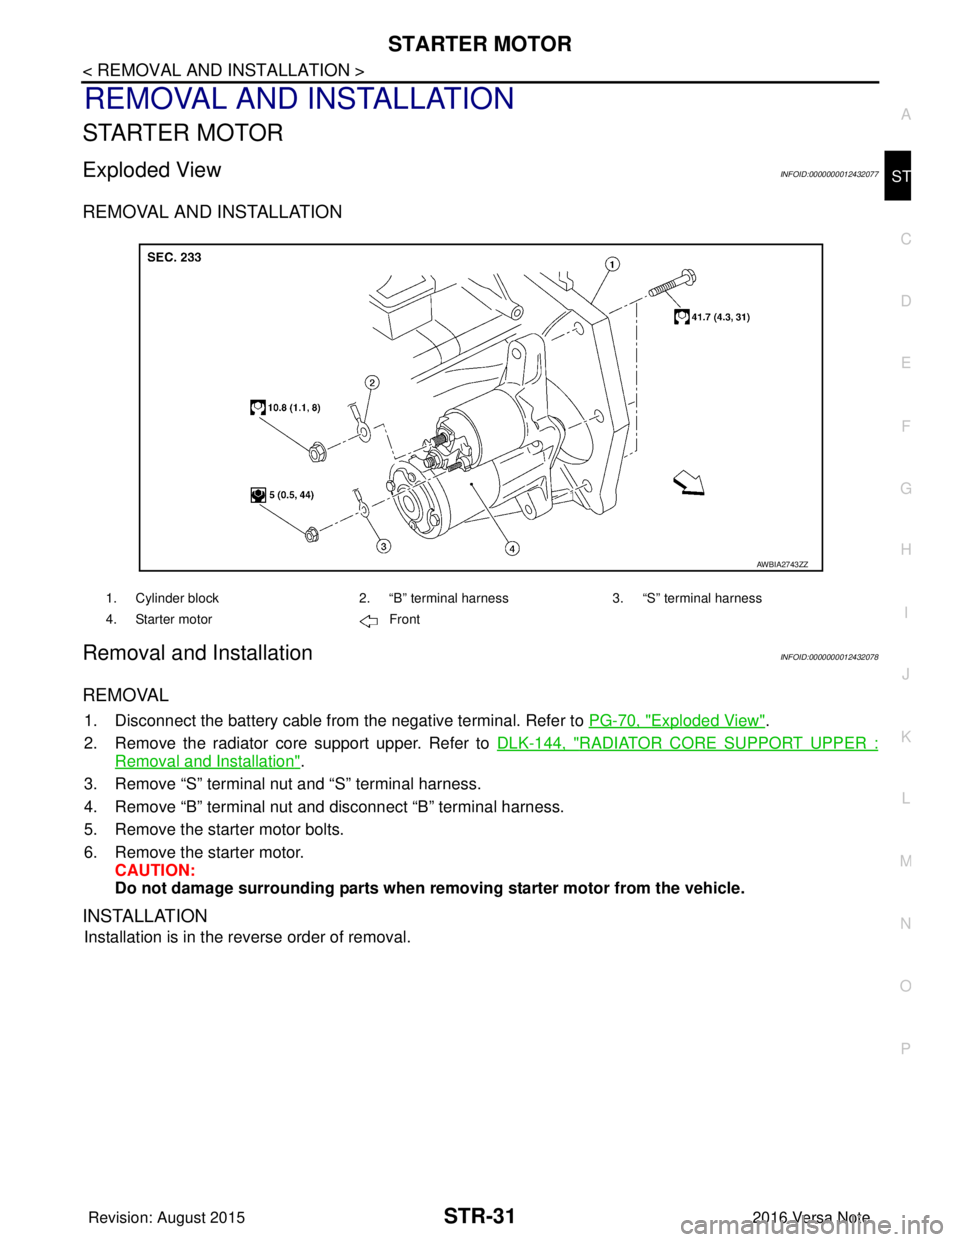
STARTER MOTOR
Exploded ViewINFOID:0000000012432077
REMOVAL AND INSTALLATION
Removal and InstallationINFOID:0000000012432078
REMOVAL
1. Disconnect the battery cable from
the negative terminal. Refer to PG-70, "Exploded View".
2. Remove the radiator core support upper. Refer to DLK-144, "
RADIATOR CORE SUPPORT UPPER :
Removal and Installation".
3. Remove “S” terminal nut and “S” terminal harness.
4. Remove “B” terminal nut and disconnect “B” terminal harness.
5. Remove the starter motor bolts.
6. Remove the starter motor. CAUTION:
Do not damage surrounding parts when re moving starter motor from the vehicle.
INSTALLATION
Installation is in the reverse order of removal.
1. Cylinder block2. “B” terminal harness3. “S” terminal harness
4. Starter motor Front
AWBIA2743ZZ
Revision: August 2015 2016 Versa Note
cardiagn.com