2016 NISSAN NOTE radiator
[x] Cancel search: radiatorPage 412 of 3641
BODY COMPONENT PARTSBRM-13
< PREPARATION >
C
DE
F
G H
I
J
L
M A
B
BRM
N
O P
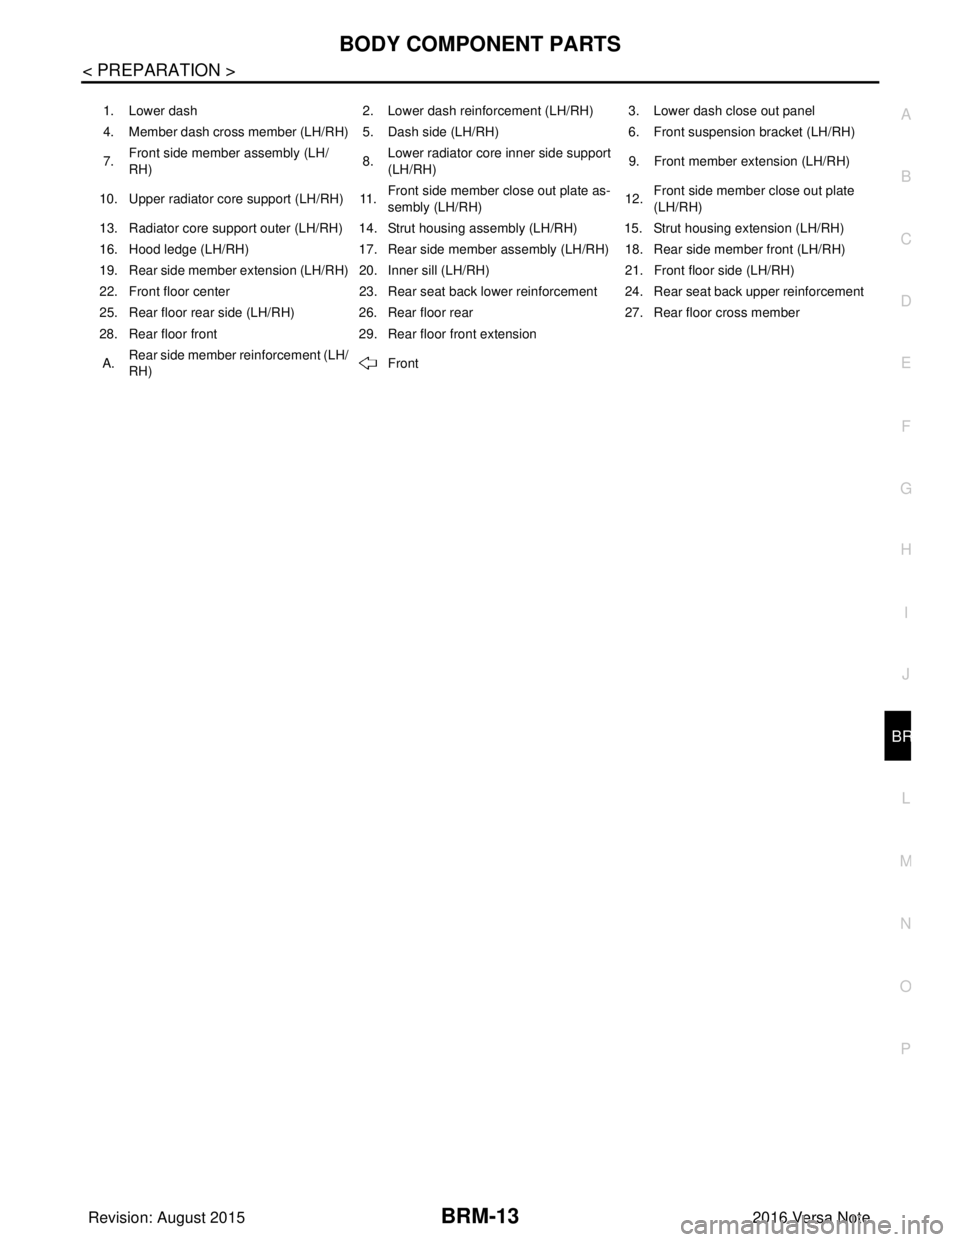
1. Lower dash 2. Lower dash reinforcement (LH/RH) 3. Lower dash close out panel
4. Member dash cross member (LH/RH) 5. Dash side (LH/RH) 6. Front suspension bracket (LH/RH)
7. Front side member assembly (LH/
RH) 8.Lower radiator core inner side support
(LH/RH) 9. Front member extension (LH/RH)
10. Upper radiator core support (LH/RH) 11. Front side member close out plate as-
sembly (LH/RH)12.
Front side member close out plate
(LH/RH)
13. Radiator core support outer (LH/RH) 14. Strut housing assembly (LH/RH) 15. Strut housing extension (LH/RH)
16. Hood ledge (LH/RH) 17. Rear side member assembly (LH/RH) 18. Rear side member front (LH/RH)
19. Rear side member extension (LH/RH) 20. Inner sill (LH/RH) 21. Front floor side (LH/RH)
22. Front floor center 23. Rear seat back lower reinforcement 24. Rear seat back upper reinforcement
25. Rear floor rear side (LH/RH) 26. Rear floor rear 27. Rear floor cross member
28. Rear floor front 29. Rear floor front extension
A. Rear side member reinforcement (LH/
RH)
Front
Revision: August 2015
2016 Versa Note
cardiagn.com
Page 424 of 3641
REPLACEMENT OPERATIONSBRM-25
< REMOVAL AND INSTALLATION >
C
DE
F
G H
I
J
L
M A
B
BRM
N
O P
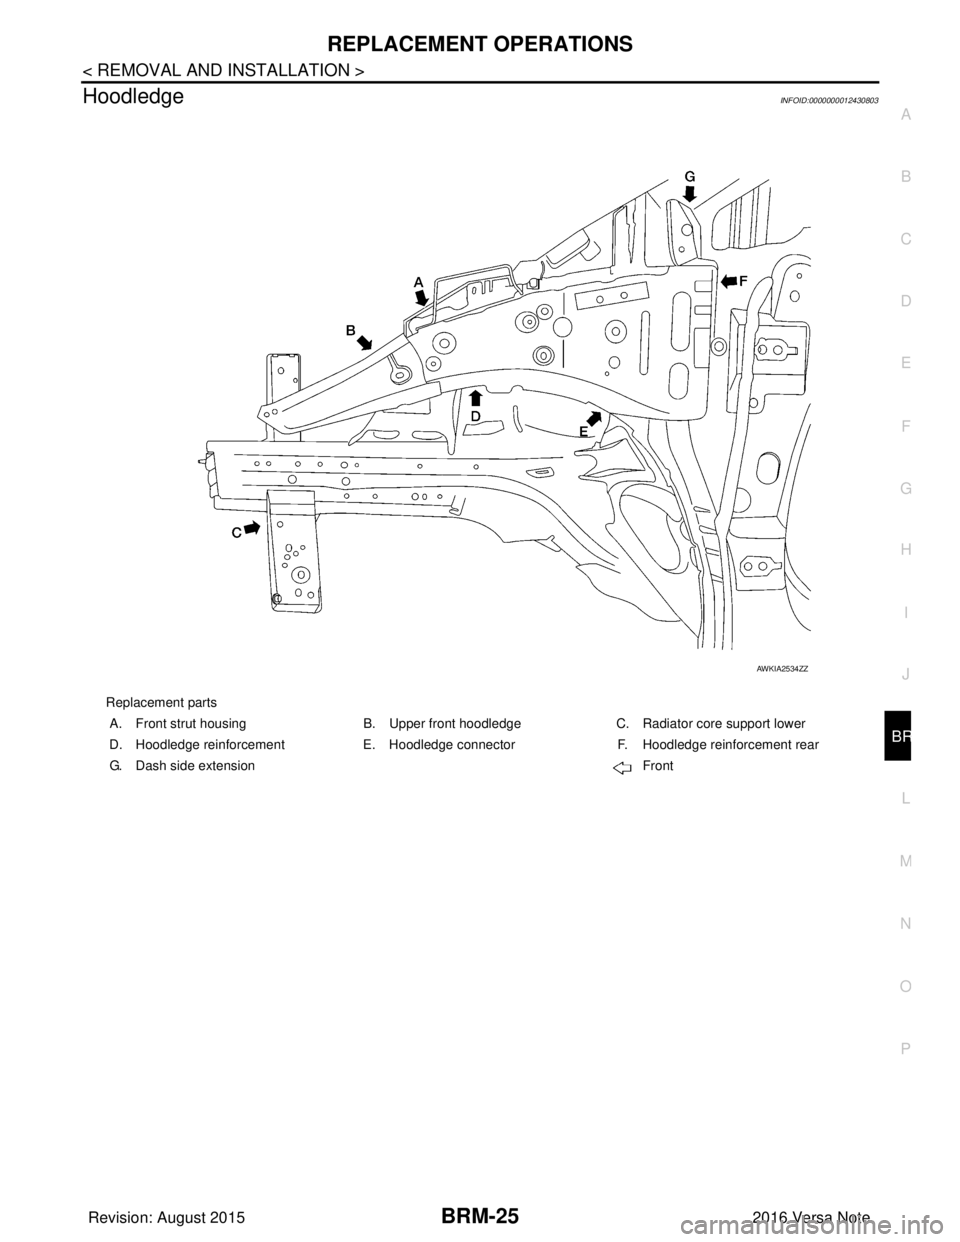
HoodledgeINFOID:0000000012430803
Replacement parts A. Front strut housing B. Upper front hoodledge C. Radiator core support lower
D. Hoodledge reinforcement E. Hoodledge connector F. Hoodledge reinforcement rear
G. Dash side extension Front
AWKIA2534ZZ
Revision: August 2015 2016 Versa Note
cardiagn.com
Page 442 of 3641
BODY ALIGNMENTBRM-43
< SERVICE DATA AND SPECIFICATIONS (SDS)
C
DE
F
G H
I
J
L
M A
B
BRM
N
O P
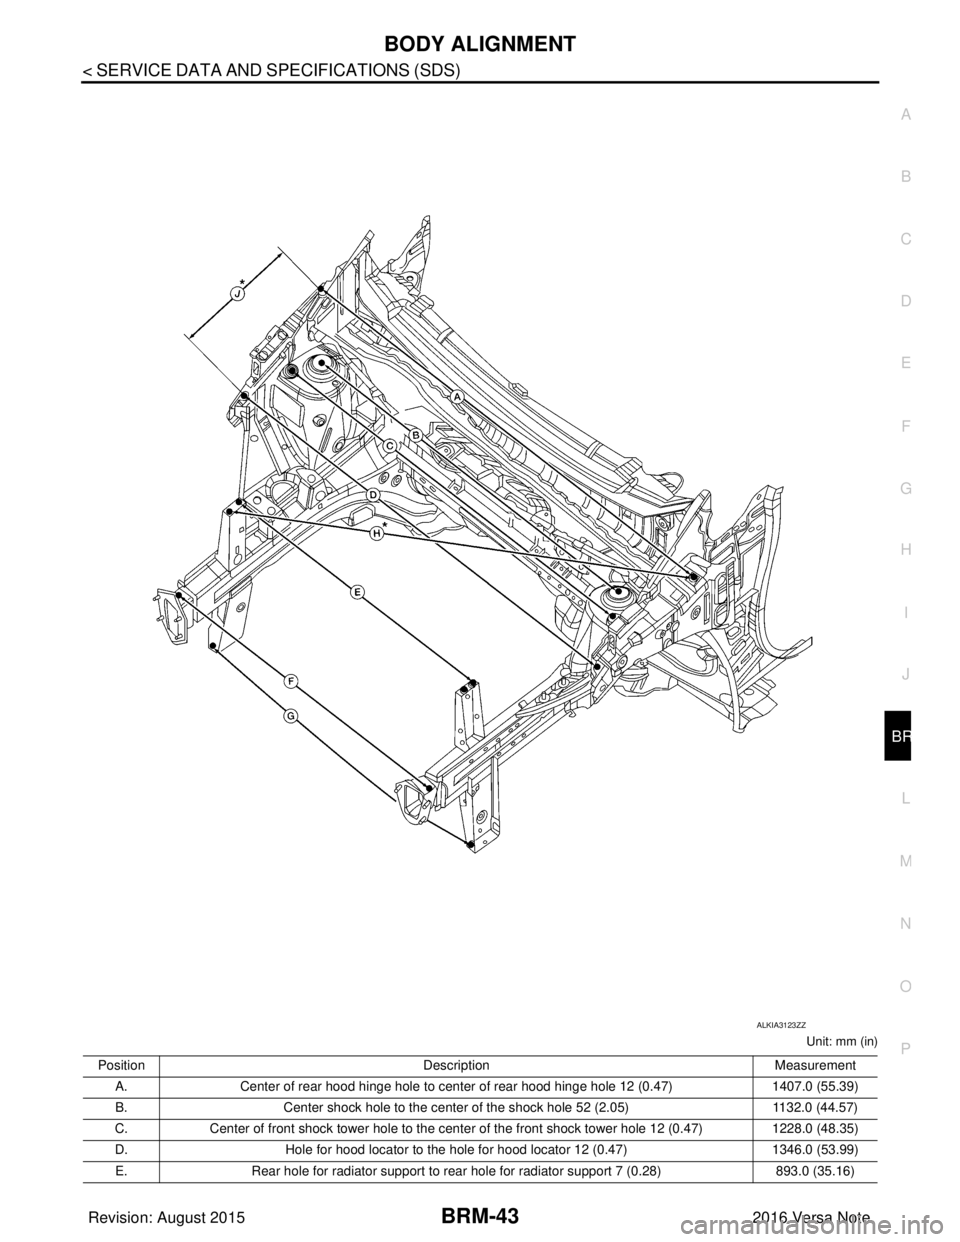
Unit: mm (in)
ALKIA3123ZZ
Position Description Measurement
A. Center of rear hood hinge hole to center of rear hood hinge hole 12 (0.47) 1407.0 (55.39)
B. Center shock hole to the center of the shock hole 52 (2.05) 1132.0 (44.57)
C. Center of front shock tower hole to the center of the front shock tower hole 12 (0.47) 1228.0 (48.35)
D. Hole for hood locator to the hole for hood locator 12 (0.47) 1346.0 (53.99)
E. Rear hole for radiator support to rear hole for radiator support 7 (0.28) 893.0 (35.16)
Revision: August 2015 2016 Versa Note
cardiagn.com
Page 443 of 3641
BRM-44
< SERVICE DATA AND SPECIFICATIONS (SDS)
BODY ALIGNMENT
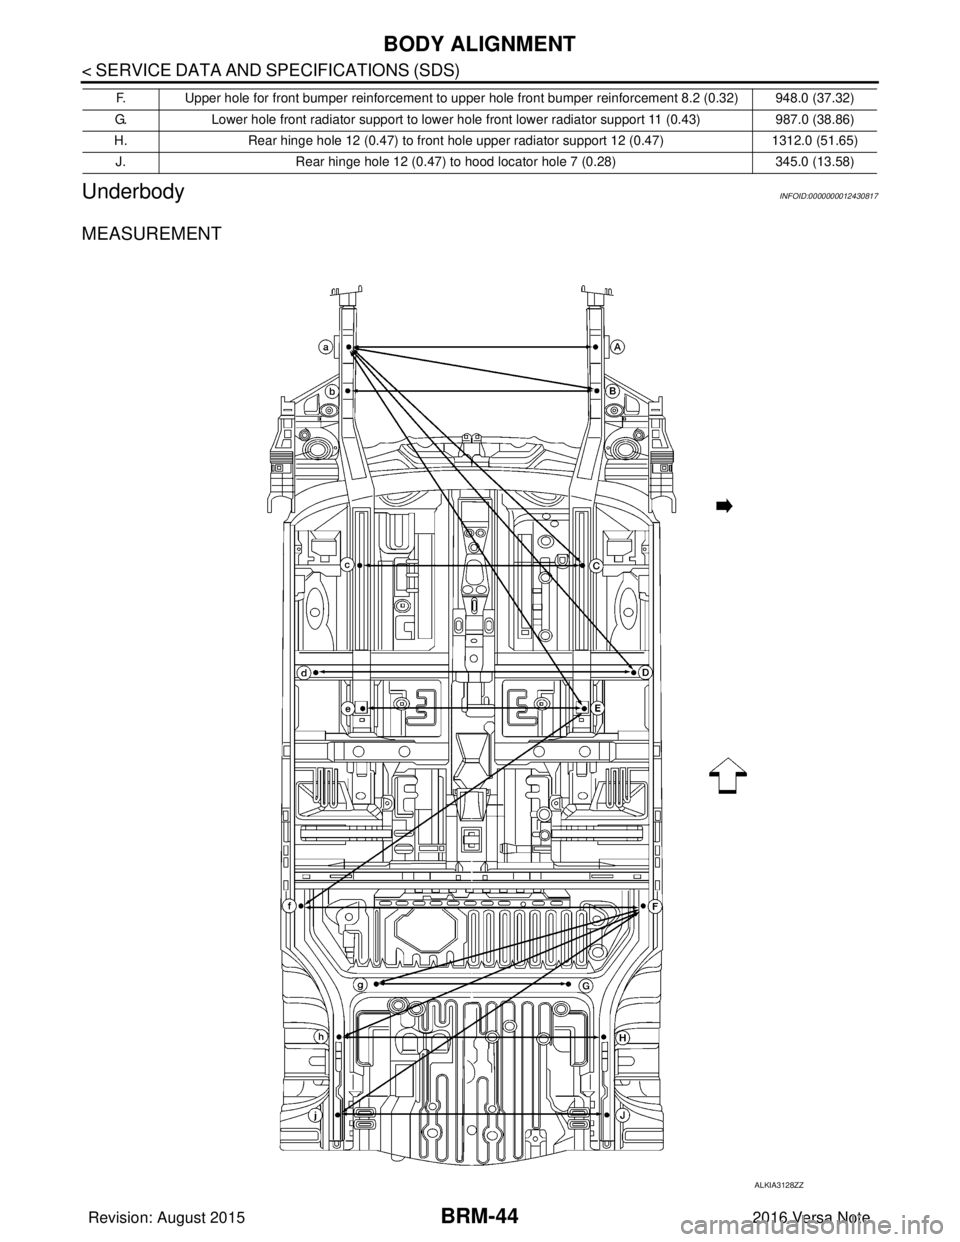
Underbody
INFOID:0000000012430817
MEASUREMENT
F. Upper hole for front bumper reinforcement to upper hole front bumper reinforcement 8.2 (0.32) 948.0 (37.32)
G. Lower hole front radiator support to lower hole front lower radiator support 11 (0.43) 987.0 (38.86)
H. Rear hinge hole 12 (0.47) to front hole upper radiator support 12 (0.47) 1312.0 (51.65)
J. Rear hinge hole 12 (0.47) to hood locator hole 7 (0.28) 345.0 (13.58)
ALKIA3128ZZ
Revision: August 2015 2016 Versa Note
cardiagn.com
Page 624 of 3641
CHG
GENERATORCHG-29
< REMOVAL AND INSTALLATION >
C
DE
F
G H
I
J
K L
B A
O P
N
REMOVAL AND INSTALLATION
GENERATOR
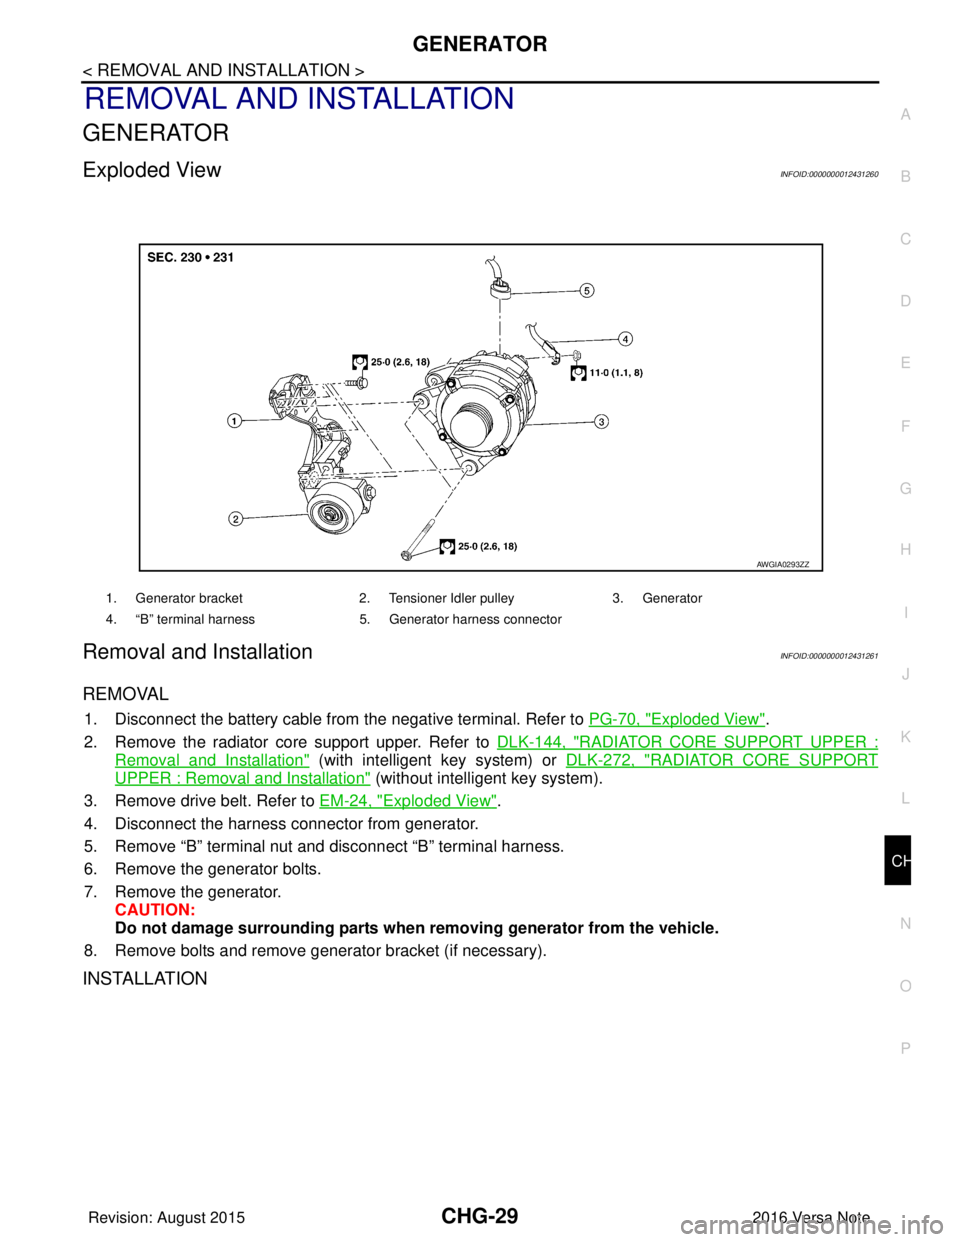
Exploded ViewINFOID:0000000012431260
Removal and InstallationINFOID:0000000012431261
REMOVAL
1. Disconnect the battery cable from
the negative terminal. Refer to PG-70, "Exploded View".
2. Remove the radiator core support upper. Refer to DLK-144, "
RADIATOR CORE SUPPORT UPPER :
Removal and Installation" (with intelligent key system) or DLK-272, "RADIATOR CORE SUPPORT
UPPER : Removal and Installation" (without intelligent key system).
3. Remove drive belt. Refer to EM-24, "
Exploded View".
4. Disconnect the harness connector from generator.
5. Remove “B” terminal nut and disconnect “B” terminal harness.
6. Remove the generator bolts.
7. Remove the generator. CAUTION:
Do not damage surrounding parts when removing generator from the vehicle.
8. Remove bolts and remove generator bracket (if necessary).
INSTALLATION
1. Generator bracket 2. Tensioner Idler pulley3. Generator
4. “B” terminal harness 5. Generator harness connector
AWGIA0293ZZ
Revision: August 2015 2016 Versa Note
cardiagn.com
Page 693 of 3641

DLK-4
DOOR LOCK OPERATION WARNING DOES
NOT OPERATE .............................................. .
132
Diagnosis Procedure ........................................... ..132
KEY ID WARNING DOES NOT OPERATE .....133
Diagnosis Procedure ........................................... ..133
SQUEAK AND RATTLE TROUBLE DIAG-
NOSES .............................................................
134
Work Flow ............................................................ ..134
Generic Squeak and Rattle Troubleshooting .........135
Diagnostic Worksheet ............................................138
REMOVAL AND INSTALLATION ..............140
HOOD .............................................................. .140
Exploded View ..................................................... ..140
HOOD ASSEMBLY ................................................ ..140
HOOD ASSEMBLY : Removal and Installation .....140
HOOD ASSEMBLY : Adjustme nt ........................ ..141
HOOD HINGE ......................................................... ..142
HOOD HINGE : Removal and Installation .............142
HOOD SUPPORT ROD .......................................... ..143
HOOD SUPPORT ROD : Removal and Installa-
tion ....................................................................... ..
143
RADIATOR CORE SUPPORT .........................144
Exploded View ..................................................... ..144
RADIATOR CORE SUPPORT UPPER ....................144
RADIATOR CORE SUPPO RT UPPER : Removal
and Installation .................................................... ..
144
RADIATOR CORE SUPPORT LOWER ................. ..145
RADIATOR CORE SUPPORT LOWER : Removal
and Installation ......................................................
145
FRONT FENDER .............................................147
Exploded View ..................................................... ..147
Removal and Installation .......................................147
FRONT DOOR .................................................149
Exploded View ..................................................... ..149
DOOR ASSEMBLY ................................................ ..149
DOOR ASSEMBLY : Removal and Installation .....149
DOOR ASSEMBLY : Adjustme nt ........................ ..150
DOOR STRIKER .................................................... ..151
DOOR STRIKER : Removal and Installation .........151
DOOR STRIKER : Adjustment ..............................151
DOOR HINGE ......................................................... ..152
DOOR HINGE : Removal and Installation .............152
DOOR CHECK LINK .............................................. ..152
DOOR CHECK LINK : Removal and Installation ...152
REAR DOOR .................................................. .154
Exploded View ..................................................... ..154
DOOR ASSEMBLY .................................................154
DOOR ASSEMBLY : Removal and Installation ....154
DOOR ASSEMBLY : Adjustme nt ..........................156
DOOR STRIKER .................................................... .157
DOOR STRIKER : Removal and Installation ........157
DOOR STRIKER : Adjustment ............................. .157
DOOR HINGE ......................................................... .157
DOOR HINGE : Removal and Installation ............157
DOOR CHECK LINK .............................................. .158
DOOR CHECK LINK : Removal and Installation ..158
BACK DOOR .................................................. ..159
Exploded View ..................................................... .159
BACK DOOR ASSEMBLY ......................................159
BACK DOOR ASSEMBLY : Removal and Installa-
tion ....................................................................... .
159
BACK DOOR ASSEMBLY : Adjustment ...............161
BACK DOOR STRIKER ......................................... .162
BACK DOOR STRIKER : Removal and Installa-
tion ........................................................................
162
BACK DOOR STRIKER : Adjustment ...................162
BACK DOOR HINGE ............................................. .163
BACK DOOR HINGE : Removal and Installation ..163
BACK DOOR STAY ............................................... .163
BACK DOOR STAY : Removal and Installation ....163
BACK DOOR STAY : Disposal ............................ .163
BACK DOOR WEATHER-STRIP ........................... .164
BACK DOOR WEATHER-STRIP : Removal and
Installation .............................................................
164
HOOD LOCK ....................................................165
Exploded View ..................................................... .165
HOOD LOCK .......................................................... .165
HOOD LOCK : Removal and Installation ..............165
HOOD LOCK : Inspection .....................................166
HOOD LOCK RELEASE CABLE ........................... .166
HOOD LOCK RELEASE CABLE : Removal and
Installation .............................................................
166
HOOD LOCK RELEASE HANDLE ........................ .167
HOOD LOCK RELEASE HANDLE : Removal and
Installation .............................................................
167
FRONT DOOR LOCK .......................................168
Exploded View ..................................................... .168
DOOR LOCK .......................................................... .168
DOOR LOCK : Removal and Installation ..............168
INSIDE HANDLE .................................................... .169
INSIDE HANDLE : Removal and Installation ........169
OUTSIDE HANDLE ................................................ .170
OUTSIDE HANDLE : Removal and Installation ....170
Revision: August 2015 2016 Versa Note
cardiagn.com
Page 696 of 3641
DLK-7
C
DE
F
G H
I
J
L
M A
B
DLK
N
O P
Diagnosis Procedure ..........................................
..
252
WARNING CHIME FUNCTION ........................254
Description .......................................................... ..254
Component Function Check ................................254
Diagnosis Procedure .............................................254
HAZARD FUNCTION ..................................... ..255
Description .......................................................... ..255
Component Function Check ................................255
Diagnosis Procedure .............................................255
KEYFOB ID SET UP WITH CONSULT ............256
ID Code Entry Procedure .................................... ..256
KEYFOB ID SET UP WITHOUT CONSULT ....257
ID Code Entry Procedure .................................... ..257
SYMPTOM DIAGNOSIS ............................259
POWER DOOR LOCK SYSTEM SYMPTOMS ..259
Symptom Table ................................................... ..259
REMOTE KEYLESS ENTRY SYSTEM SYMP-
TOMS ................................................................
260
Symptom Table ................................................... ..260
SQUEAK AND RATTLE TROUBLE DIAG-
NOSES .............................................................
262
Work Flow ........................................................... ..262
Generic Squeak and Rattle Troubleshooting ........263
Diagnostic Worksheet ...........................................266
REMOVAL AND INSTALLATION .............268
HOOD ............................................................. ..268
Exploded View .................................................... ..268
HOOD ASSEMBLY .................................................268
HOOD ASSEMBLY : Removal and Installation ... ..268
HOOD ASSEMBLY : Adjustment ..........................269
HOOD HINGE ........................................................ ..270
HOOD HINGE : Removal and Installation .............270
HOOD SUPPORT ROD ......................................... ..271
HOOD SUPPORT ROD : Removal and Installa-
tion ........................................................................
271
RADIATOR CORE SUPPORT .........................272
Exploded View .................................................... ..272
RADIATOR CORE SUPPORT UPPER ................. ..272
RADIATOR CORE SUPPORT UPPER : Removal
and Installation ......................................................
272
RADIATOR CORE SUPPORT LOWER ................ ..273
RADIATOR CORE SUPPORT LOWER : Removal
and Installation ......................................................
273
FRONT FENDER ..............................................275
Exploded View ......................................................275
Removal and Installation .......................................275
FRONT DOOR .................................................277
Exploded View ..................................................... ..277
DOOR ASSEMBLY ..................................................277
DOOR ASSEMBLY : Removal and Installation .....277
DOOR ASSEMBLY : Adjustme nt ..........................278
DOOR STRIKER .................................................... ..279
DOOR STRIKER : Removal and Installation .........279
DOOR STRIKER : Adjustment ..............................279
DOOR HINGE ........................................................ ..280
DOOR HINGE : Removal and Installation .............280
DOOR CHECK LINK .............................................. ..280
DOOR CHECK LINK : Removal and Installation ...280
REAR DOOR ...................................................281
Exploded View .......................................................281
DOOR ASSEMBLY ..................................................281
DOOR ASSEMBLY : Removal and Installation .....281
DOOR ASSEMBLY : Adjustme nt ..........................283
DOOR STRIKER .................................................... ..284
DOOR STRIKER : Removal and Installation .........284
DOOR STRIKER : Adjustment ..............................284
DOOR HINGE ........................................................ ..284
DOOR HINGE : Removal and Installation .............284
DOOR CHECK LINK .............................................. ..285
DOOR CHECK LINK : Removal and Installation ...285
BACK DOOR ...................................................286
Exploded View ..................................................... ..286
BACK DOOR ASSEMBLY .................................... ..286
BACK DOOR ASSEMBLY : Removal and Installa-
tion .........................................................................
286
BACK DOOR ASSEMBLY : Adjustment ................288
BACK DOOR STRIKER ......................................... ..289
BACK DOOR STRIKER : Removal and Installa-
tion .........................................................................
289
BACK DOOR STRIKER : Adjustment ...................289
BACK DOOR HINGE ............................................. ..290
BACK DOOR HINGE : Removal and Installation ..290
BACK DOOR STAY .................................................290
BACK DOOR STAY : Removal and Installation ....290
BACK DOOR STAY : Disposal ..............................290
BACK DOOR WEATHER-STRIP .......................... ..291
BACK DOOR WEATHER-STRIP : Removal and
Installation .............................................................
291
HOOD LOCK ...................................................292
Exploded View .......................................................292
HOOD LOCK .......................................................... ..292
HOOD LOCK : Removal and Installation ...............292
HOOD LOCK : Inspection ......................................293
Revision: August 2015 2016 Versa Note
cardiagn.com
Page 826 of 3641
![NISSAN NOTE 2016 Service Repair Manual SQUEAK AND RATTLE TROUBLE DIAGNOSESDLK-137
< SYMPTOM DIAGNOSIS > [WITH INTELLIGENT KEY SYSTEM]
C
D
E
F
G H
I
J
L
M A
B
DLK
N
O P
3. Loose screws at console attachment points.
SEATS
When isolating seat NISSAN NOTE 2016 Service Repair Manual SQUEAK AND RATTLE TROUBLE DIAGNOSESDLK-137
< SYMPTOM DIAGNOSIS > [WITH INTELLIGENT KEY SYSTEM]
C
D
E
F
G H
I
J
L
M A
B
DLK
N
O P
3. Loose screws at console attachment points.
SEATS
When isolating seat](/manual-img/5/57363/w960_57363-825.png)
SQUEAK AND RATTLE TROUBLE DIAGNOSESDLK-137
< SYMPTOM DIAGNOSIS > [WITH INTELLIGENT KEY SYSTEM]
C
D
E
F
G H
I
J
L
M A
B
DLK
N
O P
3. Loose screws at console attachment points.
SEATS
When isolating seat noise it's important to note the position the seat is in and the load placed on the seat when
the noise is present. These conditions should be duplicated when verifying and isolating the cause of the
noise.
Cause of seat noise include:
1. Headrest rods and holder
2. A squeak between the seat pad cushion and frame
3. The rear seatback lock and bracket
These noises can be isolated by moving or pressing on the suspected components while duplicating the con-
ditions under which the noise occurs. Most of thes e incidents can be repaired by repositioning the component
or applying urethane tape to the contact area.
UNDERHOOD
Some interior noise may be caused by components under the hood or on the engine wall. The noise is then
transmitted into the passenger compartment.
Causes of transmitted underhood noise include:
1. Any component installed to the engine wall
2. Components that pass through the engine wall
3. Engine wall mounts and connectors
4. Loose radiator installation pins
5. Hood bumpers out of adjustment
6. Hood striker out of adjustment
These noises can be difficult to isolate since they cannot be reached from the interior of the vehicle. The best
method is to secure, move or insulate one component at a time and test drive the vehicle. Also, engine rpm or
load can be changed to isolate the noise. Repairs can usually be made by moving, adjusting, securing, or
insulating the component causing the noise.
Revision: August 2015 2016 Versa Note
cardiagn.com