2016 NISSAN NOTE height
[x] Cancel search: heightPage 1852 of 3641
WHEEL ALIGNMENTFSU-7
< PERIODIC MAINTENANCE >
C
DF
G H
I
J
K L
M A
B
FSU
N
O P
WHEEL ALIGNMENT
InspectionINFOID:0000000012430301
PRELIMINARY INSPECTION
WARNING:
Always adjust the wheel alignment with the vehicle on a flat surface.
NOTE:
If the wheel alignment is out of s pecification, inspect and replace any damaged or worn rear suspension parts
before making any adjustments.
1. Check and adjust the wheel alignment with the vehicle under unladen conditions. “Unladen conditions”
means that the fuel, engine coolant, and lubricants are full; the spare tire, jack, hand tools and mats are in
designated positions.
2. Check the tires for incorrect air pressure and excessive wear.
3. Check the wheels for run out and damage. Refer to WT-54, "
Wheel".
4. Check the wheel bearing axial end play. Refer to FAX-27, "
Wheel Bearing".
5. Check the shock absorbers for leaks or damage.
6. Check each mount point of the suspension co mponents for any excessive looseness or damage.
7. Check each link, arm, and the suspension member for any damage.
8. Check the vehicle height. Refer to FSU-21, "
Wheelarch Height (Unladen*)".
GENERAL INFORMATION AND RECOMMENDATIONS
1. A Four-Wheel Thrust Alignment should be performed.
• This type of alignment is recomm ended for any NISSAN/INFINITI vehicle.
• The four-wheel “thrust” process helps ensure that the vehicle is properly aligned and the steering wheel
is centered.
• The alignment machine itself should be capabl e of accepting any NISSAN/INFINITI vehicle.
• The alignment machine should be checked to ensure that it is level.
2. Make sure the alignment machine is properly calibrated. • Your alignment machine should be regularly calibrated in order to give correct information.
• Check with the manufacturer of your specific a lignment machine for their recommended Service/Cali-
bration Schedule.
ALIGNMENT PROCESS
IMPORTANT: Use only the alignment specifications listed in this Service Manual. Refer to FSU-20, "Wheel
Alignment (Unladen*1)".
• When displaying the alignment settings, many alignment machines use “indicators”: (Green/red, plus or
minus, Go/No Go). Do NOT use these indicators.
- The alignment specifications programmed into your alignment machine that operate these indicators may
not be correct.
- This may result in an ERROR.
• Most camera-type alignment machines are equipped with "Rolling Compensation" method and optional
"Jacking Compensation" method to "compensate" the alignment targets or head units.
"Rolling Compensation" is the preferred method.
- If using the "Rolling Compensation" method, after inst alling the alignment targets or head units, push or pull
on the rear wheel to move the vehicle. Do not push or pull on the vehicle body.
- If using the "Jacking Compensation" method, after inst alling the alignment targets or head units, raise the
vehicle and rotate the wheels 1/2 turn in either direction.
NOTE:
Do not use the "Rolling Compensation" method if you are using sensor-type alignment equipment.
• Follow all instructions for the alignment machine you're using for more information.
CAMBER, CASTER AND KINGPIN INCLINATION ANGLES INSPECTION
• Camber, caster, kingpin inclination angles cannot be adjusted.
• Before inspection, set the front wheels onto a turning radius gauge. Set the rear wheels onto a pad that has
the same height so the vehicle will remain horizontal.
TOTAL TOE-IN INSPECTION
Measure the total toe-in using the following procedure.
Revision: August 2015 2016 Versa Note
cardiagn.com
Page 1853 of 3641
FSU-8
< PERIODIC MAINTENANCE >
WHEEL ALIGNMENT
WARNING:
• Always perform the following procedure on a flat surface.
• Make sure that no person is in fr ont of vehicle before pushing it.
1. Bounce the front of vehicle up and down to stabilize the vehicle height (posture).
2. Push on the rear wheel to move the vehicle straight ahead about 5 m (16 ft).
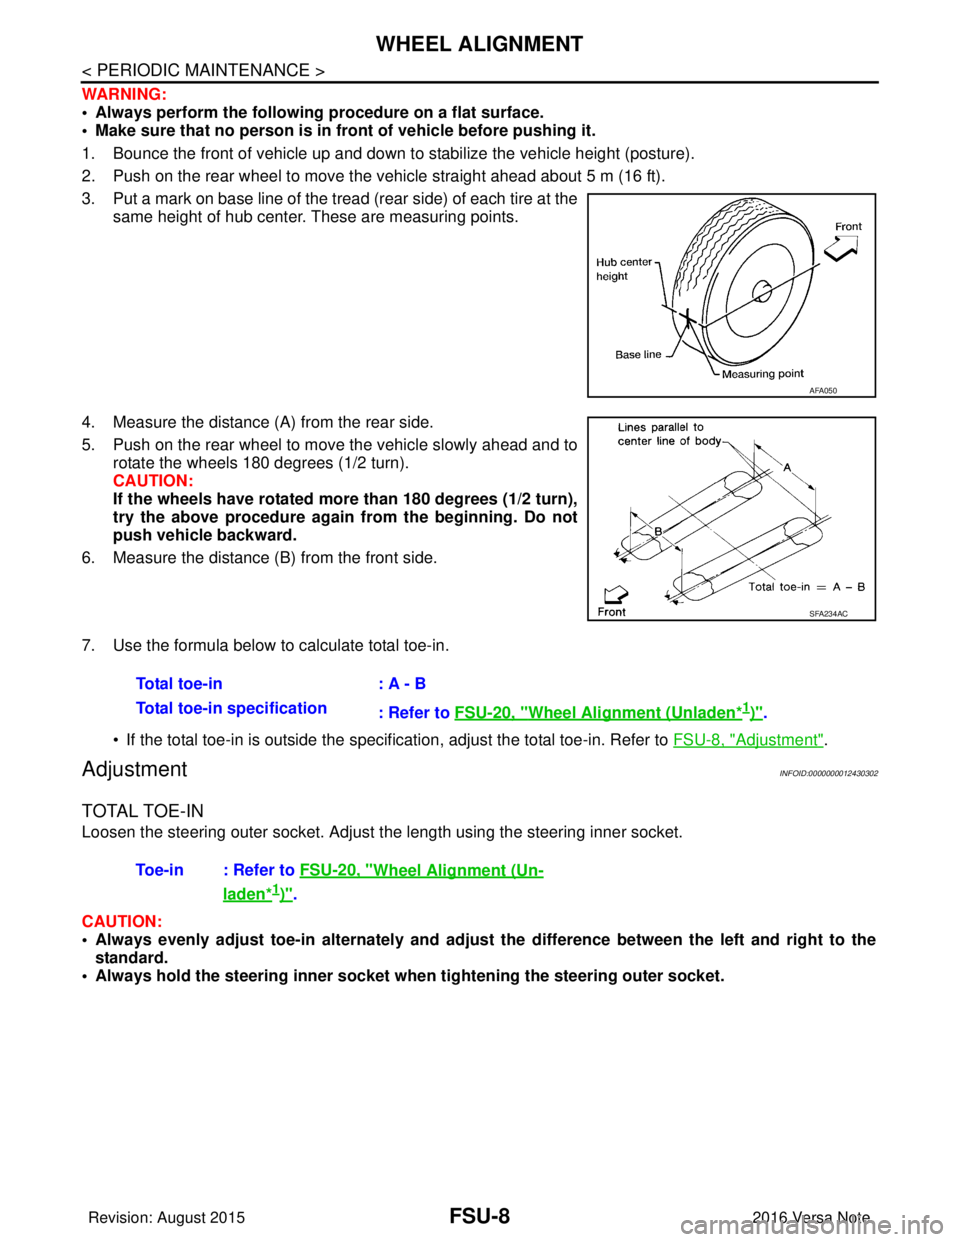
3. Put a mark on base line of the tread (rear side) of each tire at the same height of hub center. These are measuring points.
4. Measure the distance (A) from the rear side.
5. Push on the rear wheel to move the vehicle slowly ahead and to rotate the wheels 180 degrees (1/2 turn).
CAUTION:
If the wheels have rotated more than 180 degrees (1/2 turn),
try the above procedure again from the beginning. Do not
push vehicle backward.
6. Measure the distance (B) from the front side.
7. Use the formula below to calculate total toe-in.
• If the total toe-in is outside the specification, adjust the total toe-in. Refer to FSU-8, "
Adjustment".
AdjustmentINFOID:0000000012430302
TOTAL TOE-IN
Loosen the steering outer socket. Adjust the length using the steering inner socket.
CAUTION:
• Always evenly adjust toe-in alternately and adjust the difference be tween the left and right to the
standard.
• Always hold the steering inner socket wh en tightening the steering outer socket.
AFA050
SFA234AC
Total toe-in: A - B
Total toe-in specification : Refer to FSU-20, "
Wheel Alignment (Unladen*1)".
Toe-in : Refer to FSU-20, "
Wheel Alignment (Un-
laden*1)".
Revision: August 2015 2016 Versa Note
cardiagn.com
Page 1866 of 3641
SERVICE DATA AND SPECIFICATIONS (SDS)FSU-21
< SERVICE DATA AND SPECIFICATIONS (SDS)
C
DF
G H
I
J
K L
M A
B
FSU
N
O P
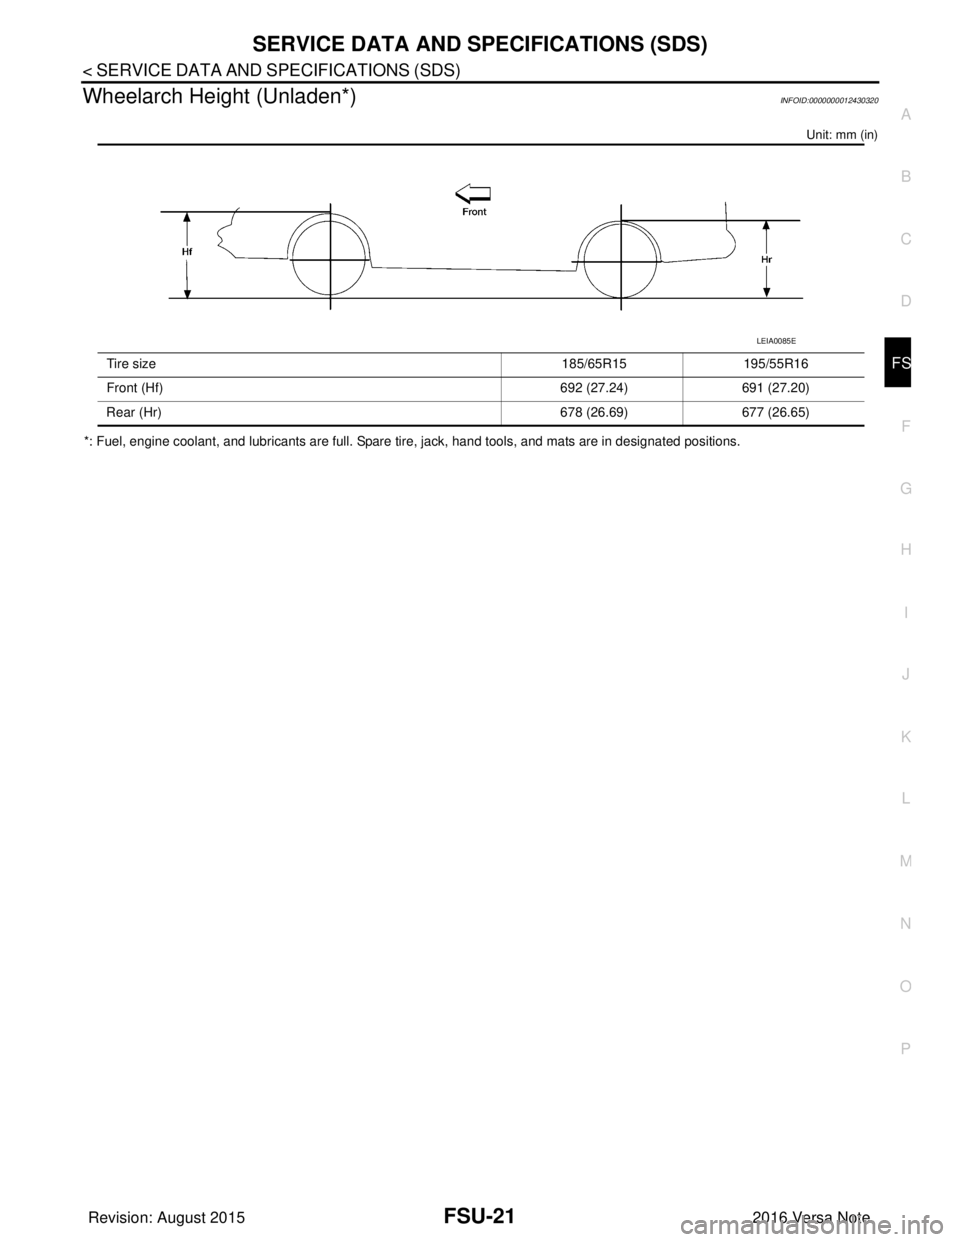
Wheelarch Height (Unladen*)INFOID:0000000012430320
Unit: mm (in)
*: Fuel, engine coolant, and lubricants are full. Spare tire, jack, hand tools, and mats are in designated positions. Tire size
185/65R15195/55R16
Front (Hf) 692 (27.24)691 (27.20)
Rear (Hr) 678 (26.69)677 (26.65)
LEIA0085E
Revision: August 2015 2016 Versa Note
cardiagn.com
Page 1924 of 3641
GI-36
< VEHICLE INFORMATION >
IDENTIFICATION INFORMATION
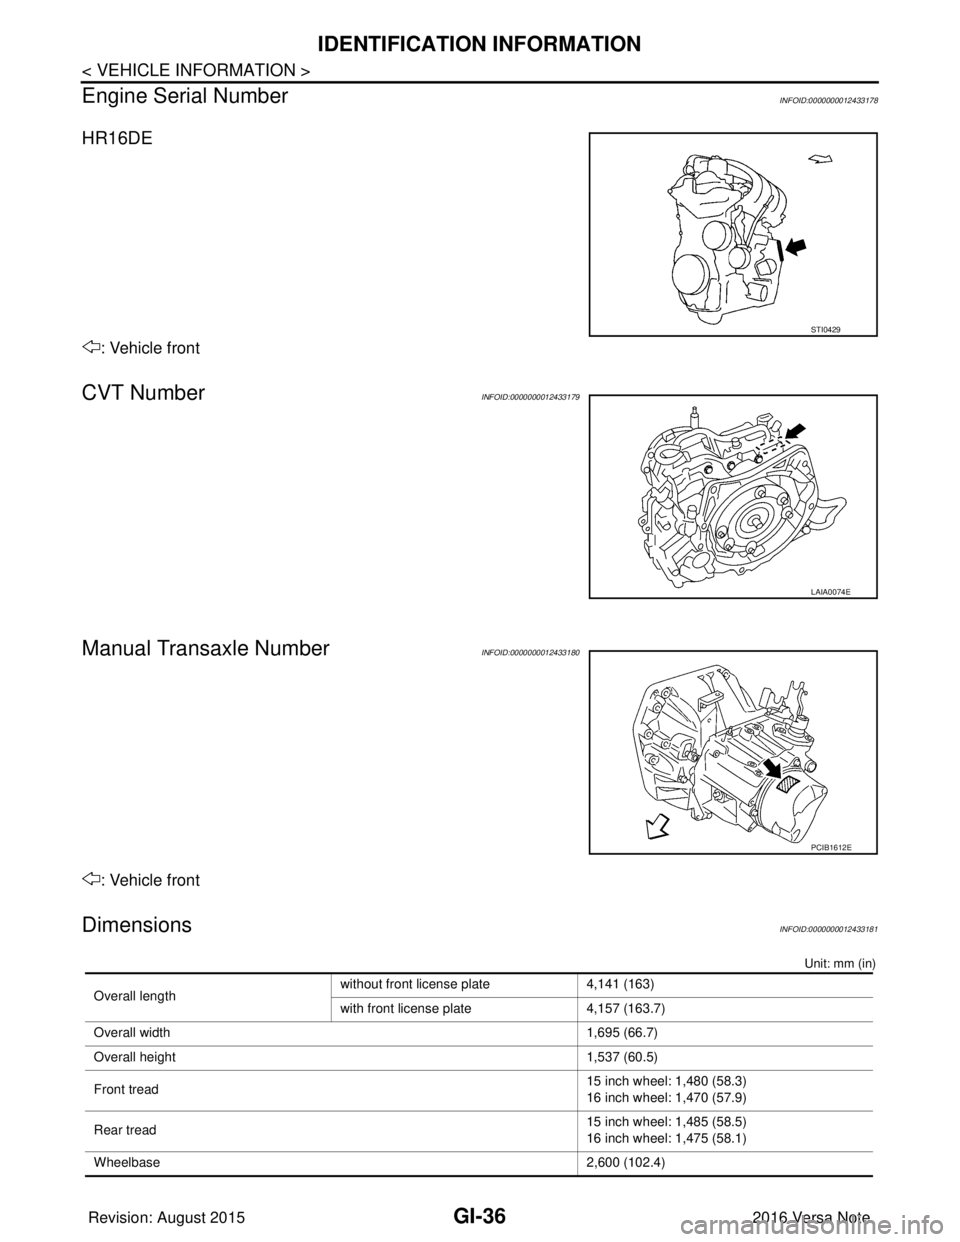
Engine Serial Number
INFOID:0000000012433178
HR16DE
: Vehicle front
CVT NumberINFOID:0000000012433179
Manual Transaxle NumberINFOID:0000000012433180
: Vehicle front
DimensionsINFOID:0000000012433181
Unit: mm (in)
STI0429
LAIA0074E
PCIB1612E
Overall length without front license plate 4,141 (163)
with front license plate
4,157 (163.7)
Overall width 1,695 (66.7)
Overall height 1,537 (60.5)
Front tread 15 inch wheel: 1,480 (58.3)
16 inch wheel: 1,470 (57.9)
Rear tread 15 inch wheel: 1,485 (58.5)
16 inch wheel: 1,475 (58.1)
Wheelbase 2,600 (102.4)
Revision: August 2015 2016 Versa Note
cardiagn.com
Page 2176 of 3641
BODY SIDE TRIMINT-25
< REMOVAL AND INSTALLATION >
C
DE
F
G H
I
K L
M A
B
INT
N
O P
Installation
Installation is in the reverse order of removal.
CENTER PILLAR LOWER FINISHER
CENTER PILLAR LOWER FINISHER
: Removal and InstallationINFOID:0000000012431869
REMOVAL
1. Remove front kicking plate and rear kicking plate. Refer to INT-22, "KICKING PLATE : Removal and
Installation".
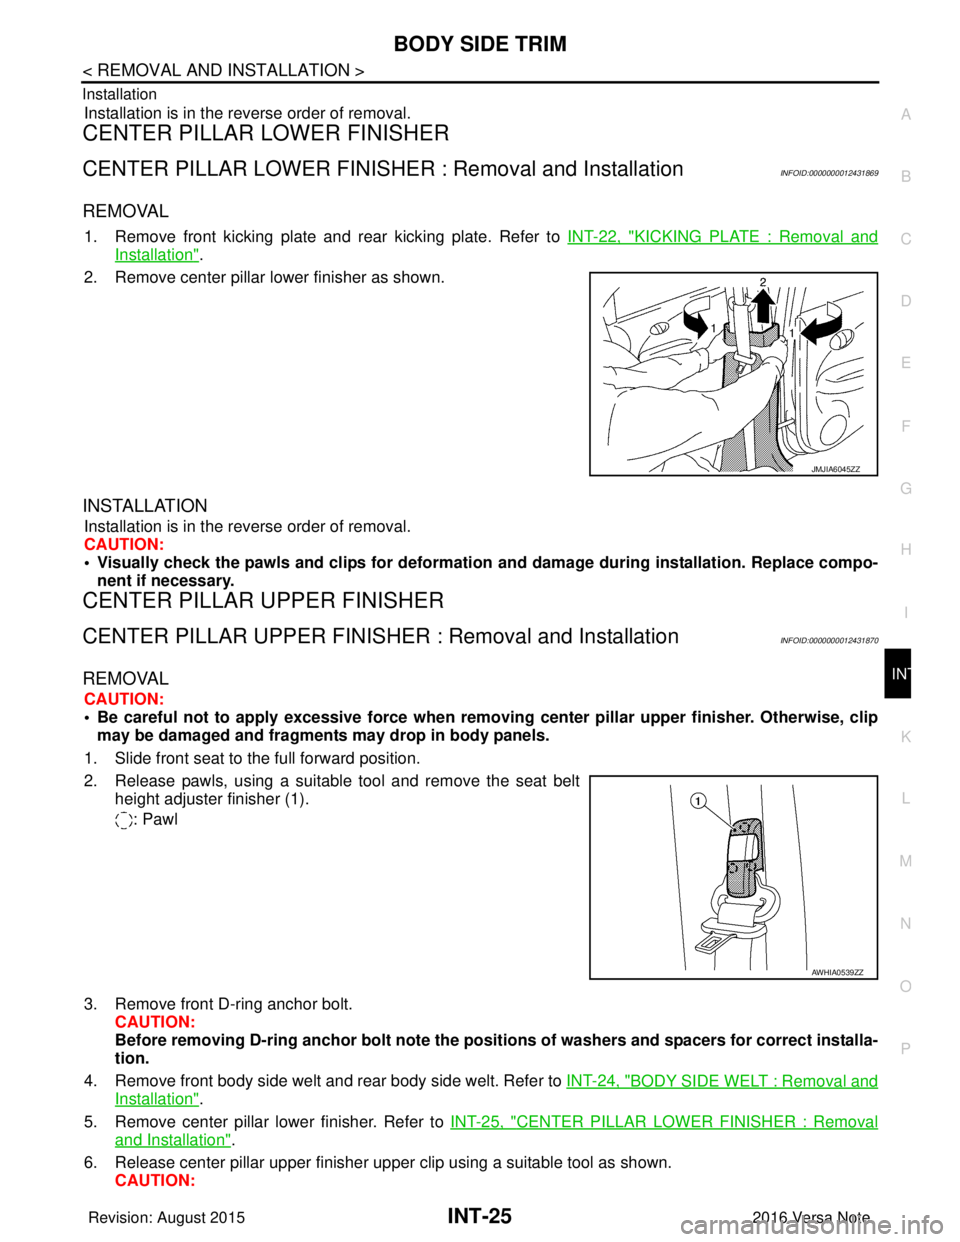
2. Remove center pillar lower finisher as shown.
INSTALLATION
Installation is in the reverse order of removal.
CAUTION:
• Visually check the pawls and clips for deformation and damage during installation. Replace compo-
nent if necessary.
CENTER PILLAR UPPER FINISHER
CENTER PILLAR UPPER FINISHER : Removal and InstallationINFOID:0000000012431870
REMOVAL
CAUTION:
• Be careful not to apply excessive for ce when removing center pillar upper finisher. Otherwise, clip
may be damaged and fragments may drop in body panels.
1. Slide front seat to the full forward position.
2. Release pawls, using a suitable tool and remove the seat belt height adjuster finisher (1).
: Pawl
3. Remove front D-ring anchor bolt. CAUTION:
Before removing D-ring anchor bolt note the positions of washers and spacers for correct installa-
tion.
4. Remove front body side welt and rear body side welt. Refer to INT-24, "
BODY SIDE WELT : Removal and
Installation".
5. Remove center pillar lower finisher. Refer to INT-25, "
CENTER PILLAR LOWER FINISHER : Removal
and Installation".
6. Release center pillar upper finisher upper clip using a suitable tool as shown. CAUTION:
JMJIA6045ZZ
AWHIA0539ZZ
Revision: August 2015 2016 Versa Note
cardiagn.com
Page 2351 of 3641
MA-36
< PERIODIC MAINTENANCE >
CHASSIS AND BODY MAINTENANCE
1. Check that there is no foreign material in the reservoir tank, andrefill with new brake fluid. Refer to MA-11, "
Fluids and Lubri-
cants".
2. Loosen the bleeder valve, slowly depress the brake pedal to the full stroke, and then release the pedal. Repeat this operation at
intervals of 2 or 3 seconds until new brake fluid is discharged.
Then close the bleeder valve with the brake pedal depressed.
Repeat the same work on each wheel.
3. Perform the air bleeding procedure. Refer to MA-36, "
BRAKE
FLUID : Bleeding Brake System".
BRAKE FLUID : Bleeding Brake SystemINFOID:0000000012432283
CAUTION:
• Turn the ignition switch OFF and disconnect ABS act uator and electric unit (control unit) or battery
negative terminal before performing the work.
• Monitor the fluid level in the reservoir tank while performing the air bleeding.
• Do not spill or splash brake fluid on painted su rfaces. Brake fluid may seriously damage paint. Wipe
it off immediately and wash with wa ter if it gets on a painted surface.
• Always use new brake fluid for refilling. Do not reuse drained brake fluid.
• Do not allow foreign matter (e.g. dust) and oils other than brake fluid to enter the reservoir tank.
1. Connect a vinyl tube to the bleeder valve.
2. Fully depress the brake pedal 4 to 5 times.
3. Loosen the bleeder valve and bleed air with the br ake pedal depressed, and then quickly tighten the
bleeder valve.
4. Repeat steps 2 and 3 until all of the air is out of the brake line.
5. Tighten the bleeder valve to the specified torque. • Front disc brake: Refer to BR-36, "
BRAKE CALIPER ASSEMBLY : Exploded View".
• Rear drum brake: Refer to BR-41, "
Exploded View".
6. Perform steps 1 to 5 in the following order: Front (RH) brake → front (LH) brake → rear (RH) brake → rear
(LH) brake.
7. Check that the fluid level in the reservoir tank is within the specified range after air bleeding. Refer to MA-
35, "BRAKE FLUID : Inspection".
8. Add brake fluid as necessary to keep the brake fluid level within the specified range. Refer to MA-11, "
Flu-
ids and Lubricants".
9. Inspect the brake pedal height and play. Adjust it if the measurement value is not the standard. Refer to
BR-9, "
Inspection and Adjustment".
DISC BRAKE
DISC BRAKE : InspectionINFOID:0000000012432284
INSPECTION
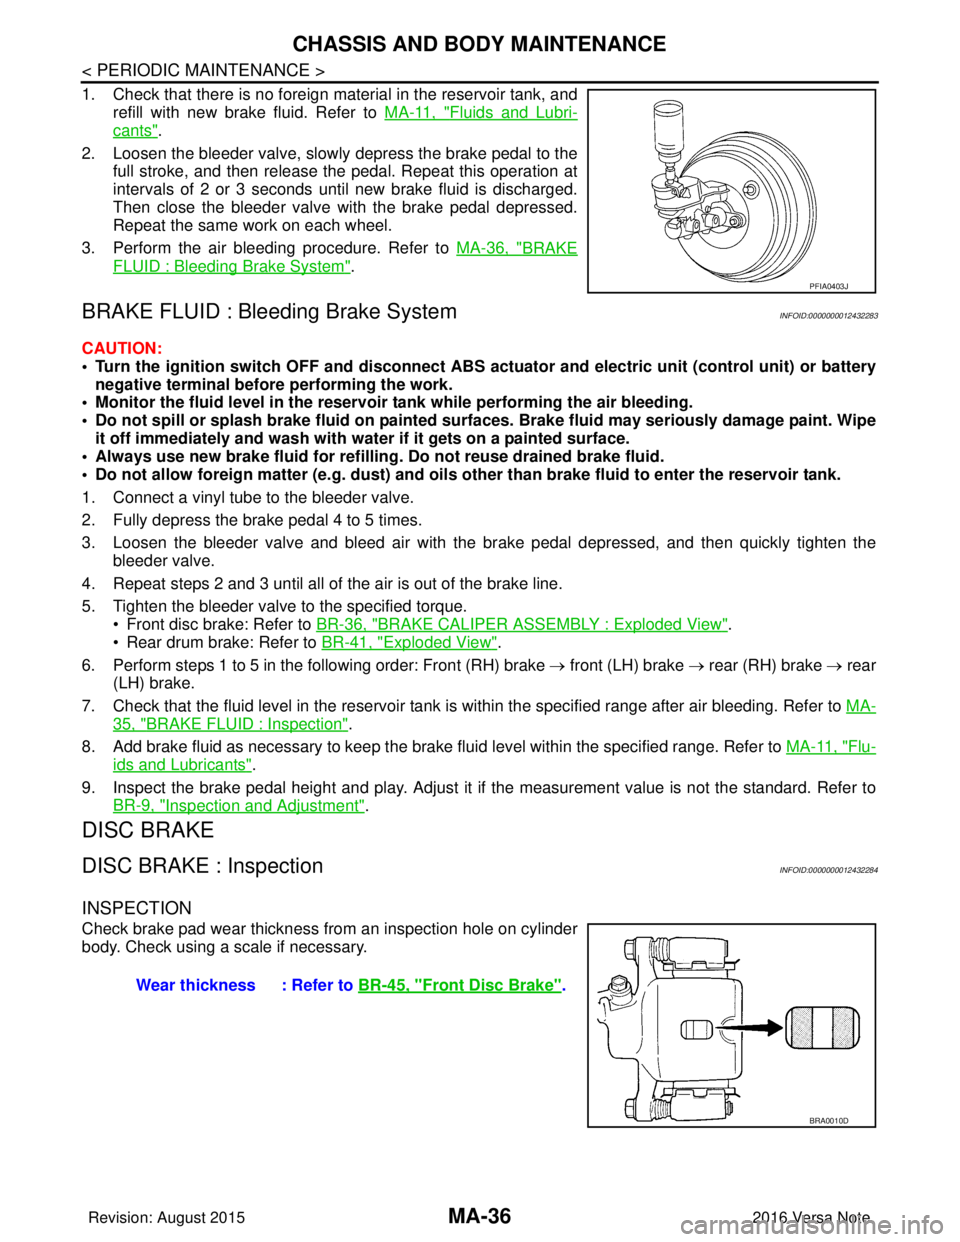
Check brake pad wear thickness from an inspection hole on cylinder
body. Check using a scale if necessary.
PFIA0403J
Wear thickness : Refer to BR-45, "Front Disc Brake".
BRA0010D
Revision: August 2015 2016 Versa Note
cardiagn.com
Page 2404 of 3641
![NISSAN NOTE 2016 Service Repair Manual MWI-46
< DTC/CIRCUIT DIAGNOSIS >[TYPE A]
FUEL LEVEL SENSOR SIGNAL CIRCUIT
3.CHECK FUEL LEVEL SENSOR GROUND CIRCUIT
1. Disconnect ECM connector F11.
2. Check continuity between combination meter har ne NISSAN NOTE 2016 Service Repair Manual MWI-46
< DTC/CIRCUIT DIAGNOSIS >[TYPE A]
FUEL LEVEL SENSOR SIGNAL CIRCUIT
3.CHECK FUEL LEVEL SENSOR GROUND CIRCUIT
1. Disconnect ECM connector F11.
2. Check continuity between combination meter har ne](/manual-img/5/57363/w960_57363-2403.png)
MWI-46
< DTC/CIRCUIT DIAGNOSIS >[TYPE A]
FUEL LEVEL SENSOR SIGNAL CIRCUIT
3.CHECK FUEL LEVEL SENSOR GROUND CIRCUIT
1. Disconnect ECM connector F11.
2. Check continuity between combination meter har ness connector M82 terminal 24 and fuel level sensor
unit and fuel pump harness connector B44 terminal 5.
3. Check continuity between fuel level sensor unit and fuel pump harness connector B44 terminal 5 and ground.
Is the inspection result normal?
YES >> GO TO 4.
NO >> Repair harness or connector.
4.CHECK INSTALLATION CONDITION
Check fuel level sensor unit installation, and verify t he float arm does not interfere or bind with the internal
components in the fuel tank.
Is the inspection result normal?
YES >> Inspection End.
NO >> Install the fuel level sensor unit properly.
Component InspectionINFOID:0000000012432579
1.REMOVE FUEL LEVEL SENSOR UNIT
Remove the fuel level sensor unit. Refer to FL-6, "
Removal and Installation".
>> GO TO 2.
2.CHECK FUEL LEVEL SENSOR UNIT
Check the resistance between fuel level sensor unit and fuel pump.
*: When float rod is in contact with stopper.
Is inspection result OK?
YES >> Inspection End.
NO >> Replace fuel level sensor unit and fuel pump. Refer to
FL-6, "
Removal and Installation".
Connector TerminalConnector Terminal Continuity
M82 24B44 5Yes
Connector Terminal
GroundContinuity
B44 5 No
Te r m i n a l s
ConditionResistance (Ω
)
(Approx.) Height [mm (in)]
Fuel level sensor unit
25 Full
* (A)
51 171.4 (6.75)
Empty
* (B) 283 18.5 (0.73)
JPNIA0841ZZ
Revision: August 2015
2016 Versa Note
cardiagn.com
Page 2460 of 3641
![NISSAN NOTE 2016 Service Repair Manual MWI-102
< DTC/CIRCUIT DIAGNOSIS >[TYPE B]
FUEL LEVEL SENSOR SIGNAL CIRCUIT
3.CHECK FUEL LEVEL SENSOR GROUND CIRCUIT
1. Disconnect ECM connector F11
2. Check continuity between combination meter har ne NISSAN NOTE 2016 Service Repair Manual MWI-102
< DTC/CIRCUIT DIAGNOSIS >[TYPE B]
FUEL LEVEL SENSOR SIGNAL CIRCUIT
3.CHECK FUEL LEVEL SENSOR GROUND CIRCUIT
1. Disconnect ECM connector F11
2. Check continuity between combination meter har ne](/manual-img/5/57363/w960_57363-2459.png)
MWI-102
< DTC/CIRCUIT DIAGNOSIS >[TYPE B]
FUEL LEVEL SENSOR SIGNAL CIRCUIT
3.CHECK FUEL LEVEL SENSOR GROUND CIRCUIT
1. Disconnect ECM connector F11
2. Check continuity between combination meter har ness connector M24 terminal 24 and fuel level sensor
unit and fuel pump harness connector B44 terminal 5.
3. Check continuity between fuel level sensor unit and fuel pump harness connector B44 terminal 5 and ground.
Is the inspection result normal?
YES >> GO TO 4.
NO >> Repair harness or connector.
4.CHECK INSTALLATION CONDITION
Check fuel level sensor unit installation, and verify t he float arm does not interfere or bind with the internal
components in the fuel tank.
Is the inspection result normal?
YES >> Inspection End.
NO >> Install the fuel level sensor unit properly.
Component InspectionINFOID:0000000012432639
1.REMOVE FUEL LEVEL SENSOR UNIT
Remove the fuel level sensor unit. Refer to FL-6, "
Removal and Installation".
>> GO TO 2.
2.CHECK FUEL LEVEL SENSOR UNIT
Check the resistance between fuel level sensor unit and fuel pump.
*: When float rod is in contact with stopper.
Is inspection result OK?
YES >> Inspection End.
NO >> Replace fuel level sensor unit and fuel pump. Refer to
FL-6, "
Removal and Installation".
Connector TerminalConnector Terminal Continuity
M24 24B44 5Yes
Connector Terminal
GroundContinuity
B44 5 No
Te r m i n a l s
ConditionResistance (Ω
)
(Approx.) Height [mm (in)]
Fuel level sensor unit
25 Full
* (A)
51 168.2 (6.62)
Empty
* (B) 283 17.5 (0.69)
JPNIA0841ZZ
Revision: August 2015
2016 Versa Note
cardiagn.com