2016 NISSAN NOTE ECU
[x] Cancel search: ECUPage 3138 of 3641

SR-22
< REMOVAL AND INSTALLATION >
SIDE CURTAIN AIR BAG MODULE
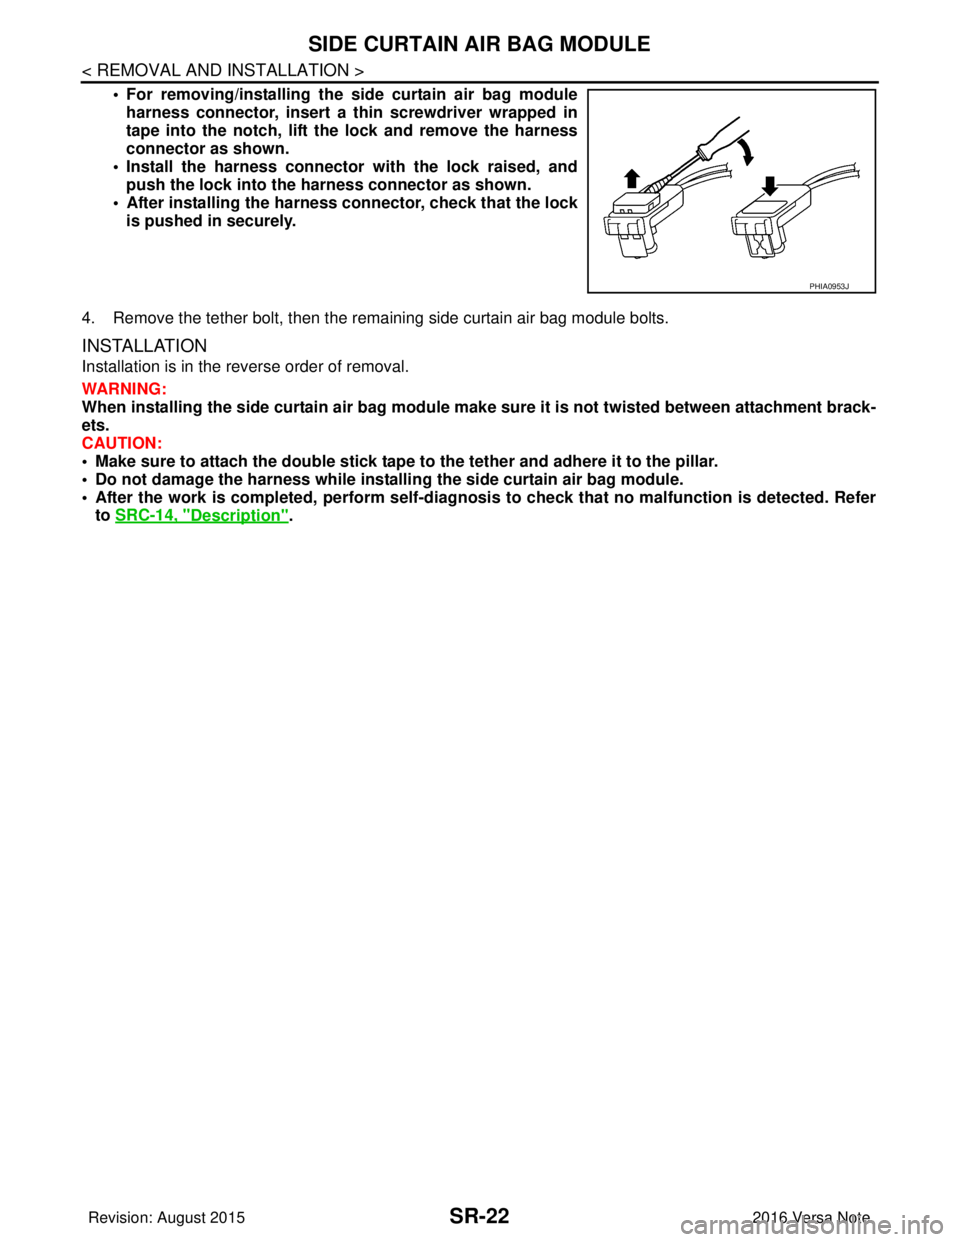
• For removing/installing the side curtain air bag moduleharness connector, insert a thin screwdriver wrapped in
tape into the notch, lift the lock and remove the harness
connector as shown.
• Install the harness connector with the lock raised, and push the lock into the harness connector as shown.
• After installing the harness connector, check that the lock
is pushed in securely.
4. Remove the tether bolt, then the remaining side curtain air bag module bolts.
INSTALLATION
Installation is in the reverse order of removal.
WARNING:
When installing the side curtain air bag module make sure it is not twisted between attachment brack-
ets.
CAUTION:
• Make sure to attach the double stick tape to the tether and adhere it to the pillar.
• Do not damage the harness while installi ng the side curtain air bag module.
• After the work is completed, perform self-diagnos is to check that no malfunction is detected. Refer
to SRC-14, "
Description".
PHIA0953J
Revision: August 2015 2016 Versa Note
cardiagn.com
Page 3146 of 3641

SR-30
< REMOVAL AND INSTALLATION >
AIR BAG DIAGNOSIS SENSOR UNIT
AIR BAG DIAGNOSIS SENSOR UNIT
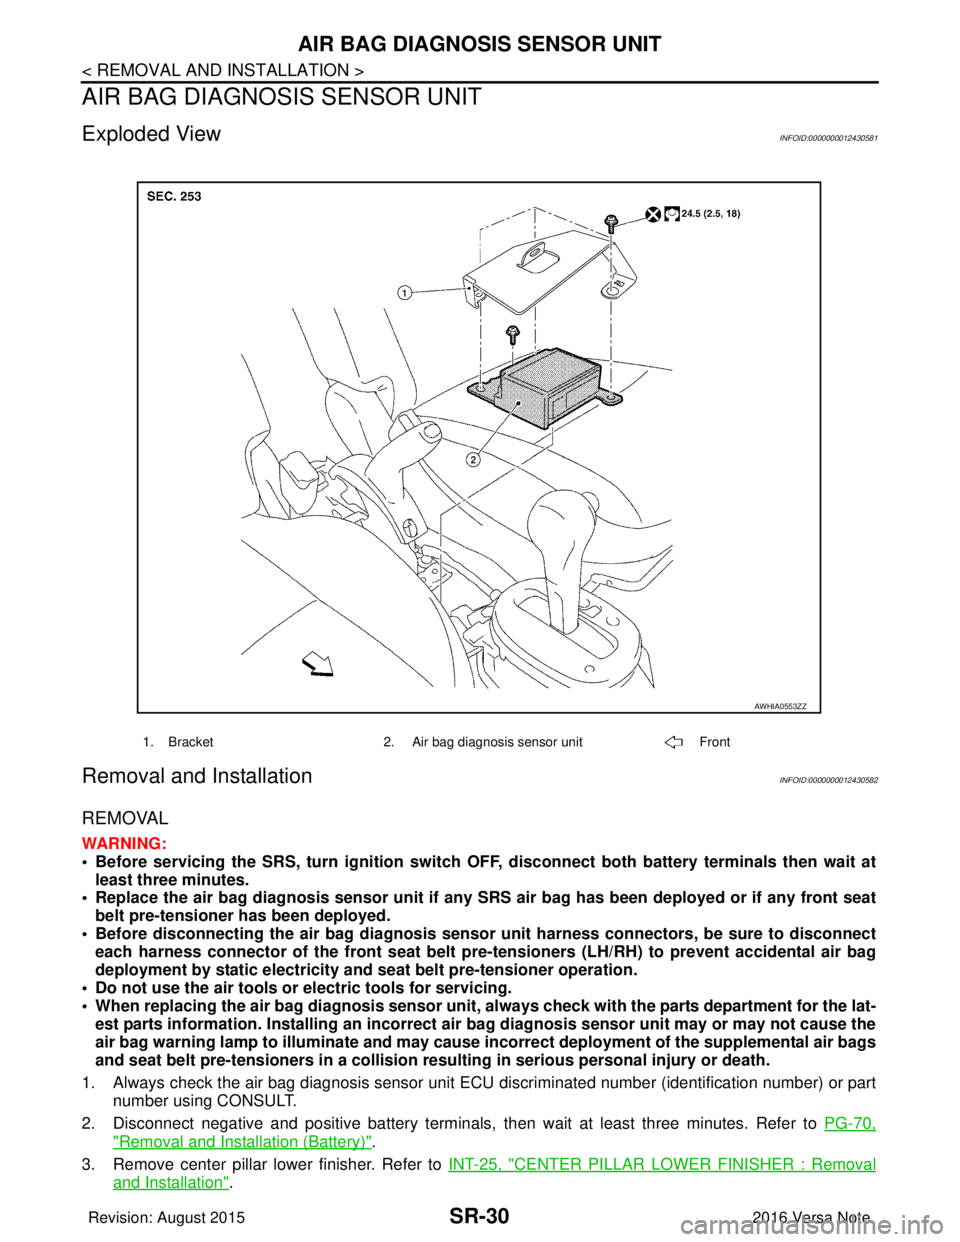
Exploded ViewINFOID:0000000012430581
Removal and InstallationINFOID:0000000012430582
REMOVAL
WARNING:
• Before servicing the SRS, turn ignition switch OFF, disconnect bot h battery terminals then wait at
least three minutes.
• Replace the air bag diagnosis senso r unit if any SRS air bag has been deployed or if any front seat
belt pre-tensioner has been deployed.
• Before disconnecting the air bag diagnosis sensor unit harness conn ectors, be sure to disconnect
each harness connector of the front seat belt pre-tensioners (LH/RH) to prevent accidental air bag
deployment by static electricity and seat belt pre-tensioner operation.
• Do not use the air tools or electric tools for servicing.
• When replacing the air bag diagno sis sensor unit, always check with th e parts department for the lat-
est parts information. Installing an incorrect air bag diagnosis sen sor unit may or may not cause the
air bag warning lamp to illuminate and may cause in correct deployment of the supplemental air bags
and seat belt pre-tensioners in a collision resulting in serious personal injury or death.
1. Always check the air bag diagnosis sensor unit ECU discriminated number (identification number) or part
number using CONSULT.
2. Disconnect negative and positive battery terminals, then wait at least three minutes. Refer to PG-70,
"Removal and Installation (Battery)".
3. Remove center pillar lower finisher. Refer to INT-25, "
CENTER PILLAR LOWER FINISHER : Removal
and Installation".
1. Bracket2. Air bag diagnosis sensor unit Front
AWHIA0553ZZ
Revision: August 2015 2016 Versa Note
cardiagn.com
Page 3147 of 3641

AIR BAG DIAGNOSIS SENSOR UNITSR-31
< REMOVAL AND INSTALLATION >
C
DE
F
G
I
J
K L
M A
B
SR
N
O P
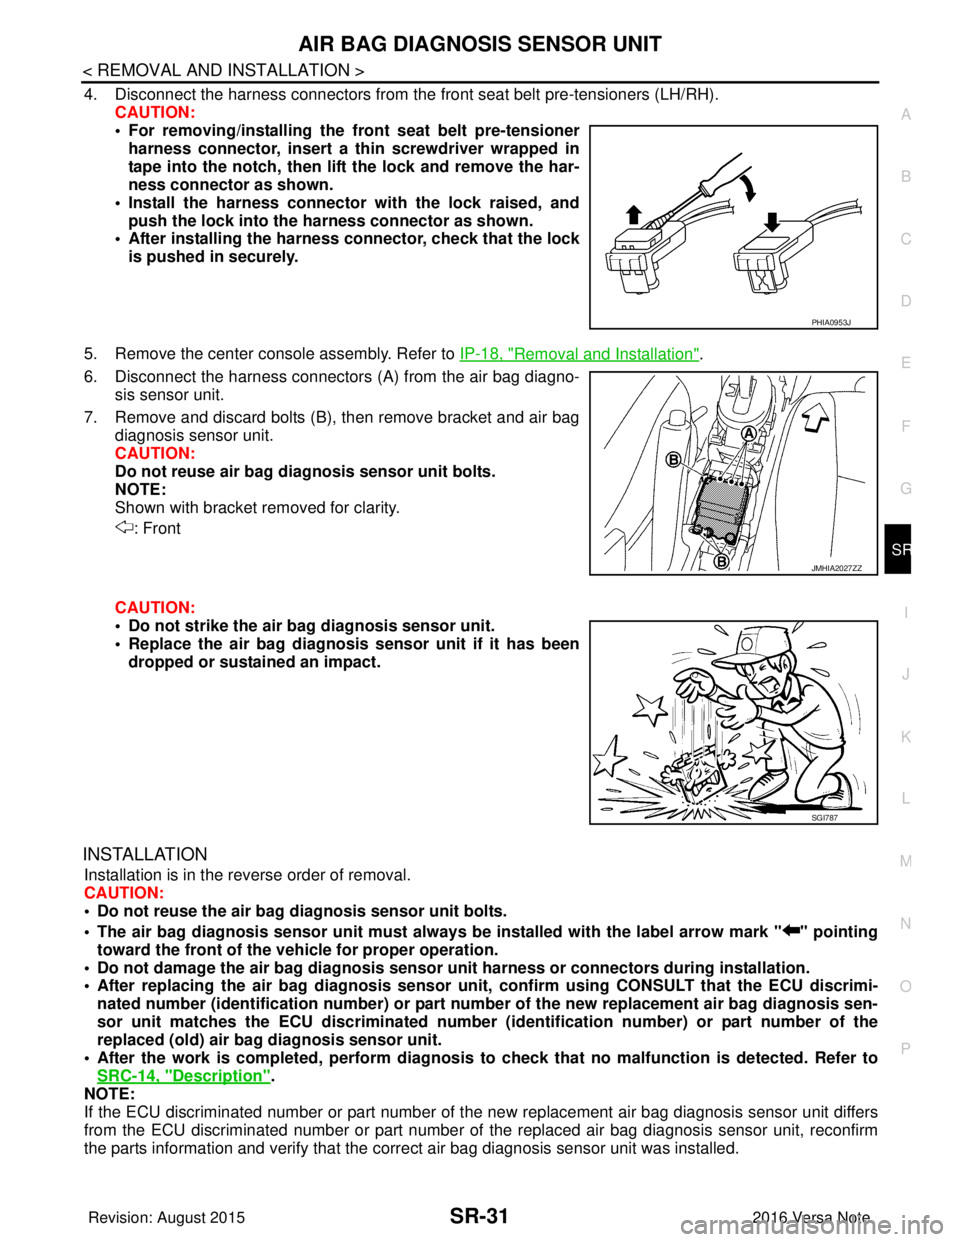
4. Disconnect the harness connectors from the front seat belt pre-tensioners (LH/RH).
CAUTION:
• For removing/installing the front seat belt pre-tensioner
harness connector, insert a thin screwdriver wrapped in
tape into the notch, then lift the lock and remove the har-
ness connector as shown.
• Install the harness connector with the lock raised, and push the lock into the harness connector as shown.
• After installing the harness connector, check that the lock
is pushed in securely.
5. Remove the center console assembly. Refer to IP-18, "
Removal and Installation".
6. Disconnect the harness connectors (A) from the air bag diagno-
sis sensor unit.
7. Remove and discard bolts (B), then remove bracket and air bag diagnosis sensor unit.
CAUTION:
Do not reuse air bag diagnosis sensor unit bolts.
NOTE:
Shown with bracket removed for clarity.
: Front
CAUTION:
• Do not strike the air ba g diagnosis sensor unit.
• Replace the air bag diagnosis sensor unit if it has been
dropped or sustained an impact.
INSTALLATION
Installation is in the reverse order of removal.
CAUTION:
• Do not reuse the air bag diagnosis sensor unit bolts.
• The air bag diagnosis sensor unit must always be installed with the label arrow mark " " pointing
toward the front of the vehicle for proper operation.
• Do not damage the air bag diagnosis sensor un it harness or connectors during installation.
• After replacing the air bag diagnosis sensor un it, confirm using CONSULT that the ECU discrimi-
nated number (identification number) or part number of the new replacement air bag diagnosis sen-
sor unit matches the ECU discrimin ated number (identification number) or part number of the
replaced (old) air bag diagnosis sensor unit.
• After the work is completed, perform diagnosis to check that no malfunction is detected. Refer to
SRC-14, "
Description".
NOTE:
If the ECU discriminated number or part number of the new replacement air bag diagnosis sensor unit differs
from the ECU discriminated number or part number of the replaced air bag diagnosis sensor unit, reconfirm
the parts information and verify that the corre ct air bag diagnosis sensor unit was installed.
PHIA0953J
JMHIA2027ZZ
SGI787
Revision: August 2015 2016 Versa Note
cardiagn.com
Page 3185 of 3641

STC-1
STEERING
C
DE
F
H I
J
K L
M
SECTION STC
A
B
STC
N
O P
CONTENTS
STEERING CONTROL SYSTEM
PRECAUTION ....... ........................................3
PRECAUTIONS .............................................. .....3
Precaution for Supplemental Restraint System
(SRS) "AIR BAG" and "SEAT BELT PRE-TEN-
SIONER" ............................................................. ......
3
Service Notice and Precautions for EPS System ......3
SYSTEM DESCRIPTION ..............................4
COMPONENT PARTS ................................... .....4
Component Parts Location .................................. ......4
EPS Control Unit .......................................................5
EPS Motor, Torque Sensor, Reduction Gear ............5
DIAGNOSIS SYSTEM (EPS CONTROL UNIT)
.....
6
CONSULT Function ............................................ ......6
ECU DIAGNOSIS INFORMATION ...............8
EPS CONTROL UNIT ..................................... .....8
Reference Value ................................................. ......8
Fail-Safe ....................................................................9
Protection Function .................................................10
DTC Inspection Priority Chart ............................. ....10
DTC Index ........................................................... ....10
WIRING DIAGRAM ......................................11
EPS SYSTEM ... .............................................. ....11
Wiring Diagram ................................................... ....11
BASIC INSPECTION ...................................15
DIAGNOSIS AND REPAIR WORKFLOW ..... ....15
Work Flow ........................................................... ....15
Diagnostic Work Sheet ............................................16
DTC/CIRCUIT DIAGNOSIS .........................18
C1601 BATTERY POWER SUPPLY .................18
DTC Logic ........................................................... ....18
Diagnosis Procedure ........................................... ....18
C1604 TORQUE SENSOR ................................21
DTC Logic ................................................................21
Diagnosis Procedure ...............................................21
C1606 EPS MOTOR ..........................................23
DTC Logic ................................................................23
Diagnosis Procedure ...............................................23
Component Inspection .............................................23
C1607, C1608 EPS CONTROL UNIT ...............25
DTC Logic ................................................................25
Diagnosis Procedure ...............................................25
C1609 VEHICLE SPEED SIGNAL ....................26
Description ...............................................................26
DTC Logic ................................................................26
Diagnosis Procedure ...............................................26
C1610 ENGINE STATUS SIGNAL ...................27
Description ...............................................................27
DTC Logic ................................................................27
Diagnosis Procedure ...............................................27
U1000 CAN COMM CIRCUIT ...........................28
Description ...............................................................28
DTC Logic ................................................................28
Diagnosis Procedure ...............................................28
EPS WARNING LAMP ......................................29
Component Function Check ....................................29
Diagnosis Procedure ...............................................29
SYMPTOM DIAGNOSIS ..............................30
EPS WARNING LAMP DOES NOT TURN ON ...30
Description ........................................................... ....30
Diagnosis Procedure ...............................................30
EPS WARNING LAMP DOES NOT TURN
OFF ....................................................................
31
Description ...............................................................31
Revision: August 2015 2016 Versa Note
cardiagn.com
Page 3189 of 3641

COMPONENT PARTSSTC-5
< SYSTEM DESCRIPTION >
C
DE
F
H I
J
K L
M A
B
STC
N
O P
EPS Control UnitINFOID:0000000012431942
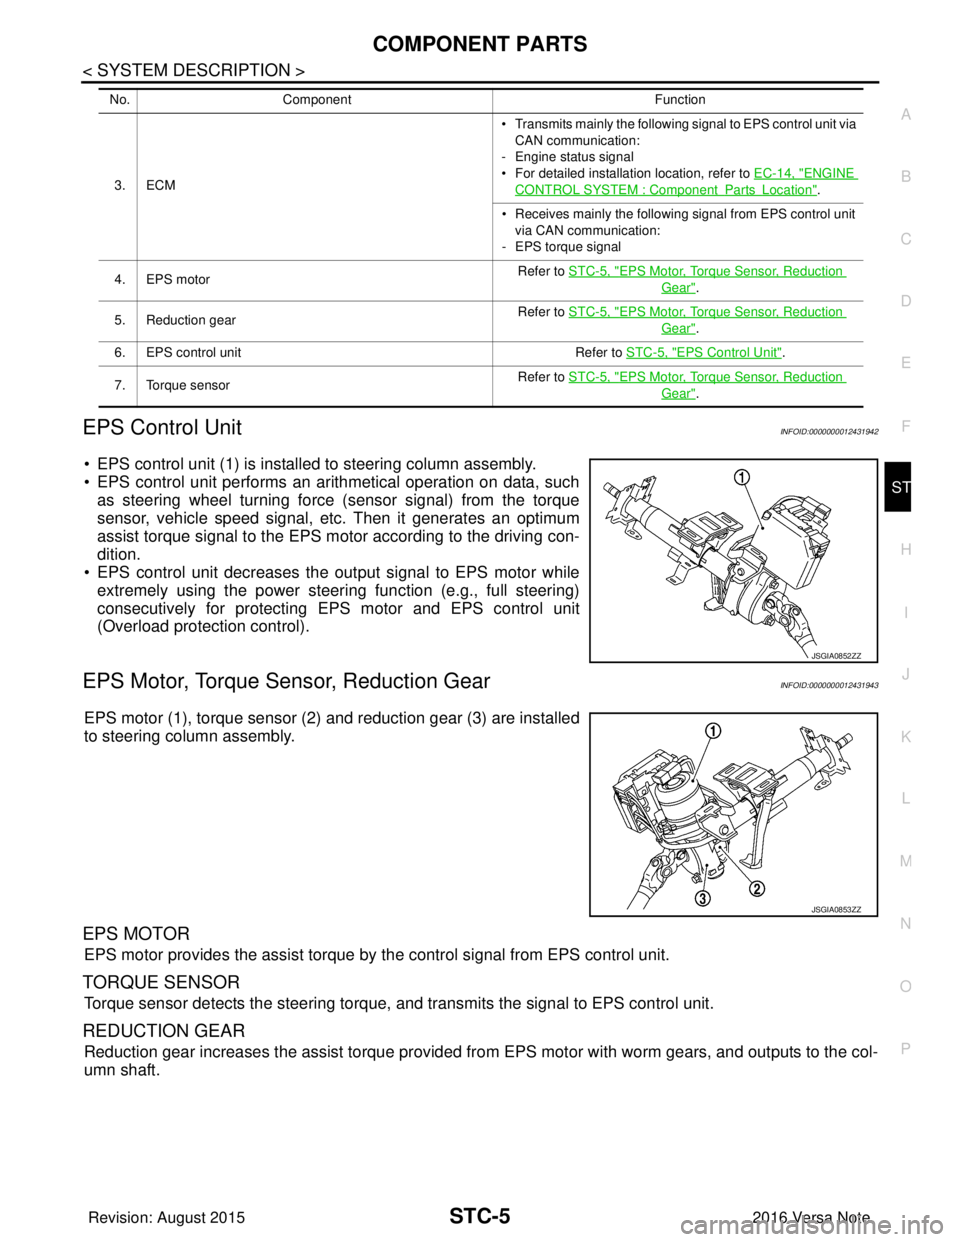
• EPS control unit (1) is installed to steering column assembly.
• EPS control unit performs an arithmetical operation on data, such as steering wheel turning force (sensor signal) from the torque
sensor, vehicle speed signal, etc. Then it generates an optimum
assist torque signal to the EPS motor according to the driving con-
dition.
• EPS control unit decreases the output signal to EPS motor while
extremely using the power steering function (e.g., full steering)
consecutively for protecting EPS motor and EPS control unit
(Overload protection control).
EPS Motor, Torque Sensor, Reduction GearINFOID:0000000012431943
EPS motor (1), torque sensor (2) and reduction gear (3) are installed
to steering column assembly.
EPS MOTOR
EPS motor provides the assist torque by the control signal from EPS control unit.
TORQUE SENSOR
Torque sensor detects the steering torque, and transmits the signal to EPS control unit.
REDUCTION GEAR
Reduction gear increases the assist torque provided from EPS motor with worm gears, and outputs to the col-
umn shaft.
3. ECM • Transmits mainly th
e following signal to EPS control unit via
CAN communication:
- Engine status signal
• For detailed installation location, refer to EC-14, "ENGINE
CONTROL SYSTEM : ComponentPartsLocation".
• Receives mainly the following signal from EPS control unit
via CAN communication:
- EPS torque signal
4. EPS motor Refer to STC-5, "
EPS Motor, Torque Sensor, Reduction
Gear".
5. Reduction gear Refer to STC-5, "
EPS Motor, Torque Sensor, Reduction
Gear".
6. EPS control unit Refer to STC-5, "
EPS Control Unit".
7. Torque sensor Refer to STC-5, "
EPS Motor, Torque Sensor, Reduction
Gear".
No.
Component Function
JSGIA0852ZZ
JSGIA0853ZZ
Revision: August 2015 2016 Versa Note
cardiagn.com
Page 3190 of 3641

STC-6
< SYSTEM DESCRIPTION >
DIAGNOSIS SYSTEM (EPS CONTROL UNIT)
DIAGNOSIS SYSTEM (EPS CONTROL UNIT)
CONSULT FunctionINFOID:0000000012431944
FUNCTION
CONSULT can display each diagnostic item usi ng the diagnostic test modes shown following:
*: The following diagnosis information is cleared by erasing:
•DTC
• Freeze frame data (FFD)
ECU IDENTIFICATION
Displays the part number stored in the control unit.
SELF DIAGNOSTIC RESULT MODE
Refer to STC-10, "DTC Index".
When “CRNT” is displayed on “Self Diagnostic Result”.
• The system is presently malfunctioning.
When “PAST” is displayed on “Self Diagnostic Result”.• System malfunction in the past is detect ed, but the system is presently normal.
FREEZE FRAME DATA (FFD)
The following vehicle status is recorded when DTC is detected and is displayed on CONSULT:
DATA MONITOR MODE
*1: Almost in accordance with the value of “MOTOR S IG”. It is not a malfunction though these values are not
accorded when steering quickly.
Diagnostic test mode Function
ECU Identification The part number stored in the control unit can be read.
Self Diagnostic Result Self-diagnostic results and freeze frame data can be read and erased quickly.
*
Data MonitorInput/Output data in the EPS control unit can be read.
Item name Display item
IGN COUNTER
(0-39) The number of times that ignition switch is tu
rned ON after the DTC is detected is displayed.
• When “0” is displayed: It indicates that the system is presently malfunctioning.
• When except “0” is displayed: It indicates that system malfunction in the past is detected, but the system is pres-
ently normal.
NOTE:
Each time when ignition switch is turned OFF to ON, numerical number increases in 1 →2→3...38 →39.
When the operation number of times exceeds 39, the number does not increase and “39” is displayed until self-
diagnosis is erased.
Monitor item (Unit) Remarks
BATTERY VOLT (V) Displays the power supply voltage for EPS control unit.
TORQUE SENSOR (Nm) Displays steering wheel turning force detected by torque sensor.
MOTOR CURRENT (A) Displays the current value consumed by EPS motor.
*1
MOTOR SIG (A) Displays the current commanded value to EPS motor.
ASSIST TORQUE (Nm) Displays assist torque being output by the electric power steering.
C/U TEMP ( °C or °F) Displays the temperature of the EPS control unit.
ASSIST LEVEL (%) Normally displays 100%. In case of an excessive stationary steering, the assist
curvature gradually falls. However, it return to 100% when left standing.
*2
VEHICLE SPEED (km/h or MPH)
Vehicle speed is displayed from vehicle speed signal via CAN communication.*3
WARNING LAMP (On/Off)EPS warning lamp control status is displayed.
ENGINE STATUS (Stop/Run) Engine speed is displayed from engine status signal via CAN communication.
Revision: August 2015 2016 Versa Note
cardiagn.com
Page 3192 of 3641

STC-8
< ECU DIAGNOSIS INFORMATION >
EPS CONTROL UNIT
ECU DIAGNOSIS INFORMATION
EPS CONTROL UNIT
Reference ValueINFOID:0000000012431945
VALUES ON THE DIAGNOSIS TOOL
CAUTION:
The output signal indicates the EPS control unit calculation data. The normal values will be displayed
even in the event that the output circuit (harness) is open.
*1: Almost in accordance with the value of “MOTOR S IG”. It is not a malfunction though these values are not
accorded when steering quickly.
*2: A fixed value is indicated regardless of steering turning.
*3: Normally displays 100%. In case of an excessive stat ionary steering, the assist curvature gradually falls.
However, it returns to 100% when left standing.
*4: It is not a malfunction, though it might not be co rresponding just after ignition switch in turned ON.
Monitor item Data monitor
Condition Display value
BATTERY VOLT Ignition switch: ON Battery voltage
TORQUE SENSOR Engine running Steering wheel: Not
steering (There is
no steering force) Approx. 0 Nm
Steering wheel: Right turn Positive value (Nm)
Steering wheel: Left turn Negative value (Nm)
MOTOR CURRENT Engine running Steering wheel: Not
steering (There is
no steering force) Approx. 0 A
Steering wheel: Right or left turn Displays consumption current of
EPS motor (A)
*1
MOTOR SIG
Engine runningSteering wheel: Not
steering (There is
no steering force) Approx. 0 A
Steering wheel: Right turn Positive value (A)
Steering wheel: Left turn Negative value (A)
ASSIST TORQUE Engine running Approx. 0 Nm
*2
C/U TEMPIgnition switch ON or engine running Displays temperature of inside of
EPS control unit (
°C or °F)
ASSIST LEVEL Engine running
100 %
*3
VEHICLE SPEEDVehicle stopped
0 km/h or mph
While driving Approximately equal to the indication
on speedometer*4
(inside of ±
10%)
WARNING LAMP EPS warning lamp: ON
On
EPS warning lamp: OFF Off
ENGINE STATUS Engine not running
Stop
Engine running Run
Revision: August 2015 2016 Versa Note
cardiagn.com
Page 3193 of 3641

EPS CONTROL UNITSTC-9
< ECU DIAGNOSIS INFORMATION >
C
DE
F
H I
J
K L
M A
B
STC
N
O P
TERMINAL LAYOUT
PHYSICAL VALUES
Fail-SafeINFOID:0000000012431946
• If any malfunction occurs in the system and control uni t detects the malfunction, EPS warning lamp on com-
bination meter turns ON to indicate system malfunction.
• When EPS warning lamp is ON, the system enters into a manual steering state. (Steering wheel turning force becomes heavy.)
• Under abnormal vehicle speed signal conditions, vehicle speed is judged as constant.
ALGIA0167ZZ
Te r m i n a l N o .
(Wire Color) Description
ConditionVa l u e
(Approx.)
+ − Signal name Input/Output
1
(P) — CAN-low
Input/Output ——
2
(L) — CAN-high
Input/Output ——
4
(Y) Ground Ignition power supply Input Ignition switch: ON
Battery voltage
Ignition switch: OFF 0 V
13
(R) Ground Torque sensor power
supply
OutputIgnition switch: ON
5 V
Ignition switch: OFF 0 V
14
(Y) Ground Torque sensor sub Input Ignition switch: ON
Steering wheel: Not
steering (There is no
steering force) 2.5 V
Engine running Steering wheel: steer-
ing 1.6 V – 3.4 V
(The value is changed according to steering
left or right)
15
(B) Ground Torque sensor ground Input Always
0 V
16
(W) Ground Torque sensor main Input Ignition switch: ON
Steering wheel: Not
steering (There is no
steering force) 2.5 V
Engine running Steering wheel: steer-
ing 1.6 V – 3.4 V
(The value is changed according to steering left or right)
17
(R) Ground Battery power supply Input Always
Battery voltage
18
(B) Ground Ground
— Always 0 V
19
(R) —
Motor —— —
20
(B) —
Motor —— —
Revision: August 2015
2016 Versa Note
cardiagn.com