2016 NISSAN NOTE warning
[x] Cancel search: warningPage 2735 of 3641
WHEEL ALIGNMENTRSU-7
< PERIODIC MAINTENANCE >
C
DF
G H
I
J
K L
M A
B
RSU
N
O P
TOTAL TOE-IN INSPECTION
Measure the total toe-in using following procedure. If it is out of the specification, inspect and replace any
damaged or worn rear suspension parts.
WARNING:
• Always perform the following procedure on a flat surface.
• Make sure that no person is in front of the vehicle before pushing it.
1. Bounce the rear of the vehicle up and down to stabilize the vehicle height (posture).
2. Push the rear wheel to move the vehicle straight ahead about 5 m (16 ft).
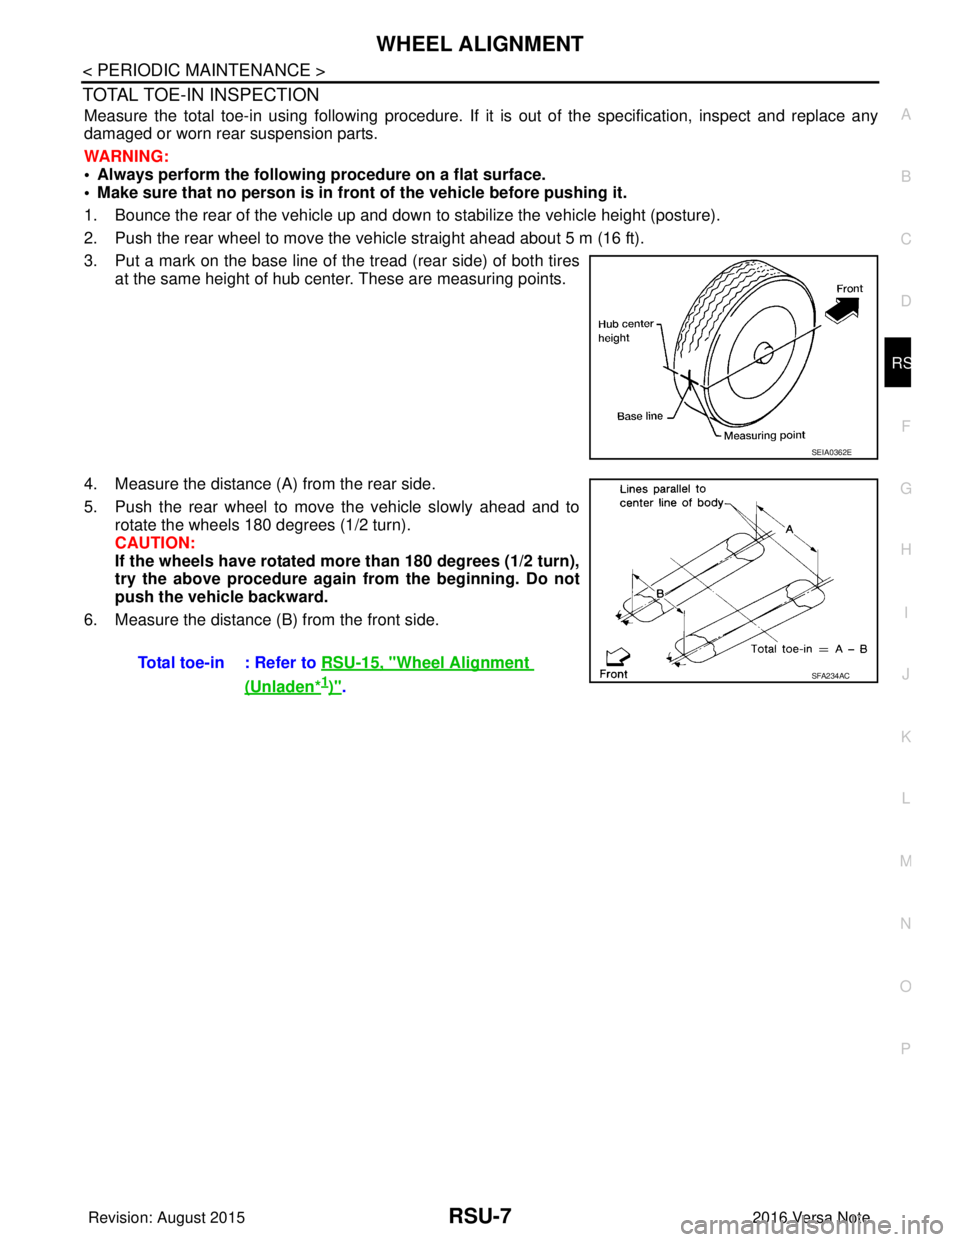
3. Put a mark on the base line of the tread (rear side) of both tires at the same height of hub center. These are measuring points.
4. Measure the distance (A) from the rear side.
5. Push the rear wheel to move the vehicle slowly ahead and to rotate the wheels 180 degrees (1/2 turn).
CAUTION:
If the wheels have rotated more than 180 degrees (1/2 turn),
try the above procedure again from the beginning. Do not
push the vehicle backward.
6. Measure the distance (B) from the front side.
SEIA0362E
Total toe-in : Refer to RSU-15, "Wheel Alignment
(Unladen*1)".SFA234AC
Revision: August 2015 2016 Versa Note
cardiagn.com
Page 2744 of 3641

WT-1
SUSPENSION
C
DF
G H
I
J
K L
M
SECTION WT
A
B
WT
N
O PCONTENTS
ROAD WHEELS & TIRES
PRECAUTION ....... ........................................3
PRECAUTIONS .............................................. .....3
Precaution for Supplemental Restraint System
(SRS) "AIR BAG" and "SEAT BELT PRE-TEN-
SIONER" ............................................................. ......
3
Service Notice and Precautions for TPMS ................3
Service Notice and Precautions for Road Wheel ......3
PREPARATION ............................................5
PREPARATION .............................................. .....5
Special Service Tool ........................................... ......5
Commercial Service Tool ..........................................5
SYSTEM DESCRIPTION ..............................6
COMPONENT PARTS ................................... .....6
Component Parts Location .................................. ......6
Component Description .............................................6
BCM ..........................................................................6
Remote Keyless Entry Receiver ...............................6
Transmitter ................................................................7
Low Tire Pressure Warning Lamp .............................7
SYSTEM ......................................................... .....8
TIRE PRESSURE MONITORING SYSTEM .......... ......8
TIRE PRESSURE MONITORING SYSTEM : Sys-
tem Diagram ..............................................................
8
TIRE PRESSURE MONITORING SYSTEM : Sys-
tem Description .........................................................
8
TIRE PRESSURE MONITORING SYSTEM :
Easy Fill Tire Alert Function ......................................
8
DIAGNOSIS SYSTEM (BCM) ............................10
WITH INTELLIGENT KEY ..................................... ....10
WITH INTELLIGENT KEY : CONSULT Function
(BCM - COMMON ITEM) ........................................
10
WITH INTELLIGENT KEY : CONSULT Function
(BCM - AIR PRESSURE MONITOR) ......................
11
WITHOUT INTELLIGENT KEY .............................. ....11
WITHOUT INTELLIGENT KEY : CONSULT Func-
tion (BCM - COMMON ITEM) ..................................
11
WITHOUT INTELLIGENT KEY : CONSULT Func-
tion (BCM - AIR PRESSURE MONITOR) ...............
12
ECU DIAGNOSIS INFORMATION ..............14
BCM ...................................................................14
List of ECU Reference ......................................... ....14
WIRING DIAGRAM ......................................15
TIRE PRESSURE MONITORING SYSTEM ......15
Wiring Diagram - With Inte lligent Key ......................15
Wiring Diagram - Without Intelligent Ke y .................18
BASIC INSPECTION ....... ............................21
DIAGNOSIS AND REPAIR WORK FLOW .......21
Work Flow ............................................................ ....21
ID REGISTRATION PROCEDURE ...................22
Description ...............................................................22
Work Procedure .......................................................22
DTC/CIRCUIT DIAGNOSIS .........................25
C1704, C1705, C1706, C1707 LOW TIRE
PRESSURE .......................................................
25
DTC Logic ............................................................ ....25
Diagnosis Procedure ...............................................25
C1708, C1709, C1710, C1711 TRANSMITTER
(NO DATA) ........................................................
27
DTC Logic ............................................................ ....27
Diagnosis Procedure ...............................................27
C1716, C1717, C1718, C1719 TRANSMITTER
(PRESSURE DATA) ..........................................
30
DTC Logic ............................................................ ....30
Diagnosis Procedure ...............................................30
Revision: August 2015 2016 Versa Note
cardiagn.com
Page 2745 of 3641

WT-2
C1729 VEHICLE SPEED SIGNAL ....................32
DTC Logic ............................................................ ...32
Diagnosis Procedure ..............................................32
LOW TIRE PRESSURE WARNING LAMP .......33
Component Function Check ................................ ...33
Diagnosis Procedure ..............................................33
POWER SUPPLY AND GROUND CIRCUIT .....34
WITH INTELLIGENT KEY ...................................... ...34
WITH INTELLIGENT KEY : Diagnosis Procedure ...34
WITHOUT INTELLIGENT KEY .............................. ...34
WITHOUT INTELLIGENT KEY : Diagnosis Proce-
dure ........................................................................
34
SYMPTOM DIAGNOSIS .............................36
TPMS SYMPTOMS ......................................... ...36
Symptom Table ................................................... ...36
LOW TIRE PRESSURE WARNING LAMP
DOES NOT TURN ON .......................................
37
Diagnosis Procedure ..............................................37
LOW TIRE PRESSURE WARNING LAMP
DOES NOT TURN OFF .....................................
38
Diagnosis Procedure ........................................... ...38
LOW TIRE PRESSURE WARNING LAMP
BLINKS ..............................................................
39
Diagnosis Procedure ........................................... ...39
EASY FILL TIRE ALERT DOES NOT ACTI-
VATE ..................................................................
40
Description ........................................................... ...40
Diagnosis Procedure ..............................................40
ID REGISTRATION CANNOT BE COMPLET-
ED ......................................................................
42
Diagnosis Procedure ............................................ ...42
NOISE, VIBRATION AND HARSHNESS
(NVH) TROUBLESHOOTING ............................
43
NVH Troubleshooting Chart ....................................43
PERIODIC MAINTENANCE .......................44
WHEEL ........................................................... ...44
Inspection ............................................................. ...44
WHEEL AND TIRE ............................................45
Adjustment ........................................................... ...45
REMOVAL AND INSTALLATION ..............48
WHEEL AND TIRE ......................................... ...48
Exploded View ..................................................... ...48
Removal and Installation .........................................48
TRANSMITTER .............................................. ...49
Exploded View ..................................................... ...49
Removal and Installation .........................................49
Disposal ............................................................... ...52
TIRE PRESSURE RECEIVER ...........................53
Removal and Installation .........................................53
SERVICE DATA AND SPECIFICATIONS
(SDS) .......... ................................. ...............
54
SERVICE DATA AND SPECIFICATIONS
(SDS) .............................................................. ...
54
Wheel ................................................................... ...54
Tire Air Pressure .....................................................54
Revision: August 2015 2016 Versa Note
cardiagn.com
Page 2746 of 3641
PRECAUTIONSWT-3
< PRECAUTION >
C
DF
G H
I
J
K L
M A
B
WT
N
O P
PRECAUTION
PRECAUTIONS
Precaution for Supplemental Restraint System (SRS) "AIR BAG" and "SEAT BELT
PRE-TENSIONER"
INFOID:0000000012432421
The Supplemental Restraint System such as “AIR BAG” and “SEAT BELT PRE-TENSIONER”, used along
with a front seat belt, helps to reduce the risk or severi ty of injury to the driver and front passenger for certain
types of collision. Information necessary to service the system safely is included in the SR and SB section of
this Service Manual.
WARNING:
• To avoid rendering the SRS inoper ative, which could increase the risk of personal injury or death in
the event of a collision which would result in air bag inflation, all maintenance must be performed by
an authorized NISSAN/INFINITI dealer.
• Improper maintenance, including in correct removal and installation of the SRS, can lead to personal
injury caused by unintentional act ivation of the system. For removal of Spiral Cable and Air Bag
Module, see the SR section.
• Do not use electrical test equipm ent on any circuit related to the SRS unless instructed to in this
Service Manual. SRS wiring harnesses can be identi fied by yellow and/or orange harnesses or har-
ness connectors.
PRECAUTIONS WHEN USING POWER TOOLS (AIR OR ELECTRIC) AND HAMMERS
WARNING:
• When working near the Airbag Diagnosis Sensor Un it or other Airbag System sensors with the Igni-
tion ON or engine running, DO NOT use air or el ectric power tools or strike near the sensor(s) with a
hammer. Heavy vibration could activate the sensor( s) and deploy the air bag(s), possibly causing
serious injury.
• When using air or electric power tools or hammers, always switch the Ignition OFF, disconnect the
battery and wait at least three mi nutes before performing any service.
Service Notice and Precautions for TPMSINFOID:0000000012432422
WARNING:
Radio waves could adversely affect electric medical equipment. Those who use a pacemaker should
contact the electric medical equipment manufacturer for the possible influences before use.
• Low tire pressure warning lamp blinks for 1 minute, then turns ON when occurring any malfunction except low tire pressure. Erase the self-diagnosis memories fo r Tire Pressure Monitoring System (TPMS), or regis-
ter the ID to turn low tire pressure warning lamp OFF. For ID registration, refer to WT-22, "
Work Procedure".
• ID registration is required when replacing or rotating wheels, replacing tire pressure sensor or BCM. Refer to WT-22, "
Work Procedure".
• Replace grommet seal, valve core and valve cap of tire pressure sensor in TPMS, when replacing each tire by reaching the wear limit. Refer to WT-49, "
Removal and Installation".
• Because the tire pressure sensor conforms to North America radio law, the following items must be
observed.
- The sensor may be used only in North America.
- It may not be used in any method other than the specified method.
- It must not be disassembled or modified.
Service Notice and Pr ecautions for Road WheelINFOID:0000000012432423
• Genuine NISSAN aluminum wheel is designed for each type of vehicle. Use it on the specified vehicle only.
• Use Genuine NISSAN parts for the road wheels, valve caps and wheel nuts.
• Always use them after adjusting the wheel balance. For the balance weights, use Genuine NISSAN alumi-
num wheel weights.
• Use caution when handling the aluminum wheels, because they can be easily scratched. When removing
dirt, do not use any abrasives, a wire brush, or other items that may scratch the coating. Use a neutral deter-
gent if a detergent is needed.
• After driving on roads scattered with anti-icing salts, wash off the wheels completely.
• When installing road wheels onto the vehicle, always wipe off any dirt or foreign substances to prevent them
from being trapped between the contact surfaces of wheel.
Revision: August 2015 2016 Versa Note
cardiagn.com
Page 2749 of 3641
WT-6
< SYSTEM DESCRIPTION >
COMPONENT PARTS
SYSTEM DESCRIPTION
COMPONENT PARTS
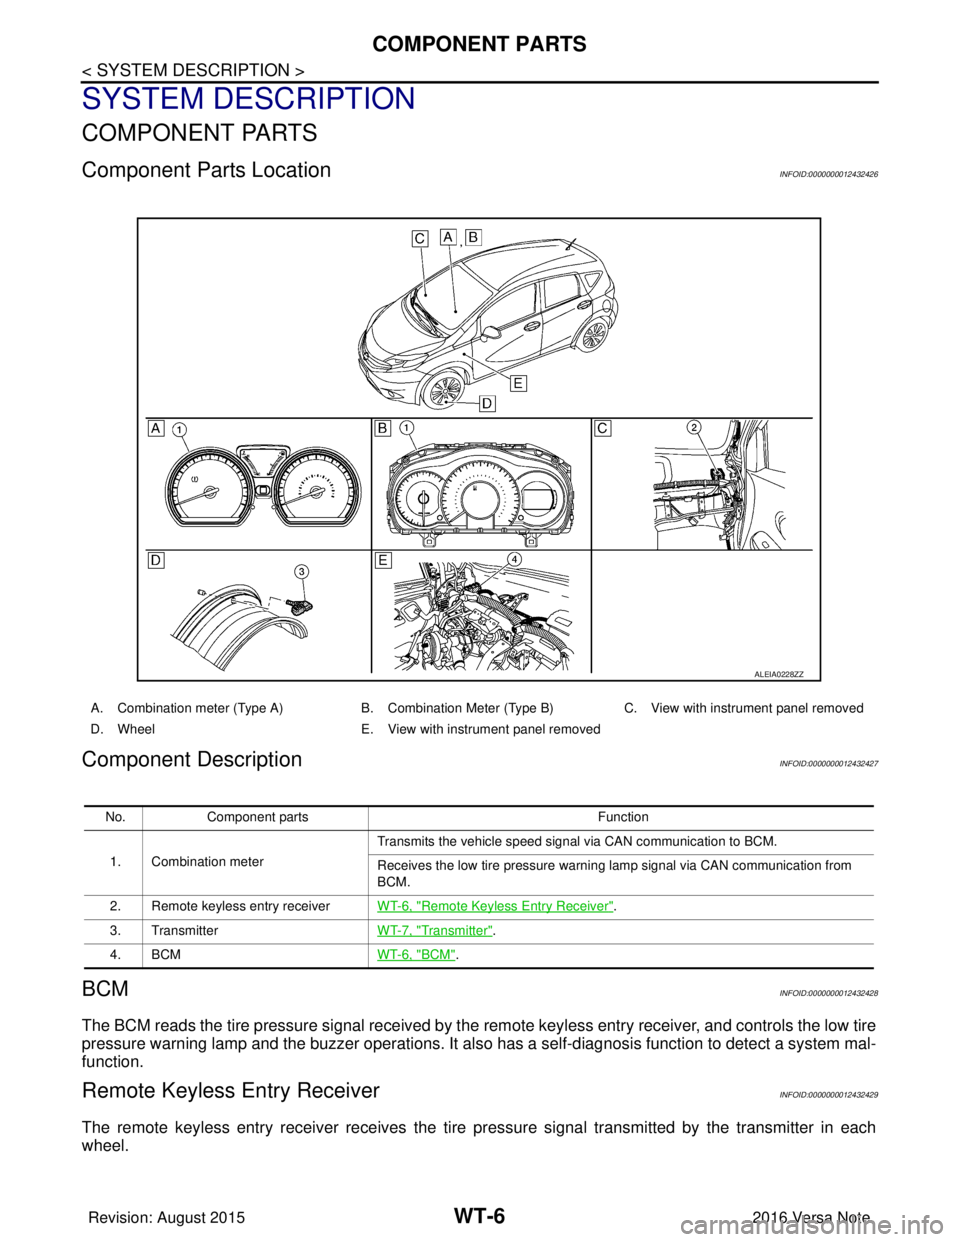
Component Parts LocationINFOID:0000000012432426
Component DescriptionINFOID:0000000012432427
BCMINFOID:0000000012432428
The BCM reads the tire pressure signal received by the remote keyless entry receiver, and controls the low tire
pressure warning lamp and the buzzer operations. It also has a self-diagnosis function to detect a system mal-
function.
Remote Keyless Entry ReceiverINFOID:0000000012432429
The remote keyless entry receiver receives the tire pressure signal transmitted by the transmitter in each
wheel.
ALEIA0228ZZ
A. Combination meter (Type A) B. Combination Meter (Type B)C. View with instrument panel removed
D. Wheel E. View with instrument panel removed
No. Component parts Function
1. Combination meter Transmits the vehicle speed signal via CAN communication to BCM.
Receives the low tire pressure warning lamp signal via CAN communication from
BCM.
2. Remote keyless entry receiver WT-6, "
Remote Keyless Entry Receiver".
3. Transmitter WT-7, "
Transmitter".
4. BCM WT-6, "
BCM".
Revision: August 2015 2016 Versa Note
cardiagn.com
Page 2750 of 3641

COMPONENT PARTSWT-7
< SYSTEM DESCRIPTION >
C
DF
G H
I
J
K L
M A
B
WT
N
O P
TransmitterINFOID:0000000012432430
A sensor-transmitter integrated with a valve is installed in each wheel, and transmits a detected tire pressure
signal in the form of a radio wave. The radio signal is received by the remote keyless entry receiver.
Low Tire Pressure Warning LampINFOID:0000000012432431
The combination meter receives tire pressure status from the BCM using CAN communication. When a low
tire pressure condition is sensed by the BCM, the combi nation meter low tire pressure warning lamp is acti-
vated.
Revision: August 2015 2016 Versa Note
cardiagn.com
Page 2751 of 3641
WT-8
< SYSTEM DESCRIPTION >
SYSTEM
SYSTEM
TIRE PRESSURE MONITORING SYSTEM
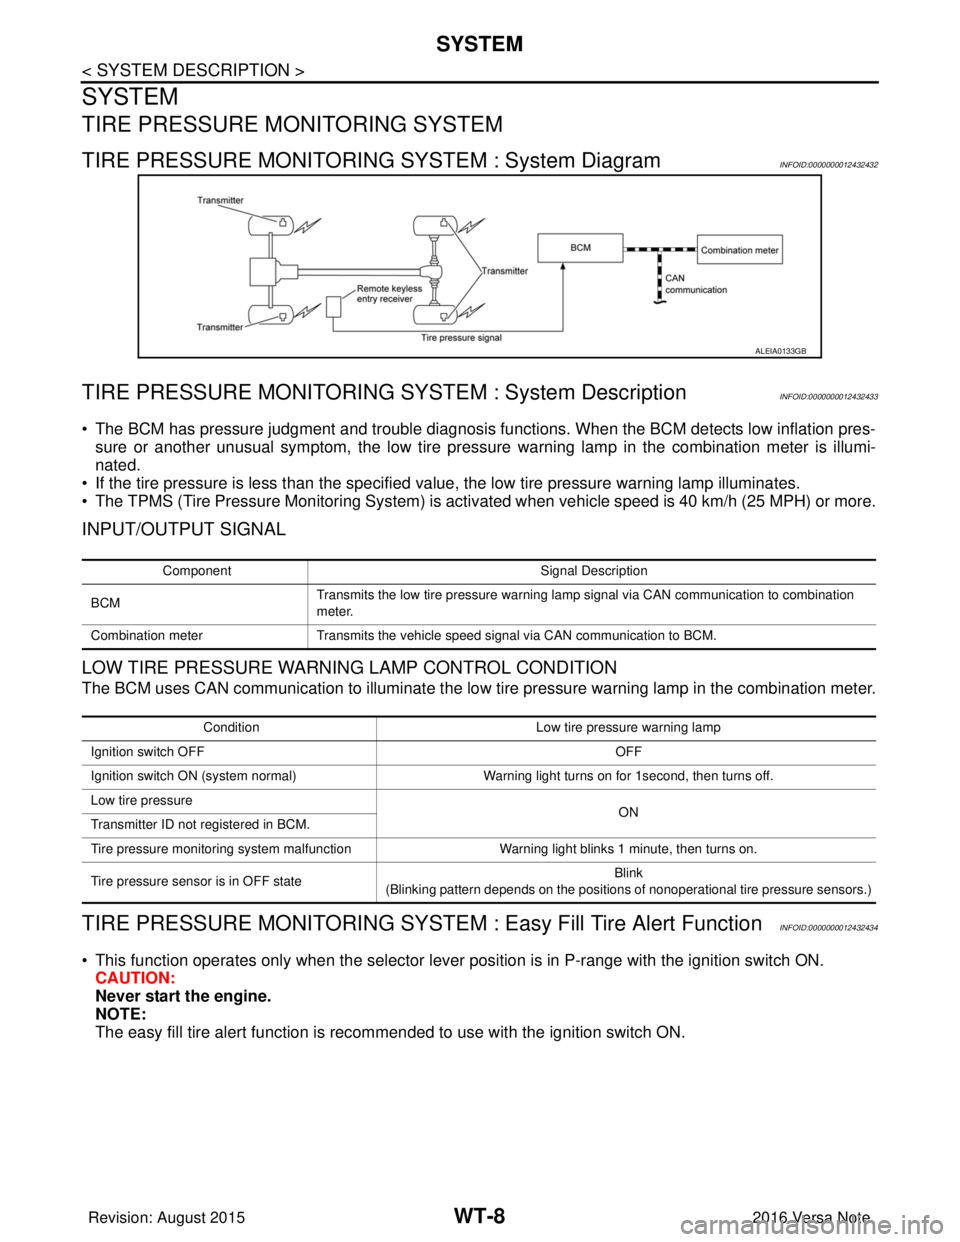
TIRE PRESSURE MONITORING SYSTEM : System DiagramINFOID:0000000012432432
TIRE PRESSURE MONITORING SY STEM : System DescriptionINFOID:0000000012432433
• The BCM has pressure judgment and trouble diagnosis functions. When the BCM detects low inflation pres-
sure or another unusual symptom, the low tire pressure warning lamp in the combination meter is illumi-
nated.
• If the tire pressure is less than the specified value, the low tire pressure warning lamp illuminates.
• The TPMS (Tire Pressure Monitoring System) is activated when vehicle s peed is 40 km/h (25 MPH) or more.
INPUT/OUTPUT SIGNAL
LOW TIRE PRESSURE WARNING LAMP CONTROL CONDITION
The BCM uses CAN communication to illuminate the low tire pressure warning lamp in the combination meter.
TIRE PRESSURE MONITORING SYSTEM : Easy Fill Tire Alert FunctionINFOID:0000000012432434
• This function operates only when the selector lever position is in P-range with the ignition switch ON.
CAUTION:
Never start the engine.
NOTE:
The easy fill tire alert function is reco mmended to use with the ignition switch ON.
ALEIA0133GB
Component Signal Description
BCM Transmits the low tire pressure warning lamp signal via CAN communication to combination
meter.
Combination meter Transmits the vehicle speed signal via CAN communication to BCM.
Condition Low tire pressure warning lamp
Ignition switch OFF OFF
Ignition switch ON (system normal) Warning light turns on for 1second, then turns off.
Low tire pressure ON
Transmitter ID not registered in BCM.
Tire pressure monitoring system malfunction Warning light blinks 1 minute, then turns on.
Tire pressure sensor is in OFF state Blink
(Blinking pattern depends on the positions of nonoperational tire pressure sensors.)
Revision: August 2015 2016 Versa Note
cardiagn.com
Page 2752 of 3641
SYSTEMWT-9
< SYSTEM DESCRIPTION >
C
DF
G H
I
J
K L
M A
B
WT
N
O P
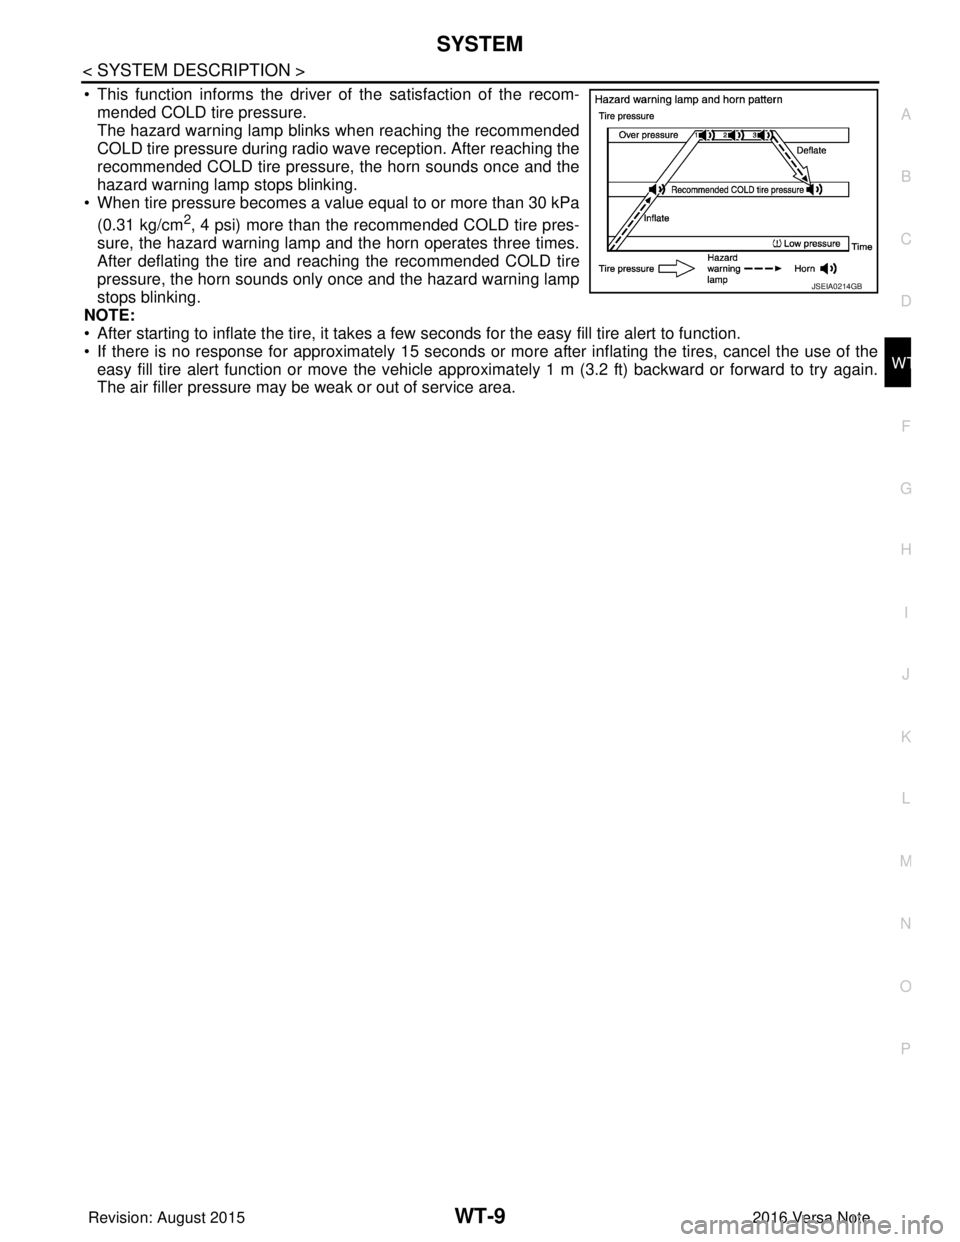
• This function informs the driver of the satisfaction of the recom- mended COLD tire pressure.
The hazard warning lamp blinks when reaching the recommended
COLD tire pressure during radio wave reception. After reaching the
recommended COLD tire pressure, the horn sounds once and the
hazard warning lamp stops blinking.
• When tire pressure becomes a value equal to or more than 30 kPa
(0.31 kg/cm
2, 4 psi) more than the recommended COLD tire pres-
sure, the hazard warning lamp and the horn operates three times.
After deflating the tire and reaching the recommended COLD tire
pressure, the horn sounds only once and the hazard warning lamp
stops blinking.
NOTE:
• After starting to inflate the tire, it takes a fe w seconds for the easy fill tire alert to function.
• If there is no response for approximately 15 seconds or mo re after inflating the tires, cancel the use of the
easy fill tire alert function or move the vehicle approximately 1 m (3.2 ft) backward or forward to try again.
The air filler pressure may be weak or out of service area.
JSEIA0214GB
Revision: August 2015 2016 Versa Note
cardiagn.com