Page 2332 of 3641

ENGINE MAINTENANCEMA-17
< PERIODIC MAINTENANCE >
C
DE
F
G H
I
J
K L
M B
MA
N
O A
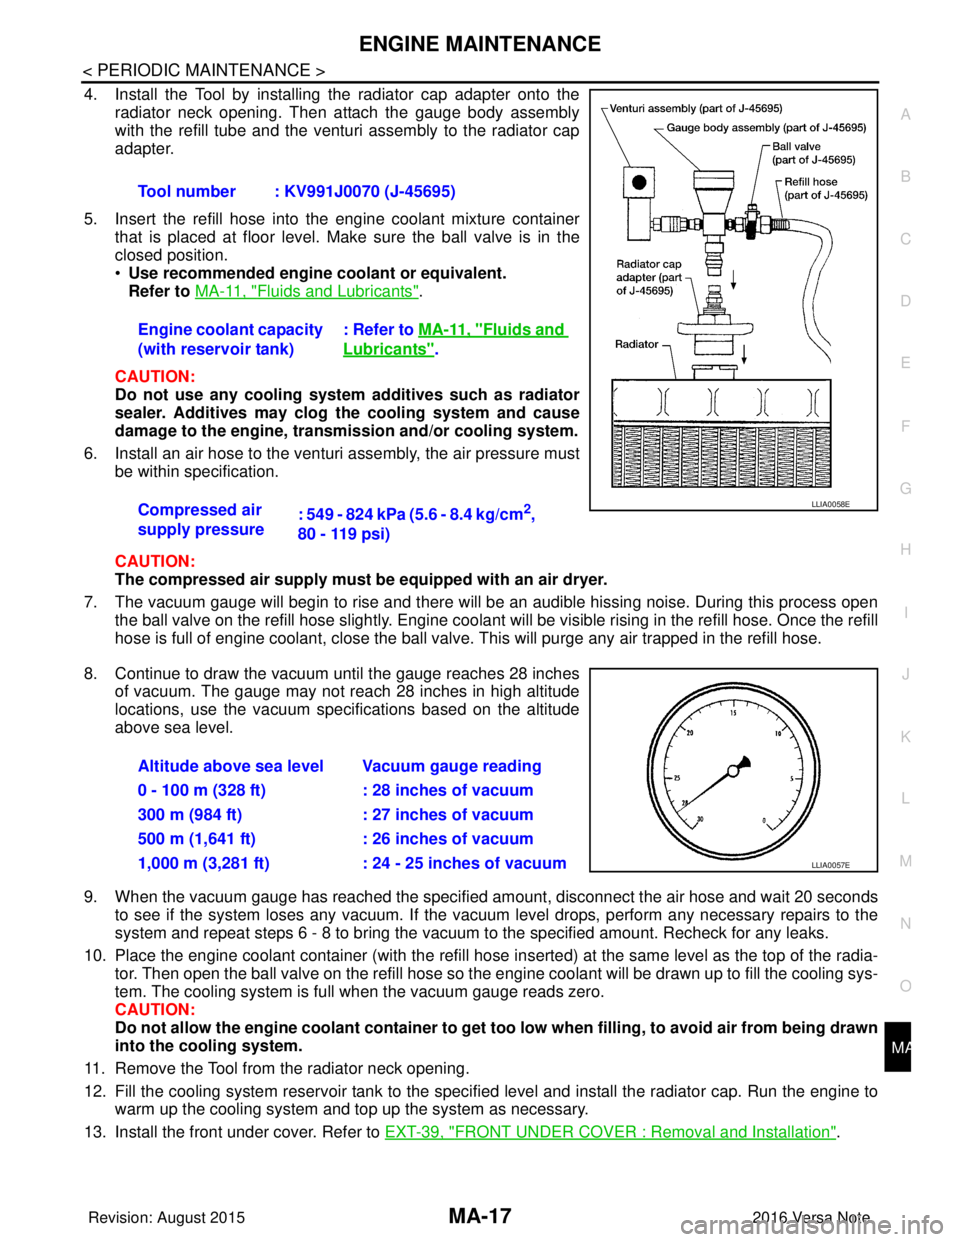
4. Install the Tool by installing the radiator cap adapter onto the
radiator neck opening. Then attach the gauge body assembly
with the refill tube and the venturi assembly to the radiator cap
adapter.
5. Insert the refill hose into the engine coolant mixture container that is placed at floor level. Make sure the ball valve is in the
closed position.
•Use recommended engine coolant or equivalent.
Refer to MA-11, "
Fluids and Lubricants".
CAUTION:
Do not use any cooling system additives such as radiator
sealer. Additives may clog the cooling system and cause
damage to the engine, transmission and/or cooling system.
6. Install an air hose to the venturi assembly, the air pressure must be within specification.
CAUTION:
The compressed air supply must be equipped with an air dryer.
7. The vacuum gauge will begin to rise and there will be an audible hissing noise. During this process open the ball valve on the refill hose slightly. Engine coolant will be visible rising in the refill hose. Once the refill
hose is full of engine coolant, close the ball valve. This will purge any air trapped in the refill hose.
8. Continue to draw the vacuum until the gauge reaches 28 inches of vacuum. The gauge may not reach 28 inches in high altitude
locations, use the vacuum specifications based on the altitude
above sea level.
9. When the vacuum gauge has reached the specified amount, disconnect the air hose and wait 20 seconds
to see if the system loses any vacuum. If the vacuum level drops, perform any necessary repairs to the
system and repeat steps 6 - 8 to br ing the vacuum to the specified amount. Recheck for any leaks.
10. Place the engine coolant container (with the refill hose in serted) at the same level as the top of the radia-
tor. Then open the ball valve on the refill hose so the engine coolant will be drawn up to fill the cooling sys-
tem. The cooling system is full when the vacuum gauge reads zero.
CAUTION:
Do not allow the engine coolant co ntainer to get too low when filling, to avoid air from being drawn
into the cooling system.
11. Remove the Tool from the radiator neck opening.
12. Fill the cooling system reservoir tank to the specif ied level and install the radiator cap. Run the engine to
warm up the cooling system and top up the system as necessary.
13. Install the front under cover. Refer to EXT-39, "
FRONT UNDER COVER : Removal and Installation".
Tool number : KV991J0070 (J-45695)
Engine coolant capacity
(with reservoir tank)
: Refer to
MA-11, "
Fluids and
Lubricants".
Compressed air
supply pressure : 549 - 824 kPa (5.6 - 8.4 kg/cm
2,
80 - 119 psi)LLIA0058E
Altitude above sea level Vacuum gauge reading
0 - 100 m (328 ft) : 28 inches of vacuum
300 m (984 ft) : 27 inches of vacuum
500 m (1,641 ft) : 26 inches of vacuum
1,000 m (3,281 ft) : 24 - 25 inches of vacuum
LLIA0057E
Revision: August 2015 2016 Versa Note
cardiagn.com
Page 3621 of 3641
WW-56
< REMOVAL AND INSTALLATION >
WASHER TANK
REMOVAL AND INSTALLATION
WASHER TANK
Exploded ViewINFOID:0000000012433233
Removal and InstallationINFOID:0000000012433234
REMOVAL
1. Remove front under cover. Refer to EXT-39, "FRONT UNDER COVER : Removal and Installation".
2. Remove fender protector (RH). Refer to EXT-38, "
Removal and Installation".
3. Remove washer tank clip (A) using a suitable tool.
1. Washer tank cap 2. Washer tank 3. Front washer motor
A. Front washer motor seal B. Washer fluid level switch (if equipped) Front
ALLIA1317ZZ
ALKIA3175ZZ
Revision: August 2015 2016 Versa Note
cardiagn.com
Page 3623 of 3641
WW-58
< REMOVAL AND INSTALLATION >
FRONT WASHER MOTOR
FRONT WASHER MOTOR
Exploded ViewINFOID:0000000012433235
Removal and InstallationINFOID:0000000012433236
REMOVAL
1. Remove front under cover. Refer to EXT-39, "FRONT UNDER COVER : Removal and Installation".
2. Remove fender protector (RH). Refer to EXT-38, "
Removal and Installation".
3. Disconnect the harness connector from the front washer motor.
4. Remove front washer tube and rear wa sher tube from front washer motor.
5. Remove front washer motor from washer tank.
6. Remove front washer motor seal from washer tank.
INSTALLATION
Installation is in the reverse order of removal.
CAUTION:
Do not rotate or damage the front washer moto r seal when installing the front washer motor.
1. Washer tank cap 2. Washer tank 3. Front washer motor
A. Front washer motor seal B. Washer fluid level switch (if equipped) Front
ALLIA1317ZZ
Revision: August 2015 2016 Versa Note
cardiagn.com
Page 3639 of 3641

WW-74
< REMOVAL AND INSTALLATION >
REAR WASHER NOZZLE AND TUBE
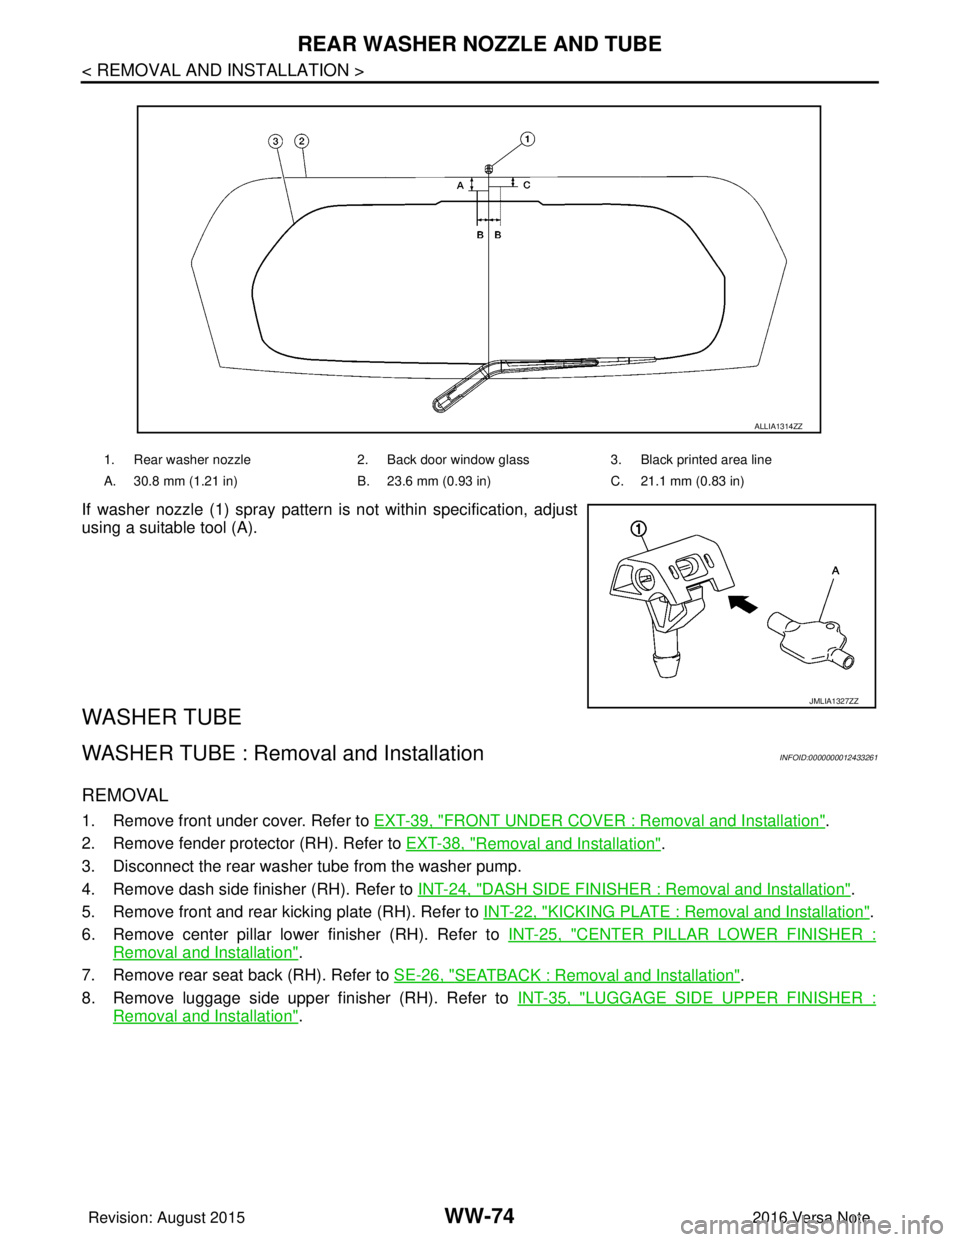
If washer nozzle (1) spray pattern is not within specification, adjust
using a suitable tool (A).
WASHER TUBE
WASHER TUBE : Removal and InstallationINFOID:0000000012433261
REMOVAL
1. Remove front under cover. Refer to EXT-39, "FRONT UNDER COVER : Removal and Installation".
2. Remove fender protector (RH). Refer to EXT-38, "
Removal and Installation".
3. Disconnect the rear washer tube from the washer pump.
4. Remove dash side finisher (RH). Refer to INT-24, "
DASH SIDE FINISHER : Removal and Installation".
5. Remove front and rear kicking plate (RH). Refer to INT-22, "
KICKING PLATE : Removal and Installation".
6. Remove center pillar lower finisher (RH). Refer to INT-25, "
CENTER PILLAR LOWER FINISHER :
Removal and Installation".
7. Remove rear seat back (RH). Refer to SE-26, "
SEATBACK : Removal and Installation".
8. Remove luggage side upper finisher (RH). Refer to INT-35, "
LUGGAGE SIDE UPPER FINISHER :
Removal and Installation".
1. Rear washer nozzle2. Back door window glass3. Black printed area line
A. 30.8 mm (1.21 in) B. 23.6 mm (0.93 in)C. 21.1 mm (0.83 in)
ALLIA1314ZZ
JMLIA1327ZZ
Revision: August 2015 2016 Versa Note
cardiagn.com