Page 17 of 40

15
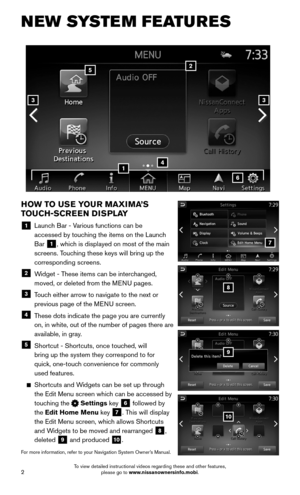
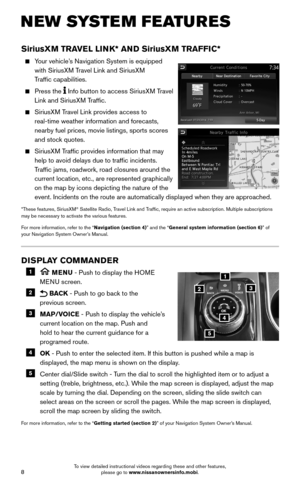
SEAT ADJUSTMENTS
SEAT FABRIC
If so equipped, your vehicle’s seats may be made from a material known as Alcantara®.
In the case of most localized stains, using lukewarm water and soap will restore
Alcantara® to its factory condition. For more details on proper cleaning, please refer to
your Owner’s Manual.
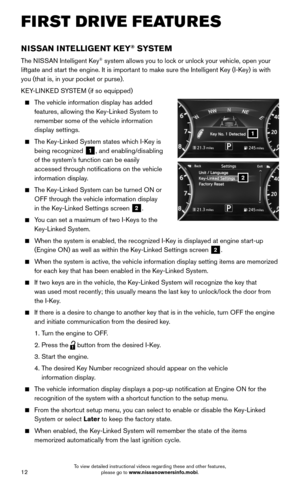
POWER SEATS
To slide the seat forward or backward, push the
switch 1 forward or backward.
To recline the seatback, push the switch
2 forward or backward.
POWER SEAT LIFTER (driver’s seat)
To adjust the angle of the front seat cushion or
height of the seat, push the front or rear end of
the switch 1 up or down.
POWER LUMBAR SUPPORT
(if so equipped for driver’s seat)
To adjust the seat lumbar support, push the front or back end of
the switch 3.
THIGH SUPPORT (if so equipped for driver’s seat)
Pull up and hold the lever 4 to extend the front
portion of the seat to the desired position.
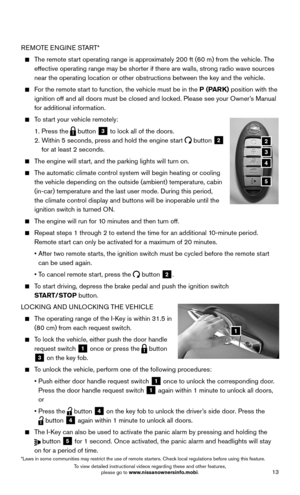
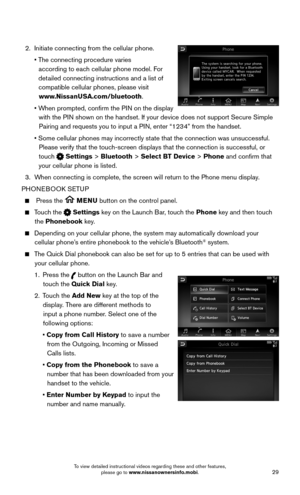
FOLDING DOWN THE REAR SEAT
To fold the rear seatback, push down on
the button on the rear parcel shelf 5. The
passenger’s side rear seatback will release.
The pull straps 6 located in the trunk will
release the rear seatbacks to allow them to
fold forward.
To raise the seatback, lift up each seatback and
push it to the upright position until it is latched.
For more information, refer to the “Safety –– Seats, seat belts and supplemental restraint system (section 1)” of your Owner’s Manual.
123
5
4
6
To view detailed instructional videos regarding these and other features, please go to www.nissanownersinfo.mobi.
Page 18 of 40

Two positions for the driver’s seat, steering
column (if so equipped) and outside mirrors
can be stored in the automatic drive
positioner mem")
16
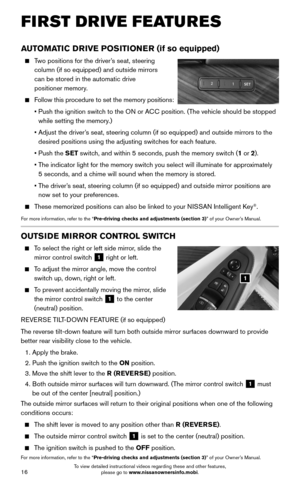
AUTOMATIC DRIVE POSITIONER (if so equipped)
Two positions for the driver’s seat, steering
column (if so equipped) and outside mirrors
can be stored in the automatic drive
positioner memory.
Follow this procedure to set the memory positions:
• Push the ignition switch to the ON or ACC position. (The vehicle should be stopped
while setting the memory.)
• Adjust the driver’s seat, steering column (if so equipped) and outside mirrors to the
desired positions using the adjusting switches for each feature.
• Push the SET switch, and within 5 seconds, push the memory switch (1 or 2).
• The indicator light for the memory switch you select will illuminate for approximately
5 seconds, and a chime will sound when the memory is stored.
• The driver’s seat, steering column (if so equipped) and outside mirror positions \
are
now set to your preferences.
These memorized positions can also be linked to your NISSAN Intelligent Key®.
For more information, refer to the “Pre-driving checks and adjustments (section 3)” of your Owner’s Manual.
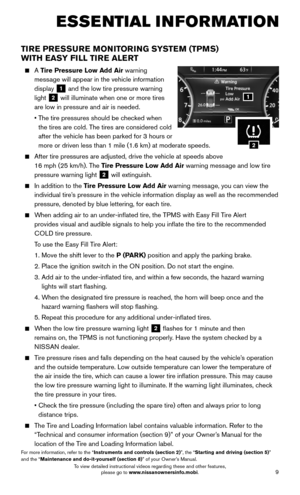
OUTSIDE MIRROR CONTROL SWITCH
To select the right or left side mirror, slide the
mirror control switch 1 right or left.
To adjust the mirror angle, move the control
switch up, down, right or left.
To prevent accidentally moving the mirror, slide
the mirror control switch 1 to the center
(neutral) position.
REVERSE TILT-DOWN FEATURE (if so equipped)
The reverse tilt-down feature will turn both outside mirror surfaces down\
ward to provide
better rear visibility close to the vehicle.
1. Apply the brake.
2. Push the ignition switch to the ON position.
3. Move the shift lever to the R (REVERSE) position.
4. Both outside mirror surfaces will turn downward. (The mirror control switch 1 must
be out of the center [neutral] position.)
The outside mirror surfaces will return to their original positions when \
one of the following
conditions occurs:
The shift lever is moved to any position other than R (REVERSE).
The outside mirror control switch 1 is set to the center (neutral) position.
The ignition switch is pushed to the OFF position.
For more information, refer to the “Pre-driving checks and adjustments (section 3)” of your Owner’s Manual.
1
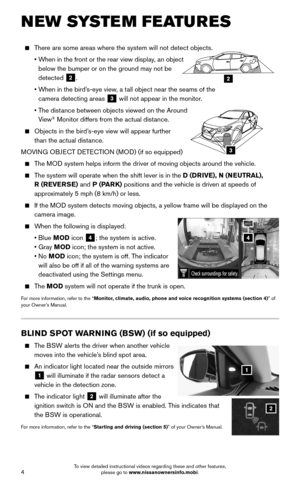
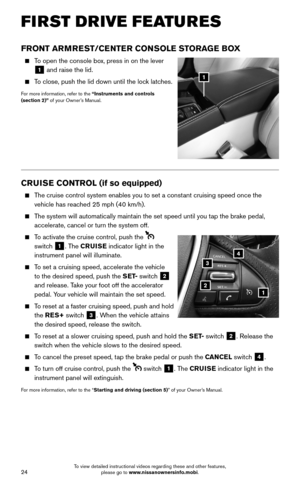
FIRST DRIVE FEATURES
To view detailed instructional videos regarding these and other features, please go to www.nissanownersinfo.mobi.
Page 19 of 40
.
Depress the brake pedal.
Press the ignition swi")
17
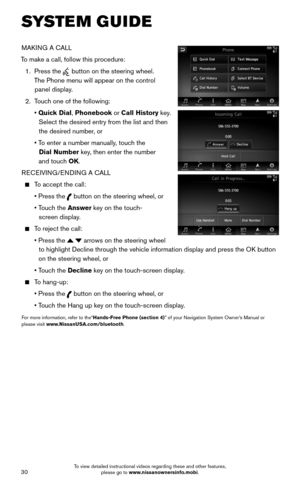
STARTING/STOPPING THE ENGINE
It is important to make sure the NISSAN
Intelligent Key® is with you (that is, in your
pocket or purse).
Depress the brake pedal.
Press the ignition switch START/STOP button
to start the engine.
TURNING THE ENGINE OFF
Move the shift lever to the P (PARK) position.
Press the ignition switch START/STOP button to turn the engine off.
For more information, refer to the “Starting and driving (section 5)” of your Owner’s Manual.
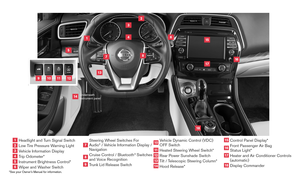
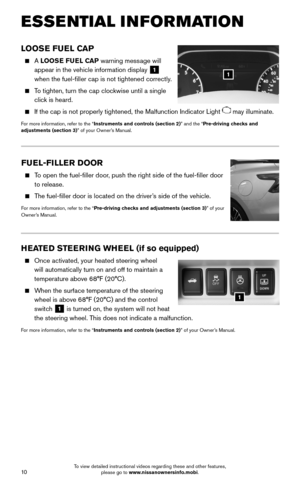
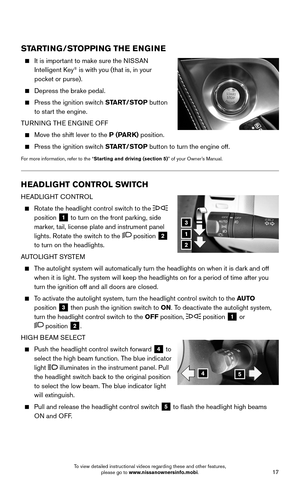
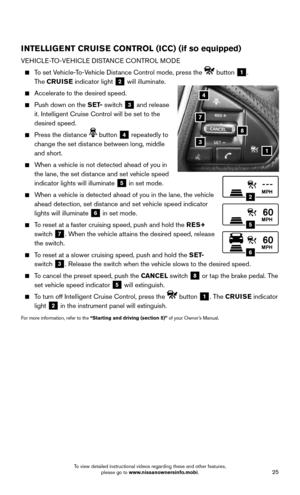
HEADLIGHT CONTROL SWITCH
HEADLIGHT CONTROL
Rotate the headlight control switch to the
position 1 to turn on the front parking, side
marker, tail, license plate and instrument panel
lights. Rotate the switch to the position 2
to turn on the headlights.
AUTOLIGHT SYSTEM
The autolight system will automatically turn the headlights on when it is\
dark and off
when it is light. The system will keep the headlights on for a period of time after you
turn the ignition off and all doors are closed.
To activate the autolight system, turn the headlight control switch to the AUTO
position 3 then push the ignition switch to ON. To deactivate the autolight system,
turn the headlight control switch to the OFF position, position 1 or
position 2.
HIGH BEAM SELECT
Push the headlight control switch forward 4 to
select the high beam function. The blue indicator
light illuminates in the instrument panel. Pull
the headlight switch back to the original position
to select the low beam. The blue indicator light
will extinguish.
Pull and release the headlight control switch 5 to flash the headlight high beams
ON and OFF.
1
3
2
45
To view detailed instructional videos regarding these and other features, please go to www.nissanownersinfo.mobi.
Page 20 of 40
 to the position
6 to turn the fog lights on.")
18
6
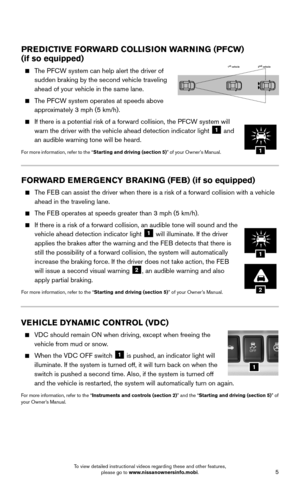
FOG LIGHT SWITCH
The headlights must be on and the low beams
selected for the fog lights to operate.
Turn the switch (inside collar) to the position
6 to turn the fog lights on.
Turn the switch (inside collar) to the OFF
position to turn the fog lights off.
LANE CHANGE SIGNAL
Move the lever up or down until the turn signal begins to flash but th\
e lever does not
latch to signal a lane change. Hold the lever until the lane change is completed.
Move the lever up or down until the turn signal begins to flash but th\
e lever does not
latch and release the lever. The turn signal will automatically flash 3 times.
Choose the appropriate method to signal a lane change based on the road and
traffic conditions.
For more information, refer to the “Instruments and controls (section 2)” of your Owner’s Manual.
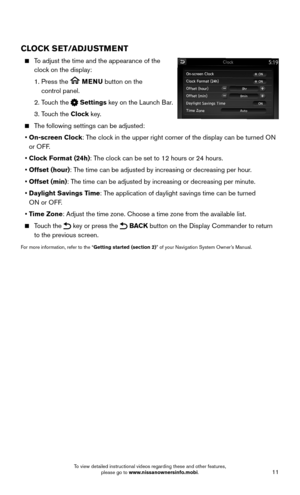
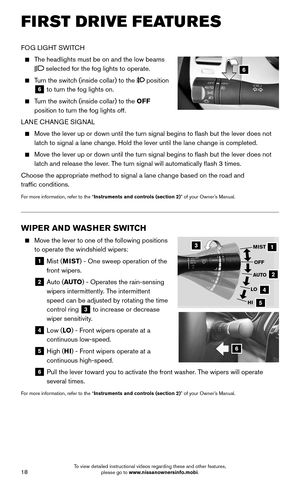
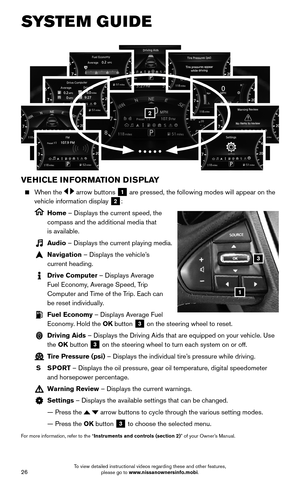
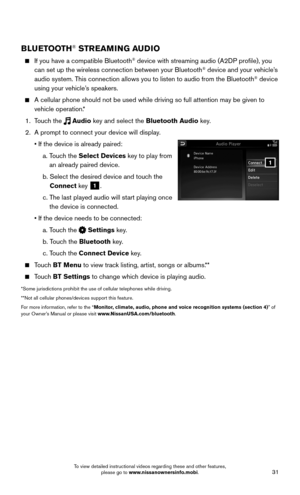
WIPER AND WASHER SWITCH
Move the lever to one of the following positions
to operate the windshield wipers:
1 Mist (MIST) - One sweep operation of the
front wipers.
2 Auto (AUTO) - Operates the rain-sensing
wipers intermittently. The intermittent
speed can be adjusted by rotating the time
control ring 3 to increase or decrease
wiper sensitivity.
4 Low (LO) - Front wipers operate at a
continuous low-speed.
5 High (HI) - Front wipers operate at a
continuous high-speed.
6 Pull the lever toward you to activate the front washer. The wipers will operate
several times.
For more information, refer to the “Instruments and controls (section 2)” of your Owner’s Manual.
1
2
4
5
MIST
OFF
AUTO
LO
HI
3
6
FIRST DRIVE FEATURES
To view detailed instructional videos regarding these and other features, please go to www.nissanownersinfo.mobi.
Page 21 of 40

OPENING/CLOSING THE MOONROOF
AND SUNSHADE
To fully open the moonroof and sunshade, push
the switch fully past the detent toward the
OPEN posi")
19
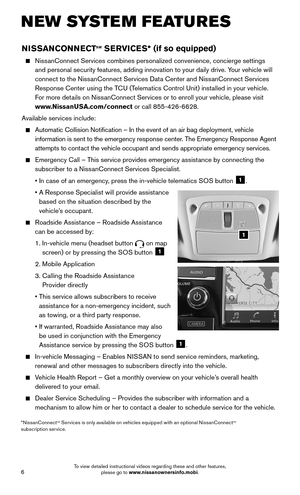
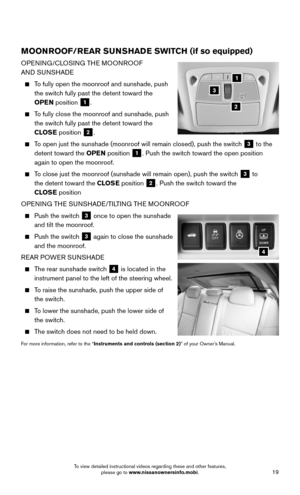
MOONROOF/REAR SUNSHADE SWITCH (if so equipped)
OPENING/CLOSING THE MOONROOF
AND SUNSHADE
To fully open the moonroof and sunshade, push
the switch fully past the detent toward the
OPEN position 1.
To fully close the moonroof and sunshade, push
the switch fully past the detent toward the
CLOSE position 2.
To open just the sunshade (moonroof will remain closed), push the switc\
h 3 to the
detent toward the OPEN position 1. Push the switch toward the open position
again to open the moonroof.
To close just the moonroof (sunshade will remain open), push the switch 3 to
the detent toward the CLOSE position 2. Push the switch toward the
CLOSE position
OPENING THE SUNSHADE/TILTING THE MOONROOF
Push the switch 3 once to open the sunshade
and tilt the moonroof.
Push the switch 3 again to close the sunshade
and the moonroof.
REAR POWER SUNSHADE
The rear sunshade switch 4 is located in the
instrument panel to the left of the steering wheel.
To raise the sunshade, push the upper side of
the switch.
To lower the sunshade, push the lower side of
the switch.
The switch does not need to be held down.
For more information, refer to the “Instruments and controls (section 2)” of your Owner’s Manual.
4
1
2
3
To view detailed instructional videos regarding these and other features, please go to www.nissanownersinfo.mobi.
Page 22 of 40

1 AUTO BUTTON/DRIVER’S SIDE TEMPERATURE CONTROL DIAL
The automatic mode may be used year-round. Press the AUTO button to turn
the system on, and the s")
20
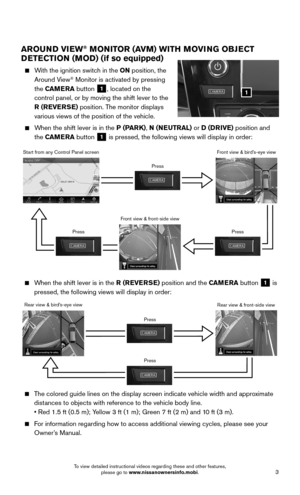
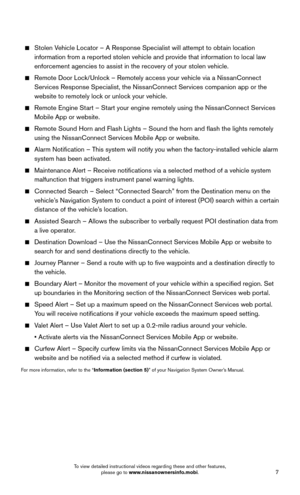
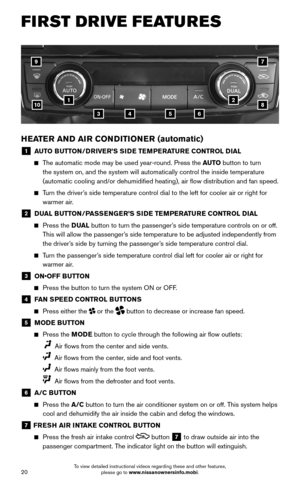
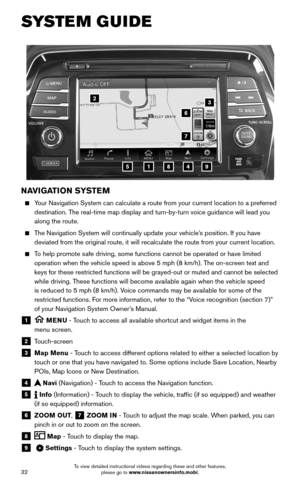
HEATER AND AIR CONDITIONER (automatic)
1 AUTO BUTTON/DRIVER’S SIDE TEMPERATURE CONTROL DIAL
The automatic mode may be used year-round. Press the AUTO button to turn
the system on, and the system will automatically control the inside temp\
erature
(automatic cooling and/or dehumidified heating), air flow distribu\
tion and fan speed.
Turn the driver’s side temperature control dial to the left for cooler air or right for \
warmer air.
2 DUAL BUTTON/PASSENGER’S SIDE TEMPERATURE CONTROL DIAL
Press the D UAL button to turn the passenger’s side temperature controls on or off.
This will allow the passenger’s side temperature to be adjusted independently from
the driver’s side by turning the passenger’s side temperature control dial.
Turn the passenger’s side temperature control dial left for cooler air or right for
warmer air.
3 ON•OFF BUTTON
Press the button to turn the system ON or OFF.
4 FAN SPEED CONTROL BUTTONS
Press either the or the button to decrease or increase fan speed.
5 MODE BUTTON
Press the MODE button to cycle through the following air flow outlets:
Air flows from the center and side vents.
Air flows from the center, side and foot vents.
Air flows mainly from the foot vents.
Air flows from the defroster and foot vents.
6 A/C BUTTON
Press the A/C button to turn the air conditioner system on or off. This system helps
cool and dehumidify the air inside the cabin and defog the windows.
7 FRESH AIR INTAKE CONTROL BUTTON
Press the fresh air intake control button 7 to draw outside air into the
passenger compartment. The indicator light on the button will extinguish.
FIRST DRIVE FEATURES
4
21
35
10
6
9
8
7
To view detailed instructional videos regarding these and other features, please go to www.nissanownersinfo.mobi.
Page 23 of 40

21
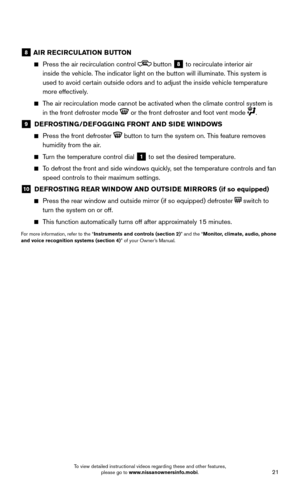
8 AIR RECIRCULATION BUTTON
Press the air recirculation control button 8 to recirculate interior air
inside the vehicle. The indicator light on the button will illuminate. This system is
used to avoid certain outside odors and to adjust the inside vehicle temperature
more effectively.
The air recirculation mode cannot be activated when the climate control s\
ystem is
in the front defroster mode or the front defroster and foot vent mode .
9 DEFROSTING/DEFOGGING FRONT AND SIDE WINDOWS
Press the front defroster button to turn the system on. This feature removes
humidity from the air.
Turn the temperature control dial 1 to set the desired temperature.
To defrost the front and side windows quickly, set the temperature controls and fan
speed controls to their maximum settings.
10 DEFROSTING REAR WINDOW AND OUTSIDE MIRRORS (if so equipped)
Press the rear window and outside mirror (if so equipped) defroster switch to
turn the system on or off.
This function automatically turns off after approximately 15 minutes.
For more information, refer to the “Instruments and controls (section 2)” and the “Monitor, climate, audio, phone and voice recognition systems (section 4)” of your Owner’s Manual.
To view detailed instructional videos regarding these and other features, please go to www.nissanownersinfo.mobi.
Page 24 of 40

22
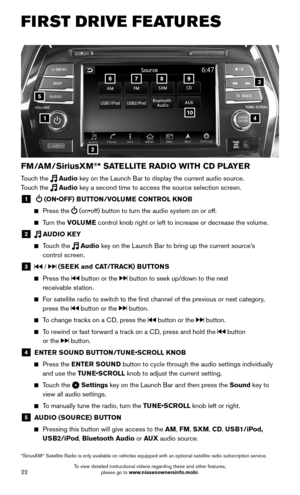
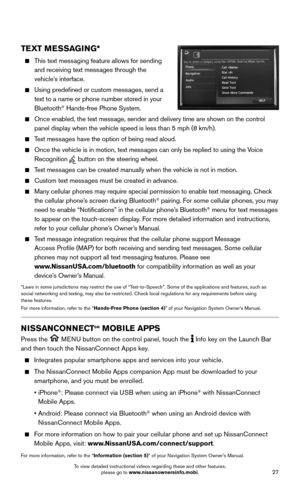
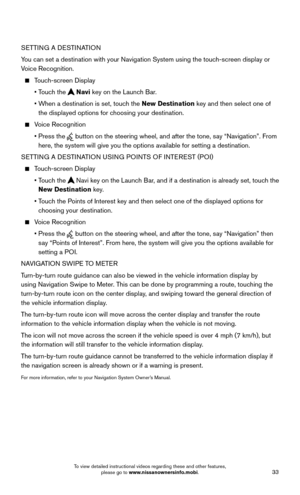
FM/AM/SiriusXM®* SATELLITE RADIO WITH CD PLAYER
Touch the Audio key on the Launch Bar to display the current audio source.
Touch the Audio key a second time to access the source selection screen.
1 (ON•OFF) BUTTON/VOLUME CONTROL KNOB
Press the (on•off) button to turn the audio system on or off.
Turn the VOLUME control knob right or left to increase or decrease the volume.
2 AUDIO KEY
Touch the Audio key on the Launch Bar to bring up the current source’s
control screen.
3 / (SEEK and CAT/TRACK) BUTTONS
Press the button or the button to seek up/down to the next
receivable station.
For satellite radio to switch to the first channel of the previous or next category,
press the button or the button.
To change tracks on a CD, press the button or the button.
To rewind or fast forward a track on a CD, press and hold the button
or the button.
4 ENTER SOUND BUTTON/TUNE•SCROLL KNOB
Press the ENTER SOUND button to cycle through the audio settings individually
and use the TUNE•SCROLL knob to adjust the current setting.
Touch the Settings key on the Launch Bar and then press the Sound key to
view all audio settings.
To manually tune the radio, turn the TUNE•SCROLL knob left or right.
5 AUDIO (SOURCE) BUTTON
Pressing this button will give access to the AM, FM, SXM, CD, USB1/iPod,
USB2/iPod, Bluetooth Audio or AUX audio source.
4
6789
10
2
3
1
5
*SiriusXM® Satellite Radio is only available on vehicles equipped with an optional s\
atellite radio subscription service.
FIRST DRIVE FEATURES
To view detailed instructional videos regarding these and other features, please go to www.nissanownersinfo.mobi.