Page 153 of 290
.
DS Rdeactivates automatically if:
Ryou are drivin gfaste rthan 28 mph (45 k")
Deactivating DSR
XBriefly press thecruise control lever for-
ward s?.
or
XAccelerate and drive faste rthan 28 mph
(45 km/h).
DS Rdeactivates automatically if:
Ryou are drivin gfaste rthan 28 mph (45 km/h).
Ryou disengage th eLO WRANGE transmissio n
ratio.
Rthere is amalfunction in th eES P®or AB Ssys-
tem.
PARKTRONIC
General notes
PARKTRONI Cis an electronic parkin gaid. The
system is equipped wit hultrasonic sensor sin
th efron tand rea rbumpers to monitor th eare a
around your vehicle. PARKTRONI Cindicate svis -
ually and audibl yth edistanc ebetween your
vehicl eand an object.
Your vehicl efeatures tw oseparat esoun demit-
ters wit hdifferen tfrequencies fo rth ewarnin g
tones. The warnin granges in fron tof and behin d
th evehicl eare indicate dby differen twarnin g
tones.
PARKTRONI Cis activated automatically when
you:
Rtur nth eke yto position 2in th eignition loc k
Rrelease theparkin gbrak eand
Rmov eth eselector lever to D,Nor R.
PARKTRONI Cis deactivated at speeds abov e
11 mph (18 km/h). PARKTRONI Cis reactivated
at speeds belo w10 mph (16 km/h).
Important safet ynotes
PARKTRONI Cis only an aid. It canno treplac e
your own awareness of th eimmediat esurround -
ings. You are responsibl efo rsaf emaneuvering,
parkin gand pullin gaway. Whe nmaneuvering,
parkin gand pullin gaway, mak esur ethat there
are no persons, animals or objects in th emaneu-
verin garea.
!Pay particular attention to obstacles abov e
or belo wthesensor swhen parking, suc has
flower pot sor trailer towbars. PARKTRONI C
doe sno trecogniz esuc hobjects when they are in th
eimmediat evicinit yof th evehicle.
You could damage th evehicl eor objects .
PARKTRONI Ccan suffer interferenc efrom:
Rultrasonic source ssuc has atruck's
compressed-air brakes, an automati ccar
wash or apneumati cdrill
Rattachments to th evehicle, e.g. rea rmoun-
te dracks
Rnumber plates (vehicle license plates) that
are no taffixed flat against th ebumper
Rdirty or icy sensor s
Remove adetachable trailer couplin gif it is no
longer required. PARKTRONI Cmeasures th e
minimum detection range to an obstacle from
th ebumper, no tth eball coupling.
Range of th esensor s
PARKTRONI Cdoe sno taccoun tfo robstacles
that are :
Rbeneathits detection range, e.g. persons, ani -
mals or objects
Rabov eits detection range, e.g. overhangin g
loads ,overhang sor truck loading ramps
The sensor smus tbe free of dirt, ice or slush.
Otherwise ,they canno tfunction correctly.
Driving systems15 1
Driving an d parking
Z
Page 154 of 290
.
Front sensors
CenterApprox. 39 in
(100 cm)
CornersApprox. 26 in(65 cm)
Rear sensors
CenterApprox. 71 in
(180 cm)
Cor")
Clean the sensors regularly, taking care not to
scratch or damage them (Ypage 236).
Front sensors
CenterApprox. 39 in
(100 cm)
CornersApprox. 26 in(65 cm)
Rear sensors
CenterApprox. 71 in
(180 cm)
CornersApprox. 39 in
(100 cm)
Mini mum distance
CenterApprox. 12 in(30 cm)
Front corner sensorsApprox. 10 in(25 cm)
Rear corner sensorsApprox. 12 in(30 cm)
Ifan obstacle iswithin th isrange, all segments
of the warning displays light up and you hear a
warning tone. Ifthe distance between the veh i-
cle and the obstacle falls below the minimum
range, it ispossible that thedistance may no
longer be displ ayed.
Warning displays
Warning display, fron tarea
Warning display for th eleft-hand rear area in th e
left-hand exterio rmirror
:
Warning segments for the left front area
;Warning segments for the right front area
=Operational readiness symbol for the front
area
?Warning display segments
AOperational readiness symbol for the rear
area
The warning displays show the distance
between the sensor and the obstacle.
The warning display is divided into five yellow
and two red segments for each side of the vehi- cle. PARKTRONIC is operational if yellow indi-
cator segments =and Aare lit.
There is a malfunction ifonly the red segments
of the warning display light up .
The position of the gear lever determines
whether the front and/or rear area is monitored.
152Driving systems
Driving and parking
Page 155 of 290

Selector lever posi-
tionMonitoring
DFront area
Ror NFront and rear area
PNo areas activated
One or more segments light up as the vehicle
approaches an obstacle, depending on the vehi-
cle's distance from the obstacle.
From the:
Rsixth segment, an intermittent warning tone
sounds for approximately 2 seconds.
Rseventh segment, a continuous warning tone
sounds. This indicates that you have now
reached the minimum distance.
Roll-back warning
PARKTRONIC automatically monitors the area
behind the vehicle if the vehicle begins to roll
backwards without reverse gear engaged, e.g.
after stopping on an uphill gradient.
If PARKTRONIC recognizes an obstacle at a dis-
tance of at most 31 in (80 cm), all the segments
in the warning displays light up. A continuous
warning tone also sounds as the vehicle
approaches the obstacle and for a further
2 seconds after the vehicle has come to a halt.
Activating/deactivating PARKTRONIC
XPress the fbutton.
If PARKTRONIC is deactivated, the indicator
lamp in the switch lights up.
Towing a trailer
PARKTRONIC detects a coupled trailer if your
vehicle is equipped with the corresponding elec-
trical installations for trailer towing.
PARKTRONIC is deactivated for the rear area
when you establish an electrical connection
between your vehicle and a trailer. If you use an
adapter for the socket, remove it from the
socket after detaching the trailer. Otherwise,
PARKTRONIC remains deactivated for the rear
area.
Remove a detachable trailer coupling if it is no
longer required. PARKTRONIC measures the
minimum detection range to an obstacle from
the bumper, not the ball coupling.
Driving systems153
Driving and parking
Z
Page 156 of 290

Problems with PARKTRONIC
ProblemPossible causes/consequences andMSolutions
Only the red segments in
the PARKTRONIC warn-
ing displays are lit.
A warning tone also
sounds for approx-
imately 2 seconds.
PARKTRONIC is deacti-
vated after approx-
imately 20 seconds.
The indicator lamp of the
f button lights up
and the red segments in
the PARKTRONIC warn-
ing display go out.PARKTRONIC has malfunctioned and has switched itself off.
XIf problems persist, have PARKTRONIC checked at a qualified spe- cialist workshop.
The PARKTRONIC warn-
ing displays implausible
distances.
For example, all the seg-
ments may be lit even
though there is no obsta-
cle present.The PARKTRONIC sensors are dirty or iced up.
XClean the PARKTRONIC sensors (Ypage 236).
XTurn the key to position 2again in the ignition lock.
The license plate or other parts attached near the sensors may not be
secured correctly.
XCheck the license plate and attachment parts near the sensors for
correct seating.
An external radio or ultrasonic source may be causing interference.
XCheck PARKTRONIC functions in a different location.
Rear view camera
Important safety notes
The rear view camera is only an aid. It cannot
replace your own awareness of the immediate
surroundings. You are responsible for safe
maneuvering, parking and pulling away. When
maneuvering, parking and pulling away, make
sure that there are no persons, animals or
objects in the maneuvering area.
The rear view camera is a visual parking aid.
Information on operation can be found in the
separate Audio 15 supplement.
The camera is in the middle of the roof above the
high-mounted brake lamp (
Ypage 236).
You can find information on cleaning the camera
in the "Maintenance and care" section
(
Ypage 236).
Working mode
ADR (working speed governor)
General notes
When activated, ADR automatically increases
the engine speed to a preset speed or a speed
you have set.
iAfter a cold start, the idling speed of the
engine is increased automatically. If the pre-
set working speed is lower than the increased idling speed, the working speed is only
reached once the engine has completed the
warm-up phase.
It is only possible to activate ADR with the
vehicle stationary and the parking brake
applied.
The selector lever of the automatic transmis-
sion must be in position P.
154Working mode
Driving and parking
Page 157 of 290

Switching ADR on and off
XTo activate:press upper section :of the
E switch while the engine is running.
The indicator lamp in the switch comes on.
The K indicator lamp in the instrument
cluster lights up or the display shows the fol-
lowing message: Operating speed gover‐
nor active.
XTo deactivate:press lower section ;of the
E switch while the engine is running.
The indicator lamp in the switch goes out.
ADR is automatically deactivated if:
Ryou release the parking brake.
Rthe brake pedal is depressed.
Rthe vehicle moves.
Rthe control unit detects a malfunction.
Setting the working speed
XActivate ADR.
XTo increase: press theEbutton.
XTo decrease: press theFbutton.
Towing a trailer
Notes on trailer towing
Important safety notes
GWARNING
Installing an unsuitable ball coupling may
result in overloading of the trailer tow hitch
and the rear axle. This applies especially if the ball coupling in question is longer or angled
differently. This could seriously impair the
driving characteristics and the trailer can
come loose. There is a risk of an accident.
You should only ever install a ball coupling
that has the permissible dimensions and that
is designed to meet your trailer-towing
requirements. Do not modify the ball coupling
or the trailer tow hitch.
GWARNING
If you use a ball coupling that is not approved
for your vehicle, it may cause excessive strain
on the trailer tow hitch. This can cause dam-
age to the vehicle and the trailer may come
loose during the journey. The handling may be
impaired and the rear axle may be overloaded.
This may lead to an accident involving serious
or even fatal injury.
Therefore note the following:
ROnly install a ball coupling that is approved for your vehicle.
RBefore the journey, make sure that the ballcoupling is correctly installed and secured.
To do this, observe the operating instruc-
tions of the ball coupling manufacturer.
RDo not make any modifications to the ball
coupling or the trailer tow hitch.
You must observe the operating instructions
of the trailer tow hitch or ball coupling manu-
facturer.
GWARNING
If the ball coupling is not correctly installed
and secured, it could come loose while driving and endanger other road users. There is a risk
of an accident and injury.
Towing a trailer155
Driving and parking
Z
Page 158 of 290

Install and secure the ball coupling as descri-
bed in the ball coupling manufacturer's instal-
lation instructions. Make sure that the ball
coupling is correctly installed and secured
before every journey.
GWARNING
When the vehicle/trailer combination begins
to lurch, you could lose control of it. The vehi- cle/trailer combination could even rollover.
There is a risk of an accident.
On no account should you attempt to
straighten up the vehicle/trailer combination
by increasing the speed. Reduce vehicle
speed and do not countersteer. Apply the
brake as necessary.
Always observe the operating instructions pro-
vided by the manufacturers of the trailer cou-
pling and the ball coupling.
Couple and decouple the trailer carefully. When backing up the towing vehicle, make sure
nobody is standing between the vehicle and the
trailer.
A trailer which is incorrectly coupled to the tow-
ing vehicle could break away. A correctly cou-
pled trailer must be positioned horizontally
behind the towing vehicle.
Ensure that the following weights are not excee-
ded:
Rthe permissible noseweight
Rthe permissible trailer load
Rthe permissible rear axle load of the towing
vehicle
Rthe permissible gross weight of both the tow-
ing vehicle and the trailer
Rthe permissible gross combination weight
The applicable permissible values that may not
be exceeded can be found:
Rin your vehicle documents
Ron the type plates for the trailer tow hitch
Ron the type plates for the trailer
Ron the vehicle identification plate
(Ypage 276).
Where the values differ, the lowest is valid.
You will find values approved by the manufac-
turer on the identification plates and those for
the towing vehicle in the "Permissible trailer loads and trailer drawbar noseweights" section
(
Ypage 159).
Your vehicle behaves differently with a trailer
than without one.
The vehicle/trailer combination:
Ris heavier
Ris restricted in its acceleration and gradient-
climbing capability
Rhas an increased braking distance
Ris more susceptible to strong crosswinds
Rrequires more sensitive steering
Rhas a larger turning circle
This may impair the handling characteristics.
When towing a trailer, always adjust your speed
to suit the road and w
eather conditions. Drive
carefully. Maintain a safe distance.
If you require any further explanation of the
information contained in the Operator's Manual,
please contact an authorized Sprinter dealer.
General notes
RObserve the legally prescribed maximum
speed for vehicle/trailer combinations in the
relevant country, state or Canadian province. Before setting off, check the vehicle docu-
ments of the your trailer to find out the per-
missible maximum speed.
This reduces the risk of accidents.
RInstall only an approved trailer coupling on
your vehicle. Only use a ball coupling that is
approved for your vehicle and Sprinter trailer
tow hitch. More information on the availabil-
ity, mounting and installation of the trailer
electrics is available at any qualified specialist
workshop.
RThe trailer coupling is one of the most impor-
tant vehicle parts with regard to road safety.
The notes on operation, care and mainte-
nance issued by the manufacturer should be
observed.
RThe bumpers of your vehicle are not suitable
for installing detachable trailer couplings.
RDo not attach rented trailer tow hitches or
other detachable trailer tow hitches to the
bumper.
RMinimize the risk of damage to the ball cou-
pling. If you do not require the ball coupling,
remove it from the ball coupling recess.
156Towing a trailer
Driving and parking
Page 159 of 290
.
iThe height of the ball neck changes accord-
ing to the load on the vehicle. If this")
Weight information can be found in the “Per-
missible trailer and drawbar noseweights” sec-
tion (
Ypage 159).
iThe height of the ball neck changes accord-
ing to the load on the vehicle. If this is case,
use a trailer with a height-adjustable trailer
drawbar.
Driving tips
The maximum permissible speed for vehicle/
trailer combination depends on the type of
trailer. Before setting off, check the vehicle
documents of the your trailer to find out the
permissible maximum speed. Observe the
legally prescribed maximum speed for vehicle/
trailer combinations in the relevant country,
state or Canadian province.
When towing a trailer, your vehicle's handling
characteristics will be different in comparison to when driving without a trailer and it will con-
sume more fuel.
On long, steep downhill slopes you must select
shift range 3,2or 1in good time.
iThis also applies if cruise control is activa-
ted.
This enables you to utilize the engine's braking
effect and you do not need to brake so heavily to
keep the correct speed. which protects the
brake system and prevents the brakes from
overheating and wearing too quickly. If you need to brake additionally, to not depress the brake
pedal constantly, but periodically.
Driving tips
If the trailer begins to swing from side to side:
XDo not accelerate.
XDo not counter-steer.
XBrake if necessary.
iYou can reduce the risk of the trailer swing-
ing and rocking by retrofitting anti-roll bars or trailer stability programs. More information is
available from your authorized Sprinter
Dealer.
RMaintain a greater distance than you would
when driving without towing a trailer.
RAvoid sudden braking. Apply the brakes gen-
tly at first to allow the trailer brake to overrun.
Then, increase the brake force quickly.
RThe figures for the gradient climbing capabil-
ities from a standstill refer to sea level. When
driving in mountainous areas, note that the
power output of the engine, and with it its
gradient climbing capability, decrease with
increasing altitude.
Coupling up a trailer
Trailer coupled ready for use
XMake sure the selector lever of the automatic
transmission is in position P.
XApply the vehicle's parking brake.
XClose all doors.
XPosition the trailer horizontally behind your
vehicle.
iThe height of the ball neck changes accord-
ing to the load on the vehicle. In this case, use
a trailer with a height-adjustable trailer draw-
bar.
XCouple the trailer.
XEstablish all electrical and other connections to the trailer. When doing so, hook the break-
away cable of the trailer into eyelet :on the
ball coupling.
XRemove the objects that are preventing the
trailer from rolling, e.g. wheel chocks.
XRelease the trailer parking brake.
iThe subharness of the vehicle has a cable
connection to the brake lamp indicator lamp.
Observe the maximum permissible trailer
dimensions (width and length).
Towing a trailer157
Driving and parking
Z
Page 160 of 290

Most federal states and all Canadian provinces
require by law:
Rsafety chains between the towing vehicle andthe trailer. The chains should be cross-wound
under the trailer drawbar. They must be fas-
tened to the vehicle's trailer coupling, not to
the bumper or the axle.
Leave enough slack in the chains. This allows you to drive round tight corners.
Ra separate brake system for certain types of
trailer.
Ra safety shut-off for braked trailers. Find out
the specific requirements according to the
applicable laws.
If the trailer becomes detached from the tow-
ing vehicle, the safety feature applies the
trailer brakes.
Towing a trailer
There are numerous legal requirements con-
cerning the towing of a trailer, e.g. speed restric-tions. Make sure your vehicle/trailer combina-
tion complies with local laws. This not only
means where you live, but also anywhere you
are driving to. Information is available from the
police and local authorities.
Observe the following when towing a trailer:
RPractice driving around bends, stopping and
backing up at a place where there is no traffic.
This enables you to gain experience and get
used to the new handling characteristics.
RBefore driving, check:
-that the trailer tow hitch and ball coupling
are secure
-that the safety switch for a braked trailer is
functioning properly
-that the safety chains are secure and not
damaged
-that the electrical connections are secure
-that the lights are working
-that the wheels are in good order and the
tire pressure is correct
RAdjust the exterior mirrors to provide an
unobstructed view of the rear section of the
trailer.
RIf the trailer has electronically controlled
brakes, pull the vehicle/trailer combination
away carefully. Brake manually using the
brake controller and check that the brakes
are working.
RSecure the load on the trailer according to the
applicable specifications and current stand-
ards on securing loads (
Ypage 214).
RWhen driving with a trailer, check at regular
intervals that the load is secured and that the
brakes and lights are working.
RBear in mind that the handling will be less
stable when towing a trailer than when driving
without one. Avoid sudden steering move-
ments.
RThe vehicle/trailer combination is heavier,
accelerates more slowly and has a decreased
gradient climbing capability and a longer
braking distance.
It is more susceptible to crosswinds and
requires cautious steering.
RIf possible, do not brake suddenly, but rather
moderately at first so that the trailer can acti-
vate its brakes. Then increase the force on the
brake pedal.
RIf the automatic transmission repeatedly
shifts between gears when driving on inclines,
restrict the shift range. Select shift range 4,3,
2 or 1.
Driving in a low gear and at a low speed
reduces the risk of damaging the engine.
RWhen driving on a downhill gradient, shift to a
low gear and take advantage of the engine's
braking effect.
Avoid continuous brake application as this
may overheat the vehicle brakes and, if inst
al-
led, the trailer brakes.
RIf the coolant temperature increases dramat-
ically while the air-conditioning system is
switched on, switch off the air-conditioning
system.
Coolant heat can also be dissipated by
switching the airflow and the temperature of
the heater/air conditioning to the maximum
level. Open the windows if necessary.
RWhen overtaking, pay particular attention to
the extended length of your vehicle/trailer
combination.
Due to the length of your vehicle/trailer com- bination you need an additional distance
before you can return to your original lane.
158Towing a trailer
Driving and parking
 1
1 2
2 3
3 4
4 5
5 6
6 7
7 8
8 9
9 10
10 11
11 12
12 13
13 14
14 15
15 16
16 17
17 18
18 19
19 20
20 21
21 22
22 23
23 24
24 25
25 26
26 27
27 28
28 29
29 30
30 31
31 32
32 33
33 34
34 35
35 36
36 37
37 38
38 39
39 40
40 41
41 42
42 43
43 44
44 45
45 46
46 47
47 48
48 49
49 50
50 51
51 52
52 53
53 54
54 55
55 56
56 57
57 58
58 59
59 60
60 61
61 62
62 63
63 64
64 65
65 66
66 67
67 68
68 69
69 70
70 71
71 72
72 73
73 74
74 75
75 76
76 77
77 78
78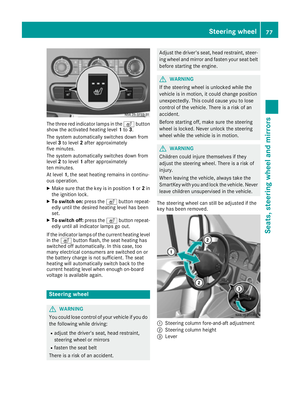 79
79 80
80 81
81 82
82 83
83 84
84 85
85 86
86 87
87 88
88 89
89 90
90 91
91 92
92 93
93 94
94 95
95 96
96 97
97 98
98 99
99 100
100 101
101 102
102 103
103 104
104 105
105 106
106 107
107 108
108 109
109 110
110 111
111 112
112 113
113 114
114 115
115 116
116 117
117 118
118 119
119 120
120 121
121 122
122 123
123 124
124 125
125 126
126 127
127 128
128 129
129 130
130 131
131 132
132 133
133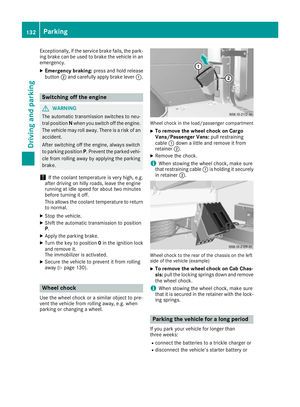 134
134 135
135 136
136 137
137 138
138 139
139 140
140 141
141 142
142 143
143 144
144 145
145 146
146 147
147 148
148 149
149 150
150 151
151 152
152 153
153 154
154 155
155 156
156 157
157 158
158 159
159 160
160 161
161 162
162 163
163 164
164 165
165 166
166 167
167 168
168 169
169 170
170 171
171 172
172 173
173 174
174 175
175 176
176 177
177 178
178 179
179 180
180 181
181 182
182 183
183 184
184 185
185 186
186 187
187 188
188 189
189 190
190 191
191 192
192 193
193 194
194 195
195 196
196 197
197 198
198 199
199 200
200 201
201 202
202 203
203 204
204 205
205 206
206 207
207 208
208 209
209 210
210 211
211 212
212 213
213 214
214 215
215 216
216 217
217 218
218 219
219 220
220 221
221 222
222 223
223 224
224 225
225 226
226 227
227 228
228 229
229 230
230 231
231 232
232 233
233 234
234 235
235 236
236 237
237 238
238 239
239 240
240 241
241 242
242 243
243 244
244 245
245 246
246 247
247 248
248 249
249 250
250 251
251 252
252 253
253 254
254 255
255 256
256 257
257 258
258 259
259 260
260 261
261 262
262 263
263 264
264 265
265 266
266 267
267 268
268 269
269 270
270 271
271 272
272 273
273 274
274 275
275 276
276 277
277 278
278 279
279 280
280 281
281 282
282 283
283 284
284 285
285 286
286 287
287 288
288 289
289