2016 MERCEDES-BENZ SL ROADSTER change time
[x] Cancel search: change timePage 312 of 333
Important safety notes
The tyre pressure warning system does not warn
you of an incorrectly set tyre pressure. Observe
the notes on the recommended tyre pressure
(Y page 307).
The tyre pressure loss warning does not replace
the need to regularly check the tyre pressures.
An even loss of pressure on several tyres at the
same time cannot be detected by the tyre pres- sure loss warning system.
The tyre pressure monitor is not able to warn
you of a sudden loss of pressure, e.g. if the tyre
is penetrated by a foreign object. In the event of
a sudden loss of pressure, bring the vehicle to a halt by braking carefully. Avoid abrupt steering
manoeuvres.
The function of the tyre pressure loss warning
system is limited or delayed if:
R snow chains are fitted to your vehicle's tyres.
R road conditions are wintry.
R you are driving on sand or gravel.
R you adopt a very sporty driving style (corner-
ing at high speeds or driving with high rates of
acceleration).
R you drive with a heavy load.
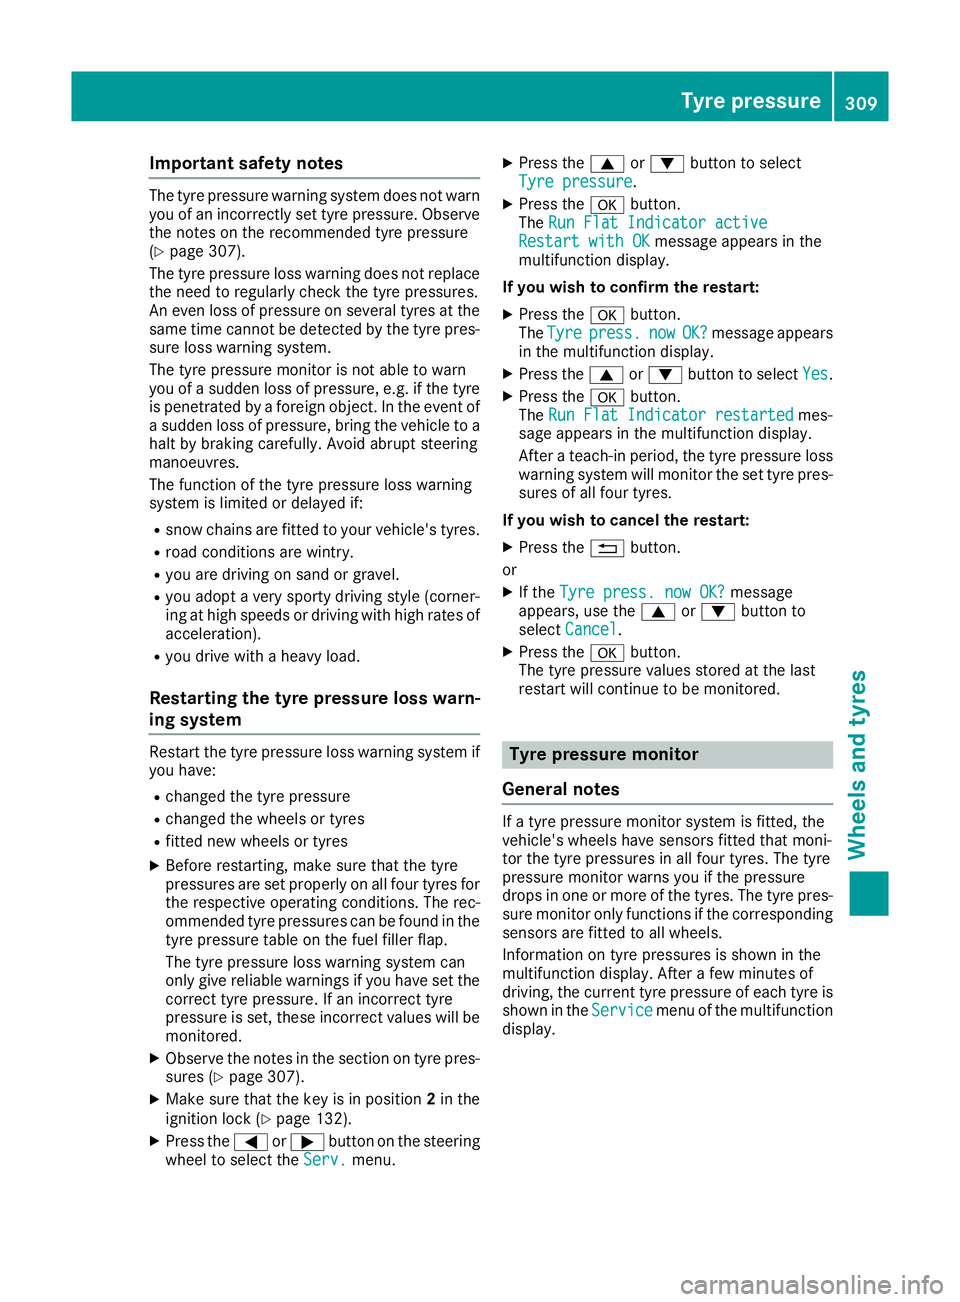
Restarting the tyre pressure loss warn-
ing system Restart the tyre pressure loss warning system if
you have:
R changed the tyre pressure
R changed the wheels or tyres
R fitted new wheels or tyres
X Before restarting, make sure that the tyre
pressures are set properly on all four tyres for
the respective operating conditions. The rec-
ommended tyre pressures can be found in the
tyre pressure table on the fuel filler flap.
The tyre pressure loss warning system can
only give reliable warnings if you have set the correct tyre pressure. If an incorrect tyre
pressure is set, these incorrect values will be
monitored.
X Observe the notes in the section on tyre pres-
sures (Y page 307).
X Make sure that the key is in position 2in the
ignition lock (Y page 132).
X Press the =or; button on the steering
wheel to select the Serv.
Serv. menu. X
Press the 9or: button to select
Tyre pressure Tyre pressure.
X Press the abutton.
The Run Flat Indicator active Run Flat Indicator active
Restart with OK
Restart with OK message appears in the
multifunction display.
If you wish to confirm the restart:
X Press the abutton.
The Tyre
Tyre press.
press. now
nowOK?
OK?message appears
in the multifunction display.
X Press the 9or: button to select Yes
Yes .
X Press the abutton.
The Run Flat Indicator restarted
Run Flat Indicator restarted mes-
sage appears in the multifunction display.
After a teach-in period, the tyre pressure loss warning system will monitor the set tyre pres-
sures of all four tyres.
If you wish to cancel the restart: X Press the %button.
or X If the Tyre press. now OK?
Tyre press. now OK? message
appears, use the 9or: button to
select Cancel Cancel .
X Press the abutton.
The tyre pressure values stored at the last
restart will continue to be monitored. Tyre pressure monitor
General notes If a tyre pressure monitor system is fitted, the
vehicle's wheels have sensors fitted that moni-
tor the tyre pressures in all four tyres. The tyre
pressure monitor warns you if the pressure
drops in one or more of the tyres. The tyre pres- sure monitor only functions if the corresponding
sensors are fitted to all wheels.
Information on tyre pressures is shown in the
multifunction display. After a few minutes of
driving, the current tyre pressure of each tyre is
shown in the Service Servicemenu of the multifunction
display. Tyre pressure
309Wheels and tyres Z
Page 314 of 333
tyre pressure of the wheel that has been
removed. If this occurs, note that the value dis-
played for the position where the spare wheel is fitted is not the same as the current tyre pres-
sure of the emergency spare wheel.
Warning messages of the tyre pressure monitor If the tyre pressure monitor detects a pressure
loss in one or more tyres, a warning message is
shown in the multifunction display. The yellow
tyre pressure warning lamp then lights up:
R If the Rectify tyre pressure
Rectify tyre pressure message
appears in the multifunction display, the tyre
pressure in at least one tyre is too low. The
tyre pressure must be corrected when the
opportunity arises.
R If the Check Check tyre(s)
tyre(s) message appears in the
multifunction display, the tyre pressure in at
least one tyre has dropped significantly. The
tyres must be checked.
R If the Warning tyre defect
Warning tyre defect message
appears in the multifunction display, the tyre
pressure in at least one tyre has dropped sud- denly. The tyres must be checked.
Observe the instructions and safety notes in the display messages in the "Tyres" section
(Y page 237).
If the position of the wheels are interchanged on
the vehicle, the tyre pressures may be displayed
in the wrong positions for a short time. After a
few minutes of driving, this is rectified and the
tyre pressures are displayed in the correct posi- tions.
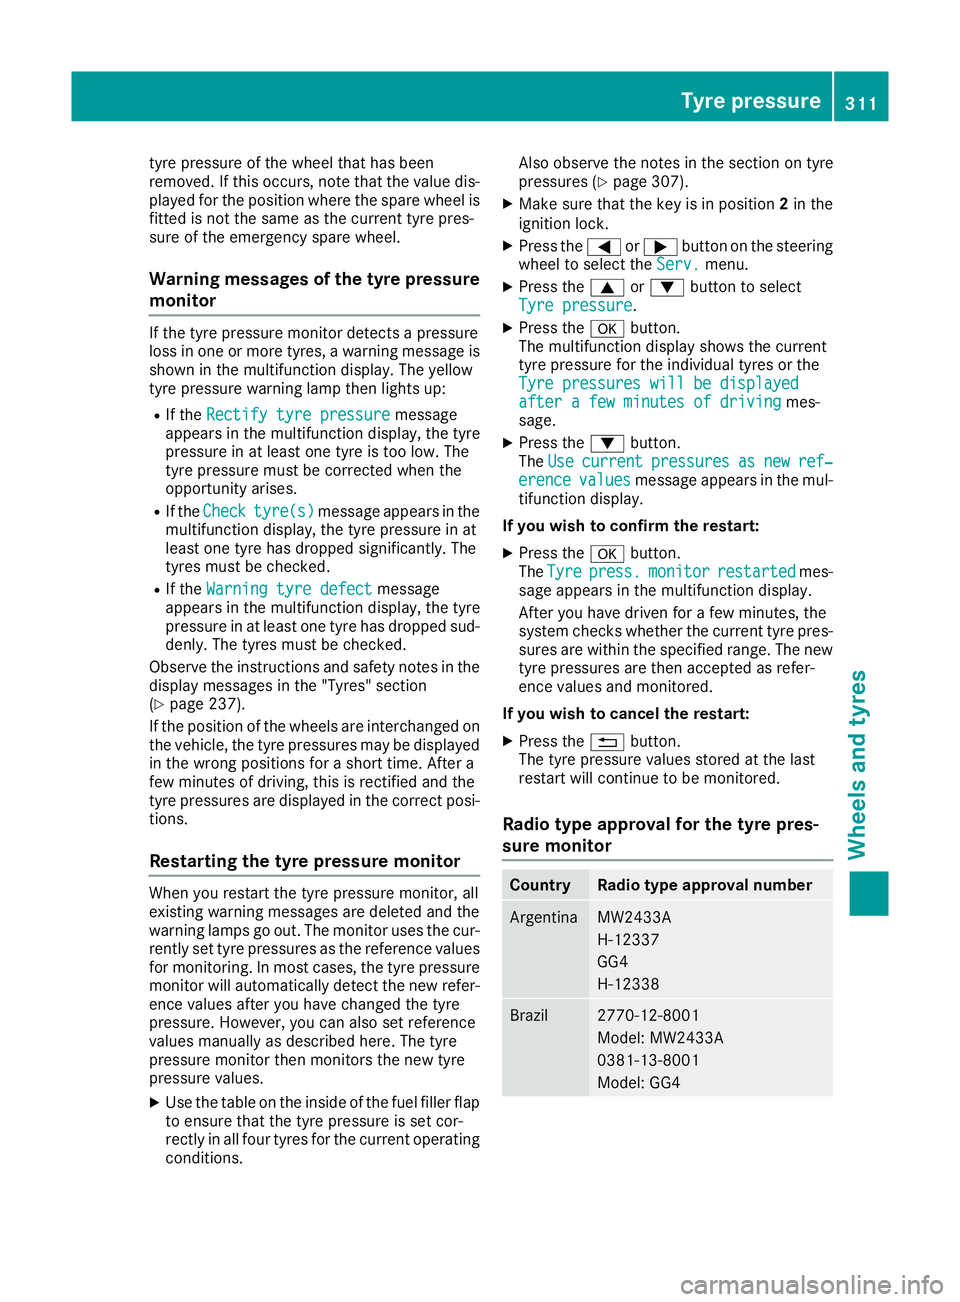
Restarting the tyre pressure monitor When you restart the tyre pressure monitor, all
existing warning messages are deleted and the
warning lamps go out. The monitor uses the cur-
rently set tyre pressures as the reference values for monitoring. In most cases, the tyre pressure
monitor will automatically detect the new refer- ence values after you have changed the tyre
pressure. However, you can also set reference
values manually as described here. The tyre
pressure monitor then monitors the new tyre
pressure values.
X Use the table on the inside of the fuel filler flap
to ensure that the tyre pressure is set cor-
rectly in all four tyres for the current operating conditions. Also observe the notes in the section on tyre
pressures (Y page 307).
X Make sure that the key is in position 2in the
ignition lock.
X Press the =or; button on the steering
wheel to select the Serv.
Serv. menu.
X Press the 9or: button to select
Tyre pressure Tyre pressure.
X Press the abutton.
The multifunction display shows the current
tyre pressure for the individual tyres or the
Tyre pressures will be displayed Tyre pressures will be displayed
after a few minutes of driving after a few minutes of driving mes-
sage.
X Press the :button.
The Use
Use current
current pressures
pressures as
asnew
new ref‐
ref‐
erence
erence values
valuesmessage appears in the mul-
tifunction display.
If you wish to confirm the restart: X Press the abutton.
The Tyre
Tyre press.
press. monitor
monitor restarted
restarted mes-
sage appears in the multifunction display.
After you have driven for a few minutes, the
system checks whether the current tyre pres-
sures are within the specified range. The new tyre pressures are then accepted as refer-
ence values and monitored.
If you wish to cancel the restart:
X Press the %button.
The tyre pressure values stored at the last
restart will continue to be monitored.
Radio type approval for the tyre pres-
sure monitor Country Radio type approval number
Argentina MW2433A
H-12337
GG4
H-12338
Brazil 2770-12-8001
Model: MW2433A
0381-13-8001
Model: GG4 Tyre pressure
311Wheels and tyres Z
Page 315 of 333
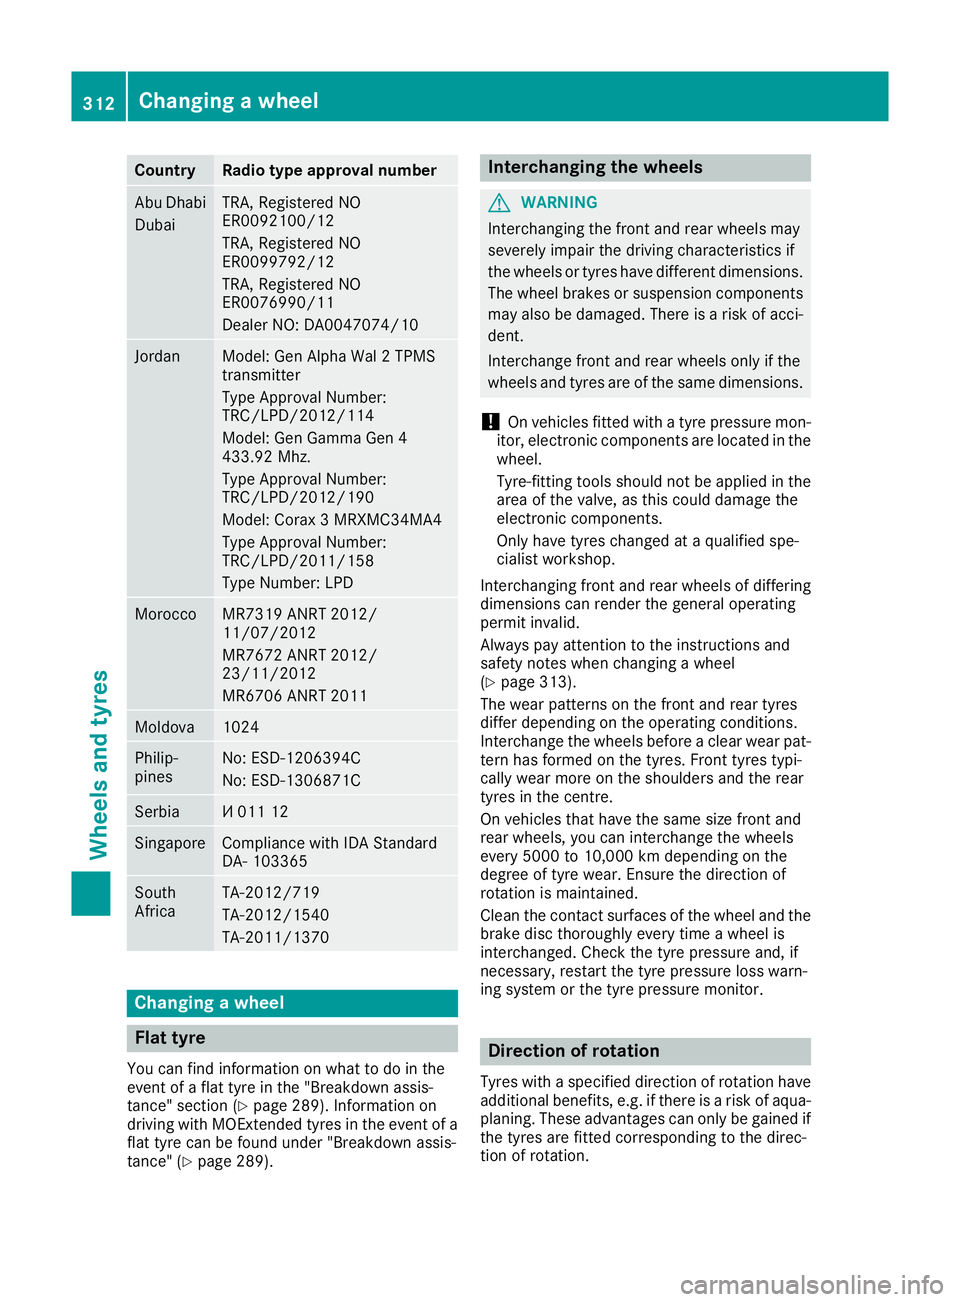
Country Radio type approval number
Abu Dhabi
Dubai TRA, Registered NO
ER0092100/12
TRA, Registered NO
ER0099792/12
TRA, Registered NO
ER0076990/11
Dealer NO: DA0047074/10
Jordan Model: Gen Alpha Wal 2 TPMS
transmitter
Type Approval Number:
TRC/LPD/2012/114
Model: Gen Gamma Gen 4
433.92 Mhz.
Type Approval Number:
TRC/LPD/2012/190
Model: Corax 3 MRXMC34MA4
Type Approval Number:
TRC/LPD/2011/158
Type Number: LPD Morocco MR7319 ANRT 2012/
11/07/2012
MR7672 ANRT 2012/
23/11/2012
MR6706 ANRT 2011
Moldova 1024
Philip-
pines No: ESD-1206394C
No: ESD-1306871C
Serbia И 011 12
Singapore Compliance with IDA Standard
DA- 103365
South
Africa TA-2012/719
TA-2012/1540
TA-2011/1370
Changing a wheel
Flat tyre
You can find information on what to do in the
event of a flat tyre in the "Breakdown assis-
tance" section (Y page 289). Information on
driving with MOExtended tyres in the event of a flat tyre can be found under "Breakdown assis-
tance" (Y page 289). Interchanging the wheels
G
WARNING
Interchanging the front and rear wheels may
severely impair the driving characteristics if
the wheels or tyres have different dimensions. The wheel brakes or suspension components may also be damaged. There is a risk of acci-
dent.
Interchange front and rear wheels only if the
wheels and tyres are of the same dimensions.
! On vehicles fitted with a tyre pressure mon-
itor, electronic components are located in the wheel.
Tyre-fitting tools should not be applied in thearea of the valve, as this could damage the
electronic components.
Only have tyres changed at a qualified spe-
cialist workshop.
Interchanging front and rear wheels of differing
dimensions can render the general operating
permit invalid.
Always pay attention to the instructions and
safety notes when changing a wheel
(Y page 313).
The wear patterns on the front and rear tyres
differ depending on the operating conditions.
Interchange the wheels before a clear wear pat-
tern has formed on the tyres. Front tyres typi-
cally wear more on the shoulders and the rear
tyres in the centre.
On vehicles that have the same size front and
rear wheels, you can interchange the wheels
every 5000 to 10,000 km depending on the
degree of tyre wear. Ensure the direction of
rotation is maintained.
Clean the contact surfaces of the wheel and the
brake disc thoroughly every time a wheel is
interchanged. Check the tyre pressure and, if
necessary, restart the tyre pressure loss warn-
ing system or the tyre pressure monitor. Direction of rotation
Tyres with a specified direction of rotation have additional benefits, e.g. if there is a risk of aqua- planing. These advantages can only be gained if
the tyres are fitted corresponding to the direc-
tion of rotation. 312
Changing a wheelWheels and tyres
Page 317 of 333
must be positioned vertically, directly under
the jacking point of the vehicle.
Observe the following when raising the vehicle:
R only use the vehicle-specific jack that has
been tested and approved by Mercedes-Benz
to raise the vehicle. If the jack is used incor-
rectly, it could tip over while the vehicle is
raised.
R the jack is designed only to raise and hold the
vehicle for a short time while a wheel is being
changed. It is not permissible to use it to per- form maintenance work under the vehicle.
R avoid changing the wheel on uphill and down-
hill slopes.
R before raising the vehicle, safeguard it from
rolling away by applying the parking brake and
positioning wheel chocks. Do not release the parking brake while the vehicle is raised.
R the jack must be placed on a firm, flat and
non-slip surface. On a loose surface, a large,
flat load-bearing underlay must be used. On a
slippery surface, a non-slip underlay must be
used, e.g. rubber mats.
R do not use wooden blocks or similar objects
as a jack underlay. Otherwise, the jack will not
be able to achieve its load-bearing capacity
due to the restricted height.
R make sure that the distance between the
underside of the tyres and the ground does
not exceed 3 cm.
R never place your hands or feet under the
raised vehicle.
R do not lie under the vehicle.
R do not start the engine when the vehicle is
raised.
R do not open or close a door or the boot lid
when the vehicle is raised.
R make sure that no persons are present in the
vehicle when the vehicle is raised.
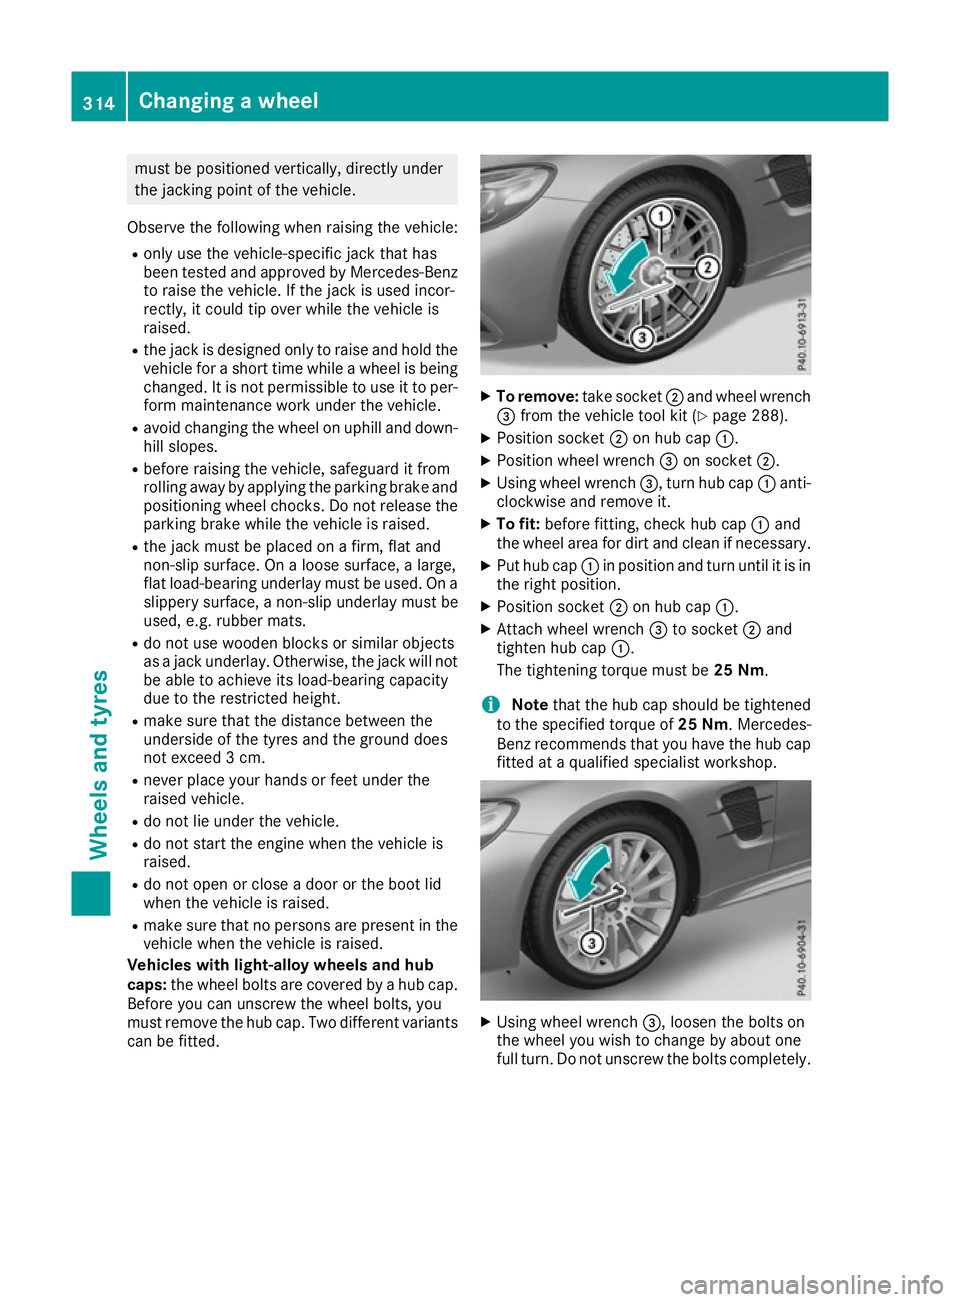
Vehicles with light-alloy wheels and hub
caps: the wheel bolts are covered by a hub cap.
Before you can unscrew the wheel bolts, you
must remove the hub cap. Two different variants
can be fitted. X
To remove: take socket;and wheel wrench
= from the vehicle tool kit (Y page 288).
X Position socket ;on hub cap :.
X Position wheel wrench =on socket ;.
X Using wheel wrench =, turn hub cap:anti-
clockwise and remove it.
X To fit: before fitting, check hub cap :and
the wheel area for dirt and clean if necessary.
X Put hub cap :in position and turn until it is in
the right position.
X Position socket ;on hub cap :.
X Attach wheel wrench =to socket ;and
tighten hub cap :.
The tightening torque must be 25 Nm.
i Note
that the hub cap should be tightened
to the specified torque of 25 Nm. Mercedes-
Benz recommends that you have the hub cap
fitted at a qualified specialist workshop. X
Using wheel wrench =, loosen the bolts on
the wheel you wish to change by about one
full turn. Do not unscrew the bolts completely. 314
Changing a wheelWheels and tyres
Page 320 of 333
X
Stow the jack and the rest of the tyre-change
tool kit in the boot again.
X Mercedes-AMG vehicles and vehicles
with AMG equipment:
insert the cover into
the outer sill.
X Check the air pressure of the newly fitted
wheel and adjust accordingly.
Observe the recommended tyre pressure
(Y page 307).
Vehicles with a tyre pressure monitor: all fit-
ted wheels must be equipped with functioning
sensors.
If you are driving with the emergency spare
wheel fitted, the tyre pressure loss warning sys- tem or the tyre pressure monitor cannot func-
tion reliably. Only restart the tyre pressure loss
warning system or tyre pressure monitor when
the defective wheel has been replaced with a
new wheel.
Vehicles with a tyre pressure monitor: all fit-
ted wheels must be equipped with functioning
sensors. Wheel and tyre combinations
You can ask for information regarding permitted wheel-tyre combinations at a Mercedes-Benz
Service Centre.
! For safety reasons, Mercedes-Benz recom-
mends that you only use tyres and wheels
which have been approved by Mercedes-Benz specifically for your vehicle.
These are specially adapted to the control
systems, such as ABS or ESP ®
and are
marked as follows:
R MO = Mercedes-Benz Original
R MOE = Mercedes-Benz Original Extended
(tyres featuring run-flat characteristics)
R MO1 = Mercedes-Benz Original (only cer-
tain AMG tyres)
Mercedes-Benz Original Extended tyres may
only be used on wheels that have been spe-
cifically approved by Mercedes-Benz.
Only use tyres, wheels or accessories tested
and approved by Mercedes-Benz. Certain
characteristics, e.g. handling, vehicle noise
emissions or fuel consumption, may other-
wise be adversely affected. In addition, when driving with a load, tyre dimension variations
could cause the tyres to come into contact with the bodywork and axle components. This
could result in damage to the tyres or the
vehicle.
Mercedes-Benz accepts no liability for dam-
age resulting from the use of tyres, wheels or accessories other than those tested and
approved.
Further information about wheels, tyres and
approved combinations can be obtained from
any qualified specialist workshop.
! Retreaded tyres are neither tested nor rec-
ommended by Mercedes-Benz, since previ-
ous damage cannot always be detected on
retreaded tyres. As a result, Mercedes-Benz
cannot guarantee vehicle safety if retreaded
tyres are fitted. Do not fit used tyres if you
have no information about their previous
usage.
! Large wheels: the lower the section width
for a certain wheel size, the lower the ride
comfort is on poor road surfaces. Roll comfort and suspension comfort are reduced and therisk of damage to the wheels and tyres as a
result of driving over obstacles increases.
The recommended tyre pressures can be found
in the tyre pressure table on the fuel filler flap.
For further information on tyre pressure, see
(Y page 307). Check tyre pressures regularly
and only when the tyres are cold.
Notes on the vehicle equipment – always fit the
vehicle:
R with tyres of the same size across an axle
(left/right)
R with the same type of tyres at a given time
(summer tyres, winter tyres, MOExtended
tyres)
Exception: it is permissible to fit a different
type or make in the event of a flat tyre.
Observe the "MOExtended tyres (tyres with
run-flat characteristics)" section
(Y page 289).
Vehicles with MOExtended tyres are not equip-
ped with a TIREFIT kit at the factory. It is there-
fore recommended that you additionally equip
your vehicle with a TIREFIT kit if you fit tyres that do not feature run-flat characteristics, e.g. win-
ter tyres. A TIREFIT kit can be obtained from a
qualified specialist workshop. Wheel and tyre combinations
317Wheels and tyres Z
Page 328 of 333
mends that you have the oil change carried out
at a qualified specialist workshop. Mercedes-
Benz approval is indicated on the oil container
by the inscription "MB-Freigabe" or "MB-
Approval" and the corresponding designation,
e.g. MB-Freigabe or MB-Approval 229.51.
You can call up an overview of approved engine
oils on the Internet at
http://bevo.mercedes-benz.com by entering
the designation, e.g. 229.5.
The table shows which engine oils have been
approved for your vehicle.
In certain countries, different engine oils can be used, provided that the maintenance intervals
are reduced. For more information, please con-
tact a qualified specialist workshop. Model MB-Freigabe or MB-Approval
All models
229.5
Mercedes‑AMG vehicles:
use only SAE 0W-40
or SAE 5W-40 engine oils.
i If the engine oils listed in the table are not
available, you may add the following engine
oils until the next oil change:
R Petrol engines: MB-Freigabe or MB-
Approval 229.1, 229.3 or ACEA A3
This may only be added once and the amount must not be greater than 1.0 l.
Capacities The following values refer to an oil change,
including the oil filter.
Missing values were not available at the time of
going to print. Model Replacement
amount SL 400
6.5 l
SL 500
8.0 l
Mercedes‑AMG
SL 63 Mercedes‑AMG
SL 65 Additives
!
Do not use any additives with the engine oil.
This could damage the engine. Brake fluid
G
WARNING
The brake fluid continuously absorbs mois-
ture from the air. This results in the boiling
point of the brake fluid lowering. If the boiling
point of the brake fluid is too low, vapour
pockets may form when the brakes are sub-
jected to a heavy load. This would impair brak- ing efficiency. There is a risk of an accident.
Have the brake fluid renewed at the prescri-
bed intervals.
When handling brake fluid, observe the impor-
tant safety notes on service products
(Y page 322).
The brake fluid change intervals can be found in the Service Booklet.
Only use brake fluid approved by Mercedes-
Benz in accordance with MB-Freigabe or MB-
Approval 331.0.
Information about approved brake fluid can be
obtained at any qualified specialist workshop or on the Internet at
http://bevo.mercedes-benz.com.
i Have the brake fluid regularly replaced at a
qualified specialist workshop and the replace- ment confirmed in the Service Booklet. Coolant
Important safety notes G
WARNING
If antifreeze comes into contact with hot com- ponents in the engine compartment, it may
ignite. There is a risk of fire and injury.
Let the engine cool down before you top up
the antifreeze. Make sure that antifreeze is
not spilled next to the filler neck. Thoroughly
clean the antifreeze from components before
starting the engine. Service products and capacities
325Technical data Z