Page 209 of 333

surrounding conditions, pull over to a safe
location and make entries only while the vehi- cle is stationary.
When telephoning, you must observe the legal
requirements for the country in which you are
currently driving.
X Switch on the mobile phone (see the manu-
facturer's operating instructions).
X Switch on the multimedia system
(Y page 253).
X Insert the mobile phone into the bracket
(Y page 268).
or
X Establish a Bluetooth ®
connection to the mul-
timedia system (Y page 256).
X Press the =or; button on the steering
wheel to select the Tel
Tel menu.
You will see one of the following display mes-
sages in the multifunction display:
R Telephone ready
Telephone ready or the name of the net-
work provider: the mobile phone has found a
network and is ready to receive.
R Telephone Telephone No
Noservice
service: there is no network
available or the mobile phone is searching for
a network.
You can obtain further information about suita-
ble mobile phones and connecting mobile
phones via Bluetooth ®
:
R on the Internet at http://www.mercedes-
benz.com/connect
R at any Mercedes-Benz Service Centre
Accepting a call If someone calls you when you are in the
Tel Tel
menu, a display message appears in the multi-
function display.
You can accept a call at any time irrespective of
the selected menu.
X Press the 6button on the steering wheel
to accept an incoming call.
Rejecting or ending a call X
Press the ~button on the steering wheel
to reject or end an incoming call. Selecting an entry in the phone book X
Press the =or; button on the steering
wheel to select the Tel Telmenu.
X Press the 9,:ora button to
switch to the phone book.
X Authorise access to the phone book on the
phone.
X Press :or9 to select the names one
after the other.
or
X To start rapid scrolling: press and hold:
or 9 for longer than one second.
The names in the phone book are displayed
quickly one after the other.
Rapid scrolling stops when you release the
button or reach the end of the list.
X If only one telephone number is stored for
a name: press the 6ora button to
start dialling.
or
X If there is more than one number for a
particular name:
press the6ora
button to display the numbers.
X Press the 9or: button to select the
number you want to dial.
X Press the 6ora button to start dial-
ling.
or
X To exit the telephone book: press the~
or % button.
Redialling The on-board computer saves the last names or
numbers dialled in the redial memory.
X Press the =or; button on the steering
wheel to select the Tel Telmenu.
X Press the 6button to switch to the redial
memory.
X Press the 9or: button to select the
desired name or number.
X Press the 6ora button to start dial-
ling.
or X To exit the redial memory: press the~
or % button. 206
Menus and submenusOn-board computer and displays
Page 210 of 333

R Mercedes-AMG vehicl")
Assistance menu
Introduction Depending on your vehicle's equipment, in the
Assist.
Assist. menu, you have the following options:
R Showing the assistance graphic
(Y page 207)
R Mercedes-AMG vehicles: setting the vehicle
level (Y page 178)
R Activating/deactivating the Traffic Sign
Assist message function (Y page 207)
R Activating/deactivating Steering Pilot and
Stop&Go Pilot (Y page 207)
R Activating/deactivating Active Brake Assist
(Y page 207)
R Activating/deactivating Active Brake Assist
with cross-traffic function (Y page 207)
R Activating/deactivating ATTENTION ASSIST
(Y page 208)
R Activating/deactivating Active Blind Spot
Assist (Y page 208)
R Activating/deactivating Active Lane Keeping
Assist (Y page 208)
Showing the assistance graphic X
Press the =or; button on the steering
wheel to select the Assist. Assist.menu.
X Press 9or: to select Assist.
Assist.
graphic
graphic.
X Press ato confirm your selection.
The multifunction display shows the Distance
Pilot DISTRONIC distance display in the assis-
tance graphic display.
The assistance graphic shows you the status
of and/or information from other driving sys- tems or driving safety systems:
R Traffic Sign Assist (Y page 191)
R Distance Pilot DISTRONIC (Y page 161)R
Active Brake Assist (Y page 64)
R Active Brake Assist with cross-traffic func-
tion (Y page 72)
R ATTENTION ASSIST (Y page 190)
R Active Lane Keeping Assist (Y page 195)
X Press :to display the ATTENTION ASSIST
assessment.
Traffic Sign Assist In the
Traffic Sign Assist Traffic Sign Assist menu, you can
switch the Traffic Sign Assist message function
on or off. When the message function is activa-
ted, detected traffic signs and information
appear in the multifunction display for five sec-
onds.
X Press the =or; button on the steering
wheel to select the Assist. Assist.menu.
X Press the 9or: button to select
Traffic Sign Assist
Traffic Sign Assist .
X Press ato confirm.
The current selection appears.
X To activate/deactivate the message func-
tion: press aagain.
Further information on Traffic Sign Assist
(Y page 191).
Activating/deactivating Steering Pilot
and Stop&Go Pilot X
Press the =or; button on the steering
wheel to select the Assist. Assist.menu.
X Press 9or: to select Steering
Steering
Pilot
Pilot.
X Confirm by pressing aon the steering
wheel.
The current selection appears.
X To activate/deactivate: press theabut-
ton again.
When Steering Pilot and Stop&Go Pilot are
activated, the multifunction display shows the Steering Pilot Steering Pilot On
Onmessage.
Further information on Steering Pilot and
Stop&Go Pilot (Y page 168).
Activating/deactivating Active Brake
Assist You can use this function to activate or deacti-
vate Active Brake Assist. Menus and sub
menus
207On-board computer and displays Z
Page 211 of 333

You can use the function to activate or deacti-
vate Active Brake Assist or, on vehicles with the
Driving Assistance Plus package, to activate or
deactivate Active Brake Assist with cross-traffic
function.
X Press the =or; button on the steering
wheel to select the Assist.
Assist. menu.
X Press the 9or: button to select
Brake Assist
Brake Assist.
X Press ato confirm.
The current selection appears.
X To activate/deactivate: pressaagain.
If Active Brake Assist or Active Brake Assist
with cross-traffic function is deactivated, the
æ symbol appears in the assistance
graphic display of the multifunction display.
Further information on Active Brake Assist
(Y page 64).
Further information on Active Brake Assist with
cross-traffic function (Y page 72).
Setting ATTENTION ASSIST X
Press the =or; button on the steering
wheel to select the Assist.
Assist. menu.
X Press the 9or: button to select
Attention Assist
Attention Assist.
X Press ato confirm.
The current selection appears.
X Press ato confirm.
X Press the :or9 button to set Off Off,
Standard
Standard orSensitive
Sensitive.
X Press the abutton to save the setting.
When ATTENTION ASSIST is deactivated, the
é symbol appears in the multifunction dis-
play in the assistance graphic display.
Further information on ATTENTION ASSIST
(Y page 190).
Activating/deactivating Active Blind
Spot Assist X
Press the =or; button on the steering
wheel to select the Assist.
Assist. menu.
X Press the 9or: button to select
Blind Spot Assist
Blind Spot Assist.
X Press ato confirm your selection.
The current selection appears.
X To activate/deactivate: press theabut-
ton again. Further information on Active Blind Spot Assist
(Y
page 193).
Activating/deactivating Active Lane
Keeping Assist X
Press the =or; button on the steering
wheel to select the Assist. Assist.menu.
X Press the 9or: button to select
Lane Keeping Assist
Lane Keeping Assist.
X Press ato confirm your selection.
The current selection appears.
X Press aagain.
X Press the :or9 button to set Off
Off,
Standard
Standard orAdaptive
Adaptive .
X Press the abutton to save the setting.
When Active Lane Keeping Assist is activated,
the multifunction display shows the lane
markings as bright lines in the assistance
graphic.
Further information on Active Lane Keeping
Assist (Y page 195). Service menu
Depending on the equipment fitted in the vehi-
cle, you have the following options in the Serv. Serv.
menu:
R Calling up display messages (Y page 216)
R Restarting the tyre pressure loss warning sys-
tem (Y page 309)
R Checking the tyre pressure electronically
(Y page 309)
R Calling up the service due date
(Y page 281) Settings menu
Introduction Depending on the equipment fitted in the vehi-
cle, in the
Settings Settings menu you have the follow-
ing options:
R Changing the instrument cluster settings
(Y page 209)
R Changing the light settings (Y page 209)
R Changing the vehicle settings (Y page 211)
R Changing the convenience settings
(Y page 211)
R Restoring the factory settings (Y page 212)208
Menus and submenusOn-board computer and displays
Page 212 of 333

Instrument cluster
Selecting the distance unit
The Display unit Speed-/odometer:
Display unit Speed-/odometer: func-
tion allows you to choose whether certain dis-
plays appear in kilometres or miles in the mul-
tifunction display.
X Press the =or; button on the steering
wheel to select the Settings Settingsmenu.
X Press the :or9 button to select the
Instrument cluster
Instrument cluster submenu.
X Press ato confirm.
X Press the :or9 button to select the
Display unit Speed-/odometer
Display unit Speed-/odometer function.
The current setting km
km ormiles
miles appears.
X Press the abutton to save the setting.
The selected unit of measurement for distance
applies to the: R digital speedometer in the Trip Tripmenu
R total distance recorder and trip meter
R trip computer
R current consumption and the range
R navigation instructions in the Navi
Navimenu
R cruise control
R speed limiter
R Distance Pilot DISTRONIC
R ASSYST PLUS service interval display
Selecting permanent display United Kingdom: this function is unavailable.
The Permanent display:
Permanent display: function allows you
to choose whether the multifunction display
always shows the outside temperature or the
speed.
The speed display is inverse to your speedome-
ter.
X Press the =or; button on the steering
wheel to select the Settings Settingsmenu.
X Press the :or9 button to select the
Instrument cluster
Instrument cluster submenu.
X Press ato confirm.
X Press the :or9 button to select the
Permanent display:
Permanent display: function.
The current setting, outside temperature
outside temperature
or Dig. speedo [mph]:
Dig. speedo [mph]: , appears.
X To change the setting: pressaagain. Lights Setting the daytime driving lights
The Daytime driving lights
Daytime driving lights function can
only be switched on with the engine switched
off.
X Press the =or; button on the steering
wheel to select the Settings Settingsmenu.
X Press the :or9 button to select the
Lights
Lights submenu.
X Press ato confirm.
X Press the :or9 button to select the
Daytime driving lights
Daytime driving lights function.
If the Daytime
Daytime driving
drivinglights
lightsfunction has
been switched on, the cone of light and the
W symbol in the multifunction display are
shown in orange.
X Press the abutton to save the setting.
Further information on daytime driving lights
(Y page 113).
Switching the Intelligent Light System
on/off
X Press the =or; button on the steering
wheel to select the Settings Settingsmenu.
X Press the :or9 button to select the
Lights
Lights submenu.
X Press ato confirm.
X Press the :or9 button to select the
Intell. Light System
Intell. Light System function.
If the Intell. Light System
Intell. Light System function has
been switched on, the multifunction display
shows the cone of light and the Lsymbol
in orange.
X Press the abutton to save the setting.
When you activate the Intell.
Intell. Light LightSystem
System ,
you activate the following functions:
R Motorway mode
R Active light function
R Cornering light function
R Extended range foglamps
If you set the dipped-beam headlamps for driv-
ing on the right/left, the multifunction display
shows the Intell. Light System: System
Intell. Light System: System
inoperative Inactive for left-side inoperative Inactive for left-side
traffic traffic orIntell.
Intell. Light
LightSystem:
System: System
System
inoperative Inactive for right-side
inoperative Inactive for right-side
traffic
traffic display message instead of the
Intell. Light Sys.
Intell. Light Sys. function in theLight
Light
submenu (Y page 210). This display message
will only appear if the setting for driving on the Menus and submenus
209On-board computer and displays Z
Page 213 of 333
.
Setting the dipped-beam headlamps for
driving on the left/right")
left/right is set opposite to your vehicle's coun-
try version.
Further information on the Intelligent Light Sys-
tem (Y page 115).
Setting the dipped-beam headlamps for
driving on the left/right
You can use this function to switch between
symmetrical and asymmetrical dipped beam
(Y page 113).
X Press the =or; button on the steering
wheel to select the Settings
Settings menu.
X Press the :or9 button to select the
Lights
Lights submenu.
X Press ato confirm.
X Press the :or9 button to select the
Dipped beams Setting for:
Dipped beams Setting for: function.
The current setting Right-side traffic
Right-side traffic or
Left-side traffic Left-side traffic appears.
X Press the abutton to save the setting.
If you change the setting, conversion does not take place until the next time the vehicle is
stationary.
If you set the dipped-beam headlamps for driv-
ing on the right/left, then motorway mode and
the extended range foglamps are unavailable.
These are only deactivated if the setting for driv-
ing on the left/right is set opposite to your vehi-
cle's country version.
A qualified specialist workshop can set the
dipped-beam headlamps for driving on the left/ right.
Setting the brightness of the ambient
lighting
X Press the =or; button on the steering
wheel to select the Settings
Settings menu.
X Press the :or9 button to select the
Lights
Lights submenu.
X Press ato confirm.
X Press the :or9 button to select the
Amb. light +/- Amb. light +/- function.
The current setting appears.
X Press ato confirm.
X Press the :or9 button to adjust the
brightness to any level from Off
OfftoLevel 5
Level 5
(bright).
X Press the aor% button to save the
setting. Setting the ambient lighting colour
X Press the =or; button on the steering
wheel to select the Settings
Settings menu.
X Press the :or9 button to select the
Lights
Lights submenu.
X Press ato confirm.
X Press the :or9 button to select the
Amb. light col.
Amb. light col. function.
X Press ato confirm.
X Press the :or9 button to set the col-
our to SOLAR
SOLAR, SOLAR orange
SOLAR orange orSOLAR red
SOLAR red.
X Press the aor% button to save the
setting.
Activating/deactivating the surround
lighting and exterior lighting delayed
switch-off
X Press the =or; button on the steering
wheel to select the Settings Settingsmenu.
X Press the :or9 button to select the
Lights
Lights submenu.
X Press ato confirm.
X Press :or9 to select the Surround
Surround
lighting
lighting function.
If the Surround
Surround lighting
lightingfunction is activa-
ted, the multifunction display shows the light
cone and the area around the vehicle in
orange.
X Press the abutton to save the setting.
Deactivating delayed switch-off of the exterior
lighting temporarily: X Before leaving the vehicle, turn the key to
position 0in the ignition lock.
X Turn the key to position 2in the ignition lock.
The exterior lighting delayed switch-off is
deactivated.
Delayed switch-off of the exterior lighting is
reactivated the next time you start the engine.
If you have activated the Surround lighting Surround lighting
function and you turn the light switch to Ã,
the following functions are activated when it is
dark:
R surround lighting: the exterior lighting
remains lit for 40 seconds after unlocking
with the key. If you start the engine, the sur-
round lighting is switched off and automatic
headlamp mode is activated (Y page 113).
R exterior lighting delayed switch-off: the
exterior lighting remains lit for 60 seconds
after the engine is switched off. If you close all 210
Menus and submenusOn-board computer and displays
Page 214 of 333

the doors and the boot lid, the exterior lighting
goes off after 15 second s.
Depending on your vehicle's equipment, when
the surround lighting and delayed switch-off
exterior lighting are on, the following light up:
R side lamps
R dipped-beam headlamps
R daytime driving lights
R surround lighting in the exterior mirrors
Activating/deactivating the interior light- ing delayed switch-off
If you activate the Lighting Lightingdelayed
delayedsw.-off
sw.-off
function, the interior lighting remains on for
20 seconds after you remove the key from the
ignition lock.
X Press the =or; button on the steering
wheel to select the Settings
Settingsmenu.
X Press the :or9 button to select the
Lights
Lights submenu.
X Press ato confirm.
X Press the :or9 button to select the
Lighting delayed sw.-off
Lighting delayed sw.-off function.
When the Lighting
Lighting delayed
delayedsw.-off
sw.-offfunc-
tion is activated, the vehicle interior is dis-
played in orange in the multifunction display.
X Press the abutton to save the setting.
Vehicle Setting the permanent speed limiter
X Press the =or; button on the steering
wheel to select the Settings
Settings menu.
X Press the :or9 button to select the
Vehicle Vehicle submenu.
X Press ato confirm.
X Press :or9 to select the Limit
Limit
speed (winter tyres):
speed (winter tyres): function.
The current setting appears.
X Press ato confirm.
X Press the :or9 button to adjust the
permanent speed limiter in increments of ten
(160 km/h 160 km/h to240 km/h
240 km/h). The Off
Offsetting
switches the permanent speed limiter off.
X Press the abutton to store the entry.
Further information on the permanent speed
limiter (Y page 172). Activating/deactivating the automatic
locking feature
If you activate the Automatic door locks Automatic door locks
function, the vehicle is centrally locked above a
speed of approximately 15 km/h.
X Press the =or; button on the steering
wheel to select the Settings Settingsmenu.
X Press the :or9 button to select the
Vehicle
Vehicle submenu.
X Press ato confirm.
X Press the :or9 button to select the
Automatic door locks
Automatic door locks function.
When the Automatic
Automatic door
doorlocks
locks function is
activated, the multifunction display shows the
left-hand vehicle door in orange.
X Press the abutton to save the setting.
Further information on the automatic locking
feature (Y page 84).
Activating/deactivating the acoustic
locking confirmation
If you switch on the Acoustic
Acoustic Lock Lockfunction, an
acoustic signal sounds when you lock the vehi-
cle.
X Press the =or; button on the steering
wheel to select the Settings
Settings menu.
X Press the :or9 button to select the
Vehicle Vehicle submenu.
X Press ato confirm.
X Press the :or9 button to select the
Acoustic Lock
Acoustic Lock function.
If the Acoustic Lock
Acoustic Lock function is activated,
the & symbol in the multifunction display
lights up orange.
X Press the abutton to save the setting.
Comfort Activating/deactivating the EASY-
ENTRY/EXIT feature
G
WARNING
When the EASY-ENTRY/EXIT feature adjusts
the steering wheel, you and other vehicle
occupants – particularly children – could
become trapped. There is a risk of injury.
While the EASY-ENTRY/EXIT feature is mak-
ing adjustments, make sure that no one has Menus and submenus
211On-board computer and displays
Z
Page 215 of 333

any body parts in the sweep of the steering
wheel.
If someone is trapped:
R press one of the memory function position
buttons, or
R move the switch for steering wheel adjust-
ment in the opposite direction to that in
which the steering wheel is moving.
The adjustment process is stopped.
X Press the =or; button on the steering
wheel to select the Settings
Settings menu.
X Press the :or9 button to select the
Convenience Convenience submenu.
X Press ato confirm.
X Using :or9, select the Easy
Easy Entry/
Entry/
Exit
Exit function.
If the Easy
Easy Entry/Exit
Entry/Exit function is activated,
the multifunction display shows the steering
wheel in orange.
X Press the abutton to save the setting.
Further information on the EASY-ENTRY/EXIT
feature (Y page 106).
Switching belt adjustment on/off
X Press the =or; button on the steering
wheel to select the Settings
Settings menu.
X Press the :or9 button to select the
Convenience
Convenience submenu.
X Press ato confirm.
X Press the :or9 button to select the
Belt adjustment
Belt adjustment function.
When the Belt adjustment
Belt adjustment function is acti-
vated, the seat belt is displayed in orange in
the multifunction display.
X Press the abutton to save the setting.
Further information on belt adjustment
(Y page 43).
Switching the fold mirrors in when lock-
ing function on/off
This function is only available when the vehicle is
equipped with the electrical fold-in function.
When you activate the Auto. fold-in mir‐
Auto. fold-in mir‐
rors rors function, the exterior mirrors are folded in
when the vehicle is locked.
If you have switched on the Auto. fold-in
Auto. fold-in
mirrors mirrors function and you fold in the exterior
mirrors using the button on the door (Y
page 109), they will not fold out automati-
cally. The exterior mirrors can then only be fol-
ded out using the button on the door.
X Press the =or; button on the steering
wheel to select the Settings Settingsmenu.
X Press the :or9 button to select the
Convenience
Convenience submenu.
X Press ato confirm.
X Press the :or9 button to select the
Auto. fold-in mirrors
Auto. fold-in mirrors function.
If the Auto. fold-in mirrors
Auto. fold-in mirrors function is
switched on, the multifunction display shows the exterior mirror in orange.
X Press the abutton to save the setting.
Resetting to factory settings X
Press the =or; button on the steering
wheel to select the Settings
Settingsmenu.
X Press the :or9 button to select the
Factory setting
Factory setting submenu.
X Press ato confirm.
The Reset all settings?
Reset all settings? function
appears.
X Press the :or9 button to select No
Noor
Yes
Yes .
X Press the abutton to confirm the selec-
tion.
If you have selected Yes
Yes and confirmed, the
multifunction display shows a confirmation
message.
For safety reasons, not all functions are reset:
the Limit speed (winter tyres): Limit speed (winter tyres): function
of the permanent speed limiter can only be set in
the Vehicle
Vehicle submenu. If you want to reset the
Daytime driving lights
Daytime driving lights function in the
Lights
Lights submenu, you must turn the key to posi-
tion 1in the ignition lock. 212
Menus and submenusOn-board computer and displays
Page 216 of 333

Warm-up :
Digital speedometer
; Gear indicator
= Upshift indicator
? Engine oil temperature
A Coolant temperature
B Transmission oil temperature
X Press the =or; butto")
AMG menu (Mercedes-AMG vehicles)
Warm-up :
Digital speedometer
; Gear indicator
= Upshift indicator
? Engine oil temperature
A Coolant temperature
B Transmission oil temperature
X Press the =or; button on the steering
wheel to select the AMG
AMG menu.
Upshift indicator: upshift indicatorUP
UP=
indicates that the engine has reached the
overrevving range when in the manual drive
program.
Engine and transmission oil temperature:
when the engine and transmission are at nor-
mal operating temperature, oil tempera-
ture ?and Bare displayed in white in the
multifunction display.
If the multifunction display shows oil temper- ature ?orB in blue, the engine or the
transmission are not yet at normal operating
temperature. Avoid using the full output of the engine during this time.
SETUP :
Engine mode C C,S
S,S+
S+ orM
M
; Suspension setting SPORT
SPORTorCOMFORT
COMFORT
= Transmission position D
D/ M
M
? ESP ®
mode ( On
On/OffOff) SETUP displays the following information, func-
tions and settings:
R the digital speedometer
R the gear indicator
R the engine mode
R the suspension mode
R the transmission position
R the ESP ®
(Electronic Stability Program) mode
X Press =or; on the steering wheel to
select the AMG
AMG menu.
X Press 9repeatedly until SETUP appears.
RACETIMER Displaying and starting the RACETIMER
The RACETIMER is only intended for use on a
closed race circuit. Do not use the function on
public roads. :
Lap
; RACETIMER
You can start the RACETIMER when the engine is running or if the key is in position 2in the ignition
lock.
X Press =or; on the steering wheel to
select the AMG AMGmenu.
X Press the 9button repeatedly until the
RACETIMER appears.
X To start: press the abutton to start the
RACETIMER.
Displaying the intermediate time Menus and sub
menus
213On-board computer and displays Z
 1
1 2
2 3
3 4
4 5
5 6
6 7
7 8
8 9
9 10
10 11
11 12
12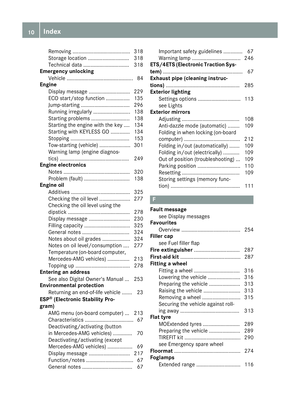 13
13 14
14 15
15 16
16 17
17 18
18 19
19 20
20 21
21 22
22 23
23 24
24 25
25 26
26 27
27 28
28 29
29 30
30 31
31 32
32 33
33 34
34 35
35 36
36 37
37 38
38 39
39 40
40 41
41 42
42 43
43 44
44 45
45 46
46 47
47 48
48 49
49 50
50 51
51 52
52 53
53 54
54 55
55 56
56 57
57 58
58 59
59 60
60 61
61 62
62 63
63 64
64 65
65 66
66 67
67 68
68 69
69 70
70 71
71 72
72 73
73 74
74 75
75 76
76 77
77 78
78 79
79 80
80 81
81 82
82 83
83 84
84 85
85 86
86 87
87 88
88 89
89 90
90 91
91 92
92 93
93 94
94 95
95 96
96 97
97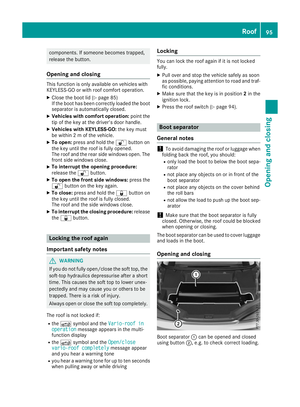 98
98 99
99 100
100 101
101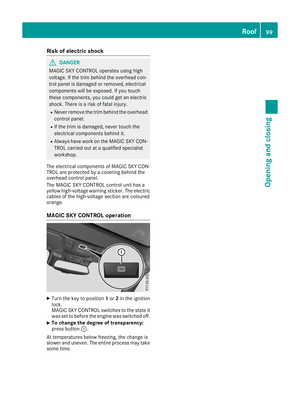 102
102 103
103 104
104 105
105 106
106 107
107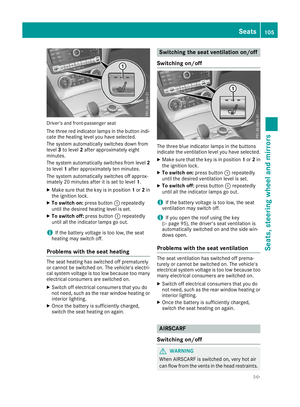 108
108 109
109 110
110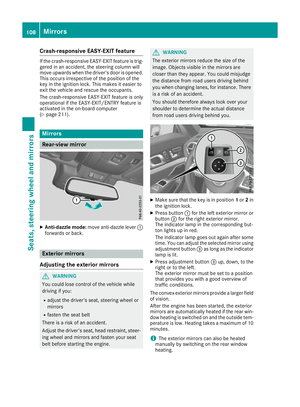 111
111 112
112 113
113 114
114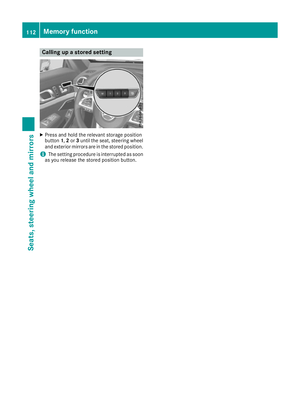 115
115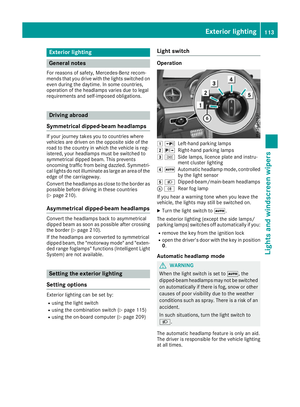 116
116 117
117 118
118 119
119 120
120 121
121 122
122 123
123 124
124 125
125 126
126 127
127 128
128 129
129 130
130 131
131 132
132 133
133 134
134 135
135 136
136 137
137 138
138 139
139 140
140 141
141 142
142 143
143 144
144 145
145 146
146 147
147 148
148 149
149 150
150 151
151 152
152 153
153 154
154 155
155 156
156 157
157 158
158 159
159 160
160 161
161 162
162 163
163 164
164 165
165 166
166 167
167 168
168 169
169 170
170 171
171 172
172 173
173 174
174 175
175 176
176 177
177 178
178 179
179 180
180 181
181 182
182 183
183 184
184 185
185 186
186 187
187 188
188 189
189 190
190 191
191 192
192 193
193 194
194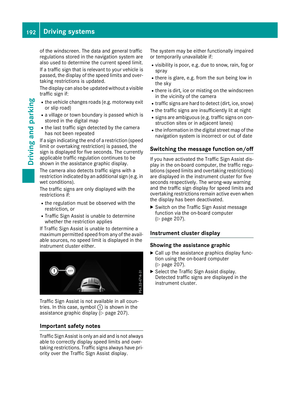 195
195 196
196 197
197 198
198 199
199 200
200 201
201 202
202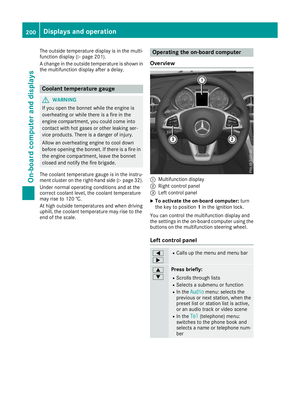 203
203 204
204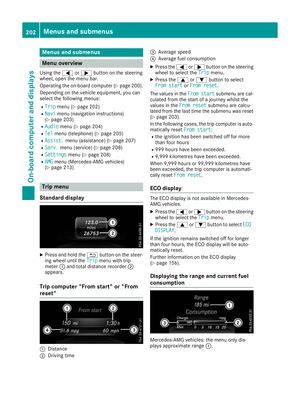 205
205 206
206 207
207 208
208 209
209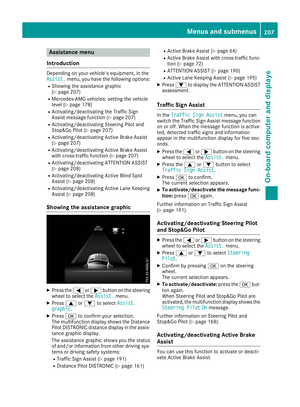 210
210 211
211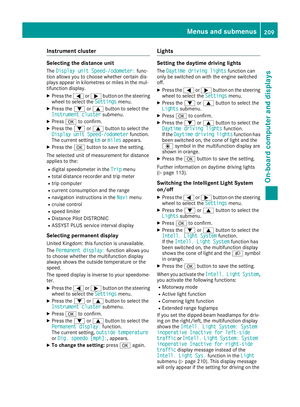 212
212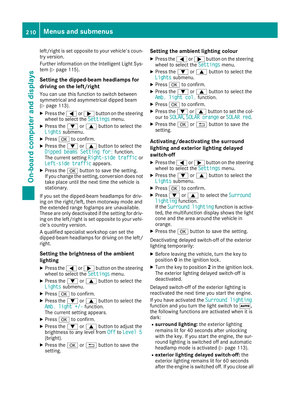 213
213 214
214 215
215 216
216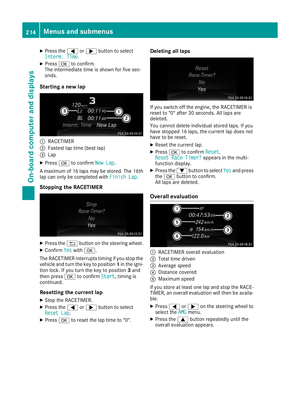 217
217 218
218 219
219 220
220 221
221 222
222 223
223 224
224 225
225 226
226 227
227 228
228 229
229 230
230 231
231 232
232 233
233 234
234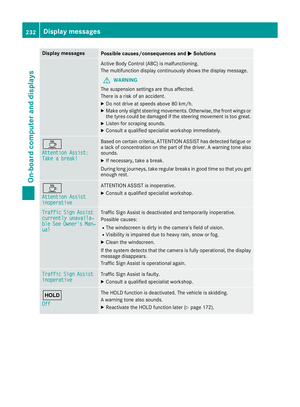 235
235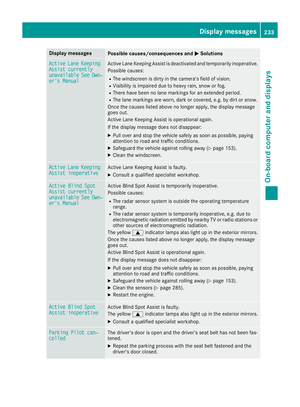 236
236 237
237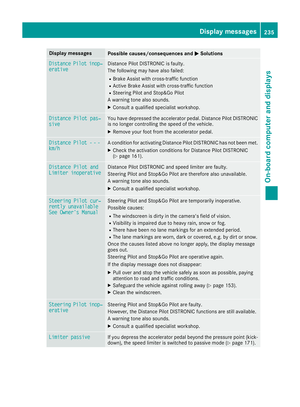 238
238 239
239 240
240 241
241 242
242 243
243 244
244 245
245 246
246 247
247 248
248 249
249 250
250 251
251 252
252 253
253 254
254 255
255 256
256 257
257 258
258 259
259 260
260 261
261 262
262 263
263 264
264 265
265 266
266 267
267 268
268 269
269 270
270 271
271 272
272 273
273 274
274 275
275 276
276 277
277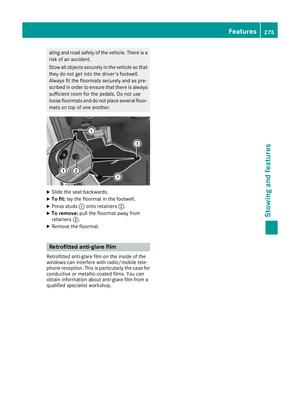 278
278 279
279 280
280 281
281 282
282 283
283 284
284 285
285 286
286 287
287 288
288 289
289 290
290 291
291 292
292 293
293 294
294 295
295 296
296 297
297 298
298 299
299 300
300 301
301 302
302 303
303 304
304 305
305 306
306 307
307 308
308 309
309 310
310 311
311 312
312 313
313 314
314 315
315 316
316 317
317 318
318 319
319 320
320 321
321 322
322 323
323 324
324 325
325 326
326 327
327 328
328 329
329 330
330 331
331 332
332