2016 MERCEDES-BENZ SL ROADSTER seat adjustment
[x] Cancel search: seat adjustmentPage 20 of 333
Switching belt adjustment on/off
(on-board computer) ...................... 212
Seat belts
Adjusting the driver's and front-
passenger seat belt ......................... 43
Fastening ......................................... 42
Important safety guidelines ............. 41
Introduction ..................................... 41
Releasing ......................................... 43
Warning lamp ................................. 244
Warning lamp (function) ................... 43
Seats
Adjusting (electrically) ................... 102
Adjusting the head restraint .......... 103
Belt guide ...................................... 103
Correct driver's seat position ........ 101
Important safety notes .................. 101
Overview ........................................ 101
Seat heating problem .................... 105
Seat ventilation problem ................ 105
Sliding forward/back ..................... 104
Storing settings (memory func-
tion) ............................................... 111
Switching AIRSCARF on/of f.......... 105
Switching seat heating on/of f....... 104
Switching the seat ventilation on/
off .................................................. 105
Selector lever
Positions ........................................ 141
Sensors (cleaning instructions) ....... 285
Service
see ASSYST PLUS
Service Centre
see Qualified specialist workshop
Service menu (on-board com-
puter) .................................................. 208
Service message
see ASSYST PLUS
Service products
Brake fluid ..................................... 325
Coolant (engine) ............................ 325
Engine oil ....................................... 324
Fuel ................................................ 322
Important safety notes .................. 322
Washer fluid ................................... 326
Setting the air distribution ............... 126
Setting the airflow ............................ 126 Setting the date/time format
See also Digital Owner's Manua l... 253
Setting the language
See also Digital Owner's Manua l... 253
Setting the time
See also Digital Owner's Manua l... 253
Settings
Factory (on-board computer) ......... 212
On-board compute r....................... 208
SETUP (on-board computer) ............. 213
Side lamps
Switching on/of f........................... 114
Side windows
Convenience closing ........................ 91
Important safety notes .................... 89
Opening/closing (front) ................... 90
Opening/closing (rear) .................... 91
Opening/closing all ......................... 91
Overview .......................................... 89
Problem (malfunction) ..................... 93
Resetting ......................................... 92
Reversing feature ............................. 90
Sidebag ................................................ 45
SIM card
Inserting ........................................ 258
SMS
See also Digital Owner's Manua l... 253
Snow chains ...................................... 307
Socket
Front-passenger footwell ............... 268
Sockets
General notes ................................ 268
Sound
Switching on/of f........................... 254
Specialist workshop ............................ 27
Spectacles compartment ................. 263
Speed limiter
Display message ............................ 235
Important safety notes .................. 170
Selecting ........................................ 171
Speed, controlling
see Cruise control
Speedometer
Digital ............................................ 203
In the Instrument cluster ................. 32
Segments ...................................... 199
Selecting a display uni t.................. 209 Index
17
Page 38 of 333
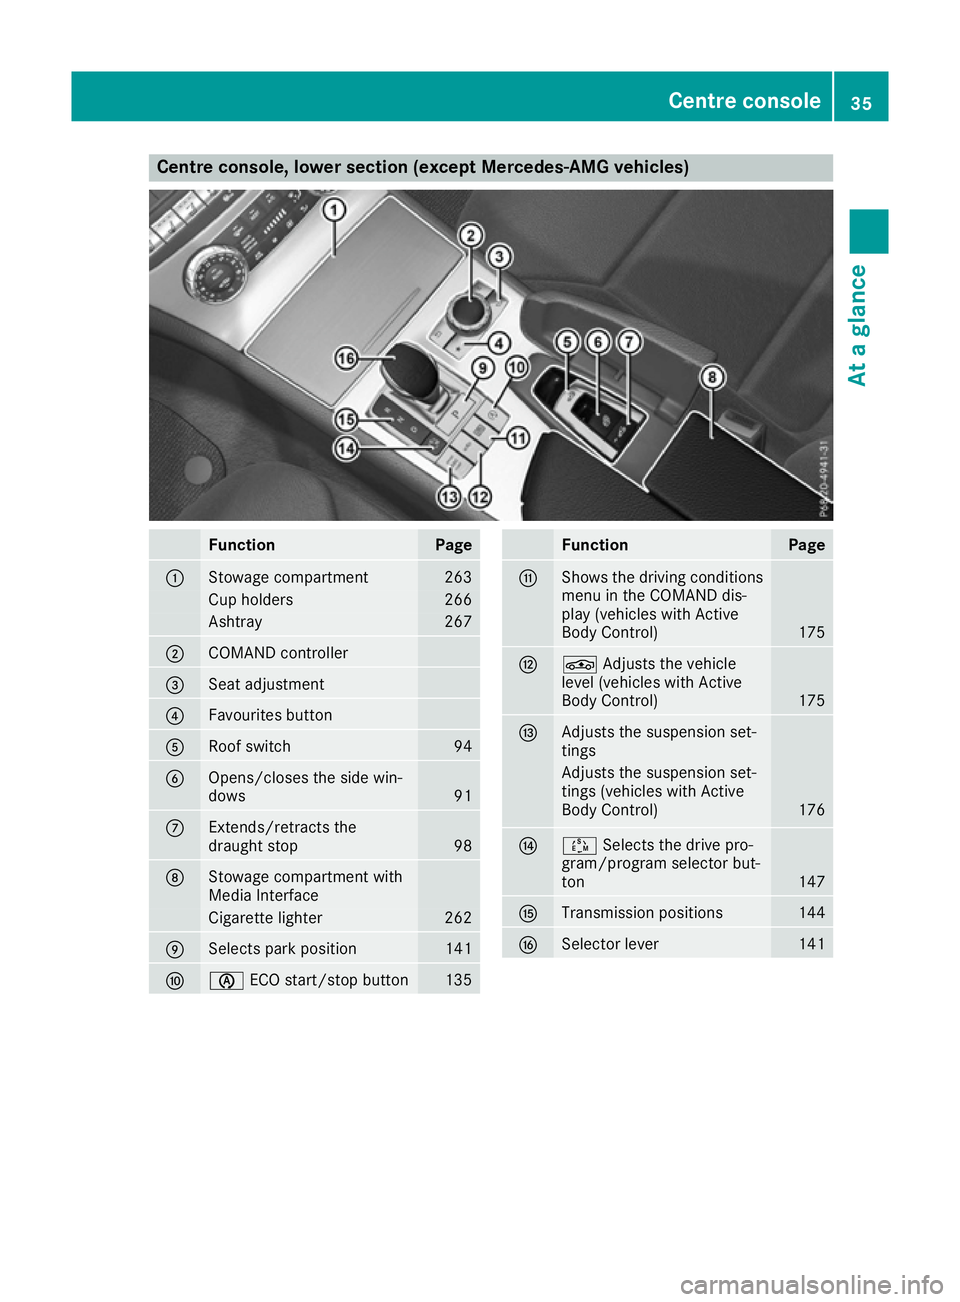
Centre console, lower section (except Mercedes-AMG vehicles)
Function Page
:
Stowage compartment 263
Cup holders 266
Ashtray 267
;
COMAND controller
=
Seat adjustment
?
Favourites button
A
Roof switch 94
B
Opens/closes the side win-
dows
91
C
Extends/retracts the
draught stop 98
D
Stowage compartment with
Media Interface
Cigarette lighter 262
E
Selects park position 141
F
è
ECO start/stop button 135 Function Page
G
Shows the driving conditions
menu in the COMAND dis-
play (vehicles with Active
Body Control) 175
H
É
Adjusts the vehicle
level (vehicles with Active
Body Control) 175
I
Adjusts the suspension set-
tings Adjusts the suspension set-
tings (vehicles with Active
Body Control) 176
J
Ú
Selects the drive pro-
gram/program selector but-
ton 147
K
Transmission positions 144
L
Selector lever 141Centre console
35At a glance
Page 39 of 333
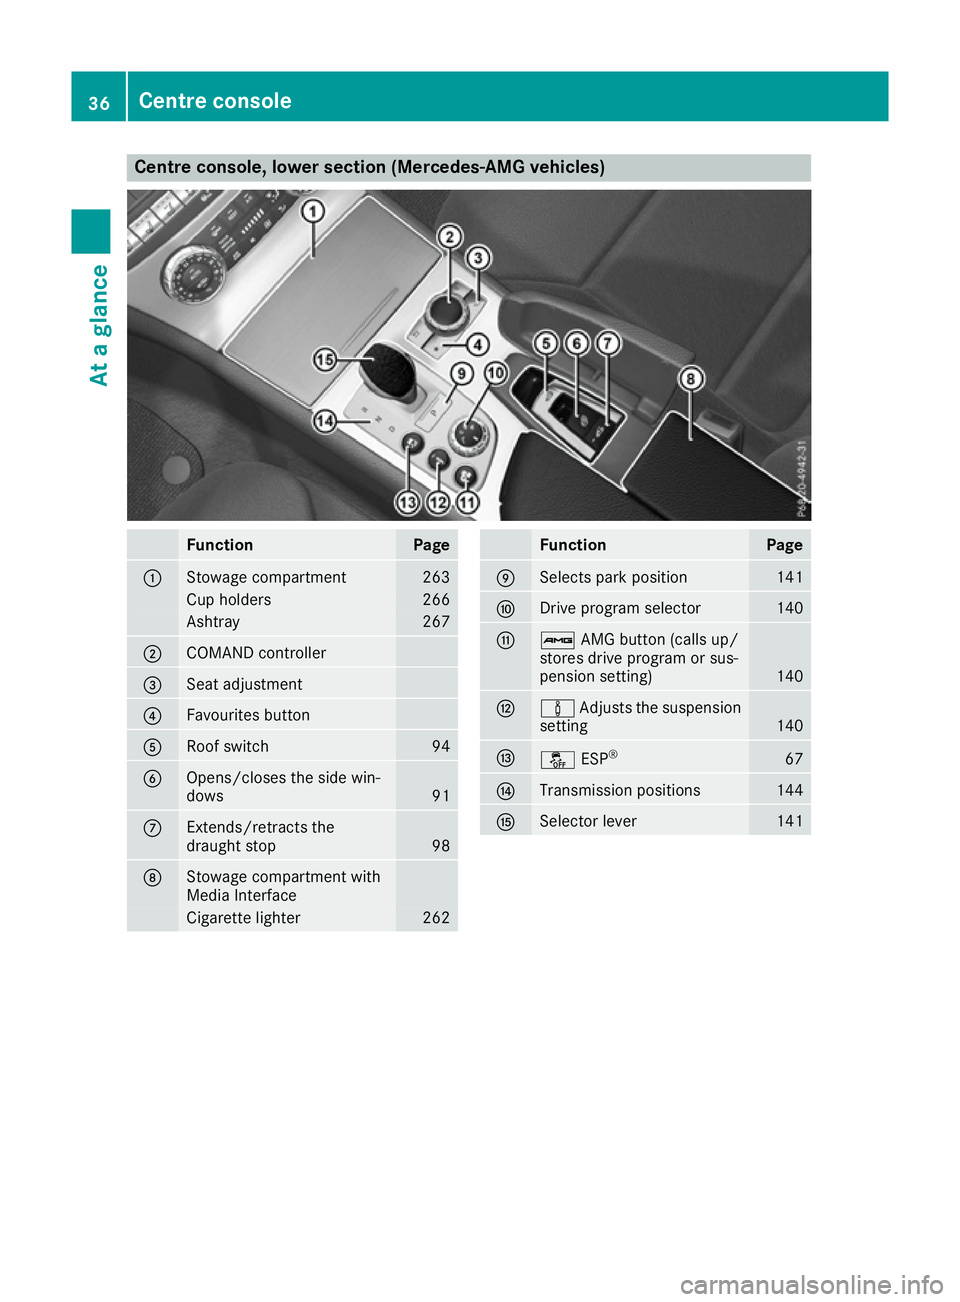
Centre console, lower section (Mercedes-AMG vehicles)
Function Page
:
Stowage compartment 263
Cup holders 266
Ashtray 267
;
COMAND controller
=
Seat adjustment
?
Favourites button
A
Roof switch 94
B
Opens/closes the side win-
dows
91
C
Extends/retracts the
draught stop
98
D
Stowage compartment with
Media Interface
Cigarette lighter 262 Function Page
E
Selects park position 141
F
Drive program selector 140
G
ß
AMG button (calls up/
stores drive program or sus-
pension setting) 140
H
à
Adjusts the suspension
setting 140
I
å
ESP® 67
J
Transmission positions 144
K
Selector lever 14136
Centre consoleAt a glance
Page 46 of 333
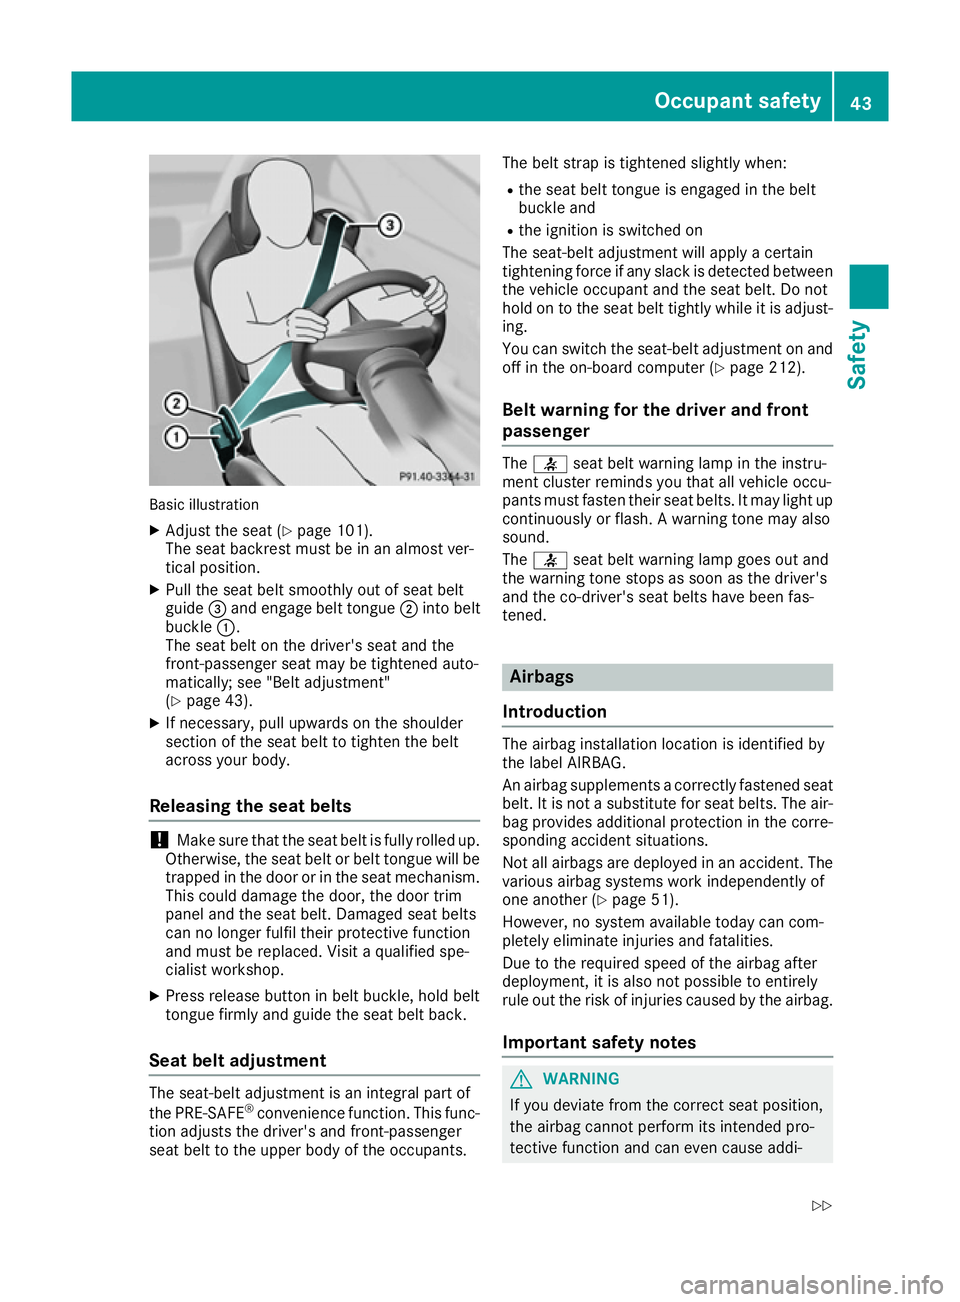
Basic illustration
X Adjust the seat (Y page 101).
The seat backrest must be in an almost ver-
tical position.
X Pull the seat belt smoothly out of seat belt
guide =and engage belt tongue ;into belt
buckle :.
The seat belt on the driver's seat and the
front-passenger seat may be tightened auto-
matically; see "Belt adjustment"
(Y page 43).
X If necessary, pull upwards on the shoulder
section of the seat belt to tighten the belt
across your body.
Releasing the seat belts !
Make sure that the seat belt is fully rolled up.
Otherwise, the seat belt or belt tongue will be
trapped in the door or in the seat mechanism. This could damage the door, the door trim
panel and the seat belt. Damaged seat belts
can no longer fulfil their protective function
and must be replaced. Visit a qualified spe-
cialist workshop.
X Press release button in belt buckle, hold belt
tongue firmly and guide the seat belt back.
Seat belt adjustment The seat-belt adjustment is an integral part of
the PRE-SAFE ®
convenience function. This func-
tion adjusts the driver's and front-passenger
seat belt to the upper body of the occupants. The belt strap is tightened slightly when:
R the seat belt tongue is engaged in the belt
buckle and
R the ignition is switched on
The seat-belt adjustment will apply a certain
tightening force if any slack is detected between
the vehicle occupant and the seat belt. Do not
hold on to the seat belt tightly while it is adjust-
ing.
You can switch the seat-belt adjustment on and
off in the on-board computer (Y page 212).
Belt warning for the driver and front
passenger The
7 seat belt warning lamp in the instru-
ment cluster reminds you that all vehicle occu-
pants must fasten their seat belts. It may light up continuously or flash. A warning tone may also
sound.
The 7 seat belt warning lamp goes out and
the warning tone stops as soon as the driver's
and the co-driver's seat belts have been fas-
tened. Airbags
Introduction The airbag installation location is identified by
the label AIRBAG.
An airbag supplements a correctly fastened seat
belt. It is not a substitute for seat belts. The air- bag provides additional protection in the corre-
sponding accident situations.
Not all airbags are deployed in an accident. The
various airbag systems work independently of
one another (Y page 51).
However, no system available today can com-
pletely eliminate injuries and fatalities.
Due to the required speed of the airbag after
deployment, it is also not possible to entirely
rule out the risk of injuries caused by the airbag.
Important safety notes G
WARNING
If you deviate from the correct seat position,
the airbag cannot perform its intended pro-
tective function and can even cause addi- Occupant safety
43Safety
Z
Page 53 of 333

Problems with automatic front-passenger front airbag deactivation
Be sure to observe the notes on "System self-test" (Y
page 48).Problem
Possible causes/consequences and
M
MSolutions The PASSENGER AIR
BAG OFF indicator lamp
lights up and remains lit,
even though the front-
passenger seat is occu-
pied by an adult or a per-
son with a build corre-
sponding to that of an
adult. The classification of the person on the front-passenger seat is false.
X Make sure the conditions for a correct classification of the person
on the front-passenger seat are met (Y page 46).
X If the PASSENGER AIR BAG OFF indicator lamp remains lit, the front-
passenger seat may not be used.
X Have the automatic front-passenger front airbag deactivation sys-
tem checked immediately at a qualified specialist workshop. The PASSENGER AIR
BAG OFF indicator lamp
does not light up and/or
does not stay on.
The front-passenger seatis:
R empty
R occupied with a rear-
ward-facing child
restraint system The automatic front-passenger front airbag deactivation system is
malfunctioning.
X Make sure there is nothing between the seat and the child restraint
system.
X Make sure that the entire base of the child restraint system rests on
the seat cushion of the front-passenger seat.
X Make sure that the seat cushion length is fully retracted.
X When installing the child restraint system, make sure that the seat
belt is tight. Do not pull the seat belt tight with the front-passenger
seat adjustment. This could result in the seat belt and the child
restraint system being pulled too tightly.
X Check that the child restraint system is installed correctly.
X Make sure that no objects are applying additional weight to the
seat.
X If the PASSENGER AIR BAG OFF indicator lamp remains off and/or
the PASSENGER AIR BAG ON indicator lamp lights up, do not install
a rearward-facing child restraint system on the front-passenger
seat.
X Have the automatic front-passenger front airbag deactivation sys-
tem checked immediately at a qualified specialist workshop. Roll bars
G
DANGER
If the roll bar has developed a fault, it may not function, e.g. in the event of an accident. The
roll bars may then not protect the vehicle
occupants as intended. This poses an
increased risk of injury or even fatal injury.
Have roll bars checked immediately at a quali-
fied specialist workshop. G
WARNING
If you place objects or clothing on the roll bar covers, these could impair roll bar extension.
The roll bars may then not protect the vehicle occupants as intended. In addition, objects
could endanger the vehicle occupants when
the roll bar is extending. This poses an
increased risk of injury or even fatal injury.
Ensure that the movement area of the roll barcovers is kept clear. Always stow all objects in
the vehicle correctly. 50
Occupant safetySafety
Page 104 of 333
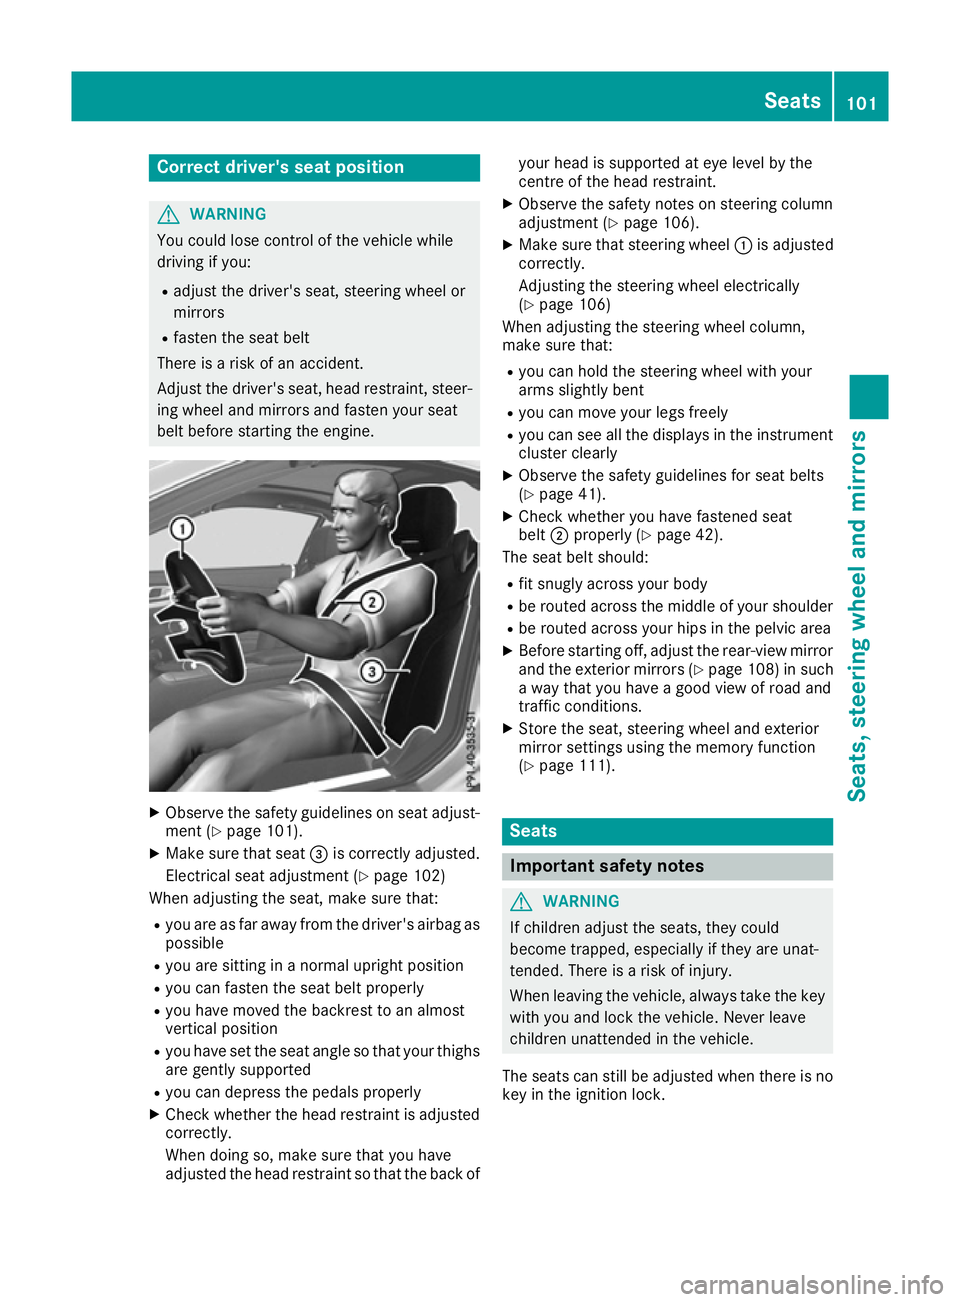
Correct driver's seat position
G
WARNING
You could lose control of the vehicle while
driving if you:
R adjust the driver's seat, steering wheel or
mirrors
R fasten the seat belt
There is a risk of an accident.
Adjust the driver's seat, head restraint, steer-
ing wheel and mirrors and fasten your seat
belt before starting the engine. X
Observe the safety guidelines on seat adjust-
ment (Y page 101).
X Make sure that seat =is correctly adjusted.
Electrical seat adjustment (Y page 102)
When adjusting the seat, make sure that:
R you are as far away from the driver's airbag as
possible
R you are sitting in a normal upright position
R you can fasten the seat belt properly
R you have moved the backrest to an almost
vertical position
R you have set the seat angle so that your thighs
are gently supported
R you can depress the pedals properly
X Check whether the head restraint is adjusted
correctly.
When doing so, make sure that you have
adjusted the head restraint so that the back of your head is supported at eye level by the
centre of the head restraint.
X Observe the safety notes on steering column
adjustment (Y page 106).
X Make sure that steering wheel :is adjusted
correctly.
Adjusting the steering wheel electrically
(Y page 106)
When adjusting the steering wheel column,
make sure that:
R you can hold the steering wheel with your
arms slightly bent
R you can move your legs freely
R you can see all the displays in the instrument
cluster clearly
X Observe the safety guidelines for seat belts
(Y page 41).
X Check whether you have fastened seat
belt ;properly (Y page 42).
The seat belt should:
R fit snugly across your body
R be routed across the middle of your shoulder
R be routed across your hips in the pelvic area
X Before starting off, adjust the rear-view mirror
and the exterior mirrors (Y page 108) in such
a way that you have a good view of road and
traffic conditions.
X Store the seat, steering wheel and exterior
mirror settings using the memory function
(Y page 111). Seats
Important safety notes
G
WARNING
If children adjust the seats, they could
become trapped, especially if they are unat-
tended. There is a risk of injury.
When leaving the vehicle, always take the key with you and lock the vehicle. Never leave
children unattended in the vehicle.
The seats can still be adjusted when there is no
key in the ignition lock. Seats
101Seats, steering wheel and mirrors Z
Page 105 of 333

G
WARNING
When adjusting a seat, you or another vehicle occupant could become trapped by the guiderail of the seat, for instance. There is a risk of
injury.
Make sure that no one has any part of their
body within the sweep of the seat when
adjusting it.
Observe the safety notes on "Airbags"
(Y page 43) and "Children in the Vehicle"
(Y page 54). G
WARNING
If you adjust the seat height carelessly, you or other vehicle occupants could be trapped andthereby injured. Children in particular could
accidentally press the electrical seat adjust-
ment buttons and become trapped. There is a
risk of injury.
While moving the seats, make sure that your
hands or other body parts do not get under the
lever assembly of the seat adjustment sys-
tem. G
WARNING
The head restraints cannot provide the inten-
ded protection unless they are fitted and
adjusted correctly. There is an increased risk of injury to the head and neck in the event of
an accident or sudden braking, for example.
Always drive with the head restraints fitted.
Ensure that the centre of the head restraints
support the back of each vehicle occupant's
head at eye level before driving off. G
WARNING
You could lose control of the vehicle while
driving if you:
R adjust the driver's seat, steering wheel or
mirrors
R fasten the seat belt
There is a risk of an accident.
Adjust the driver's seat, head restraint, steer-
ing wheel and mirrors and fasten your seat
belt before starting the engine. !
To avoid damage to the seats and the seat
heating, observe the following information:
R do not spill any liquids on the seats. If liquid
is spilled on the seats, dry them as soon as possible.
R if the seat covers are damp or wet, do not
switch on the seat heating. The seat heat-
ing should also not be used to dry the seats.
R clean the seat covers as recommended;
see the "Interior care" section.
R do not transport heavy loads on the seats.
Do not place sharp objects on the seat
cushions, e.g. knives, nails or tools. The
seats should only be occupied by passen-
gers, if possible.
R when the seat heating is in operation, do
not cover the seats with insulating materi-
als, e.g. blankets, coats, bags, seat covers,
child seats or booster seats.
! Make sure that there are no objects in the
footwell under or behind the seats when mov- ing the seats back. There is a risk that the
seats and/or the objects could be damaged.
i The head restraints cannot be removed.
For more information, contact a qualified spe-
cialist workshop. Adjusting the seats electrically
:
Head restraint height
; Seat height
= Seat cushion angle
? Seat cushion length
A Seat fore-and-aft adjustment
B Backrest angle 102
SeatsSeats, steering wheel and mirrors
Page 109 of 333

This could result in burns in the immediate
vicinity of the air vents. There is a risk of injury.
Reduce the heater output before it becomes
too hot. The AIRSCARF function warms the head and
neck area of vehicle occupants with warm air.
The warm air flows out of the holes in the head
restraints.
The three red indicator lamps in the button indi- cate the heating level you have selected.
X Make sure that the key is in position 2in the
ignition lock.
X To switch on: press button:.
Three red indicator lamps in the button light
up. The blower starts up after a preheating
phase of seven seconds.
X Press button :repeatedly until the desired
heating level is set.
X To switch off: press button:repeatedly
until all the indicator lamps go out.
i The blower continues running for seven sec-
onds to cool down the heating elements.
i If the battery voltage is too low, AIRSCARF
may switch off. Steering wheel
Important safety notes
G
WARNING
You could lose control of the vehicle while
driving if you:
R adjust the driver's seat, steering wheel or
mirrors
R fasten the seat belt There is a risk of an accident.
Adjust the driver's seat, head restraint, steer-
ing wheel and mirrors and fasten your seat
belt before starting the engine. G
WARNING
Children could become trapped by the steer-
ing wheel if they adjust it. There is a risk of
injury.
When leaving the vehicle, always take the key with you and lock the vehicle. Never leave
children unattended in the vehicle.
The electrically adjustable steering wheel can
still be adjusted when there is no key in the igni-
tion lock. Adjusting the steering wheel electri-
cally
:
To adjust the steering wheel height
; To adjust the steering wheel position (fore-
and-aft adjustment)
i Further related subjects:
R EASY-ENTRY/EXIT feature (Y page 106)
R Storing settings (Y page 111) EASY-ENTRY/EXIT feature
Important safety notes G
WARNING
If you drive off while the EASY-ENTRY/EXIT
feature is making adjustments, you could lose 106
Steering wheelSeats, steering wheel and mirrors