2016 MERCEDES-BENZ SL ROADSTER load capacity
[x] Cancel search: load capacityPage 291 of 333

X
Lift and swing out bracket =from the side on
which locking button ?is located.
X Take fire extinguisher ;out of the roller box.
X To insert: insert fire extinguisher ;into the
roller box.
X Insert bracket =into the roller box on the
side opposite locking button ?.
X Then, insert bracket =completely.
X Slide locking button ?in the opposite direc-
tion to the arrow.
X Check whether bracket =is properly
engaged.
X Close cover :.
Have the fire extinguisher refilled after each use and checked every one or two years. It may oth-
erwise fail in an emergency. Vehicle tool kit
General notes The towing eye is located in the boot in a bracket
below the boot lid lock.
If the vehicle is equipped with a TIREFIT kit, it is located in the stowage well under the floor of the
boot.
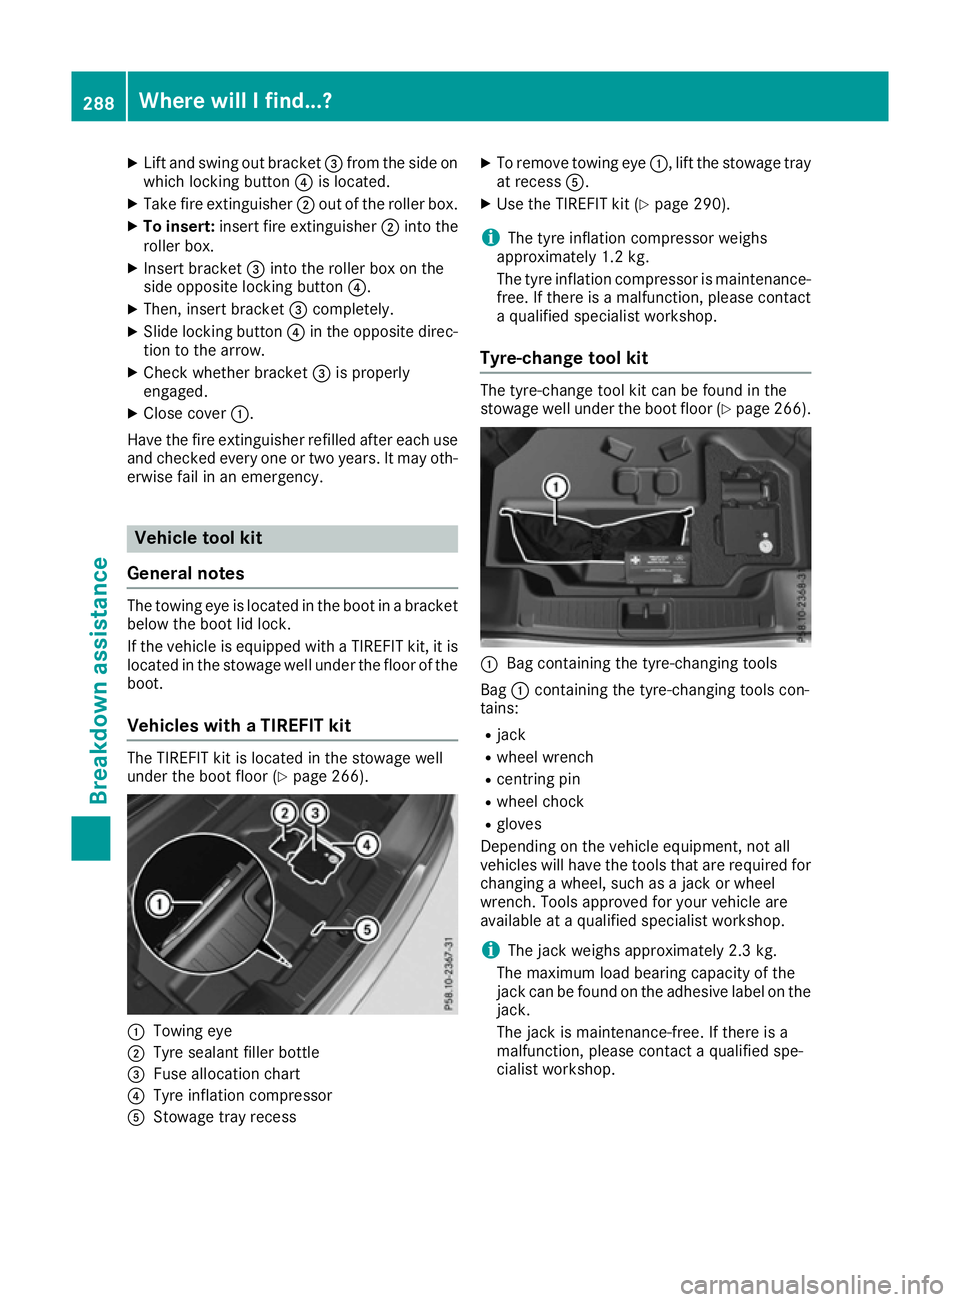
Vehicles with a TIREFIT kit The TIREFIT kit is located in the stowage well
under the boot floor (Y page 266).:
Towing eye
; Tyre sealant filler bottle
= Fuse allocation chart
? Tyre inflation compressor
A Stowage tray recess X
To remove towing eye :, lift the stowage tray
at recess A.
X Use the TIREFIT kit (Y page 290).
i The tyre inflation compressor weighs
approximately 1.2 kg.
The tyre inflation compressor is maintenance-
free. If there is a malfunction, please contact a qualified specialist workshop.
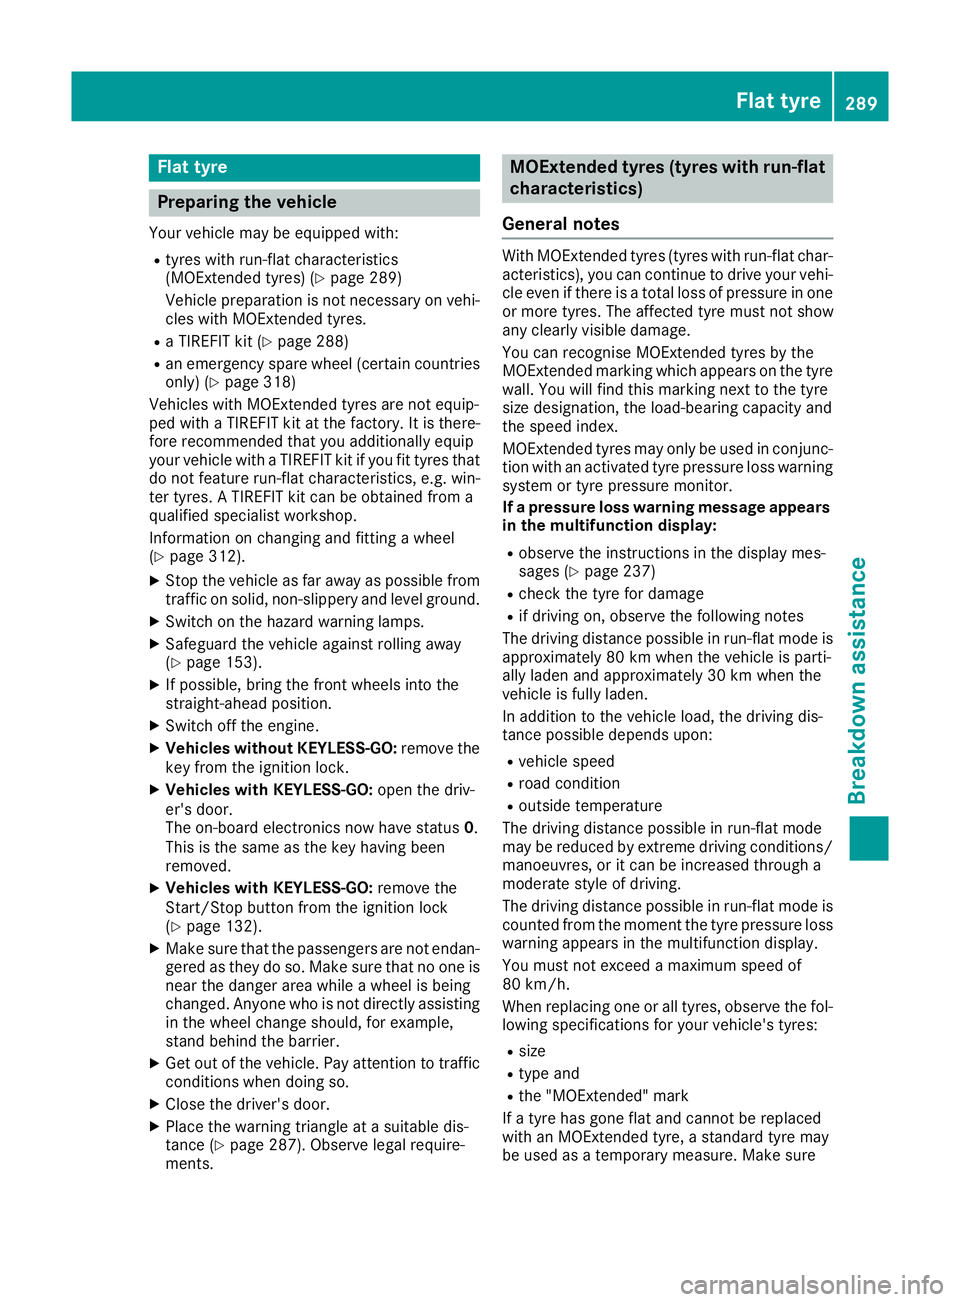
Tyre-change tool kit The tyre-change tool kit can be found in the
stowage well under the boot floor (Y
page 266). :
Bag containing the tyre-changing tools
Bag :containing the tyre-changing tools con-
tains:
R jack
R wheel wrench
R centring pin
R wheel chock
R gloves
Depending on the vehicle equipment, not all
vehicles will have the tools that are required for
changing a wheel, such as a jack or wheel
wrench. Tools approved for your vehicle are
available at a qualified specialist workshop.
i The jack weighs approximately 2.3 kg.
The maximum load bearing capacity of the
jack can be found on the adhesive label on the jack.
The jack is maintenance-free. If there is a
malfunction, please contact a qualified spe-
cialist workshop. 288
Where will I find...?Breakdown assistance
Page 292 of 333

Flat tyre
Preparing the vehicle
Your vehicle may be equipped with: R tyres with run-flat characteristics
(MOExtended tyres) (Y page 289)
Vehicle preparation is not necessary on vehi- cles with MOExtended tyres.
R a TIREFIT kit (Y page 288)
R an emergency spare wheel (certain countries
only) (Y page 318)
Vehicles with MOExtended tyres are not equip-
ped with a TIREFIT kit at the factory. It is there-
fore recommended that you additionally equip
your vehicle with a TIREFIT kit if you fit tyres that do not feature run-flat characteristics, e.g. win-
ter tyres. A TIREFIT kit can be obtained from a
qualified specialist workshop.
Information on changing and fitting a wheel
(Y page 312).
X Stop the vehicle as far away as possible from
traffic on solid, non-slippery and level ground.
X Switch on the hazard warning lamps.
X Safeguard the vehicle against rolling away
(Y page 153).
X If possible, bring the front wheels into the
straight-ahead position.
X Switch off the engine.
X Vehicles without KEYLESS-GO: remove the
key from the ignition lock.
X Vehicles with KEYLESS-GO: open the driv-
er's door.
The on-board electronics now have status 0.
This is the same as the key having been
removed.
X Vehicles with KEYLESS-GO: remove the
Start/Stop button from the ignition lock
(Y page 132).
X Make sure that the passengers are not endan-
gered as they do so. Make sure that no one is
near the danger area while a wheel is being
changed. Anyone who is not directly assisting in the wheel change should, for example,
stand behind the barrier.
X Get out of the vehicle. Pay attention to traffic
conditions when doing so.
X Close the driver's door.
X Place the warning triangle at a suitable dis-
tance (Y page 287). Observe legal require-
ments. MOExtended tyres (tyres with run-flat
characteristics)
General notes With MOExtended tyres (tyres with run-flat char-
acteristics), you can continue to drive your vehi- cle even if there is a total loss of pressure in one
or more tyres. The affected tyre must not show
any clearly visible damage.
You can recognise MOExtended tyres by the
MOExtended marking which appears on the tyre wall. You will find this marking next to the tyre
size designation, the load-bearing capacity and
the speed index.
MOExtended tyres may only be used in conjunc-tion with an activated tyre pressure loss warning
system or tyre pressure monitor.
If a pressure loss warning message appears in the multifunction display:
R observe the instructions in the display mes-
sages (Y page 237)
R check the tyre for damage
R if driving on, observe the following notes
The driving distance possible in run-flat mode is
approximately 80 km when the vehicle is parti-
ally laden and approximately 30 km when the
vehicle is fully laden.
In addition to the vehicle load, the driving dis-
tance possible depends upon:
R vehicle speed
R road condition
R outside temperature
The driving distance possible in run-flat mode
may be reduced by extreme driving conditions/
manoeuvres, or it can be increased through a
moderate style of driving.
The driving distance possible in run-flat mode is counted from the moment the tyre pressure loss
warning appears in the multifunction display.
You must not exceed a maximum speed of
80 km/h.
When replacing one or all tyres, observe the fol-
lowing specifications for your vehicle's tyres:
R size
R type and
R the "MOExtended" mark
If a tyre has gone flat and cannot be replaced
with an MOExtended tyre, a standard tyre may
be used as a temporary measure. Make sure Flat tyre
289Breakdown assistance Z
Page 317 of 333

must be positioned vertically, directly under
the jacking point of the vehicle.
Observe the following when raising the vehicle:
R only use the vehicle-specific jack that has
been tested and approved by Mercedes-Benz
to raise the vehicle. If the jack is used incor-
rectly, it could tip over while the vehicle is
raised.
R the jack is designed only to raise and hold the
vehicle for a short time while a wheel is being
changed. It is not permissible to use it to per- form maintenance work under the vehicle.
R avoid changing the wheel on uphill and down-
hill slopes.
R before raising the vehicle, safeguard it from
rolling away by applying the parking brake and
positioning wheel chocks. Do not release the parking brake while the vehicle is raised.
R the jack must be placed on a firm, flat and
non-slip surface. On a loose surface, a large,
flat load-bearing underlay must be used. On a
slippery surface, a non-slip underlay must be
used, e.g. rubber mats.
R do not use wooden blocks or similar objects
as a jack underlay. Otherwise, the jack will not
be able to achieve its load-bearing capacity
due to the restricted height.
R make sure that the distance between the
underside of the tyres and the ground does
not exceed 3 cm.
R never place your hands or feet under the
raised vehicle.
R do not lie under the vehicle.
R do not start the engine when the vehicle is
raised.
R do not open or close a door or the boot lid
when the vehicle is raised.
R make sure that no persons are present in the
vehicle when the vehicle is raised.
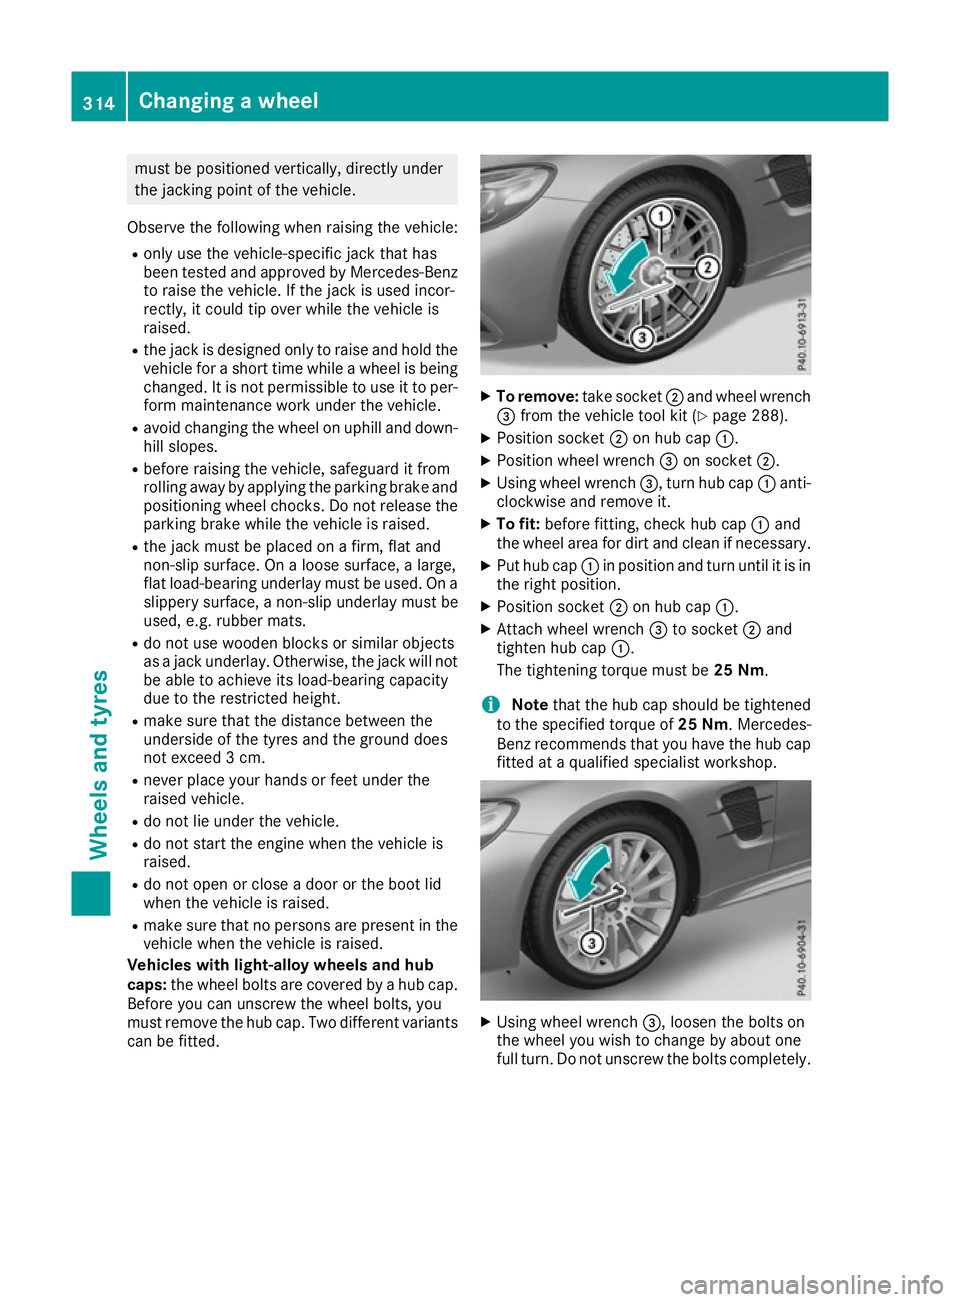
Vehicles with light-alloy wheels and hub
caps: the wheel bolts are covered by a hub cap.
Before you can unscrew the wheel bolts, you
must remove the hub cap. Two different variants
can be fitted. X
To remove: take socket;and wheel wrench
= from the vehicle tool kit (Y page 288).
X Position socket ;on hub cap :.
X Position wheel wrench =on socket ;.
X Using wheel wrench =, turn hub cap:anti-
clockwise and remove it.
X To fit: before fitting, check hub cap :and
the wheel area for dirt and clean if necessary.
X Put hub cap :in position and turn until it is in
the right position.
X Position socket ;on hub cap :.
X Attach wheel wrench =to socket ;and
tighten hub cap :.
The tightening torque must be 25 Nm.
i Note
that the hub cap should be tightened
to the specified torque of 25 Nm. Mercedes-
Benz recommends that you have the hub cap
fitted at a qualified specialist workshop. X
Using wheel wrench =, loosen the bolts on
the wheel you wish to change by about one
full turn. Do not unscrew the bolts completely. 314
Changing a wheelWheels and tyres