2016 MERCEDES-BENZ S-Class SEDAN key
[x] Cancel search: keyPage 217 of 438

Rear sensors
CenterApprox. 48 in (approx.
120 cm)
CornersApprox. 32 in (approx.
80 cm)
Minimum distance
CenterApprox. 8 in (approx. 20 cm)
CornersApprox. 6 in (approx. 15 cm)
If there is an obstacle within this range, the rel-
evant warning displays light up and a warning
tone sounds. If the distance falls below the min-
imum, the distance may no longer be shown.
Warning displays
:Segments on the left-hand side of the vehi-
cle
;Segments on the right-hand side of the vehi-
cle
=Segments showing operational readiness
The warning displays show the distance
between the sensors and the obstacle. The
warning display for the front area is in the instru-
ment cluster. The warning display for the rear
area is located on the headliner in the rear com- partment.
The warning display for each side of the vehicle
is divided into five yellow and two red segments.
PARKTRONIC is operational if operational read-
iness indicator =lights up.
The selected transmission position and the
direction in which the vehicle is rolling deter-
mine which warning display is active when the
engine is running.
Transmission posi-
tionWarning display
DFront area activated
R, Nor the vehicle is
rolling backwardsRear and front areas
activated
PNo areas activated
One or more segments light up as the vehicle
approaches an obstacle, depending on the vehi-
cle's distance from the obstacle.
From the:
Rsixth segment onwards, you will hear an inter-
mittent warning tone for approximately two
seconds.
Rseventh segment onwards, you will hear a
warning tone for approximately two seconds.
This indicates that you have now reached the minimum distance.
Deactivating/activating PARKTRONIC
:Indicator lamp
;Deactivating/activating PARKTRONIC
If indicator lamp :is on then PARKTRONIC is
deactivated. Active Parking Assist is then also
deactivated.
iPARKTRONIC is automatically activated
when you turn the SmartKey to position 2in
the ignition lock.
Driving systems215
Driving and parking
Z
Page 223 of 438

The flap closes again when:
Ryou have finished the maneuvering process
Ryou switch off the engine
Ryou open the trunk
Observe the notes on cleaning (
Ypage 363).
For technical reasons, the flap may remain
open briefly after the rear view camera has
been deactivated.
Activating/deactivating the rear view
camera
XTo activate: make sure that the SmartKey is
in position 2in the ignition lock.
XMake sure that the Activation by R gearfunction is selected in the multimedia system
(see the separate operating instructions).
XEngage reverse gear.
The rear view camera flap opens. The multi-
media system shows the area behind the vehi-
cle with guide lines.
The image from the rear view camera is avail-
able throughout the maneuvering process.
To deactivate: the rear view camera deacti-
vates if you shift the transmission to Por after
driving forwards a short distance.
Displays in the multimedia system
The rear view camera may show a distorted view
of obstacles, show them incorrectly or not at all.
The rear view camera does not show objects in
the following positions:
Rvery close to the rear bumper
Runder the rear bumper
Rin the area immediately above the handle in
the trunk lid
!Objects not at ground level may appear to
be further away than they actually are, e.g.:
Rthe bumper of a parked vehicle
Rthe drawbar of a trailer
Rthe ball coupling of a trailer tow hitch
Rthe rear section of an HGV
Ra slanted post
Use the guidelines only for orientation.
Approach objects no further than the bottom-
most guideline.
:Yellow guide line at a distance of approx-
imately 13 ft (4.0 m) from the rear of the
vehicle
;White guide line without turning the steering
wheel, vehicle width including the exterior
mirrors (static)
=Yellow guide line for the vehicle width
including the exterior mirrors, for current
steering wheel angle (dynamic)
?Yellow lane marking tires at current steering
wheel angle (dynamic)
AYellow guide line at a distance of approx-
imately 3 ft (1.0 m) from the rear of the vehi-
cle
BVehicle center axle (marker assistance)
CBumper
DRed guide line at a distance of approximately
12 in (0.30 m) from the rear of the vehicle
The guide lines are shown when the transmis-
sion is in position R.
The distance specifications only apply to
objects that are at ground level.
Driving systems221
Driving and parking
Z
Page 227 of 438
Rif the camera lenses are dirty or covered.
Observe the notes on cleaning
(
Ypage 363)
Rif the vehicle components in which the cam-
eras are installed are damaged. In this event,
have the camera position and setting checked
at a qualified specialist workshop
Do not use the 360° camera in this case. You
can otherwise injure others or cause damage to
objects or the vehicle.
The guide lines on the multimedia system show
the distances to your vehicle. The distances only
apply to road level.
The cameras in the front and in the rear area are
each protected by a flap. These flaps are opened
when the 360° camera is activated. Observe the
notes on cleaning (
Ypage 363). For technical
reasons, the flaps may remain open briefly after
the 360° camera has been deactivated.
The field of vision and other functions of the
camera system may be restricted due to addi-
tional accessories on the rear of the vehicle (e.g. license plate holder, bicycle rack).
On vehicles with height-adjustable chassis,
depending on technical conditions, leaving the
standard height can result in:
Rinaccuracies in the guide lines
Rinaccuracies in the display of generated
images (top view)
Activation conditions
The 360° camera image can be displayed if:
Rthe multimedia system is switched on
Rthe 360° Camerafunction is switched on
iIf the 360° camera is activated at speeds
above approximately 19 mph (30 km/h), a
warning message appears.
The warning message disappears if:
Rthe vehicle's speed falls below approx-
imately 19 mph (30 km/h). The 360° cam- era is then activated.
Rthe message is confirmed with the %
button.
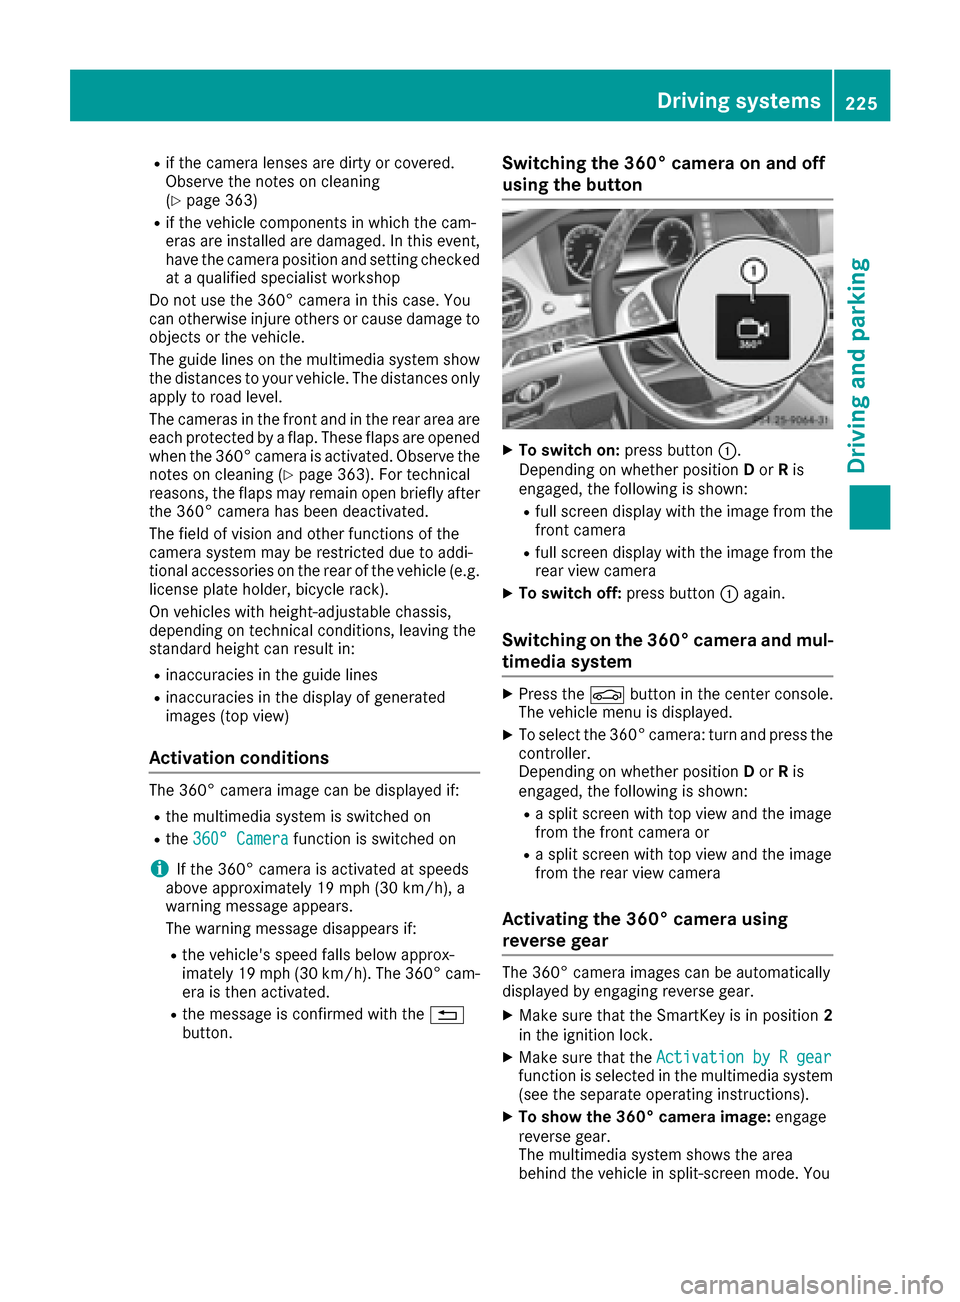
Switching the 360° camera on and off
using the button
XTo switch on: press button:.
Depending on whether position Dor Ris
engaged, the following is shown:
Rfull screen display with the image from the
front camera
Rfull screen display with the image from the
rear view camera
XTo switch off: press button:again.
Switching on the 360° camera and mul-
timedia system
XPress the Øbutton in the center console.
The vehicle menu is displayed.
XTo select the 360° camera: turn and press the
controller.
Depending on whether position Dor Ris
engaged, the following is shown:
Ra split screen with top view and the image
from the front camera or
Ra split screen with top view and the image
from the rear view camera
Activating the 360° camera using
reverse gear
The 360° camera images can be automatically
displayed by engaging reverse gear.
XMake sure that the SmartKey is in position 2
in the ignition lock.
XMake sure that the Activation by R gearfunction is selected in the multimedia system
(see the separate operating instructions).
XTo show the 360° camera image: engage
reverse gear.
The multimedia system shows the area
behind the vehicle in split-screen mode. You
Driving systems225
Driving and parking
Z
Page 239 of 438

Either no braking application, or a course-cor-
recting brake application adapted to the driving
situation occurs if:
Rthere are vehicles or obstacles, e.g. crash
barriers, located on both sides of your vehicle.
Ra vehicle approaches you too closely at the
side.
Ryou have adopted a sporty driving style with
high cornering speeds.
Ryou clearly brake or accelerate.
Ra driving safety system intervenes, e.g. ESP®
or PRE-SAFE®Brake.
RESP®is switched off.
Ra loss of tire pressure or a defective tire is
detected.
Switching on Active Blind Spot Assist
XMake sure that Active Blind Spot Assist is
activated in the on-board computer
(
Ypage 271).
XTurn the SmartKey to position2in the ignition
lock.
Warning lamps :in the exterior mirrors light
up red for approximately 1.5 second s. Gray
radar waves propagating backwards appear
next to the vehicle in the assistance display in
the multifunction display.
Active Lane Keeping Assist
General notes
Active Lane Keeping Assist monitors the area in
front of your vehicle by means of multifunction
camera :at the top of the windshield. Various
different areas to the front, rear and side of your
vehicle are also monitored with the aid of the
radar sensor system. Active Lane Keeping
Assist detects lane markings on the road and
can warn you before you leave your lane unin- tentionally. If you do not react to the warning, a
lane-correcting application of the brakes can
bring the vehicle back into the original lane.
This function is available in a speed range
between 40 mph and 120 mph (60 km/h and
200 km/h).
Important safety notes
If you fail to adapt your driving style, Active Lane
Keeping Assist can neither reduce the risk of
accident nor override the laws of physics. Active
Lane Keeping Assist cannot take account of
road and weather conditions. It may not recog-
nize traffic situations. Active Lane Keeping
Assist is only an aid. You are responsible for the
distance to the vehicle in front, for vehicle
speed, for braking in good time and for staying in
your lane.
Active Lane Keeping Assist cannot continuously
keep your vehicle in its lane.
GWARNING
Active Lane Keeping Assist cannot always
clearly detect lane markings.
In such cases, Active Lane Keeping Assist
can:
Rgive an unnecessary warning and then
make a course-correcting brake application
to the vehicle
Rnot give a warning or intervene
There is a risk of an accident.
Always pay particular attention to the traffic
situation and keep within the lane, especially
if Active Lane Keeping Assist alerts you. Ter-
minate the intervention in a non-critical driv-
ing situation.
The system may be impaired or may not function
if:
Rthere is poor visibility, e.g. due to insufficient
illumination of the road, or due to snow, rain,
fog or spray
Rthere is glare, e.g. from oncoming traffic, the
sun or reflections (e.g. when the road surface
is wet)
Rthe windshield is dirty, fogged up, damaged or
covered, for instance by a sticker, in the vicin-
ity of the camera
Driving systems237
Driving and parking
Z
Page 247 of 438
The electric motor supports the combustion
engine by providing additional torque when:
Rthe needle has exceeded areaA
Ryou press the haptic accelerator pedal
beyond the pressure point and want to obtain
more power
Operating the on-board computer
You can display the current operating condition
of the hybrid drive system in the multifunction
display and the multimedia system display
(
Ypage 245).
In the multimedia system display, you can also
call up a graphic display of the fuel consumption
and generated electricity (
Ypage 249).
Menus and submenus
Selecting displays in the display of the
multimedia system
XPress button Øon the controller.
The vehicle menu is displayed.
XTo select Energy Flow: turn and press the
controller.
The energy flow is displayed.
or
XTo select Consumption: turn and press the
controller.
Fuel consumption and the generated electric
energy are displayed.
XTo exit the display: press the %button on
the controller.
Selecting the energy flow display in the
multifunction display
XUse Ñ on the steering wheel to call up the
list of menus.
XPress the :or9 button on the steering
wheel to select the Tripmenu.
XConfirm by pressing aon the steering
wheel.
XSelect Energy Flowwith: or9 .
The active hybrid components are highlighted
in the energy flow display.
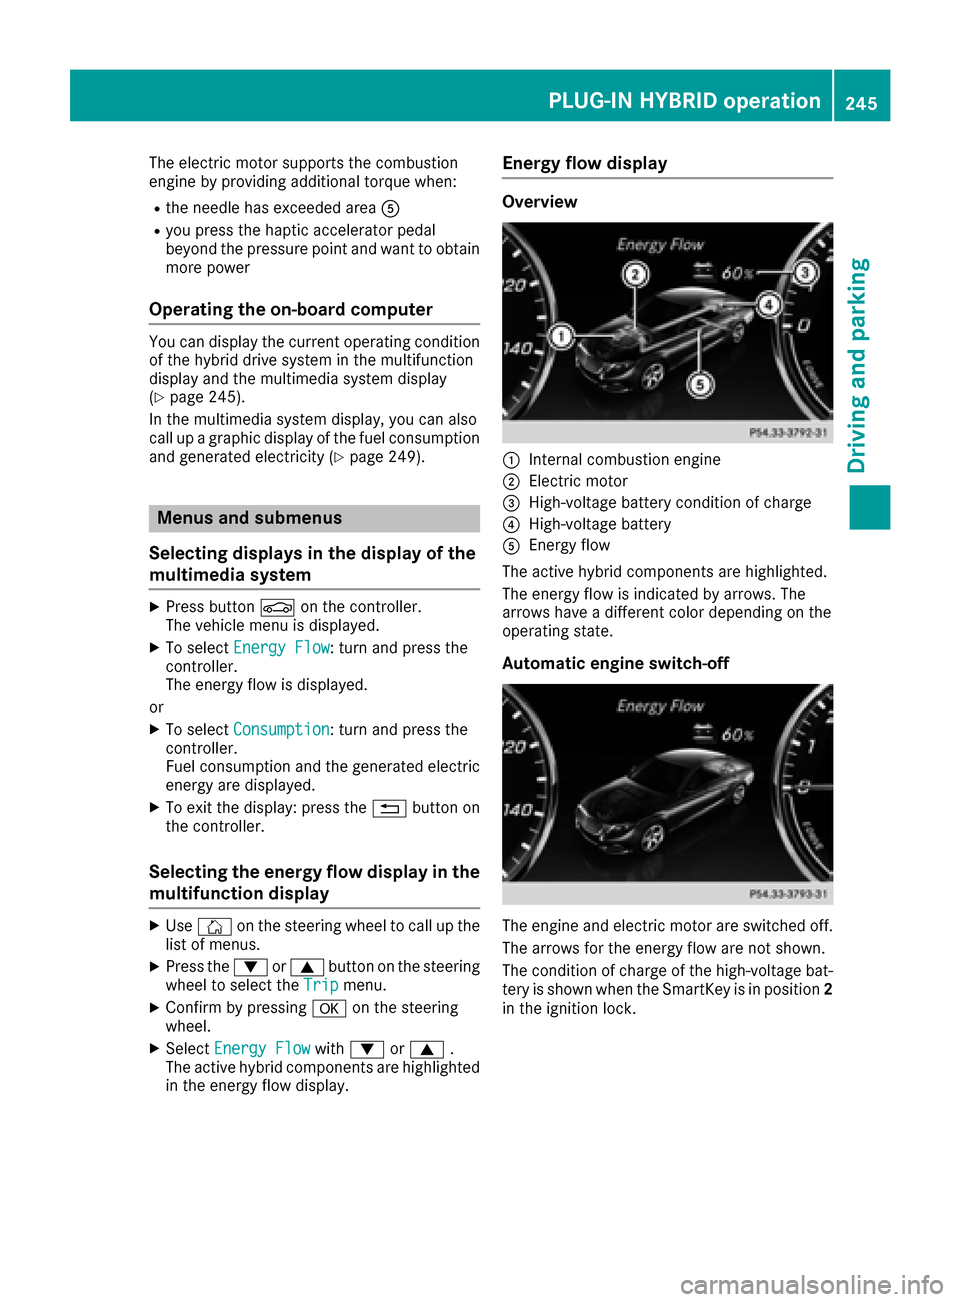
Energy flow display
Overview
:Internal combustion engine
;Electric motor
=High-voltage battery condition of charge
?High-voltage battery
AEnergy flow
The active hybrid components are highlighted.
The energy flow is indicated by arrows. The
arrows have a different color depending on the
operating state.
Automatic engine switch-off
The engine and electric motor are switched off.
The arrows for the energy flow are not shown.
The condition of charge of the high-voltage bat-
tery is shown when the SmartKey is in position 2
in the ignition lock.
PLUG‑IN HYBRID operation245
Driving and parking
Z
Page 259 of 438
Outside temperature display
You should pay special attention to road condi-
tions when temperatures are around freezing
point.
Bear in mind that the outside temperature dis-
play indicates the temperature measured and
does not record the road temperature.
The outside temperature display is in the multi-function display (
Ypage 258).
There is a short delay before a change in outside
temperature is shown in the multifunction dis-
play.
Coolant temperature display
GWARNING
Opening the hood when the engine is over-
heated or when there is a fire in the engine
compartment could expose you to hot gases
or other service products. There is a risk of
injury.
Let an overheated engine cool down before
opening the hood. If there is a fire in the
engine compartment, keep the hood closed
and contact the fire department.
!A display message is shown if the coolant
temperature is too high.
If the coolant temperature is above 257 ‡
(125 †) do not drive any further. The engine
will otherwise be damaged.
All vehicles except PLUG‑ IN HYBRID vehicles:
the coolant temperature gauge is in the lower
area of the tachometer (
Ypage 33).
PLUG-IN HYBRID vehicles: the multifunction dis-
play shows the coolant temperature in the
Coolant
submenu (Ypage 269).
Under normal operating conditions and with the
specified coolant level, the coolant temperature
may rise to 255 ‡ (124 †).
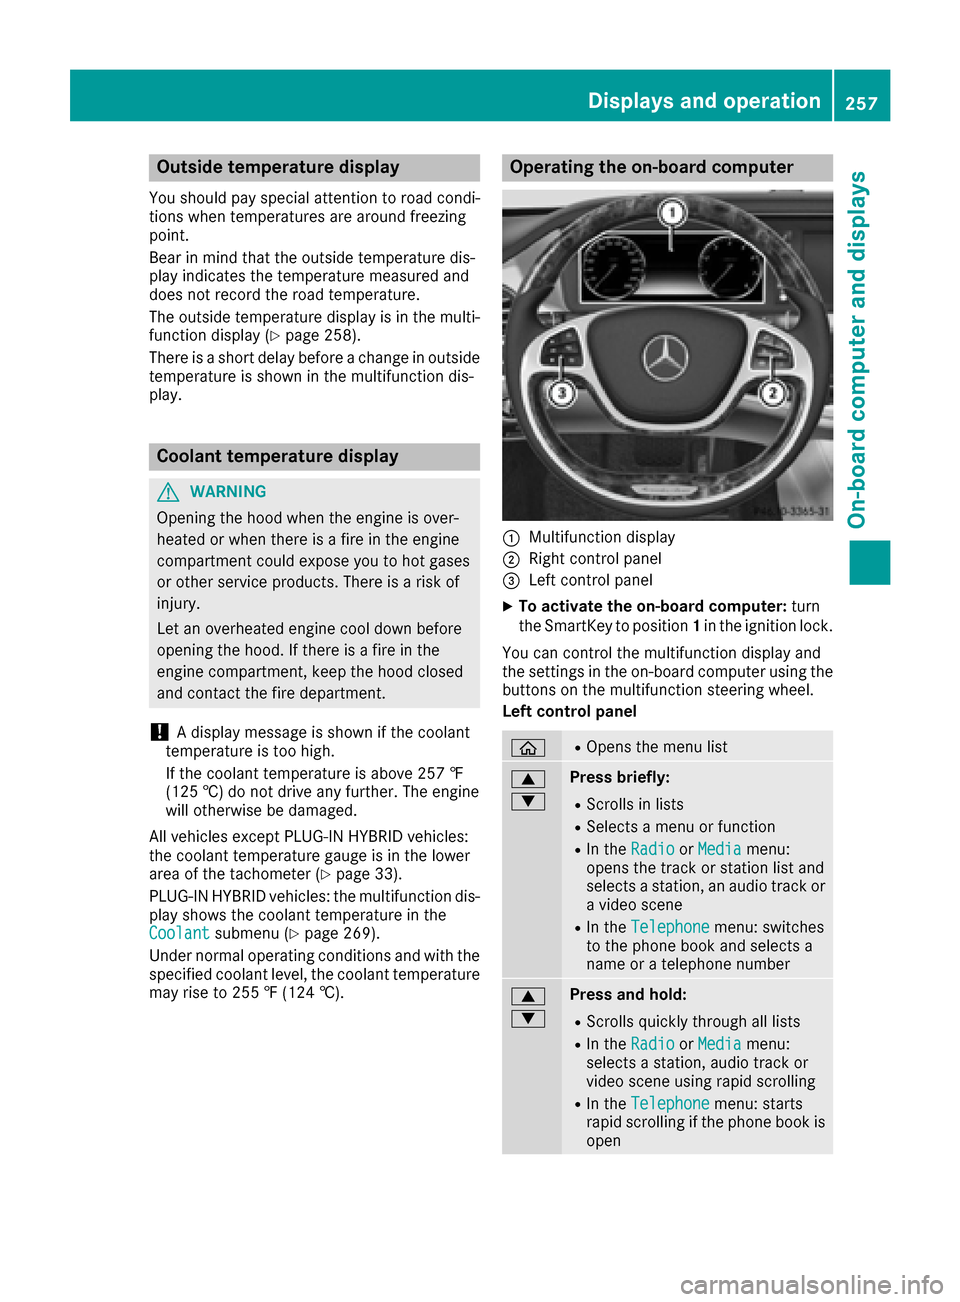
Operating the on-board computer
:Multifunction display
;Right control panel
=Left control panel
XTo activate the on-board computer: turn
the SmartKey to position 1in the ignition lock.
You can control the multifunction display and
the settings in the on-board computer using the
buttons on the multifunction steering wheel.
Left control panel
òROpens the menu list
9
:Press briefly:
RScrolls in lists
RSelects a menu or function
RIn the RadioorMediamenu:
opens the track or station list and
selects a station, an audio track or
a video scene
RIn the Telephonemenu: switches
to the phone book and selects a
name or a telephone number
9
:Press and hold:
RScrolls quickly through all lists
RIn the RadioorMediamenu:
selects a station, audio track or
video scene using rapid scrolling
RIn the Telephonemenu: starts
rapid scrolling if the phone book is
open
Displays and operation257
On-board computer and displays
Z
Page 299 of 438
Hybrid drive system
Display messagesPossible causes/consequences andMSolutions
d
VehicleOperationalSwitchtheIgnitionOff Before Exiting
PLUG-IN HYBRID vehicles:
You are leaving the vehicle when it is in a ready-to-drive state. The
READY indicator in the multifunction display is on. A warning tone also
sounds.
If you leave the vehicle:
XSecure the vehicle against rolling away (Ypage 189).
XSwitch off the ignition and remove the SmartKey.
If you do not leave the vehicle:
XSwitch off the electrical consumers, e.g. automatic climate control,
seat heating.
Please note the following: the electrical consumers are supplied by the 12 V battery. If the vehicle is left in a ready-to-drive state for an exten-
ded period, it will switch off once the 12 V battery is almost empty. It
will then only be possible to start the vehicle using a second battery
(jump-starting).
Change the currentdrive programbeforechangingtheoperating mode.or
Exit manual drive
program M beforechangingtheoperat‐ing mode.
PLUG-IN HYBRID vehicles:
You have attempted to change the operating mode when in automatic
drive program S(Sport) or manual drive program M.
XActivate the drive programE(Economy) or E+(Economy Plus)
(Ypage 250).
XSelect the preferred operating mode HYBRID,E-MODE,E-SAVE or
CHARGE (Ypage 243).
E-MODE CurrentlyUnavailable
PLUG-IN HYBRID vehicles:
The condition of charge of the high-voltage battery has dropped to the
lower limit and the E-MODEoperating mode has been switched off.
Driving with the internal combustion engine is activated and the oper-
ating mode switches to the basic HYBRIDsetting.
XContinue driving using the internal combustion engine.
You can switch to the E-SAVEorCHARGE operating mode as
required (
Ypage 243).
If you select CHARGE, the high-voltage battery is charged.
Once the charge level display for the high-voltage battery has
increased slightly, you can switch to the E-MODEoperating mode
again.
Display messages297
On-board computer and displays
Z
Page 313 of 438
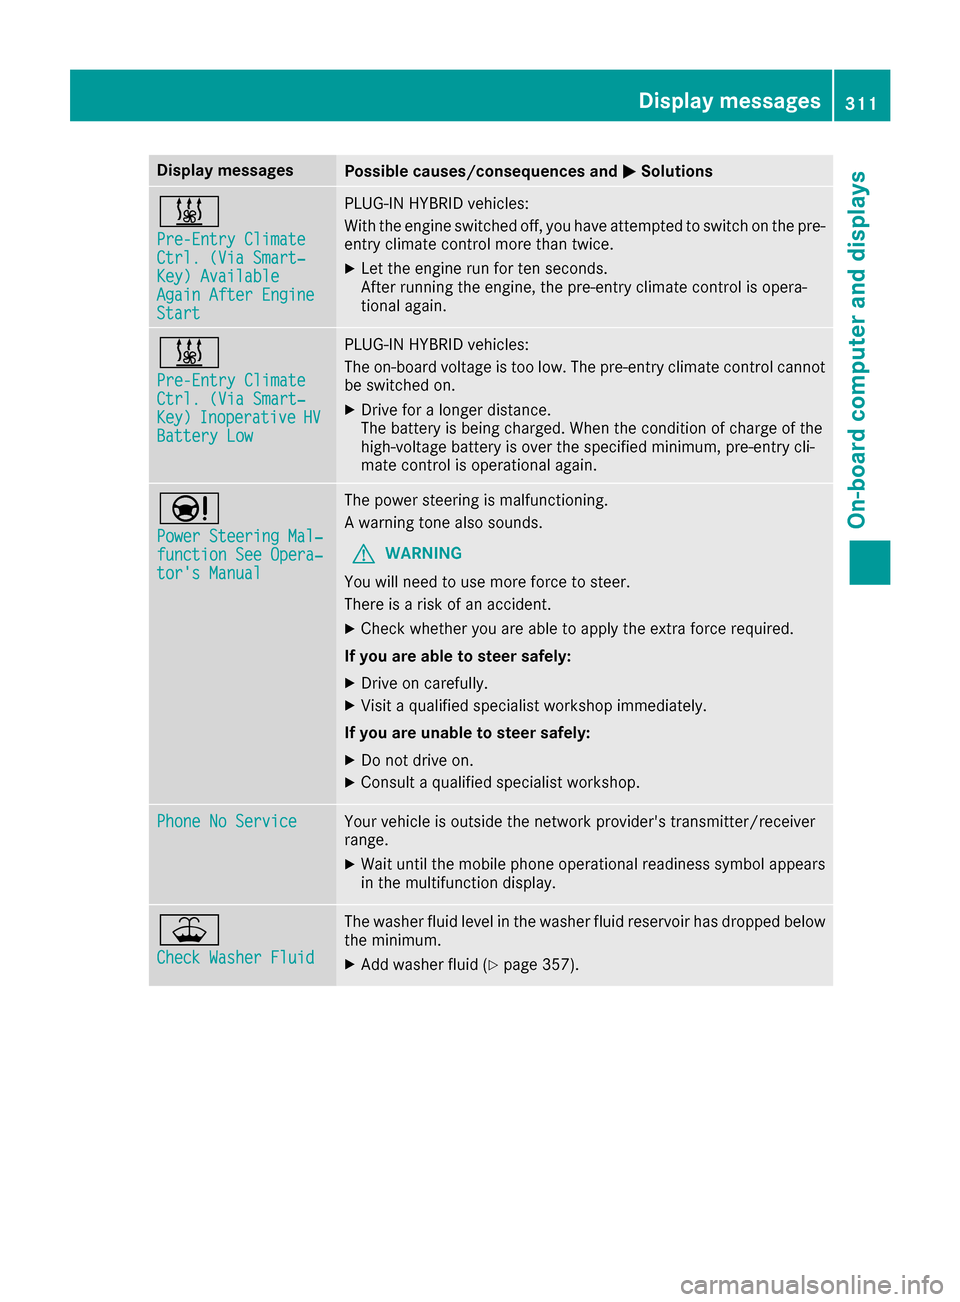
Display messagesPossible causes/consequences andMSolutions
&
Pre-Entry ClimateCtrl. (ViaSmart‐Key )AvailableAgain After EngineStart
PLUG-I NHYBRID vehicles:
Wit hth eengin eswitched off ,you hav eattempte dto switch on th epre -
entr yclimat econtrol mor ethan twice .
XLet theengin erun for te nseconds.
Afte rrunnin gth eengine, th epre-entry climat econtrol is opera-
tional again .
&
Pre-Entry Climat eCtrl. (ViaSmart‐Key )InoperativeHVBatter yLow
PLUG-I NHYBRID vehicles:
The on-boar dvoltag eis to olow. The pre-entry climat econtrol canno t
be switched on .
XDrive foralonger distance.
The battery is bein gcharged. Whe nth econdition of charg eof th e
high-voltage battery is ove rth especified minimum ,pre-entry cli -
mat econtrol is operational again .
Ð
Power Steering Mal‐function See Opera‐tor's Manual
The powersteering is malfunctioning .
A warning tone also sounds.
GWARNIN G
You will need to use mor eforce to steer .
There is aris kof an accident.
XChec kwhether you are able to apply th eextr aforce required.
If you ar eabl eto steer safely:
XDrive on carefully.
XVisit aqualified specialist workshop immediately.
If you ar eunable to steer safely:
XDo no tdrive on .
XConsult aqualified specialist workshop .
Phone No ServiceYour vehicleis outside th enetwork provider' stransmitter/receiver
range.
XWait until th emobile phone operational readiness symbol appear s
in th emultifunction display.
¥
Check Washer Fluid
The washer flui dlevel in th ewasher flui dreservoir has dropped belo w
th eminimum .
XAddwasher flui d (Ypage 357).
Display messages311
On-board computer and displays
Z