2016 MERCEDES-BENZ S-Class SEDAN key
[x] Cancel search: keyPage 363 of 438
!If the SmartKey is within the rear detection
range of KEYLESS-GO, the following situa-
tions, for example, could lead to the uninten-
tional opening of the trunk:
Rusing a car wash
Rusing a power washer
Make sure that the SmartKey is at least 10 ft
(3 m) away from the vehicle.
Cleaning the paintwork
!Do not affix:
Rstickers
Rfilms
Rmagnetic plates or similar items
to painted surfaces. You could otherwise
damage the paintwork.
Scratches, corrosive deposits, areas affected by corrosion and damage caused by inadequate
care cannot always be completely repaired. In
such cases, visit a qualified specialist workshop.
XRemove dirt immediately, where possible,
while avoiding rubbing too hard.
XSoak insect remains with insect remover and
rinse off the treated areas afterwards.
XSoak bird droppings with water and rinse off
the treated areas afterwards.
XRemove coolant, brake fluid, tree resin, oils,
fuels and greases by rubbing gently with a
cloth soaked in petroleum ether or lighter
fluid.
XUse tar remover to remove tar stains.
XUse silicone remover to remove wax.
If water no longer forms "beads" on the paint
surface, use the paint care products recommen-
ded and approved by Mercedes-Benz. This is the
case approximately every three to five months,
depending on the climate conditions and the
care product used.
If dirt has penetrated the paint surface or if the
paint has become dull, the paint cleaner recom-
mended and approved by Mercedes-Benz
should be used.
Do not use these care products in the sun or on
the hood while the hood is hot.
XUse a suitable touch-up stick, e.g. MB Touch-
Up Stick, to repair slight damage to the paint-
work quickly and provisionally.
Matte finish care
!Never polish the vehicle or the light alloy
wheels. Polishing causes the finish to shine.
!The following may cause the paint to
become shiny and thus reduce the matte
effect:
Rstrong rubbing of the paintwork with
unsuitable materials
Rfrequent use of automatic car washes
Rwashing the vehicle in direct sunlight
!Never use paint cleaner, buffing or polishing
products, or gloss preserver, e.g. wax. These
products are only suitable for high-gloss sur-
faces. Their use on vehicles with matte finish
leads to considerable surface damage (shiny,
mottled areas).
Always have paintwork repairs carried out at a
qualified specialist workshop.
!Do not use wash programs with a hot wax
treatment under any circumstances.
Observe these notes if your vehicle has a clear
matte finish. This will help you to avoid damage
to the paintwork due to incorrect treatment.
These notes also apply to light alloy wheels with a clear matte finish.
The vehicle should preferably be washed by
hand using a soft sponge, car shampoo and
plenty of water.
Use only insect remover and car shampoo from
the range of approved Mercedes-Benz care
products.
Cleaning the vehicle parts
Cleaning the wheels
GWARNING
The water jet from a circular jet nozzle (dirt
blasters) can cause invisible exterior damage
to the tires or chassis components. Compo-
nents damaged in this way may fail unexpect-
edly. There is a risk of an accident.
Do not use power washers with circular jet
nozzles to clean the vehicle. Have damaged
tires or chassis components replaced imme-
diately.
Care361
Maintenance and care
Z
Page 365 of 438

about the correct distance is available from
the equipment manufacturer.
XClean sensors:of the driving systems with
water, car shampoo and a soft cloth.
Cleaning the rear view camera
!Do not clean the camera lens and the area
around the rear view camera with a power
washer.
XMake sure that the vehicle is stationary and
that the SmartKey is in position 2in the igni-
tion lock.
XTo open the cover of the rear view camera:
with the multimedia system activated, call up
the vehicle menu: press the Ñbutton.
XTo switch to the menu bar: slide ¬the con-
troller.
XTo select System Settings: turn and press
the controller.
XTo select RearViewCamera: turn and press
the controller.
XTo select Open Camera Cover: turn and
press the controller.
The rear view camera cover opens.
XTo clean the rear view camera: use clear
water and a soft cloth to clean camera
lens :.
Cleaning the 360° camera
!Do not clean the camera lens and the area
around the 360° camera with a power
washer.360
XMake sure that the vehicle is stationary and
that the SmartKey is in position 2in the igni-
tion lock.
XTo open the cover of the 360° camera: with
the multimedia system activated, call up the
vehicle menu: press the Ñbutton.
XTo switch to the menu bar: slide ¬the con-
troller.
XTo select System Settings: turn and press
the controller.
XTo select the 360° Camera: turn and press
the controller.
XTo select Open Camera Cover: turn and
press the controller.
The cover of the 360° camera opens.
XTo clean the 360° camera: clean camera
lens :with clean water and a soft cloth.
If you drive at speeds above 20 mph (30 km/h)
or with the SmartKey in position 0or 1in the
ignition lock, the cover of the 360° camera
closes automatically.
Cleaning the exhaust pipes
GWARNING
The exhaust tail pipe and tail pipe trim can
become very hot. If you come into contact
Care363
Maintenance and care
Z
Page 370 of 438
winter tires. A TIREFIT kit may be obtained from
a qualified specialist workshop.
Information on changing and mounting wheels
(
Ypage 405).
XStop the vehicle on solid, non-slippery and
level ground, as far away as possible from
traffic.
XSwitch on the hazard warning lamps.
XSecure the vehicle against rolling away
(Ypage 189).
XIf possible, bring the front wheels into the
straight-ahead position.
XSwitch off the engine.
XOpen the driver's door.
The on-board electronics now have status0.
This is the same as the SmartKey having been
removed.
XRemove the Start/Stop button from the igni-
tion lock (Ypage 162).
or, if the SmartKey is inserted in the ignition
lock:
XRemove the SmartKey from the ignition lock.
XMake sure that the engine cannot be started
via your smartphone (Ypage 164).
XMake sure that the passengers are not endan-
gered as they do so. Make sure that no one is
near the danger area while a wheel is being
changed. Anyone who is not directly assisting
in the wheel change should, for example,
stand behind the barrier.
XGet out of the vehicle. Pay attention to traffic
conditions when doing so.
XClose the driver's door.
MOExtended tires (tires with run-flat
properties)
General notes
With MOExtended tires (tires with run flat char-
acteristics), you can continue to drive your vehi-
cle even if there is a total loss of pressure in one
or more tires. The affected tire must not show
any clearly visible damage.
You can recognize MOExtended tires by the
MOExtended marking which appears on the
sidewall of the tire. You will find this marking
next to the tire size designation, the load-bear-
ing capacity and the speed index (
Ypage 400). MOExtended tires may only be used in conjunc-
tion with an active tire pressure loss warning
system or with an active tire pressure monitor.
If a pressure loss warning message appears
in the multifunction display:
Robserve the instructions in the display mes-
sages (Ypage 306).
Rcheck the tire for damage.
Rif driving on, observe the following notes.
The driving distance possible in run-flat mode is
approximately 50 miles (80 km) when the vehi-
cle is partially laden. When the vehicle is fully
laden it is approximately 19 miles (30 km).
In addition to the vehicle load, the driving dis-
tance possible depends upon:
Rvehicle speed
Rroad condition
Routside temperature
The driving distance possible in run-flat mode
may be reduced by extreme driving conditions
or maneuvers, or it can be increased through a
moderate style of driving.
The driving distance possible in run-flat mode is
counted from the moment the tire pressure loss
warn ing appears in t
he multifunction display.
You must not exceed a maximum speed of
50 mph (80 km/h).
When replacing one or all tires, please observe
the following specifications for your vehicle's
tires:
Rsize
Rthe type and
Rthe "MOExtended" mark
If a tire has gone flat and cannot be replaced
with a MOExtended tire, a standard tire may be
used as a temporary measure. Make sure that
you use the proper size and type (summer or
winter tire).
Vehicles equipped with MOExtended tires are
not equipped with a TIREFIT kit at the factory. It
is therefore recommended that you additionally
equip your vehicle with a TIREFIT kit if you mount tires that do not feature run-flat properties, e.g.
winter tires. A TIREFIT kit may be obtained from
a qualified specialist workshop.
368Flat tire
Breakdown assistance
Page 372 of 438
compressor from the stowage well under-
neath the trunk floor (Ypage 367).
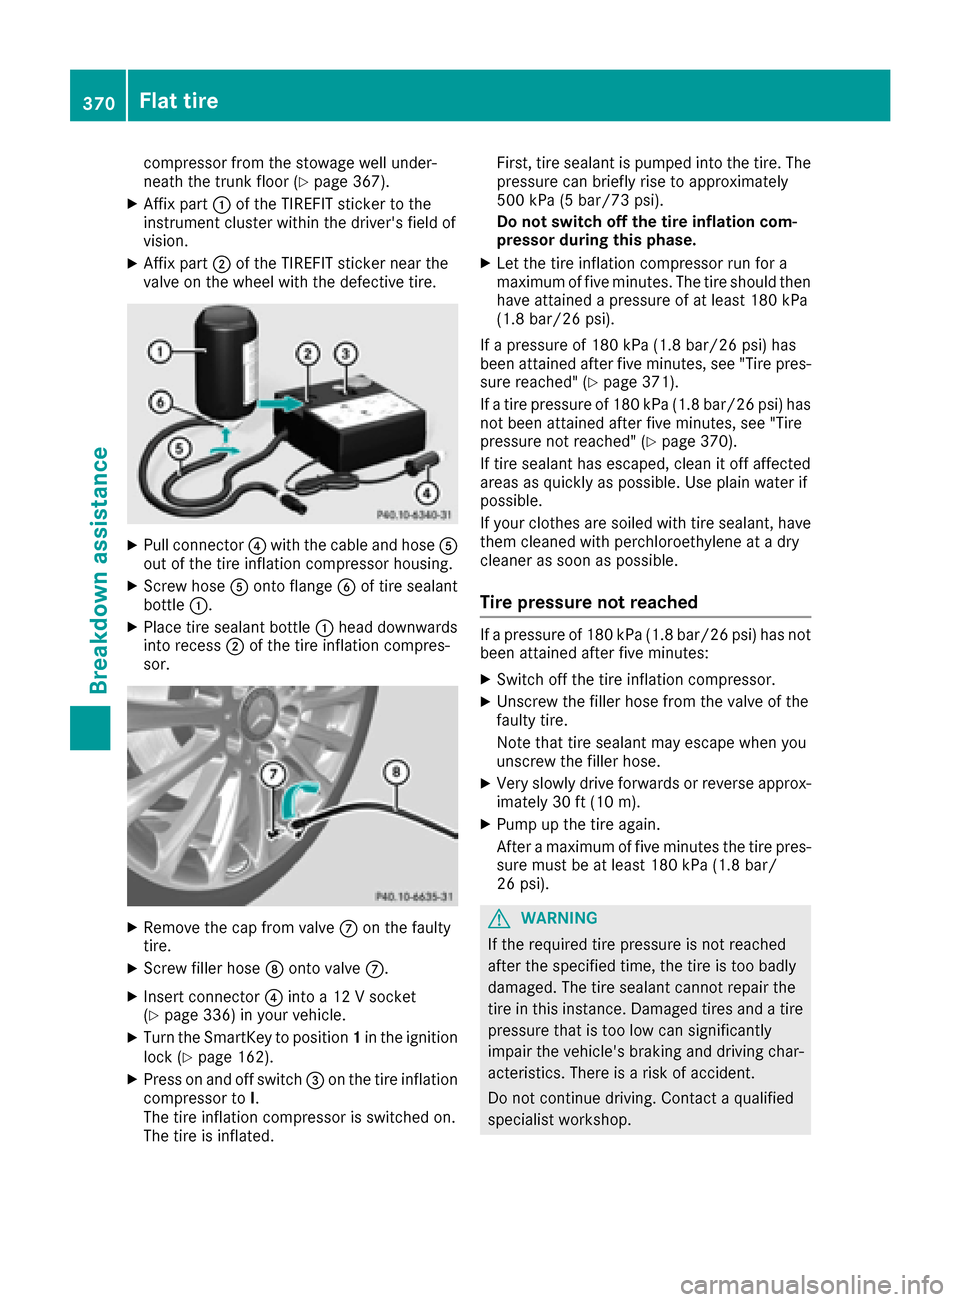
XAffix part:of the TIREFIT sticker to the
instrument cluster within the driver's field of
vision.
XAffix part ;of the TIREFIT sticker near the
valve on the wheel with the defective tire.
XPull connector ?with the cable and hose A
out of the tire inflation compressor housing.
XScrew hose Aonto flange Bof tire sealant
bottle :.
XPlace tire sealant bottle :head downwards
into recess ;of the tire inflation compres-
sor.
XRemove the cap from valve Con the faulty
tire.
XScrew filler hose Donto valve C.
XInsert connector ?into a 12 V socket
(Ypage 336) in your vehicle.
XTurn the SmartKey to position 1in the ignition
lock (Ypage 162).
XPress on and off switch =on the tire inflation
compressor to I.
The tire inflation compressor is switched on.
The tire is inflated. First, tire sealant is pumped into the tire. The
pressure can briefly rise to approximately
500 kPa (5 bar/73 psi).
Do not switch off the tire inflation com-
pressor during this phase.
XLet the tire inflation compressor run for a
maximum of five minutes. The tire should then
have attained a pressure of at least 180 kPa
(1.8 bar/26 psi).
If a pressure of 180 kPa (1.8 bar/26 psi) has
been attained after five minutes, see "Tire pres-
sure reached" (
Ypage 371).
If a tire pressure of 180 kPa (1.8 bar/26 psi) has
not been attained after five minutes, see "Tire
pressure not reached" (
Ypage 370).
If tire sealant has escaped, clean it off affected
areas as quickly as possible. Use plain water if
possible.
If your clothes are soiled with tire sealant, have
them cleaned with perchloroethylene at a dry
cleaner as soon as possible.
Tire pressure not reached
If a pressure of 180 kPa (1.8 bar/26 psi) has not
been attained after five minutes:
XSwitch off the tire inflation compressor.
XUnscrew the filler hose from the valve of the
faulty tire.
Note that tire sealant may escape when you
unscrew the filler hose.
XVery slowly drive forwards or reverse approx- imately 30 ft (10 m).
XPump up the tire again.
After a maximum of five minutes the tire pres-sure must be at least 180 kPa (1.8 bar/
26 psi).
GWARNING
If the required tire pressure is not reached
after the specified time, the tire is too badly
damaged. The tire sealant cannot repair the
tire in this instance. Damaged tires and a tire
pressure that is too low can significantly
impair the vehicle's braking and driving char-
acteristics. There is a risk of accident.
Do not continue driving. Contact a qualified
specialist workshop.
370Flat tire
Breakdown assistance
Page 376 of 438
Remove theSmartKey if you park th evehicl e
and do no trequire any electrical consumers.
The vehicl ewill then use ver ylittl eenergy, thus
conserving battery power .
PLUG-IN HYBRID vehicles: if thebattery
charge is sufficient, th ehigh-voltage battery can
also suppl yth e12 Vbattery. This only happens
if th econdition of charge of th e12 Vbattery
require sthis, e.g. after usin gelectrical consum-
ers for an extended period wit hth eengin e
switched off .As th eon-board voltag eis contin-
uously monitore dthis can also be performed
when th eengin eis switched off .The condition of
charge of th e12 Vbattery and th eon-board
voltag eare thereby kept stable for alonger
period.
High-voltage battery – important
safety notes
Only PLUG-I NHYBRID vehicles are equipped
wit h a high-voltage battery.
GDANGER
The vehicle's high-voltage electrical system is under high voltage. If you modify component s
in th evehicle's high-voltage electrical system
or touch damaged components, you may be
electrocuted. The component sin th evehi-
cle's high-voltage electrical system may be
damaged in an accident, althoug hth edamag e
is no tvisible. There is aris kof fatal injury.
Followin gan accident, do no ttouch any high -
voltag ecomponent sand never modify th e
vehicle's high-voltage electrical system. Hav e
th evehicl etowed away after an acciden tand
th evehicle's high-voltage electrical system
checke dby aqualified specialist workshop.
GWARNIN G
In th eevent of avehicl efire, th einternal pres-
sur eof th ehigh-voltage battery can exceed a
critical value .In this cas eflammabl egas
escapes throug h aventilation valv eon th e
underbody. The gas can ignite. There is aris k
of injury.
Leav eth edanger zone immediately. Secur e
th edanger area at asuitable distance, whils t
observing legal requirements .
GWARNING
If th ehousing of th ehigh-voltage battery has
been damaged, electrolyt eand gase smay
leak out .These are poisonous and caustic.
There is aris kof injury.
Avoid contact wit hskin, eyes or clothing .
Immediately rinse electrolyt esplashes off
wit hwater and seek medical attention
straight away.
!Exhaustive discharge caused by th evehicl e
standing idle for lengthy periods can damag e
th ehigh-voltage battery. If th evehicl eis idle
for lengthy periods leav eth ehigh-voltage bat -
tery connecte dto acharging station .
Consult an authorize dMercedes-Benz Cente rif
you wish to leav eyour vehicl eparked for alon g
period of time.
Charging the 12 V battery
Mercedes-AM Gvehicles:
!Only use battery chargers wit h amaximum
charging voltag eof 14.4 V.
All other vehicles:
GWARNIN G
During charging and jump-starting ,explosive
gase scan escape from th ebattery. There is a
ris kof an explosion .
Particularly avoi dfire, open flames, creating
sparks and smoking. Ensur ethere is sufficien t
ventilation while charging and jump-starting .
Do no tlean ove r abattery.
GWARNIN G
Battery acid is caustic. There is aris kof injury.
Avoid contact wit hskin, eyes or clothing .Do
no tinhale any battery gases. Do no tlean ove r
th ebattery. Kee pchildren away from batter-
ies. Wash away battery acid immediately wit h
plenty of clean water and seek medical atten -
tion .
GWARNIN G
A discharged battery can freez eat tempera-
tures belo wfreezing point. When jump-start -
374Battery (vehicle)
Breakdown assistance
Page 379 of 438
Do not start the vehicle using a rapid charging device. If your vehicle's battery is discharged, the
engine can be jump-started from another vehicle or from a second battery using jumper cables.
Observe the following points:
RThe battery is not accessible in all vehicles. If the other vehicle's battery is not accessible, jump-
start the vehicle using a second battery or a jump-starting device.
RYou may only jump-start the vehicle when the engine and exhaust system are cold.
RAll vehicles except Mercedes-AMG vehicles: do not start the engine if the battery is frozen. Let
the battery thaw first.
ROnly jump-start from batteries with a 12 V voltage rating.
ROnly use jumper cables which have a sufficient cross-section and insulated terminal clamps.
RIf the battery is fully discharged, leave the battery that is being used to jump-start connected for
a few minutes before attempting to start. This charges the battery slightly.
RMake sure that the two vehicles do not touch.
Make sure that:
Rthe jumper cables are not damaged.
Rwhen the jumper cables are connected to the battery, uninsulated sections of the terminal clamp
do not come into contact with other metal sections.
Rthe jumper cables cannot come into contact with parts which can move when the engine is
running, such as the V-belt pulley or the fan.
XSecure the vehicle by applying the electric parking brake.
XShift the transmission to position P.
XMake sure that the ignition is switched off. All indicator lamps in the instrument cluster must be
off. When using the SmartKey, turn the SmartKey to position 0in the ignition lock and remove it
(
Ypage 162).
XSwitch off all electrical consumers, e.g. rear window defroster, lighting, etc.
XOpen the hood.
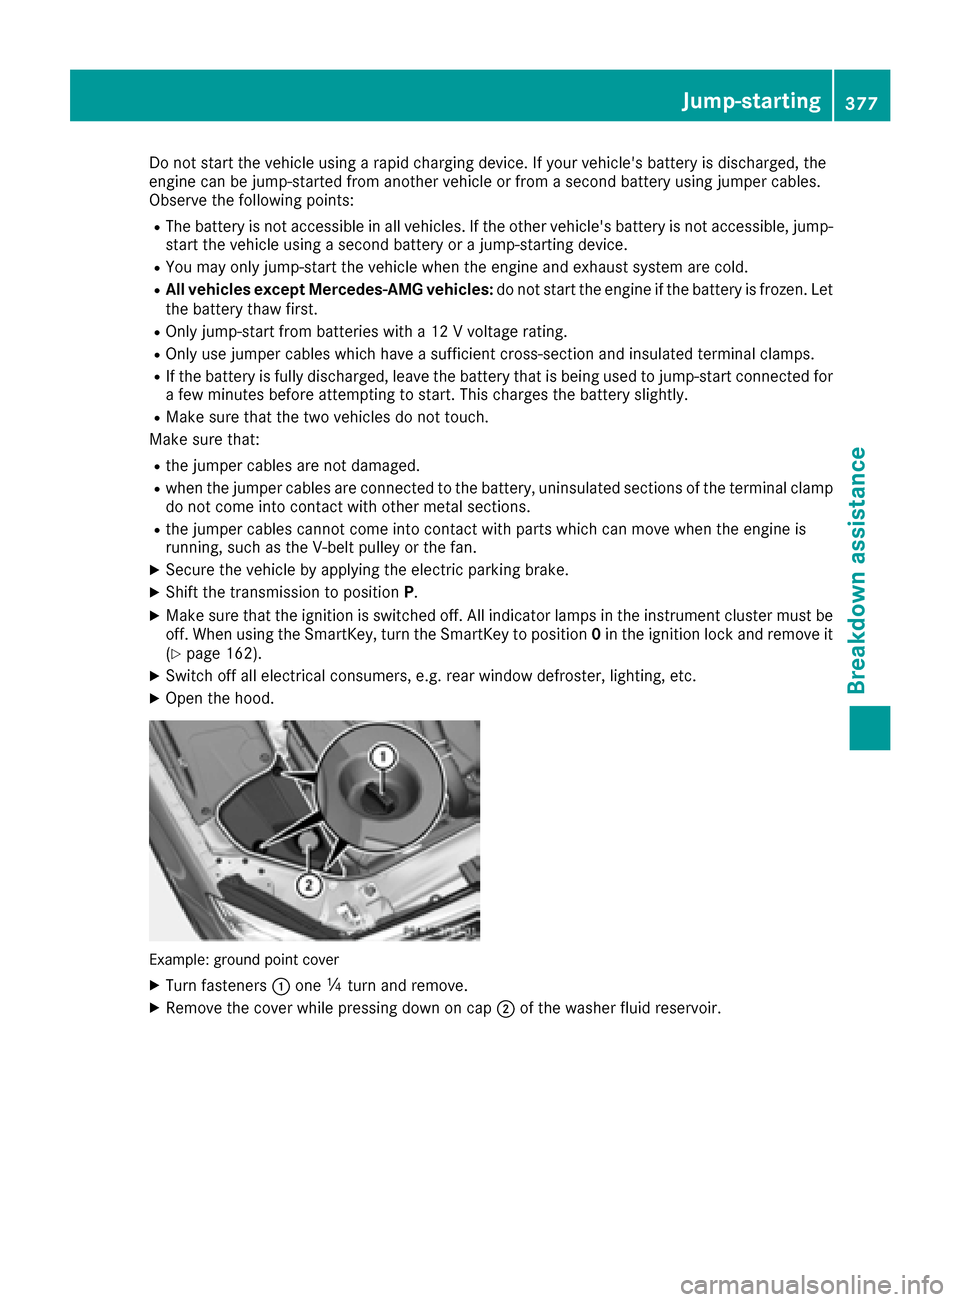
Example: ground point cover
XTurn fasteners :one Õturn and remove.
XRemove the cover while pressing down on cap ;of the washer fluid reservoir.
Jump-starting377
Breakdown assistance
Z
Page 381 of 438
Towing and tow-starting
Important safety notes
GWARNING
Functions relevant to safety are restricted or
no longer available if:
Rthe engine is not running.
Rthe brake system or the power steering is
malfunctioning.
Rthere is a malfunction in the voltage supply or the vehicle's electrical system.
If your vehicle is being towed, much more
force may be necessary to steer or brake.
There is a risk of an accident.
In such cases, use a tow bar. Before towing,
make sure that the steering moves freely.
GWARNING
When towing or tow-starting another vehicle
and its weight is greater than the permissible
gross weight of your vehicle, the:
Rthe towing eye could detach itself
Rthe vehicle/trailer combination could roll-
over.
There is a risk of an accident.
When towing or tow-starting another vehicle,
its weight should not be greater than the per- missible gross weight of your vehicle.
Details on the permissible gross vehicle weight
of your vehicle can be found on the vehicle iden-
tification plate (
Ypage 426).
!When COLLISION PREVENTION ASSIST
PLUS, DISTRONIC PLUS or the HOLD function
is activated, the vehicle brakes automatically
in certain situations.
To avoid damage to the vehicle, deactivate
these systems in the following or similar sit-
uations:
Rwhen towing the vehicle
Rin the car wash
!Make sure that the electric parking brake is
released. If the electric parking brake is faulty,
visit a qualified specialist workshop.
!Secure the tow rope or tow bar to the towing
eye only. Otherwise, the vehicle could
become damaged.
!Do not use the towing eyes for recovery pur-
poses as this could damage the vehicle. If in
doubt, recove
r the vehicle with a crane.
!When towing, pull away slowly and
smoothly. If the tractive power is too high, the
vehicles could be damaged.
!Shift the automatic transmission to Nand
do not open the driver's or front passenger's
door during towing. The automatic transmis-
sion may otherwise shift to position P, which
could damage the transmission.
!Do not tow with sling-type equipment. This
could damage the vehicle.
!The vehicle can be towed a maximum of
30 miles (50km). The towing speed of 30 mph (50 km/h) must not be exceeded.
If the vehicle has to be towed more than
30 miles (50km), the entire vehicle must be
raised and transported.
It is better to have the vehicle transported than
to have it towed away.
If the vehicle has suffered transmission damage,
have it transported on a transporter or trailer.
The automatic transmission must be in position N when the vehicle is being towed.
If the automatic transmission cannot be shifted
to position N, have the vehicle transported on a
transporter or trailer.
The battery must be connected and charged.
Otherwise, you:
Rcannot turn the SmartKey to position 2in the
ignition lock
Rcannot release the electric parking brake
Rcannot shift the automatic transmission to
position N
Disarm the automatic locking feature before the vehicle is towed (
Ypage 87). You could other-
wise be locked out when pushing or towing the
vehicle.
PLUG-IN HYBRID vehicles:
Towing and tow-starting379
Breakdown assistance
Z
Page 382 of 438
PLUG-IN HYBRID vehicles may not be towed
away but must instead be transported, if:
Rthe multifunction display is not working or
Rtheá Towing Not Permitted SeeOperator'sManualmessage appears in the
multifunction display.
If the vehicle is in a dangerous area, it can be
towed out of that area with both axles on the
ground. In this case, the towing distance must
not be greater than 165 ft (50 m)and must not
exceed a towing speed of 6 mph (10 km/h). For
longer distances, have the vehicle loaded and
transported.
Installing/removing the towing eye
Installing the towing eye
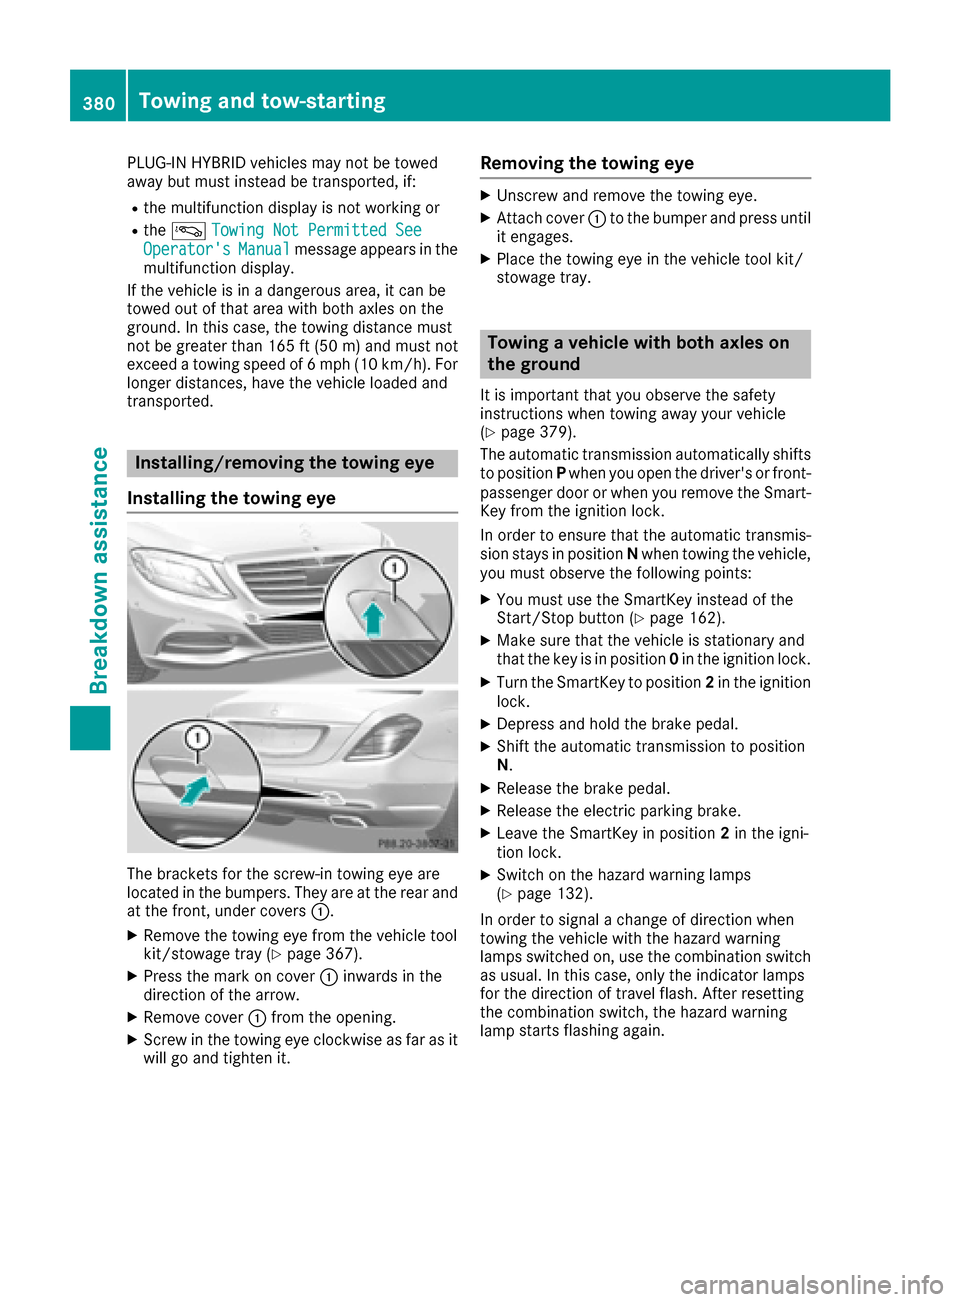
The brackets for the screw-in towing eye are
located in the bumpers. They are at the rear and
at the front, under covers :.
XRemove the towing eye from the vehicle tool
kit/stowage tray (Ypage 367).
XPress the mark on cover:inwards in the
direction of the arrow.
XRemove cover :from the opening.
XScrew in the towing eye clockwise as far as it
will go and tighten it.
Removing the towing eye
XUnscrew and remove the towing eye.
XAttach cover :to the bumper and press until
it engages.
XPlace the towing eye in the vehicle tool kit/
stowage tray.
Towing a vehicle with both axles on
the ground
It is important that you observe the safety
instructions when towing away your vehicle
(
Ypage 379).
The automatic transmission automatically shifts
to position Pwhen you open the driver's or front-
passenger door or when you remove the Smart-
Key from the ignition lock.
In order to ensure that the automatic transmis-
sion stays in position Nwhen towing the vehicle,
you must observe the following points:
XYou must use the SmartKey instead of the
Start/Stop button (Ypage 162).
XMake sure that the vehicle is stationary and
that the key is in position 0in the ignition lock.
XTurn the SmartKey to position 2in the ignition
lock.
XDepress and hold the brake pedal.
XShift the automatic transmission to position
N .
XRelease the brake pedal.
XRelease the electric parking brake.
XLeave the SmartKey in position 2in the igni-
tion lock.
XSwitch on the hazard warning lamps
(Ypage 132).
In order to signal a change of direction when
towing the vehicle with the hazard warning
lamps switched on, use the combination switch
as usual. In this case, only the indicator lamps
for the direction of travel flash. After resetting
the combination switch, the hazard warning
lamp starts f
lashing again.
380Towing and tow-starting
Breakdown assistance