2016 MERCEDES-BENZ S-Class SEDAN Cup holder
[x] Cancel search: Cup holderPage 9 of 438

Coolbox.............................................. 339
Cooling
see Climate control
Copyright ............................................ .31
Cornering light function
Display message ............................ 291
Function/notes ............................ .132
Crash-responsive emergency light-
ing ....................................................... 135
Crosswind Assist (vehicles with
MAGIC BODY CONTROL) ................... 210
Crosswind Assist (vehicles with-
out MAGIC BODY CONTROL) ...............75
Cruise control
Calling up the speed last stored .... 198
Cruise control lever ....................... 197
Deactivating ................................... 199
Display message ............................ 305
Driving system ............................... 197
Function/notes ............................. 197
General notes ................................ 197
Important safety notes .................. 197
Setting a speed .............................. 198
Storing and maintaining current
speed ............................................. 198
Cup holder
Center console .............................. 331
Important safety notes .................. 330
Rear compartment ......................... 331
Temperature controlled ................. 332
Cushion air bags .................................. 53
Customer Assistance Center
(CAC) ..................................................... 29
Customer Relations Department ....... 29
D
Data
see Technical data
Data carrier
Selecting ........................................ 266
Daytime running lamps
Display message ............................ 293
Function/notes ............................. 130
Switching on/off (on-board com-
puter) ............................................. 274
Declarations of conformity ................. 28
Diagnostics connection ...................... 28Digital speedometer
......................... 263
DIRECT SELECT lever
Automatic transmission ................. 170
Display
see Display messages
see Warning and indicator lamps
Display message
Hybrid drive system ....................... 297
Display messages
ASSYST PLUS ................................ 357
Calling up (on-board computer) ..... 277
Driving systems ............................. 299
Engine ............................................ 294
General notes ................................ 277
Hiding (on-board computer) ........... 277
Introduction ................................... 277
Lights ............................................. 291
Safety systems .............................. 278
SmartKey ....................................... 312
Tires ............................................... 306
Vehicle ........................................... 308
Distance recorder
see Odometer
see Trip odometer
Distance warning (warning lamp) .... 322
Distance warning function
Function/notes ................................ 71
DISTRONIC PLUS
Activating ....................................... 201
Activation conditions ..................... 201
Cruise control lever ....................... 201
Deactivating ................................... 205
Display message ............................ 303
Displays in the instrument cluster .. 204
Driving tips .................................... 205
Driving with DISTRONIC PLUS ....... 202
Function/notes ............................. 199
Important safety notes .................. 200
Setting a speed .............................. 203
Setting the specified minimum
distance ......................................... 204
Stopping ........................................ 203
with Steering Assist and Stop&Go
Pilot ............................................... 207
Doors
Automatic locking (switch) ............... 87
Central locking/unlocking
(SmartKey) ....................................... 79
Index7
Page 21 of 438

Switching on/off ........................... 131
Start/Stop button
General notes ................................ 162
Key positions ................................. 163
Removing ....................................... 163
Starting the engine ........................ 164
Start/stop function
see ECO start/stop function
Starting (engine) ................................ 164
STEER CONTROL .................................. 77
Steering
Display message ............................ 311
Warning lamps ............................... 324
Steering Assist
see DISTRONIC PLUS
Steering Assist and Stop&Go Pilot
(DISTRONIC PLUS)
Display message ............................ 305
Steering assistant STEER CON-
TROL
see STEER CONTROL
Steering wheel
Adjusting (electrically) ................... 120
Button overview ............................... 35
Buttons (on-board computer) ......... 257
Cleaning ......................................... 365
EASY ENTRY/EXIT feature ............. 122
Important safety notes .................. 120
Paddle shifters ............................... 174
Steering wheel heating .................. 120
Storing settings (memory func-
tion) ............................................... 126
Steering wheel heating
Problem (malfunction) ................... 122
Switching on/off ........................... 120
Steering wheel paddle shifters ........ 174
Stop&Go Pilot
see DISTRONIC PLUS
Stowage areas ................................... 325
Stowage compartments
Armrest (under) ............................. 327
Center console .............................. 326
Center console in rear compart-
ment .............................................. 327
Cup holders ................................... 330
Door ............................................... 327
Eyeglasses compartment ............... 326
Glove box ....................................... 326 Important safety information ......... 325
Rear ............................................... 327
Rear seat backrest ......................... 328
Stowage net ................................... 329
see Stowage areas
Stowage net ....................................... 329
Stowage space
Folding table .................................. 328
Parcel net retainers ....................... 329
Securing a load .............................. 329
Stowage well beneath the trunk
floor .................................................... 329
Summer tires
In w
inter ........................................ 386
Sun visor ............................................ 333
Suspension mode
Active Body Control ABC ............... 210
Suspension setting
AIRMATIC ...................................... 212
Suspension settings
SETUP (on-board computer) .......... 276
Switching air-recirculation mode
on/off ................................................. 152
T
Tachometer ........................................ 256
Tail lamps
Display message ............................ 292
see Lights
Tank content
Fuel gauge ....................................... 33
Technical data
Capacities ...................................... 427
Information .................................... 425
Tires/wheels ................................. 410
Vehicle data ................................... 433
Telephone
Accepting a call (multifunction
steering wheel) .............................. 267
Display message ............................ 311
Introduction ................................... 267
Menu (on-board computer) ............ 267
Number from the phone book ........ 268
Redialing ........................................ 268
Rejecting/ending a call ................. 268
Temperature
Coolant .......................................... 257
Index19
Page 43 of 438
Rear seats
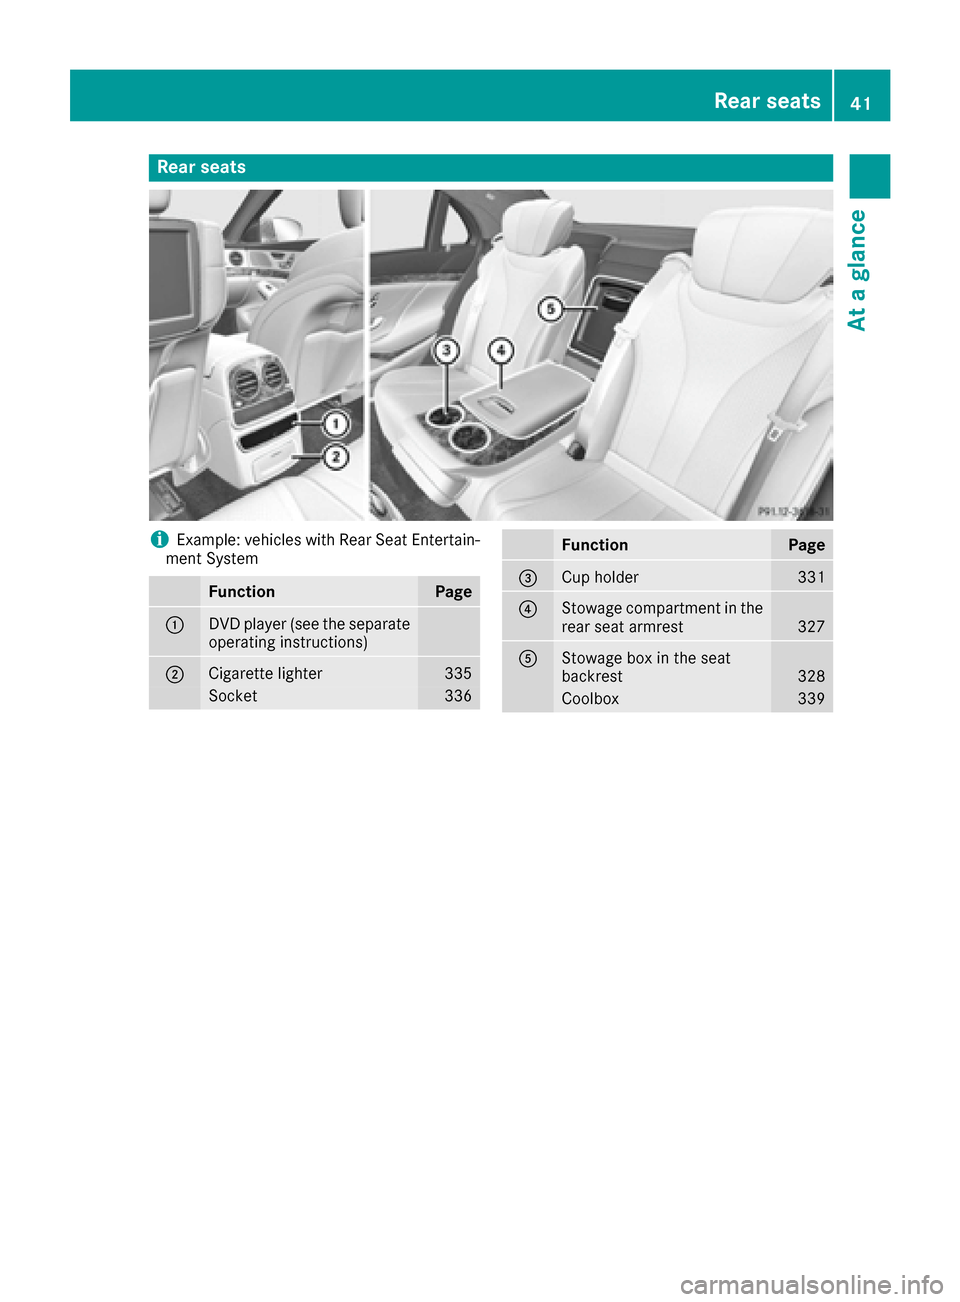
iExample: vehicles with Rear Seat Entertain-
ment System
FunctionPage
:DVD player (see the separate
operating instructions)
;Cigarette lighter335
Socket336
FunctionPage
=Cup holder331
?Stowage compartment in the
rear seat armrest327
AStowage box in the seat
backrest328
Coolbox339
Rear seats41
At a glance
Page 53 of 438

To avoid hazardous situations, always make
sure that all of the vehicle's occupants:
Rhave fastened their seat belts correctly,
including pregnant women
Rare sitting correctly and maintain the great-
est possible distance to the air bags
Rfollow the following instructions
Always make sure that there are no objects
between the air bag and the vehicle's occu-
pants.
RAdjust the seats properly before beginning
your journey. Always make sure that the seat
is in an almost upright position. The center of
the head restraint must support the head at
about eye level.
RMove the driver's and front-passenger seats
as far back as possible. The driver's seat posi-
tion must allow the vehicle to be driven safely.
ROnly hold the steering wheel on the outside.
This allows the air bag to be fully deployed.
RAlways lean against the backrest while driv-
ing. Do not lean forwards or lean against the
door or side window. You may otherwise be in
the deployment area of the air bags.
RAlways keep your feet in the footwell in front
of the seat. Do not put your feet on the dash-
board, for example. Your feet may otherwise
be in the deployment area of the air bag.
RFor this reason, always secure persons less
than 5 ft (1.50 m) tall in suitable restraint sys-
tems. Up to this height, the seat belt cannot
be worn correctly.
If a child is traveling in your vehicle, also
observe the following notes:
RAlways secure children under twelve years of
age and less than 5 ft (1.50 m)tall in suitable
child restraint systems.
RChild restraint systems should be installed on
the rear seats.
ROnly secure a child in a rearward-facing child
restraint system on the front-passenger seat
when the front-passenger front air bag is
deactivated. If the PASSENGER AIR BAG OFF
indicator lamp is permanently lit, the fro nt-
p
assenger front air bag is deactivated
(
Ypage 46).
RAlways observe the instructions and safety
notes on the "Occupant Classification System
(OCS)" (
Ypage 53) and on "Children in the vehicle" (
Ypage 61
)in addition to the child
restraint system manufacturer's installation
and operating instructions.
Objects in the vehicle interior may prevent
an air bag from functioning correctly. Before
starting your journey and to avoid risks resulting from the speed of the air bag as it deploys, make
sure that:
Rthere are no people, animals or objects
between the vehicle occupants and an air
bag.
Rthere are no objects between the seat, door
and B-pillar.
Rno hard objects, e.g. coat hangers, hang on
the grab handles or coat hooks.
Rno accessories, such as cup holders, are
attached to the vehicle within the deployment
area of an air bag, e.g. to doors, side windows,
rear side trim or side walls.
Rno heavy, sharp-edged or fragile objects are in
the pockets of your clothing. Store such
objects in a suitable place.
GWARNING
If you modify the air bag cover or affix objects
such as stickers to it, the air bag can no longer
function correctly. There is an increased risk
of injury.
Never modify an air bag cover or affix objects
to it.
GWARNING
Sensors to control the air bags are located in
the doors. Modifications or work not per-
formed correctly to the doors or door panel-
ing, as well as damaged doors, can lead to the
function of the sensors being impaired. The air
bags might therefore not function properly
anymore. Consequently, the air bags cannot
protect vehicle occupants as they are
designed to do. There is an increased risk of
injury.
Never modify the doors or parts of the doors.
Always have work on the doors or door pan-
eling carried out at a qualified specialist work-
shop.
Occupant safety51
Safety
Z
Page 81 of 438
Useful information
i
This Operator's Manual describes all models
and all standard and optional equipment of
your vehicle available at the time of publica-
tion of the Operator's Manual. Country-spe-
cific differences are possible. Please note
that your vehicle may not be equipped with all
features described. This also applies to
safety-related systems and functions.
iRead the information on qualified specialist
workshops (Ypage 28).
SmartKey
Important safety notes
GWARNING
If children are left unsupervised in the vehicle,
they could:
Ropen the doors, thus endangering other
people or road users.
Rget out and disrupt traffic.
Roperate the vehicle's equipment.
Additionally, children could set the vehicle in
motion if, for example, they:
Rrelease the parking brake.
Rshifting the automatic transmission out of
park position P
RStart the engine.
There is a risk of an accident and injury.
When leaving the vehicle, always take the
SmartKey with you and lock the vehicle. Never
leave children or animals unattended in the
vehicle. Always keep the SmartKey out of
reach of children.
GWARNING
If you attach heavy or large objects to the
SmartKey, the SmartKey could be uninten-
tionally turned in the ignition lock. This could
cause the engine to be switched off. There is a risk of an accident.
Do not attach any heavy or large objects to theSmartKey. Remove any bulky key rings before
inserting the SmartKey into the ignition lock.
!Keep the SmartKey away from strong mag-
netic fields. Otherwise, the remote control
function could be affected.
Strong magnetic fields can occur in the vicin-
ity of powerful electrical installations.
Do not keep the SmartKey:
Rwith electronic devices, e.g. a mobile phone
or another SmartKey.
Rwith metallic objects, e.g. coins or metal foil.
Rinside metallic objects, e.g. a metal case.
This can affect the functionality of the Smart-
Key.
Do not keep the SmartKey in the temperature-
controlled cup holder (
Ypage 332). On vehicles
with the KEYLESS-GO start function, do not
keep it on the parcel shelf or in the trunk. Oth-
erwise, the SmartKey may not be detected, e.g. when starting the engine using the Start/Stop
button.
A check which periodically establishes a radio
connection between the vehicle and the Smart-
Key determines whether a valid SmartKey is in
the vehicle. This occurs, for example:
Rwhen starting the engine
Rwhilst driving
Rwhen using HANDS-FREE ACCESS
Rwhen the external door handles are touched
Rduring convenience closing
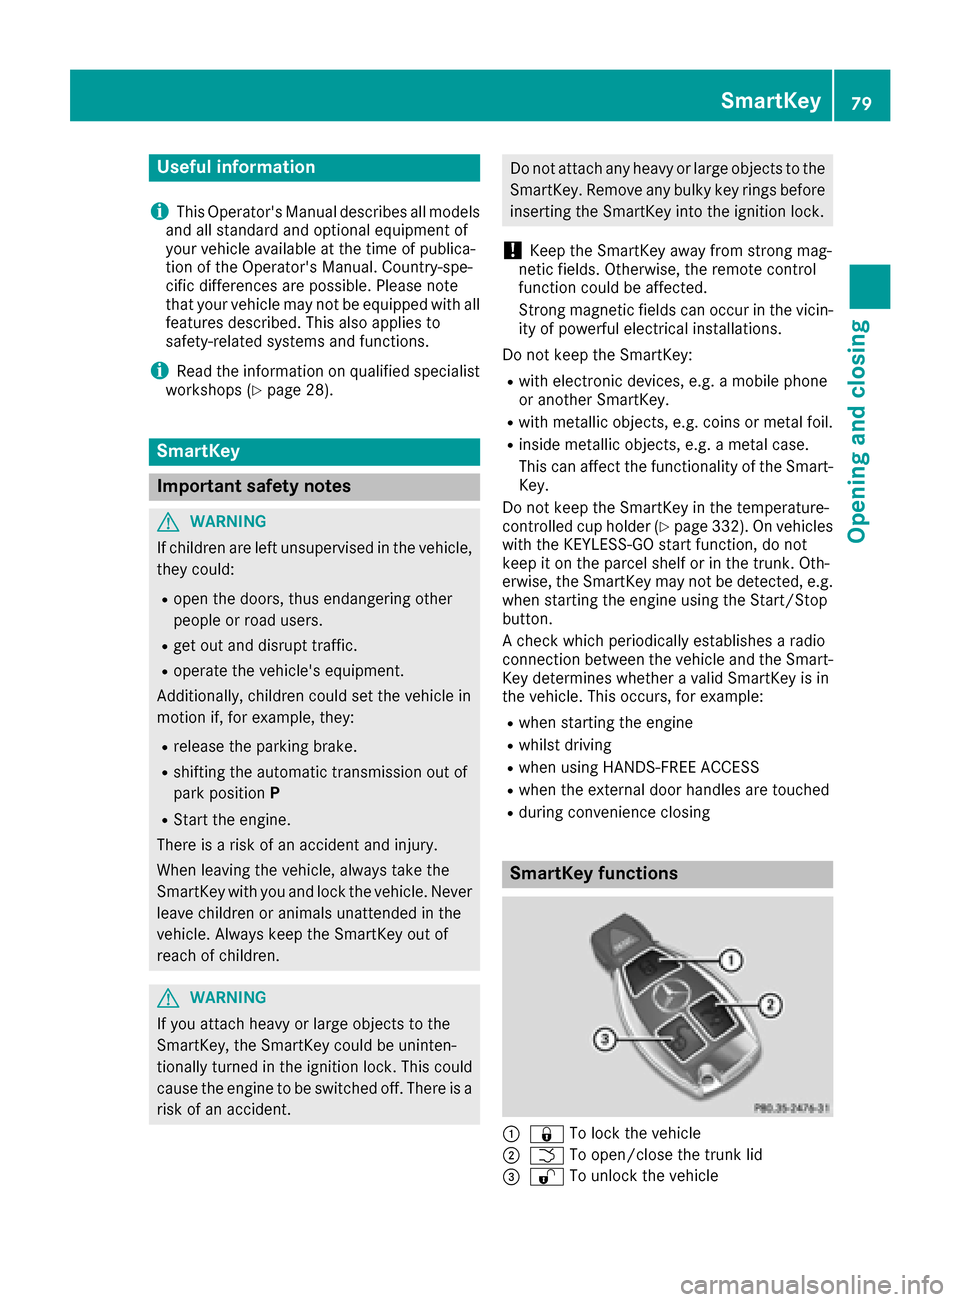
SmartKey functions
:& To lock the vehicle
;FTo open/close the trunk lid
=%To unlock the vehicle
SmartKey79
Opening and closing
Z
Page 156 of 438
The following conditions can affect your percep-
tion of the perfume intensity:
Roperating mode of the climate control system
Rinterior temperature
Rtime of year or day
Rair humidity
Rphysiological condition of occupants, e.g. fati-
gue or hunger
The perfume atomizer can only be operated
when the climate control system is switched on
and is only active when the glove box is closed.
The perfume atomizer is provided with a pre-fil-
led vial. You can also choose from a variety of
filled perfume vials and an empty vial which you can fill yourself.
If you refill an empty perfume vial, observe the
separate information sheet attached to the vial.
!If you do not use genuine Mercedes-Benz
interior perfumes, observe the manufactur-
ers' safety notices on the perfume packaging.
Do not refill the pre-filled perfume vial when it is
empty. Dispose of the used vial after use.
XTo insert the perfume vial: open the glove
box (Ypage 326).
XSlide the perfume vial into the holder as far as
it will go.
XTo remove the perfume vial: pull out the
perfume vial.
XTo refill the perfume vial: unscrew the lid of
the empty perfume vial to refill it yourself.
XFill the perfume vial with a maximum of
0.5 fl. oz. (15 ml) of the desired liquid per-
fume.
XScrew the lid back on to the vial.
!Only refill the vial when you are outside the
vehicle. Otherwise, liquid perfume could drip
into the interior and contaminate it.
Always refill the empty refillable vial with the
same perfume. Otherwise, you might not ach-
ieve optimum results from the perfume atom-
izer.
154Operating the climate control systems
Climate control
Page 165 of 438
To start the vehicle without actively using the
Smartkey:
Rthe Start/Stop button must be inserted in the
ignition lock.
Rthe Smartkey must be in the vehicle.
Rthe vehicle must not be locked with the
SmartKey or KEYLESS-GO (Ypage 80).
Do not keep the SmartKey:
Rwith electronic devices, e.g. a mobile phone
or another SmartKey.
Rwith metallic objects, e.g. coins or metal foil.
Rinside metallic objects, e.g. a metal case.
This can affect the functionality of the Smart-
Key.
Do not keep the SmartKey in the temperature-
controlled cup holder (
Ypage 332). Otherwise,
the key will not be detected, e.g. when starting
the engine with the Start/Stop button.
If you lock the vehicle with the SmartKey's
remote control or with KEYLESS-GO, after a
short time:
Ryou will not be able to switch on the ignition
with the Start/Stop button.
Ryou will not be able to start the engine with the
Start/Stop button until the vehicle is
unlocked again.
If you lock the vehicle centrally using the button
on the front door (
Ypage 86), you can continue
to start the engine with the Start/Stop button.
The engine can be switched off while the vehicle
is in motion by pressing and holding the Start/
Stop button for three seconds. This function
operates independently of the ECO start/stop
automatic engine switch-off function.
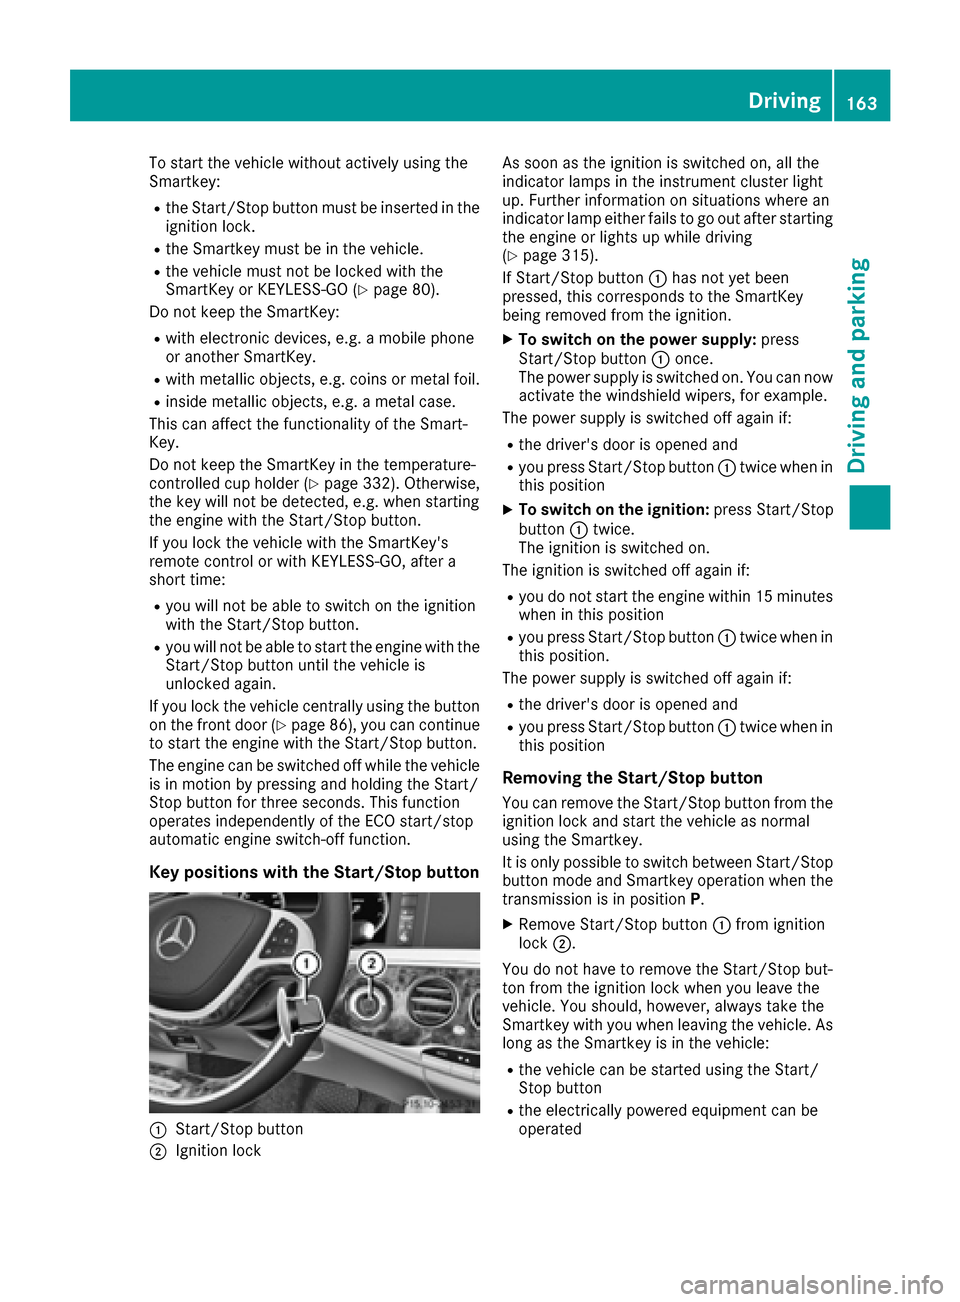
Key positions with the Start/Stop button
:Start/Stop button
;Ignition lock As soon as the ignition is switched on, all the
indicator lamps in the instrument cluster light
up. Further information on situations where an
indicator lamp either fails to go out after starting
the engine or lights up while driving
(
Ypage 315).
If Start/Stop button :has not yet been
pressed, this corresponds to the SmartKey
being removed from the ignition.
XTo switch on the power supply: press
Start/Stop button :once.
The power supply is switched on. You can now activate the windshield wipers, for example.
The power supply is switched off again if:
Rthe driver's door is opened and
Ryou press Start/Stop button :twice when in
this position
XTo switch on the ignition: press Start/Stop
button :twice.
The ignition is switched on.
The ignition is switched off again if:
Ryou do not start the engine within 15 minutes
when in this position
Ryou press Start/Stop button :twice when in
this position.
The power supply is switched off again if:
Rthe driver's door is opened and
Ryou press Start/Stop button :twice when in
this position
Removing the Start/Stop button
You can remove the Start/Stop button from the
ignition lock and start the vehicle as normal
using the Smartkey.
It is only possible to switch between Start/Stop button mode and Smartkey operation when the
transmission is in position P.
XRemove Start/Stop button :from ignition
lock ;.
You do not have to remove the Start/Stop but-
ton from the ignition lock when you leave the
vehicle. You should, however, always take the
Smartkey with you when leaving the vehicle. As long as the Smartkey is in the vehicle:
Rthe vehicle can be started using the Start/
Stop button
Rthe electrically powered equipment can be
operated
Driving163
Driving and parking
Z
Page 327 of 438
Useful information
i
This Operator's Manual describes all models
and all standard and optional equipment of
your vehicle available at the time of publica-
tion of the Operator's Manual. Country-spe-
cific differences are possible. Please note
that your vehicle may not be equipped with all
features described. This also applies to
safety-related systems and functions.
iRead the information on qualified specialist
workshops (Ypage 28).
Stowage areas
Loading guidelines
GWARNING
Combustion engines emit poisonous exhaust
gases such as carbon monoxide. Exhaust
gases can enter the vehicle interior if the
trunk lid is open when the engine is running,
especially if the vehicle is in motion. There is a
risk of poisoning.
Always switch off the engine before opening
the trunk lid. Never drive with the trunk lid
open.
GWARNING
If objects, luggage or loads are not secured or
not secured sufficiently, they could slip, tip
over or be flung around and thereby hit vehicle
occupants. There is a risk of injury, particu-
larly in the event of sudden braking or a sud-
den change in direction.
Always store objects so that they cannot be
flung around. Secure objects, luggage or
loads against slipping or tipping before the
journey.
GWARNING
The exhaust tail pipe and tail pipe trim can
become very hot. If you come into contact
with these parts of the vehicle, you could burn
yourself. There is a risk of injury.
Always be particularly careful around the
exhaust tail pipe and the tail pipe trim. Allow
these components to cool down before touch-
ing them.
The handling characteristics of a laden vehicle
are dependent on the distribution of the load
within the vehicle. For this reason, you should
observe the following notes when transporting a
load:
RNever exceed the maximum permissible
gross vehicle weight or the gross axle weight
rating of the vehicle (including occupants).
The values are specified on the vehicle iden-
tification plate on the B-pillar of the driver's
door.
RThe trunk is the preferred place to carry
objects.
RPosition heavy loads as far forwards as pos-
sible and as low down in the trunk as possible.
RThe load must not protrude above the upper
edge of the seat backrests.
RAlways place the load behind unoccupied
seats if possible.
RSecure the load with sufficiently strong and
wear-resistant tie-downs. Pad sharp edges for
protection.
Stowage spaces
Important safety notes
GWARNING
If objects in the passenger compartment are
stowed incorrectly, they can slide or be
thrown around and hit vehicle occupants. In
addition, cupholders, open stowage spaces
and mobile phone brackets cannot always
retain all objects they contain. There is a risk of injury, particularly in the event of sudden
braking or a sudden change in direction.
RAlways stow objects so that they cannot be
thrown around in such situations.
RAlways make sure that objects do not pro-
trude from stowage spaces, parcel nets or
stowage nets.
Stowage areas325
Stowage and features
Z