2016 MERCEDES-BENZ S-Class SEDAN clock
[x] Cancel search: clockPage 89 of 438
Automa tic locking featu re
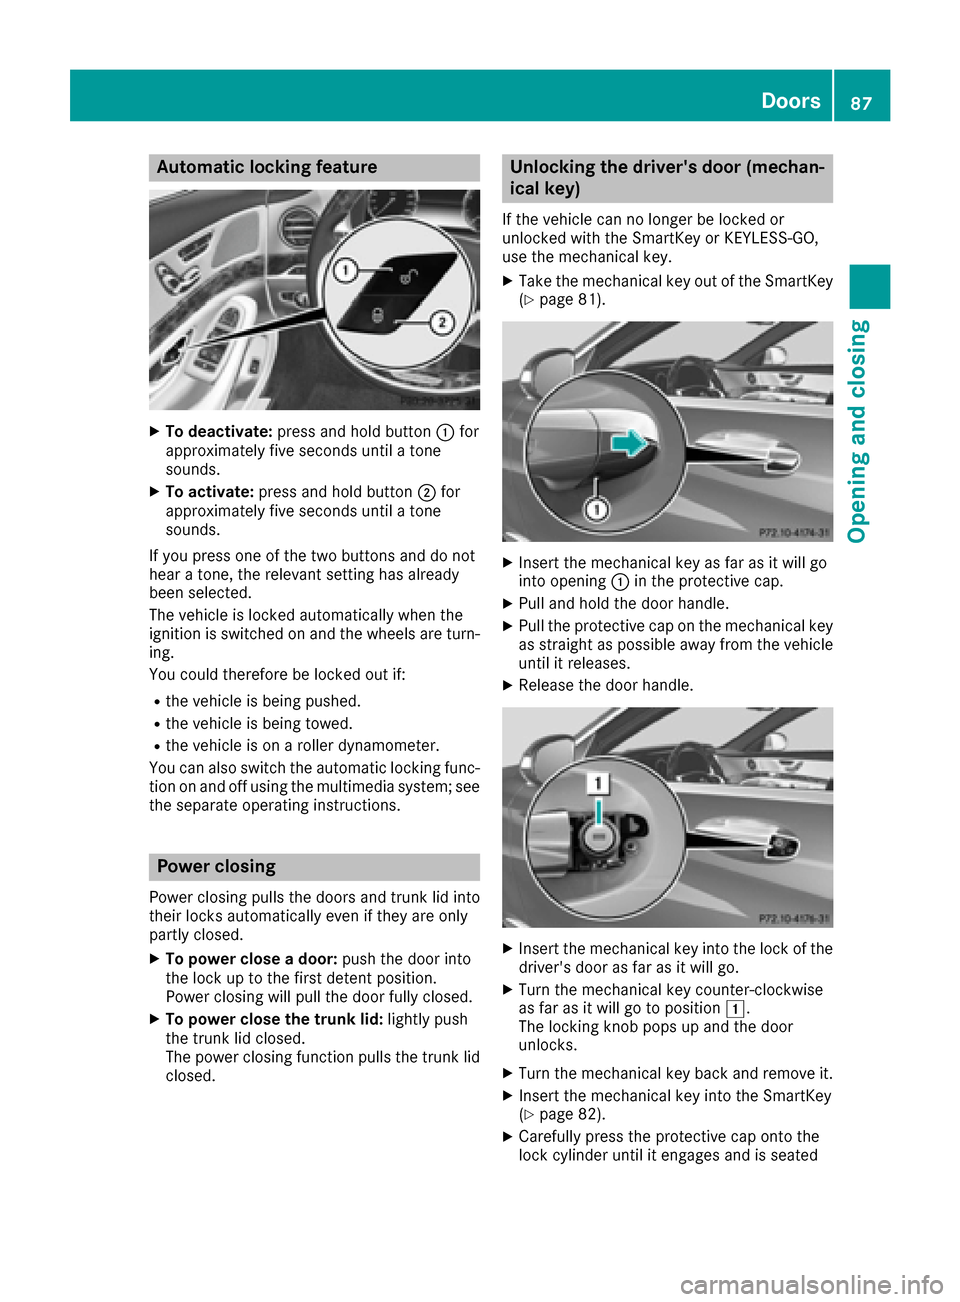
XTo deactivate:press and hold butto n: for
approximately fiv eseconds until atone
sounds.
XTo activate: press and hold butto n; for
approximately fiv eseconds until atone
sounds.
If you press on eof th etwo buttons and do no t
hear atone ,th erelevan tsetting has already
been selected.
The vehicl eis locke dautomatically when th e
ignition is switched on and th ewheels are turn-
ing .
You could therefor ebe locke dout if:
Rth evehicl eis bein gpushed.
Rth evehicl eis bein gtowed.
Rth evehicl eis on aroller dynamometer.
You can also switch th eautomatic locking func-
tion on and off usin gth emultimedia system; see
th eseparat eoperating instructions.
Power closing
Powe rclosin gpulls th edoor sand trunk lid int o
their locks automatically eve nif they are only
partly closed.
XTo power close adoor :push th edoor int o
th eloc kup to th efirst deten tposition .
Powe rclosin gwill pull th edoor fully closed.
XTo power close th etrunk lid :lightl ypush
th etrunk lid closed.
The powe rclosin gfunction pulls th etrunk lid
closed.
Unlocking the driver's door(mechan-
ical key)
If th evehicl ecan no longer be locke dor
unlocke dwit hth eSmartKey or KEYLESS-GO ,
use th emechanical key.
XTak eth emechanical ke yout of th eSmartKey
(Ypage 81).
XInser tth emechanical ke yas far as it will go
int oopening :in th eprotective cap .
XPull and hold th edoor handle.
XPull th eprotective cap on th emechanical ke y
as straight as possibl eaway from th evehicl e
until it releases.
XReleas eth edoor handle.
XInser tth emechanical ke yint oth eloc kof th e
driver's door as far as it will go.
XTurn th emechanical ke ycounter-clockwise
as far as it will go to position 1.
The locking knob pops up and th edoor
unlocks .
XTurn themechanical ke ybac kand remove it .
XInsertth emechanical ke yint oth eSmartKey
(Ypage 82) .
XCarefully press th eprotective cap onto th e
loc kcylinder until it engage sand is seated
Doors87
Opening and closing
Z
Page 90 of 438
firmly. Do not pull the door handle when doing
so.
If you use the mechanical key to unlock and
open the driver's door, the anti-theft alarm sys-
tem will be triggered. Switch off the alarm
(
Ypage 78).
Locking the vehicle (mechanical key)
If the vehicle can no longer be locked with the
SmartKey or KEYLESS-GO, use the mechanical
key.
XOpen the driver's door.
XClose the front-passenger door, the rear
doors and the trunk lid.
XPress the locking button (Ypage 86).
XCheck whether the locking knobs on the
front-passenger door and the rear doors are
still visible. Press down the locking knobs by
hand, if necessary.
XClose the driver's door.
XTake the mechanical key out of the SmartKey
(Ypage 81).
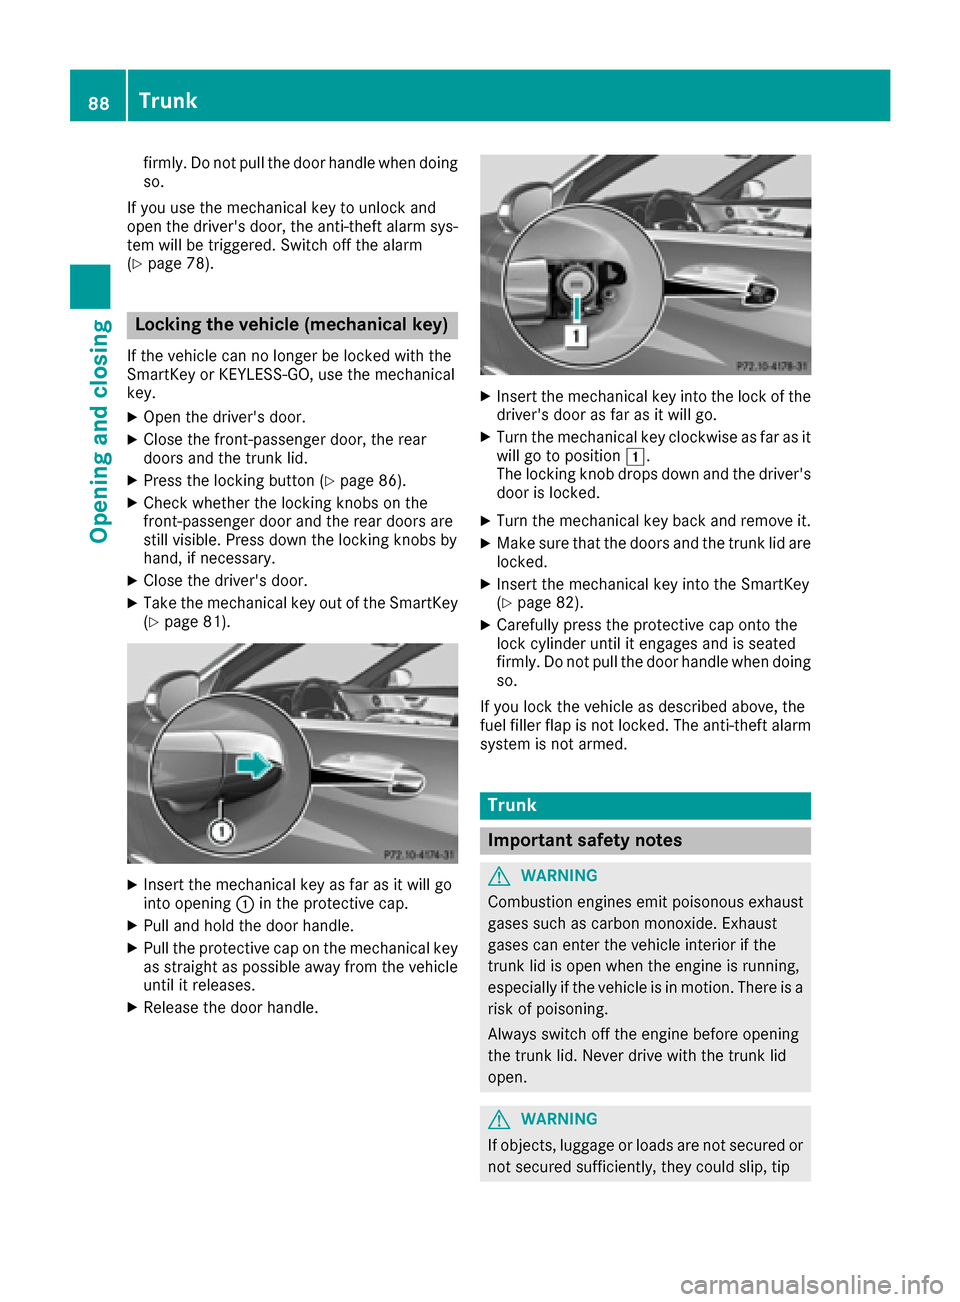
XInsert the mechanical key as far as it will go
into opening :in the protective cap.
XPull and hold the door handle.
XPull the protective cap on the mechanical key
as straight as possible away from the vehicle
until it releases.
XRelease the door handle.
XInsert the mechanical key into the lock of the
driver's door as far as it will go.
XTurn the mechanical key clockwise as far as it
will go to position 1.
The locking knob drops down and the driver's
door is locked.
XTurn the mechanical key back and remove it.
XMake sure that the doors and the trunk lid are locked.
XInsert the mechanical key into the SmartKey
(Ypage 82).
XCarefully press the protective cap onto the
lock cylinder until it engages and is seated
firmly. Do not pull the door handle when doing
so.
If you lock the vehicle as described above, the
fuel filler flap is not locked. The anti-theft alarm system is not armed.
Trunk
Important safety notes
GWARNING
Combustion engines emit poisonous exhaust
gases such as carbon monoxide. Exhaust
gases can enter the vehicle interior if the
trunk lid is open when the engine is running,
especially if the vehicle is in motion. There is a
risk of poisoning.
Always switch off the engine before opening
the trunk lid. Never drive with the trunk lid
open.
GWARNING
If objects, luggage or loads are not secured or
not secured sufficiently, they could slip, tip
88Trunk
Opening and closing
Page 95 of 438
Opening and closing
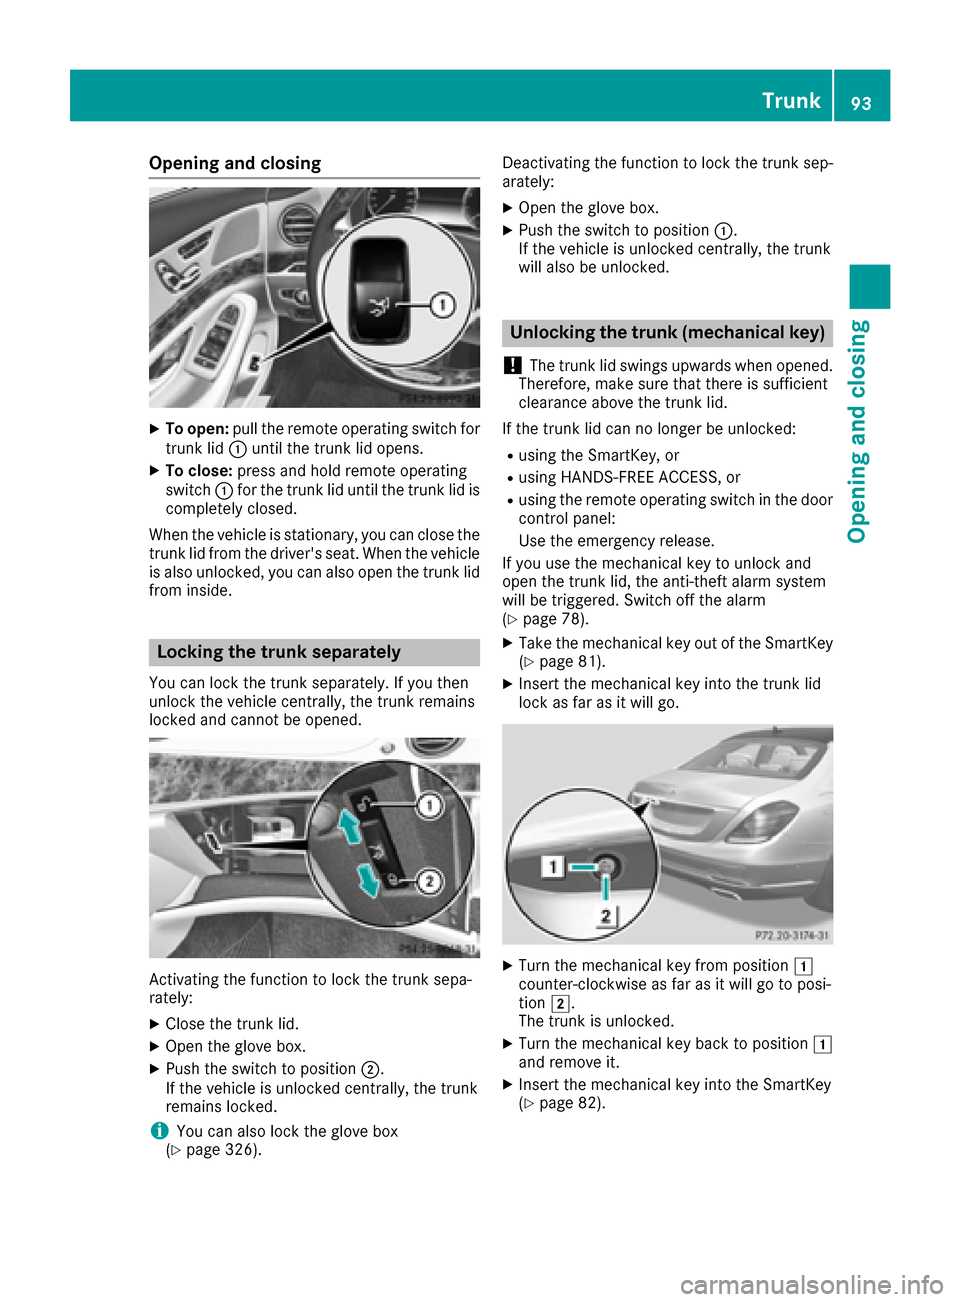
XTo open:pull the remote operating switch for
trunk lid :until the trunk lid opens.
XTo close: press and hold remote operating
switch :for the trunk lid until the trunk lid is
completely closed.
When the vehicle is stationary, you can close the
trunk lid from the driver's seat. When the vehicle
is also unlocked, you can also open the trunk lid
from inside.
Locking the trunk separately
You can lock the trunk separately. If you then
unlock the vehicle centrally, the trunk remains
locked and cannot be opened.
Activating the function to lock the trunk sepa-
rately:
XClose the trunk lid.
XOpen the glove box.
XPush the switch to position ;.
If the vehicle is unlocked centrally, the trunk
remains locked.
iYou can also lock the glove box
(Ypage 326). Deactivating the function to lock the trunk sep-
arately:
XOpen the glove box.
XPush the switch to position
:.
If the vehicle is unlocked centrally, the trunk
will also be unlocked.
Unlocking the trunk (mechanical key)
!
The trunk lid swings upwards when opened.
Therefore, make sure that there is sufficient
clearance above the trunk lid.
If the trunk lid can no longer be unlocked:
Rusing the SmartKey, or
Rusing HANDS-FREE ACCESS, or
Rusing the remote operating switch in the door
control panel:
Use the emergency release.
If you use the mechanical key to unlock and
open the trunk lid, the anti-theft alarm system
will be triggered. Switch off the alarm
(
Ypage 78).
XTake the mechanical key out of the SmartKey
(Ypage 81).
XInsert the mechanical key into the trunk lid
lock as far as it will go.
XTurn the mechanical key from position 1
counter-clockwise as far as it will go to posi-
tion 2.
The trunk is unlocked.
XTurn the mechanical key back to position 1
and remove it.
XInsert the mechanical key into the SmartKey
(Ypage 82).
Trunk93
Opening and closing
Z
Page 161 of 438
In order to ensure the direct flow of fresh air
through the air vents into the vehicle interior,
please observe the following notes:
Rkeep the air inlet between the windshield and
the hood free of blockages, such as ice, snow
or leaves.
Rnever cover the air vents or air intake grilles in
the vehicle interior.
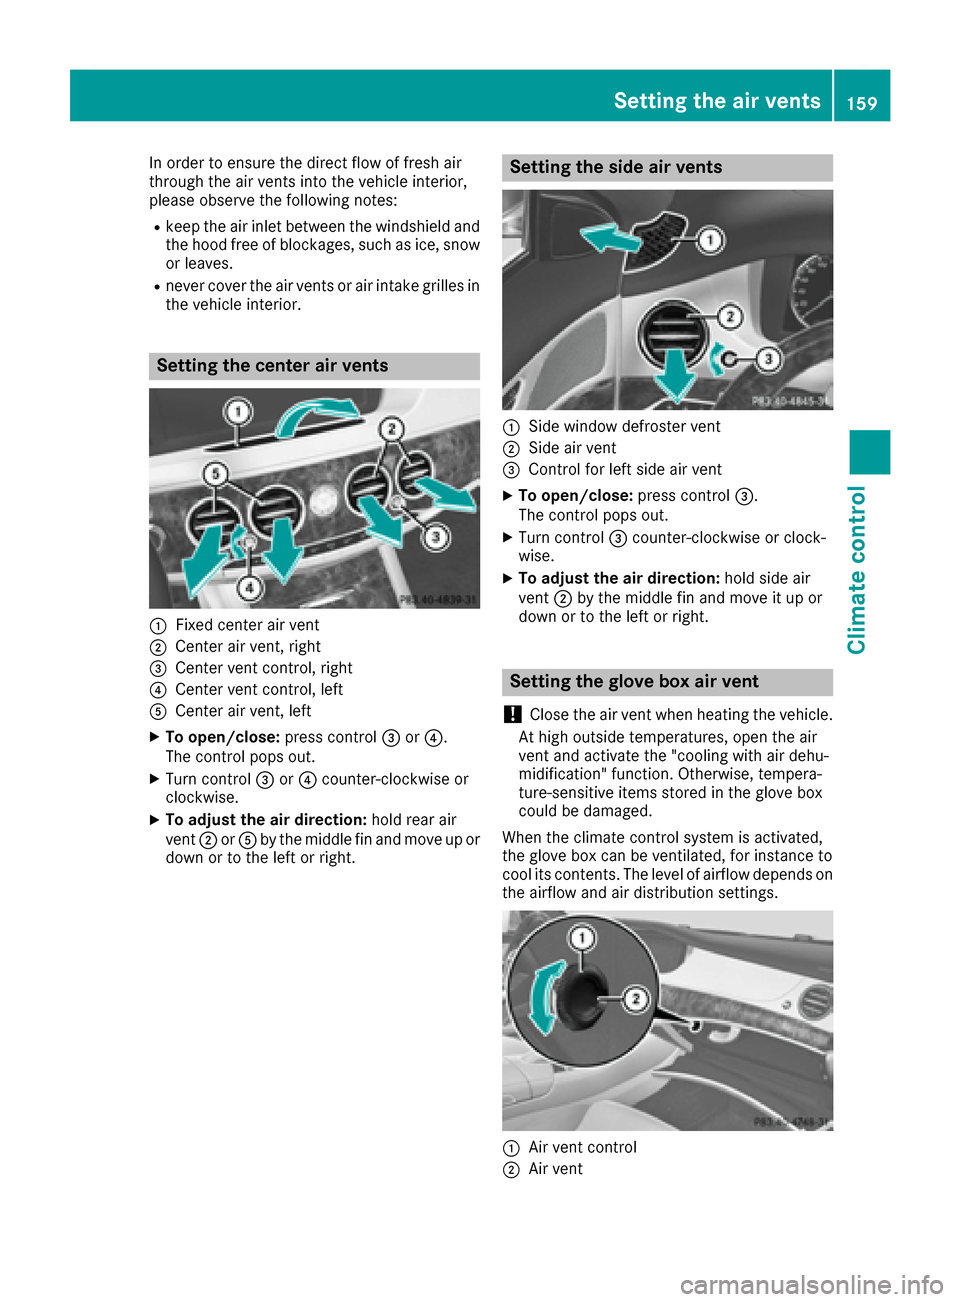
Setting the center air vents
:Fixed center air vent
;Center air vent, right
=Center vent control, right
?Center vent control, left
ACenter air vent, left
XTo open/close: press control=or?.
The control pops out.
XTurn control =or? counter-clockwise or
clockwise.
XTo adjust the air direction: hold rear air
vent ;orA by the middle fin and move up or
down or to the left or right.
Setting the side air vents
:Side window defroster vent
;Side air vent
=Control for left side air vent
XTo open/close: press control=.
The control pops out.
XTurn control =counter-clockwise or clock-
wise.
XTo adjust the air direction: hold side air
vent ;by the middle fin and move it up or
down or to the left or right.
Setting the glove box air vent
!
Close the air vent when heating the vehicle.
At high outside temperatures, open the air
vent and activate the "cooling with air dehu-
midification" function. Otherwise, tempera-
ture-sensitive items stored in the glove box
could be damaged.
When the climate control system is activated,
the glove box can be ventilated, for instance to
cool its contents. The level of airflow depends on
the airflow and air distribution settings.
:Air vent control
;Air vent
Setting the air vents159
Climate control
Z
Page 162 of 438
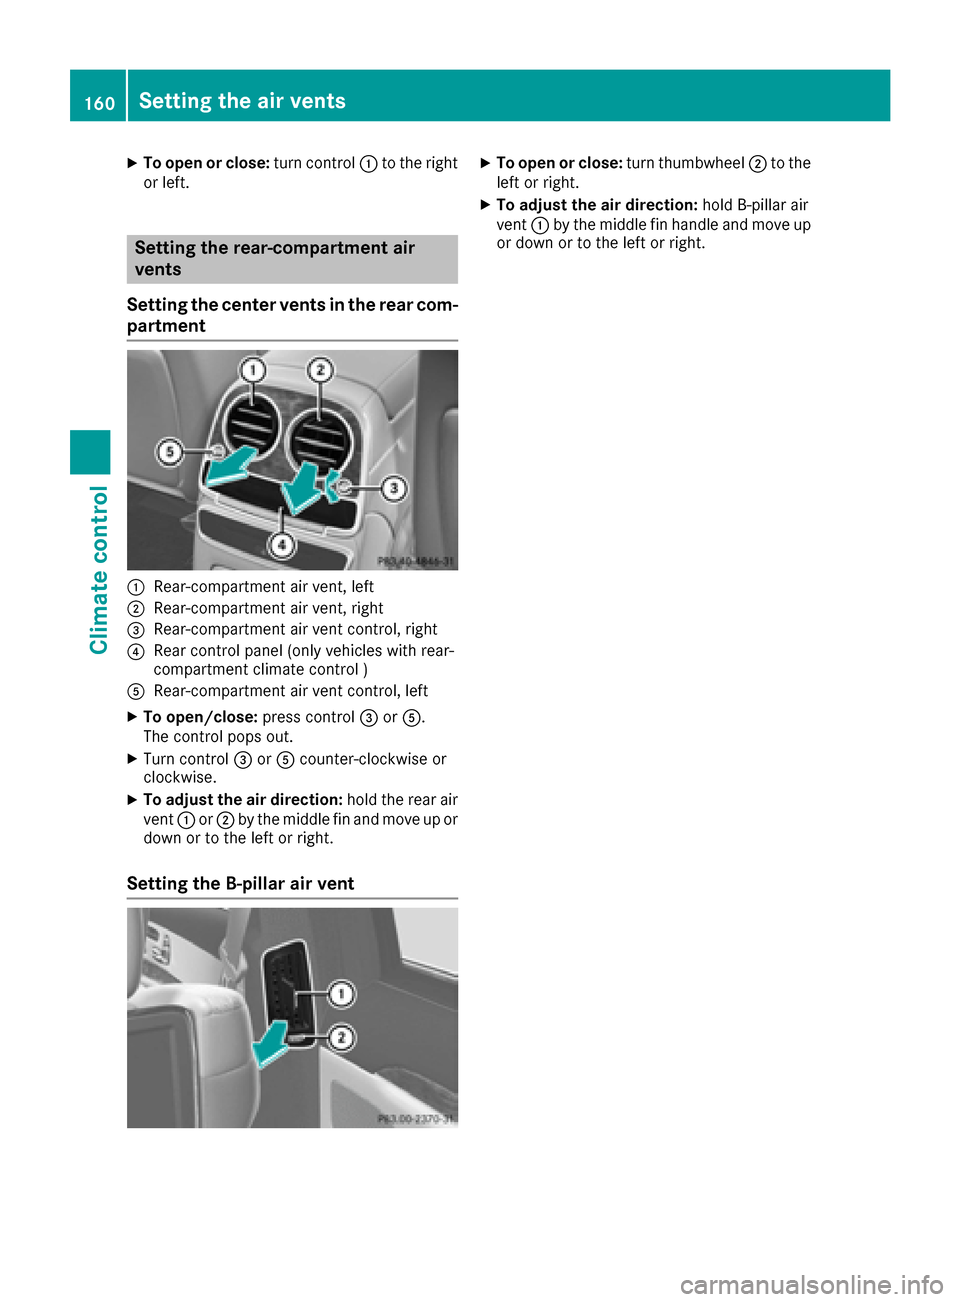
XTo open or close:turn control:to the right
or left.
Setting the rear-compartment air
vents
Setting the center vents in the rear com-
partment
:Rear-compartment air vent, left
;Rear-compartment air vent, right
=Rear-compartment air vent control, right
?Rear control panel (only vehicles with rear-
compartment climate control )
ARear-compartment air vent control, left
XTo open/close: press control=orA.
The control pops out.
XTurn control =orA counter-clockwise or
clockwise.
XTo adjust the air direction: hold the rear air
vent :or; by the middle fin and move up or
down or to the left or right.
Setting the B-pillar air vent
XTo open or close: turn thumbwheel;to the
left or right.
XTo adjust the air direction: hold B-pillar air
vent :by the middle fin handle and move up
or down or to the left or right.
160Setting the air vents
Climate control
Page 181 of 438
XPress the fuel filler flap in the direction of
arrow:.
The fuel filler flap swings up.
XTurn the fuel filler cap counterclockwise and
remove it.
XInsert the fuel filler cap into the holder on the
inside of the fuel filler flap.
XCompletely insert the filler neck of the fuel
pump nozzle into the tank, hook in place and
refuel.
XOnly fill the tank until the pump nozzle
switches off.
Do not add any more fuel after the pump stops
filling for the first time. Otherwise, fuel may
leak out.
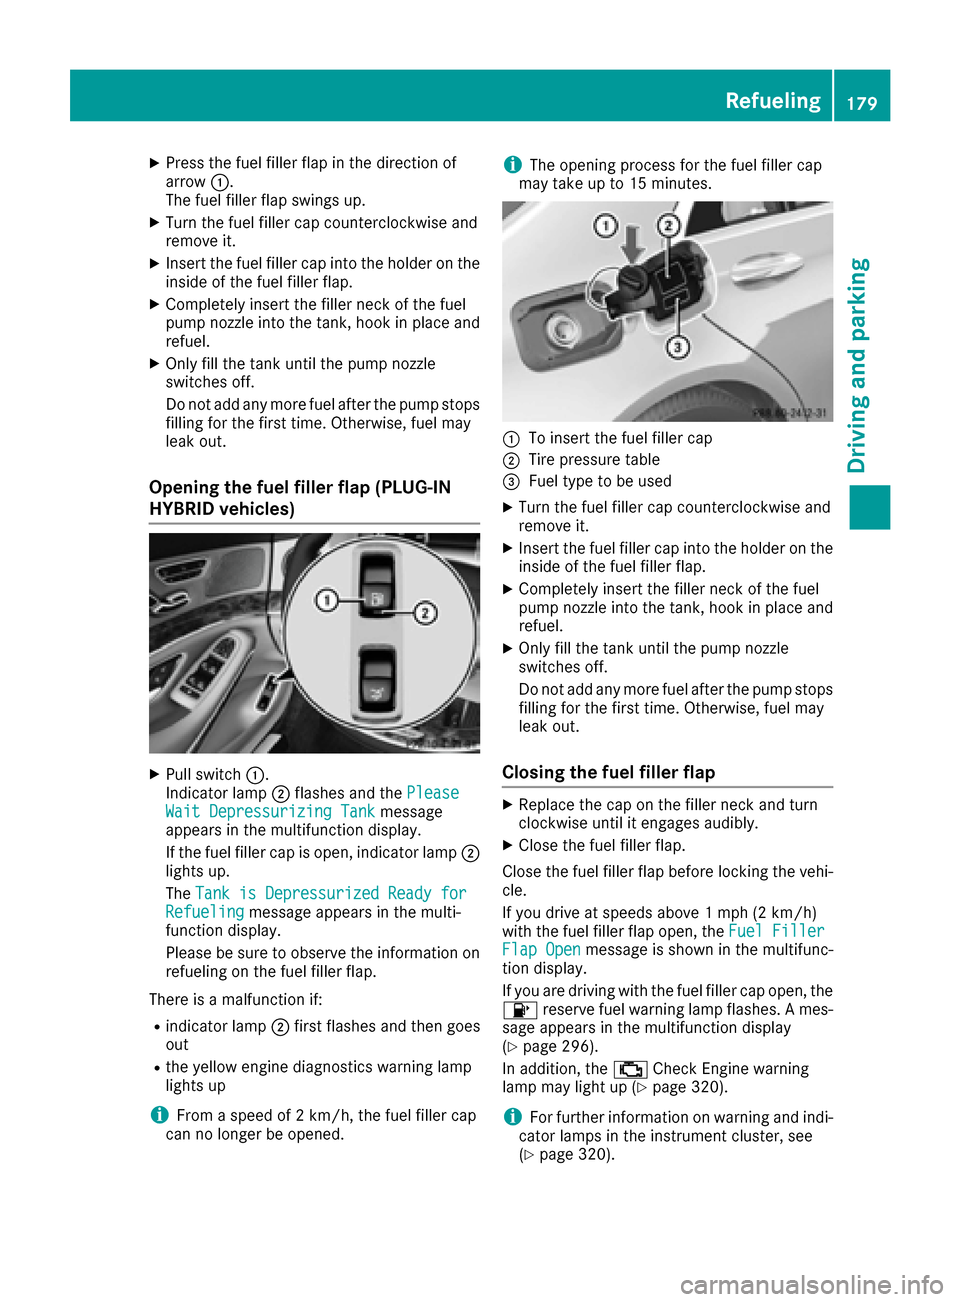
Opening the fuel filler flap (PLUG-IN
HYBRID vehicles)
XPull switch :.
Indicator lamp ;flashes and the Please
Wait Depressurizing Tankmessage
appears in the multifunction display.
If the fuel filler cap is open, indicator lamp ;
lights up.
The Tank is Depressurized Ready for
Refuelingmessage appears in the multi-
function display.
Please be sure to observe the information on
refueling on the fuel filler flap.
There is a malfunction if:
Rindicator lamp ;first flashes and then goes
out
Rthe yellow engine diagnostics warning lamp
lights up
iFrom a speed of 2 km/h, the fuel filler cap
can no longer be opened.
iThe opening process for the fuel filler cap
may take up to 15 minutes.
:To insert the fuel filler cap
;Tire pressure table
=Fuel type to be used
XTurn the fuel filler cap counterclockwise and
remove it.
XInsert the fuel filler cap into the holder on the inside of the fuel filler flap.
XCompletely insert the filler neck of the fuel
pump nozzle into the tank, hook in place andrefuel.
XOnly fill the tank until the pump nozzle
switches off.
Do not add any more fuel after the pump stopsfilling for the first time. Otherwise, fuel may
leak out.
Closing the fuel filler flap
XReplace the cap on the filler neck and turn
clockwise until it engages audibly.
XClose the fuel filler flap.
Close the fuel filler flap before locking the vehi-
cle.
If you drive at speeds above 1 mph (2 km/h)
with the fuel filler flap open, the Fuel Filler
Flap Openmessage is shown in the multifunc-
tion display.
If you are driving with the fuel filler cap open, the
8 reserve fuel warning lamp flashes. A mes-
sage appears in the multifunction display
(
Ypage 296).
In addition, the ;Check Engine warning
lamp may light up (
Ypage 320).
iFor further information on warning and indi-
cator lamps in the instrument cluster, see
(
Ypage 320).
Refueling179
Driving and parking
Z
Page 258 of 438

Useful information
i
This Operator's Manual describes all models
and all standard and optional equipment of
your vehicle available at the time of publica-
tion of the Operator's Manual. Country-spe-
cific differences are possible. Please note
that your vehicle may not be equipped with all
features described. This also applies to
safety-related systems and functions.
iRead the information on qualified specialist
workshops (Ypage 28).
Important safety notes
GWARNING
If you operate information systems and com-
munication equipment integrated in the vehi-
cle while driving, you will be distracted from
traffic conditions. You could also lose control
of the vehicle. There is a risk of an accident.
Only operate the equipment when the traffic
situation permits. If you are not sure that this
is possible, park the vehicle paying attention
to traffic conditions and operate the equip-
ment when the vehicle is stationary.
You must observe the legal requirements for the
country in which you are currently driving when
operating the on-board computer.
PLUG-IN HYBRID vehicles only:
GWARNING
If the instrument cluster has failed or mal-
functioned, you may not recognize function
restrictions in systems relevant to safety. The
operating safety of your vehicle may be
impaired. There is a risk of an accident.
Pull over as soon as it is safe to do so and
consult a qualified specialist workshop.
All vehicles, except PLUG-IN HYBRID vehi-
cles:
GWARNING
If the instrument cluster has failed or mal-
functioned, you may not recognize function
restrictions in systems relevant to safety. The
operating safety of your vehicle may be
impaired. There is a risk of an accident.
Drive on carefully. Have the vehicle checked
at a qualified specialist workshop immedi-
ately.
If the operating safety of your vehicle is
impaired, pull over as soon as it is safe to do so.
Contact a qualified specialist workshop.
The on-board computer only shows messages or
warnings from certain systems in the multifunc-
tion display. You should therefore make sure
your vehicle is operating safely at all times.
For an overview, see the instrument panel illus- tration (
Ypage 33).
Displays and operation
Instrument cluster lighting
The light sensor in the instrument cluster auto-
matically controls the brightness of the multi-
function display. In daylight, the displays in the
instrument cluster are illuminated. A dimming
function is not possible in daylight.
The lighting in the instrument cluster, in the dis-plays and the controls in the vehicle interior can
be adjusted using the brightness control knob.
The brightness control is located between the
instrument cluster and the multimedia system
display (
Ypage 35).
XTurn the brightness control knob clockwise or
counter-clockwise.
If you turn the light switch (
Ypage 130) to the
T, ÃorL position, the brightness
will depend upon the brightness of the ambi-
ent light.
Tachometer
!
Do not drive in the overrevving range, as this
could damage the engine.
The red band in the tachometer indicates the
engine's overrevving range.
The fuel supply is interrupted to protect the
engine when the red band is reached.
PLUG-IN HYBRID vehicles: if you select the oper-
ating mode E-MODE, the display in the instru-
ment cluster changes from tachometer to power
meter (
Ypage 242).
256Displays and operation
On-board computer and displays
Page 328 of 438
RClose the lockablestowage spaces before
starting a journey.
RAlwa ys stow and secure heavy, hard, poin-
te d, sharp-edged, fragile or bulky objects in
the trunk.
Observe the loading guidelines (
Ypage 325).
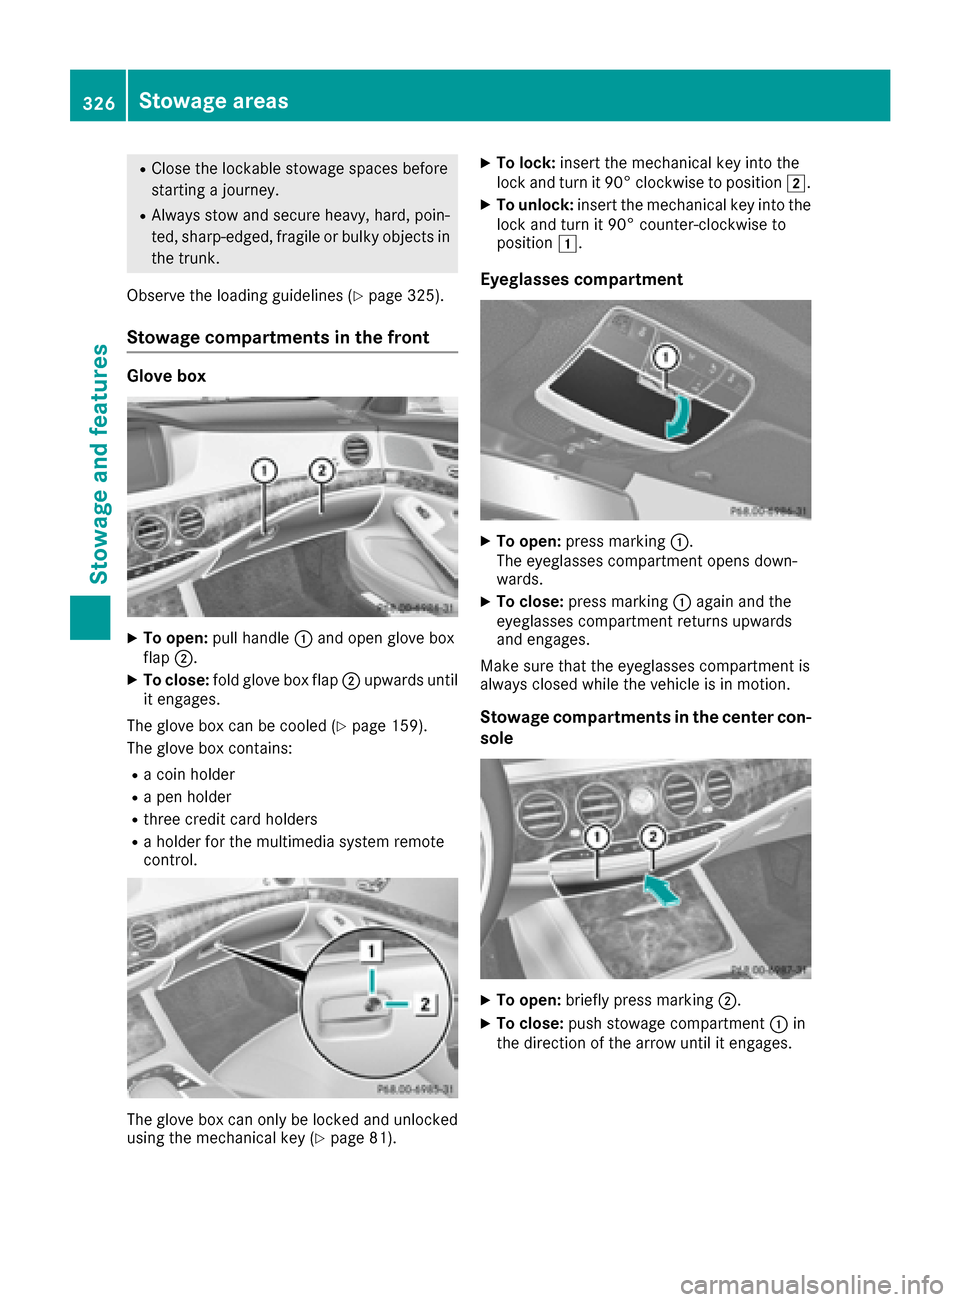
Stowage compartments in the front
Glove box
XTo open: pullhandle :and open glove box
flap ;.
XTo close: fold glove box flap ;upwards unt il
it engages.
The glove box can becooled (
Ypage 159).
The glove box contains:
Ra co inholder
Ra pen holder
Rthree cr editcard holders
Ra holder for the multimedia system remote
control.
The glove box can only be locked and unlocked
using the mechanical key (Ypage 81).
XTo lock: insert the mechanical key into the
lock and turn it 90° clockwise to position 2.
XTo unlock:insert the mechanical key into the
lock and turn it90° counter-clockwise to
position 1.
Eyeglasses compartment
XTo open: press marking :.
The eyeglasses compartment opens down-
wards.
XTo close: press marking :again and the
eyeglasses compartment returns upwards
and engages.
Make sure that the eyeglasses compartment is
always closed while the vehicle isin motion.
Stowage compartments in the center con-
sole
XTo open: briefly press marking ;.
XTo close:push stowage compartment :in
the direction of the arrow until it engages.
326Stowage areas
Stowage and features