2016 MERCEDES-BENZ GLS SUV fold seats
[x] Cancel search: fold seatsPage 21 of 397
Plastic trim (cleaning instruc-
tions)
.................................................. 343
Power closing ...................................... 88
Power windows
see Side windows
PRE-SAFE ®
(anticipatory occupant
protection)
Operation ......................................... 56
PRE-SAFE ®
(preventive occupant
safety system)
Display message ............................2 64
PRE-SAFE ®
PLUS (anticipatory
occupant protection PLUS)
Display message ............................ 265
Operation ......................................... 56
Protection against theft
ATA (Anti-Theft Alarm system) ......... 78
Immobiliser ...................................... 78
Interior motion sensor ..................... 80
Tow-away protection ........................ 79
Protection of the environment
General notes .................................. 26
Pulling away
Automatic transmission ................. 150
General notes ................................ 150
Hill start assist ............................... 151
Trailer ............................................ 151 Q
QR code Mercedes-Benz Guide App ................. 1
Rescue card ..................................... 31
Qualified specialist workshop ........... 30R
RACETIMER (on-board computer) .... 256
Radiator cover ................................... 333
Radio
Selecting a station ......................... 247
see separate operating instructions
Radio mode
See also Digital Owner's Manual ... 303
Radio-based vehicle components
Declaration of conformity ................ 28
Rain closing feature
Sliding sunroof ................................. 98 Rain closing feature (panorama
sliding sunroof)
................................... 99
Reading lamp ..................................... 125
Rear bench seat
Folding the bench seat forwards/back ............................................... 316
Rear compartment
Exit/entry position (3rd row of
seats) ............................................. 108
Setting the air vents ..................... .145
Setting the temperature ................ 136
Rear foglamp
Display message ............................ 270
Switching on/off ........................... 121
Rear seat
Adjusting ....................................... 107
Display message ............................ 287
Rear Seat Entertainment System
AUX jacks ...................................... 311
AUX jacks CD/DVD drive .............. 311
Rear window heating
Problem (fault) ............................... 138
Switching on/off ........................... 138
Rear window wiper
Replacing the wiper blade .............. 130
Switching on/off ........................... 129
Rear-compartment seat belt sta-
tus indicator ........................................ 47
Rear-view mirror
Anti-dazzle mode (automatic) ....... .117
Dipping (manual )........................... 116
Refuelling
Fuel gaug e....................................... 35
Important safety notes .................. 163
Notes for Mercedes‑AMG vehi-
cles ................................................ 383
Refuelling process ......................... 164
see Fuel
Remote control
Auxiliary heating/ventilation .......... 141
Changing the batteries (auxiliary
heating) ......................................... 143
Garage door opener ....................... 326
Programming (garage door
opener) .......................................... 326
Replacing bulbs
Dipped-beam headlamp s............... 127 18
Index
Page 22 of 397
Fitting/removing the cover (front
wheel arch) .................................... 127
General notes ................................ 126
Important safety notes .................. 126
Main-beam headlamp s................... 127
Overview of bulb types .................. 126
Turn signals (front) ......................... 128
Replacing the battery (auxiliary
heating remote control) .................... 143
Rescue card ......................................... 31
Reserve (fuel tank)
see Fuel
Reserve fuel
Display message ............................ 274
Warning lamp ................................. 298
Residual heat (climate control) ........ 140
Restraint system
Display message ............................ 267
Introduction ..................................... 42
Warning lamp ................................. 298
Warning lamp (function) ................... 43
Rev counter ........................................ 241
Reversing camera
Cleaning instructions ..................... 341
Display in the multimedia system .. 208
Function/note s............................. 207
Switching on/of f........................... 208
Reversing feature
Panorama sliding sunroo f................ 97
Roller sunblind s............................... 99
Side windows ................................... 93
Sliding sunroof ................................. 97
Tailgate ............................................ 90
Reversing lamp (display message) .. 270
Roller sunblind
Panorama sliding sunroo f................ 99
Roof carrier ........................................ 319
Roof lining and carpets (cleaning
instructions) ...................................... 344
Roof load (maximum) ........................ 387
Route (navigation)
see Route guidance (navigation)
Route guidance
See also Digital Owner's Manua l... 303
Route guidance (navigation) ............ 245 S
Safety Children in the vehicle ..................... 57
see Occupant safety
see Operating safety
Safety system
see Driving safety systems
SD card
Inserting ........................................ 311
Inserting/removing ........................ 311
Removing ....................................... 311
SD memory card
See also Digital Owner's Manua l... 303
Selecting ........................................ 247
Seat belt
Correct usage .................................. 45
Switching belt adjustment on/off
(on-board computer) ...................... 254
Seat belts
Adjusting the driver's and front-
passenger seat belt ......................... 46
Adjusting the height ......................... 46
Cleaning ......................................... 344
Display message ............................ 266
Fastening ......................................... 46
Important safety guidelines ............. 44
Introduction ..................................... 44
Rear seat belt status indicator ......... 47
Releasing ......................................... 46
Warning lamp ................................. 291
Warning lamp (function) ................... 46
Seats
Adjusting (electrically) ................... 104
Adjusting the 4-way lumbar sup-
port ................................................ 112
Adjusting the head restraint .......... 104
Calling up a stored setting (mem-
ory function) .................................. 119
Cleaning the cover ......................... 343
Correct driver's seat position ........ 102
Entry position (3rd row of seats) .... 109
Exit position (3rd row of seats) ...... 109
Folding down/up (3rd row of
seats) ............................................. 107
Folding the 2nd row of seats
forward electrically ........................ 111 Index
19
Page 23 of 397

Folding the 2nd row of seats
forward manually ........................... 108
Folding the rear bench seat for-
wards/back ................................... 315
Important safety notes .................. 102
Overview ........................................ 102
Seat heating problem .................... 113
Seat ventilation problem ................ 113
Storing settings (memory func-
tion) ............................................... 118
Switching seat heating on/off ....... 112
Switching the seat ventilation on/
off .................................................. 113
Section
Sliding sunroof ................................ .97
Selector lever
Cleaning ......................................... 343
Sensors (cleaning instructions) .......341
Service
see ASSYST PLUS
Service Centre
see Qualified specialist workshop
Service menu (on-board com-
puter) ................................................. .251
Service message
see ASSYST PLUS
Service products
AdBlue ®
special additive s.............. 384
Brake fluid ..................................... 386
Coolant (engine) ............................ 386
Engine oil ....................................... 385
Fuel ................................................ 382
Important safety notes .................. 381
Washer fluid ................................... 387
Setting the air distribution ............... 136
Setting the airflow ............................ 137
Setting the date/time format
See also Digital Owner's Manua l... 303
Setting the language
See also Digital Owner's Manua l... 303
Setting the time
See also Digital Owner's Manua l... 303
Settings
Factory (on-board computer) ......... 255
On-board compute r....................... 251
SETUP (on-board computer) ............. 256Side lamps
Switching on/of f........................... 121
Side marker lamp Display mes-
sage .................................................... 270
Side windows
Convenience closing ........................ 95
Convenience opening ...................... 95
Convenience opening/closing
(air-recirculation mode) ................. 139
Hinged side windows ....................... 94
Important safety notes .................... 93
Opening/closing .............................. 94
Overview .......................................... 93
Problem (malfunction) ..................... 96
Resetting ......................................... 96
Reversing feature ............................. 93
Sidebag ................................................ 49
SIM card
Inserting ........................................ 309
Sliding sunroof
Important safety information ........... 97
Opening/closing .............................. 98
Problem (malfunction) ................... 100
Rain closing feature ......................... 98
Resetting ......................................... 98
see Panorama sliding sunroof
SMS
See also Digital Owner's Manua l... 303
Snow chains
Information .................................... 364
Socket
Luggage compartment ................... 324
Sockets
Centre console .............................. 324
General notes ................................ 324
Rear compartment ......................... 324
Sound
Switching on/of f........................... 304
Specialist workshop ............................ 30
Spectacles compartment ................. 314
Speed limiter
Display message ............................ 281
Important safety notes .................. 182
Selecting ........................................ 183
Variable, activating ........................ 183
Speed, controlling
see Cruise control 20
Index
Page 44 of 397
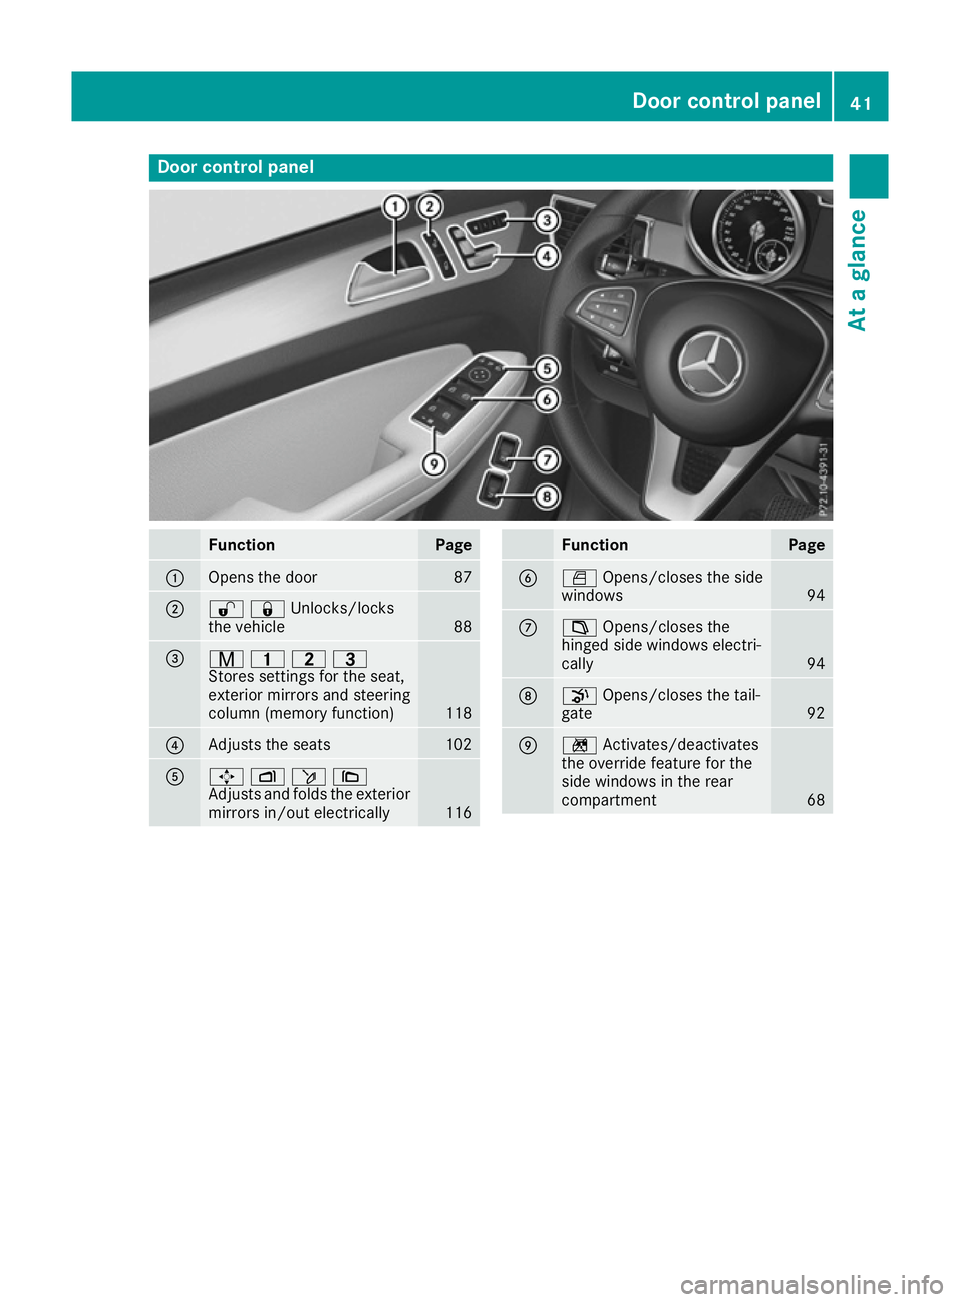
Door control panel
Function Page
:
Opens the door 87
;
%&Unlocks/locks
the vehicle
88
=
r
45=
Stores settings for the seat,
exterior mirrors and steering
column (memory function) 118
?
Adjusts the seats 102
A
7
Zö\
Adjusts and folds the exterior
mirrors in/out electrically 116 Function Page
B
W
Opens/closes the side
windows 94
C
±
Opens/closes the
hinged side windows electri-
cally 94
D
p
Opens/closes the tail-
gate 92
E
n
Activates/deactivates
the override feature for the
side windows in the rear
compartment 68Door control panel
41At a glance
Page 63 of 397
Before installing an ISOFIX child restraint sys-
tem on the second row of seats:
X Move the rear seat backrests in the second
row to an upright position (Y page 107).
X Install the ISOFIX child restraint system on
both ISOFIX securing rings :.
ISOFIX is a standardised securing system for
specially designed child restraint systems on
the rear seats.
Non-ISOFIX child seats may also be used and
can be installed using the vehicle's seat belt
system. When fitting a child restraint system, be sure to observe the manufacturer's installation
and operating instructions and the instructions
for correct use of the child restraint system
(Y page 62). Top Tether
Introduction Top Tether provides an additional connection
between the child restraint system secured with
ISOFIX and the vehicle. It helps reduce the risk
of injury even further. If the child restraint sys-
tem is fitted with a Top Tether belt, this should
always be used.
Important safety notes G
WARNING
If the rear seats or the rear seat backrests are not locked, they could fold forwards in the
event of an accident, heavy braking or sudden changes of direction. As a result, child
restraint systems cannot perform their inten-
ded protective function. Rear seats and rear
seat backrests that are not locked can also
cause additional injuries, e.g. in the event of
an accident. This poses an increased risk of
injury or even fatal injury.
Always lock the rear seats and rear seat
backrests after fitting a Top Tether belt.
Observe the lock verification indicator. Adjust the rear seat backrests so that they are in an
upright position.
Make sure that the backrest in the rear com-
partment engages fully. To do so, pull firmly on
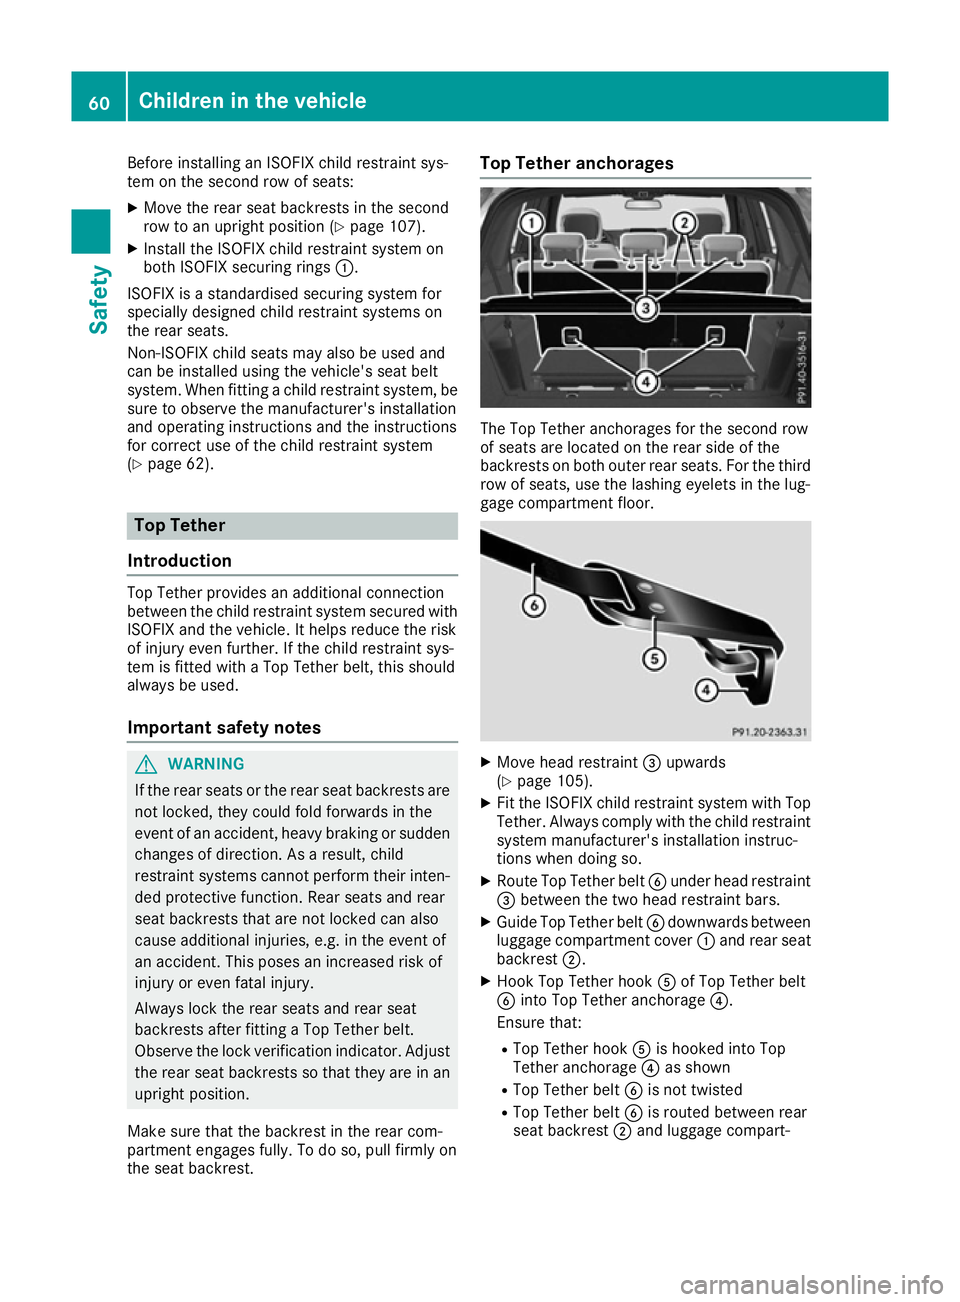
the seat backrest. Top Tether anchorages
The Top Tether anchorages for the second row
of seats are located on the rear side of the
backrests on both outer rear seats. For the third
row of seats, use the lashing eyelets in the lug-
gage compartment floor. X
Move head restraint =upwards
(Y page 105).
X Fit the ISOFIX child restraint system with Top
Tether. Always comply with the child restraint
system manufacturer's installation instruc-
tions when doing so.
X Route Top Tether belt Bunder head restraint
= between the two head restraint bars.
X Guide Top Tether belt Bdownwards between
luggage compartment cover :and rear seat
backrest ;.
X Hook Top Tether hook Aof Top Tether belt
B into Top Tether anchorage ?.
Ensure that:
R Top Tether hook Ais hooked into Top
Tether anchorage ?as shown
R Top Tether belt Bis not twisted
R Top Tether belt Bis routed between rear
seat backrest ;and luggage compart- 60
Children in the vehicleSafety
Page 106 of 397
G
WARNING
You could lose control of the vehicle while
driving if you:
R adjust the driver's seat, steering wheel or
mirrors
R fasten the seat belt
There is a risk of an accident.
Adjust the driver's seat, head restraint, steer-
ing wheel and mirrors and fasten your seat
belt before starting the engine. G
WARNING
If you adjust the seat height carelessly, you or other vehicle occupants could be trapped andthereby injured. Children in particular could
accidentally press the electrical seat adjust-
ment buttons and become trapped. There is a
risk of injury.
While moving the seats, make sure that your
hands or other body parts do not get under the
lever assembly of the seat adjustment sys-
tem. G
WARNING
The head restraints cannot provide the inten-
ded protection unless they are fitted and
adjusted correctly. There is an increased risk of injury to the head and neck in the event of
an accident or sudden braking, for example.
Always drive with the head restraints fitted.
Ensure that the centre of the head restraints
support the back of each vehicle occupant's
head at eye level before driving off. G
WARNING
The seat belt does not offer the intended level of protection if you have not moved the back-
rest to an almost vertical position. When brak-
ing or in the event of an accident, you could
slide underneath the seat belt and sustain
abdomen or neck injuries, for example. This
poses an increased risk of injury or even fatal injury.
Adjust the seat properly before beginning
your journey. Always ensure that the backrest is in an almost vertical position and that the
shoulder section of your seatbelt is routed
across the centre of your shoulder.
! To avoid damage to the seats and the seat
heating, observe the following information:
R do not spill any liquids on the seats. If liquid
is spilled on the seats, dry them as soon as possible.
R if the seat covers are damp or wet, do not
switch on the seat heating. The seat heat-
ing should also not be used to dry the seats.
R clean the seat covers as recommended;
see "Interior care".
R do not transport heavy loads on the seats.
Do not place sharp objects on the seat
cushions, e.g. knives, nails or tools. The
seats should only be occupied by passen-
gers, if possible.
R when the seat heating is in operation, do
not cover the seats with insulating materi-
als, e.g. blankets, coats, bags, seat covers,
child seats or booster seats.
! Make sure that there are no objects in the
footwell under or behind the seats when mov- ing the seats back. There is a risk that the
seats and/or the objects could be damaged.
i The head restraints cannot be removed from
the front seats. The rear-compartment head
restraints, however, can be removed
(Y page 106).
For more information, contact a qualified spe-
cialist workshop.
i Further related subjects:
R Luggage compartment enlargement (fold-
ing down the rear bench seat)
(Y page 315) Seats
103Seats, steering wheel and mirrors Z
Page 109 of 397
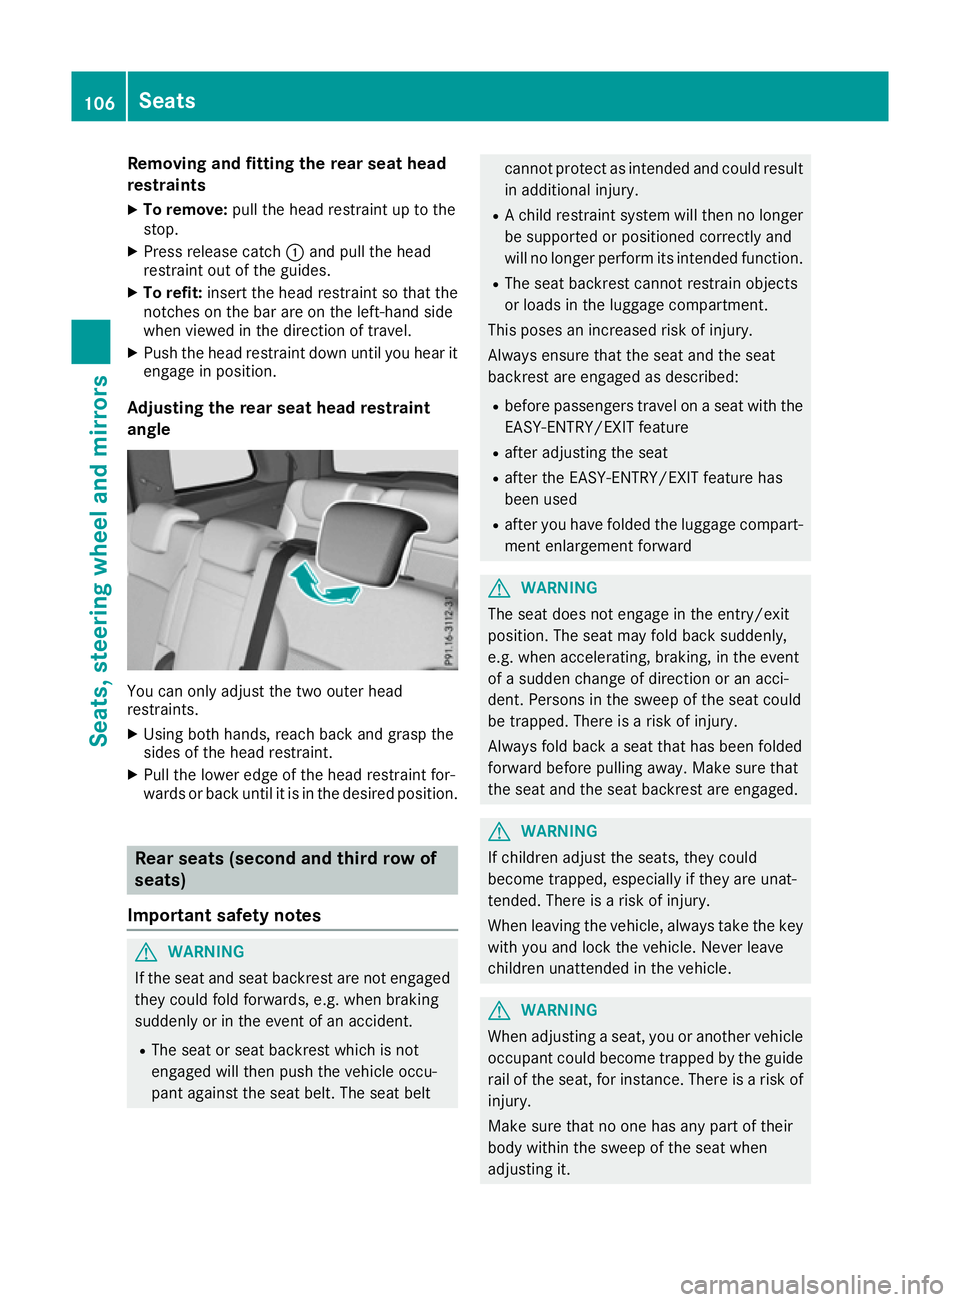
Removing and fitting the rear seat head
restraints
X To remove: pull the head restraint up to the
stop.
X Press release catch :and pull the head
restraint out of the guides.
X To refit: insert the head restraint so that the
notches on the bar are on the left-hand side
when viewed in the direction of travel.
X Push the head restraint down until you hear it
engage in position.
Adjusting the rear seat head restraint
angle You can only adjust the two outer head
restraints.
X Using both hands, reach back and grasp the
sides of the head restraint.
X Pull the lower edge of the head restraint for-
wards or back until it is in the desired position. Rear seats (second and third row of
seats)
Important safety notes G
WARNING
If the seat and seat backrest are not engaged they could fold forwards, e.g. when braking
suddenly or in the event of an accident.
R The seat or seat backrest which is not
engaged will then push the vehicle occu-
pant against the seat belt. The seat belt cannot protect as intended and could result
in additional injury.
R A child restraint system will then no longer
be supported or positioned correctly and
will no longer perform its intended function.
R The seat backrest cannot restrain objects
or loads in the luggage compartment.
This poses an increased risk of injury.
Always ensure that the seat and the seat
backrest are engaged as described:
R before passengers travel on a seat with the
EASY-ENTRY/EXIT feature
R after adjusting the seat
R after the EASY-ENTRY/EXIT feature has
been used
R after you have folded the luggage compart-
ment enlargement forward G
WARNING
The seat does not engage in the entry/exit
position. The seat may fold back suddenly,
e.g. when accelerating, braking, in the event
of a sudden change of direction or an acci-
dent. Persons in the sweep of the seat could
be trapped. There is a risk of injury.
Always fold back a seat that has been folded
forward before pulling away. Make sure that
the seat and the seat backrest are engaged. G
WARNING
If children adjust the seats, they could
become trapped, especially if they are unat-
tended. There is a risk of injury.
When leaving the vehicle, always take the key with you and lock the vehicle. Never leave
children unattended in the vehicle. G
WARNING
When adjusting a seat, you or another vehicle occupant could become trapped by the guiderail of the seat, for instance. There is a risk of
injury.
Make sure that no one has any part of their
body within the sweep of the seat when
adjusting it. 106
SeatsSeats, steering wheel and mirrors
Page 110 of 397
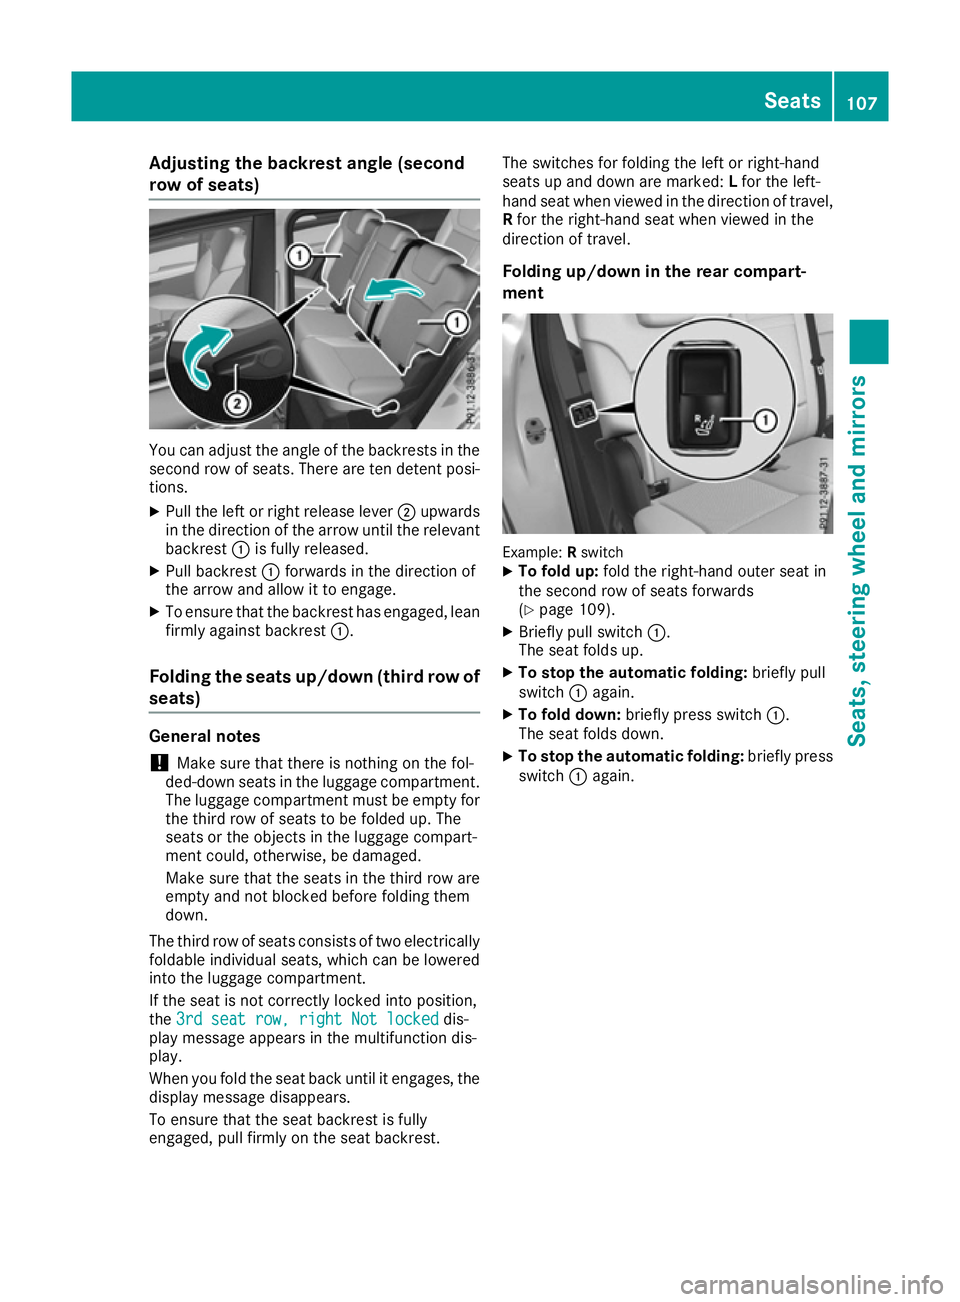
Adjusting the backrest angle (second
row of seats)
You can adjust the angle of the backrests in the
second row of seats. There are ten detent posi-
tions.
X Pull the left or right release lever ;upwards
in the direction of the arrow until the relevant
backrest :is fully released.
X Pull backrest :forwards in the direction of
the arrow and allow it to engage.
X To ensure that the backrest has engaged, lean
firmly against backrest :.
Folding the seats up/down (third row of seats) General notes
! Make sure that there is nothing on the fol-
ded-down seats in the luggage compartment.
The luggage compartment must be empty for
the third row of seats to be folded up. The
seats or the objects in the luggage compart-
ment could, otherwise, be damaged.
Make sure that the seats in the third row are
empty and not blocked before folding them
down.
The third row of seats consists of two electrically
foldable individual seats, which can be lowered
into the luggage compartment.
If the seat is not correctly locked into position,
the 3rd seat row, right Not locked 3rd seat row, right Not locked dis-
play message appears in the multifunction dis-
play.
When you fold the seat back until it engages, the display message disappears.
To ensure that the seat backrest is fully
engaged, pull firmly on the seat backrest. The switches for folding the left or right-hand
seats up and down are marked:
Lfor the left-
hand seat when viewed in the direction of travel,
R for the right-hand seat when viewed in the
direction of travel.
Folding up/down in the rear compart-
ment Example:
Rswitch
X To fold up: fold the right-hand outer seat in
the second row of seats forwards
(Y page 109).
X Briefly pull switch :.
The seat folds up.
X To stop the automatic folding: briefly pull
switch :again.
X To fold down: briefly press switch :.
The seat folds down.
X To stop the automatic folding: briefly press
switch :again. Seats
107Seats, steering wheel and mirrors Z