2016 MERCEDES-BENZ GLS SUV brakes
[x] Cancel search: brakesPage 227 of 397
G
WARNING
A course-correcting brake application cannot always prevent a collision. There is a risk of an
accident.
Always steer, brake or accelerate yourself,
especially if Active Blind Spot Assist warns
you or makes a course-correcting brake appli-
cation. Always maintain a safe distance at the sides.
If a course-correcting brake application occurs, red warning lamp :flashes in the exterior mir-
ror and a dual warning tone sounds. In addition, display underlining the danger of a side collision
appears in the multifunction display.
In very rare cases, the system may make an
inappropriate brake application. A course-cor-
recting brake application may be interrupted at any time if you steer slightly in the opposite
direction or accelerate.
The course-correcting brake application is avail-
able in the speed range between 30 km/h and
200 km/h.
Either a course-correcting brake application
appropriate to the driving situation, or none at
all, may occur in the following situations:
R there are vehicles or obstacles, e.g. crash
barriers, close to both sides of your vehicle
R a vehicle approaches too closely on the side
R you have adopted a sporty driving style with
high cornering speeds
R you brake or accelerate significantly
R a driving safety system engages, such as
ESP ®
or PRE-SAFE ®
Brake
R ESP ®
is deactivated
R the Offroad program is activated (vehicles
without the Off-Road Engineering package)
R the Offroad or Offroad Plus drive program is
activated (vehicles with the Off-Road Engi-
neering package)
R the LOW RANGE off-road gear is activated
(vehicles with the Off-Road Engineering pack-
age)
R a loss of tyre pressure or a defective tyre is
detected Activating Active Blind Spot Assist
X Make sure that Active Blind Spot Assist
(Y page 250) is activated in the on-board
computer.
X Turn the key to position 2in the ignition lock.
Warning lamps :in the exterior mirrors light
up red for approximately 1.5 seconds and
then turn yellow.
Towing a trailer
If you couple up a trailer, make sure that you
have correctly established the electrical con-
nection. This can be accomplished by checking
the trailer lighting. Active Blind Spot Assist is
then deactivated. The indicator lamps in the
exterior mirrors light up yellow and the Active
Active
Blind Spot Assist not available when Blind Spot Assist not available when
towing a trailer See Owner's Manual towing a trailer See Owner's Manual
message appears in the multifunction display.
Active Lane Keeping Assist General notes
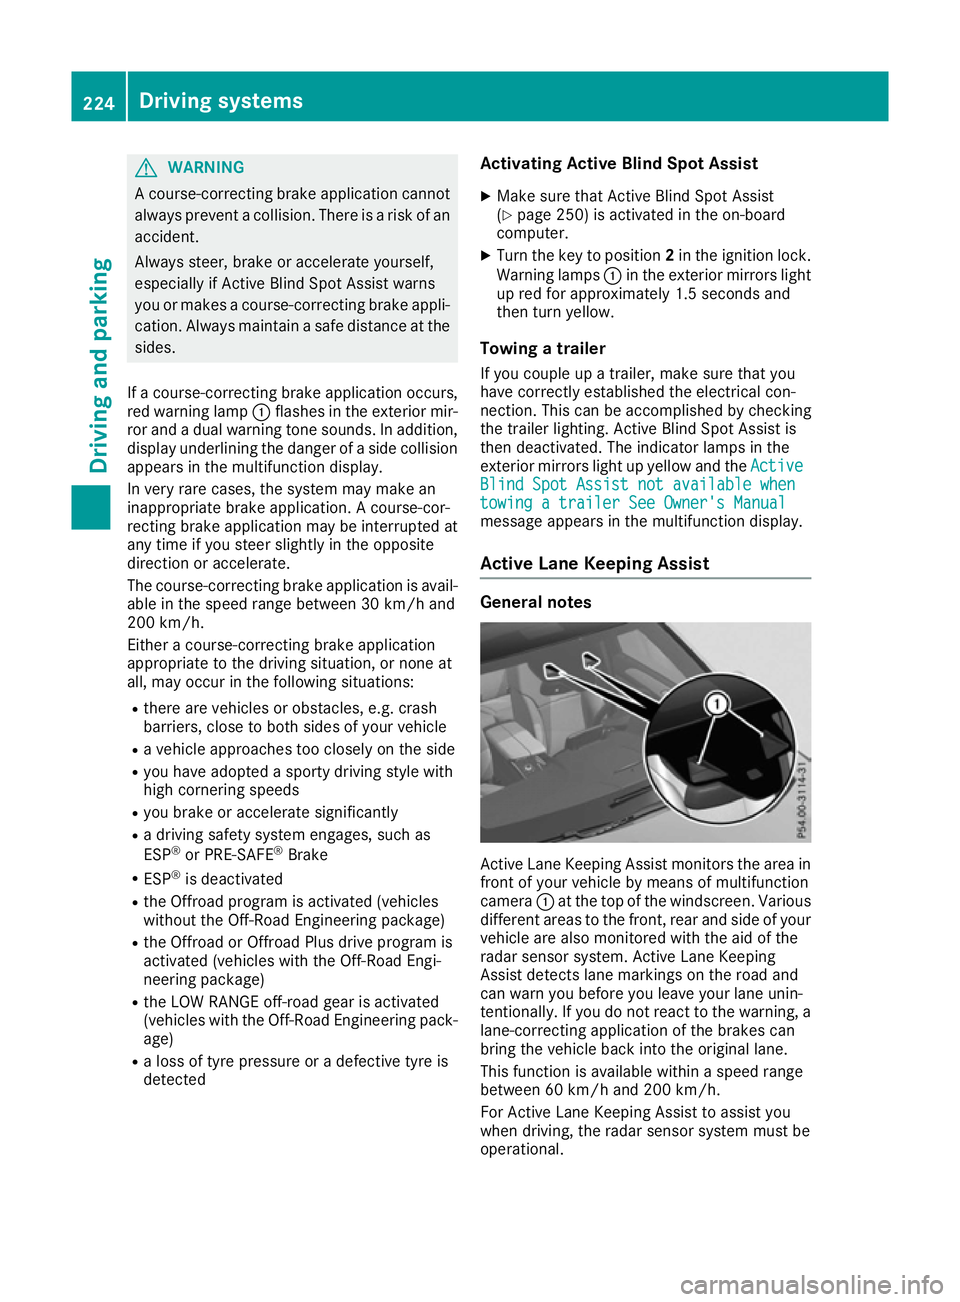
Active Lane Keeping Assist monitors the area in
front of your vehicle by means of multifunction
camera :at the top of the windscreen. Various
different areas to the front, rear and side of your vehicle are also monitored with the aid of the
radar sensor system. Active Lane Keeping
Assist detects lane markings on the road and
can warn you before you leave your lane unin-
tentionally. If you do not react to the warning, a
lane-correcting application of the brakes can
bring the vehicle back into the original lane.
This function is available within a speed range
between 60 km/h and 200 km/h.
For Active Lane Keeping Assist to assist you
when driving, the radar sensor system must be
operational. 224
Driving systemsDriving and parking
Page 230 of 397
R
you brake hard.
R you steer actively, e.g. swerve to avoid an
obstacle or change lane quickly.
R you cut the corner on a sharp bend.
Towing a trailer
If you couple up a trailer, make sure that you
have correctly established the electrical con-
nection. This can be accomplished by checking
the trailer lighting. Lane-correcting brake appli-
cation does not take place when towing a trailer.
Active Lane Keeping Assist is not activated and the lines in the assistance graphic are grey. Off-road driving systems
4MATIC (permanent all-wheel drive) 4MATIC ensures that all four wheels are perma-
nently driven. Together with ESP ®
and 4ETS, it
improves the traction of your vehicle whenever
a drive wheel spins due to insufficient grip.
If you fail to adapt your driving style, 4MATIC can
neither reduce the risk of an accident nor over-
ride the laws of physics. 4MATIC cannot take
account of road, weather and traffic conditions.
4MATIC is only an aid. You are responsible for
the distance to the vehicle in front, for vehicle
speed, for braking in good time and for staying in
lane.
! Never tow the vehicle with one axle raised.
This may damage the transfer case. Damage
of this sort is not covered by the Mercedes-
Benz implied warranty. All wheels must
remain either on the ground or be fully raised. Observe the instructions for towing the vehi-
cle with all wheels in full contact with the
ground.
! A function or performance test should only
be carried out on a twin-axle dynamometer.
Before you operate the vehicle on such a
dynamometer, please consult a qualified
workshop. You could otherwise damage the
drive train or the brake system.
i In wintry driving conditions, the maximum
effect of 4MATIC can only be achieved if you
use winter tyres (M+S tyres), with snow
chains if necessary.
Further information about "Driving off-road"
(Y page 176). DSR (Downhill Speed Regulation) General notes
DSR is an aid to assist you when driving down-
hill. It keeps the speed of travel at the speed
selected on the on-board computer. The steeper
the downhill gradient, the greater the DSR brak- ing effect on the vehicle. When driving on flat
stretches of road or on an uphill gradient, the
DSR braking effect is minimal or non-existent.
DSR controls the vehicle’s speed when it is acti-
vated and the transmission is in position D,Ror
N. By accelerating or braking, you can always
drive at a higher or a lower speed than that set
on the on-board computer.
Important safety notes G
WARNING
If the speed driven and the set speed deviate and you activate DSR on a slippery road sur-
face, the wheels may lose traction. This
increases the risk of skidding and having an
accident.
Before switching DSR on, please take into
consideration the road surface and the differ-
ence between driving speed and the set
speed.
If you fail to adapt your driving style, DSR can
neither reduce the risk of accident nor override the laws of physics. DSR cannot take account ofroad, weather and traffic conditions. DSR is only
an aid. You are responsible for the distance to
the vehicle in front, for vehicle speed, for brak-
ing in good time and for staying in lane.
You are always responsible for keeping control
of the vehicle and for assessing whether the
downhill gradient can be managed. DSR may not
always be able to keep to the set speed, depend-
ing on road surface and tyre conditions. Select a set speed suitable for the prevailing conditions
and when necessary, apply the brakes manually. Driving systems
227Driving and parking Z
Page 238 of 397
brake system and prevents the brakes from
overheating and wearing too quickly. If you need
additional braking, depress the brake pedal
repeatedly rather than continuously.
Driving tips If the trailer swings from side to side:
X Do not accelerate under any circumstances.
X Do not countersteer.
X Brake, if necessary.
R Maintain a greater distance to the vehicle in
front than when driving without a trailer.
R Avoid braking abruptly. If possible, brake gen-
tly at first to allow the trailer to run on. Then,
increase the braking force rapidly.
R The values given for gradient-climbing capa-
bilities from a standstill refer to sea level.
When driving in mountainous areas, note that
the power output of the engine, and conse-
quently the vehicle's gradient-climbing capa-
bility from a standstill, decrease with increas- ing altitude. Swivelling the ball coupling out/in
Using the switch in the driver's door G
WARNING
If the ball coupling is not engaged, the trailer
may come loose. There is a risk of an accident. Make sure that the ball coupling is securely
engaged and locked in position.
! Do not attempt to speed the up the swing-
out procedure by applying additional pressure
with your foot. The system could otherwise be
mechanically damaged.
In order to tow a trailer with your vehicle, you
must swing out the ball coupling using the
switch in the driver's door or in the tailgate.
The trailer socket is integrated into the ball cou- pling and swivels out with it.
Release the ball coupling only when the swivel
range is unobstructed. Swivelling out:
X Make sure that the vehicle is stationary.
X Shift the transmission to position P.
X Switch the ignition on.
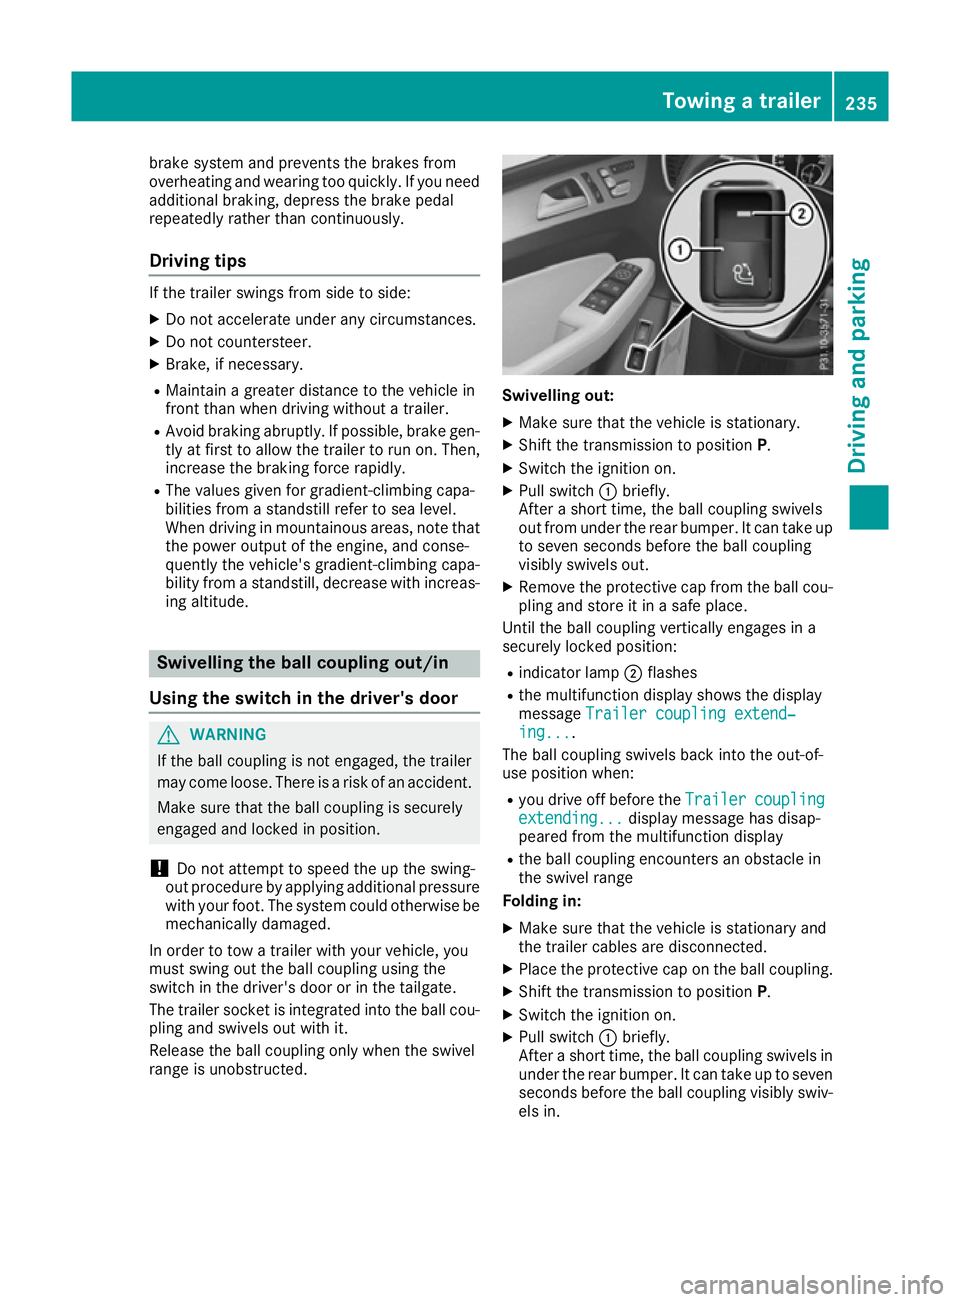
X Pull switch :briefly.
After a short time, the ball coupling swivels
out from under the rear bumper. It can take up to seven seconds before the ball coupling
visibly swivels out.
X Remove the protective cap from the ball cou-
pling and store it in a safe place.
Until the ball coupling vertically engages in a
securely locked position:
R indicator lamp ;flashes
R the multifunction display shows the display
message Trailer coupling extend‐ Trailer coupling extend‐
ing...
ing... .
The ball coupling swivels back into the out-of-
use position when:
R you drive off before the Trailer
Trailercoupling
coupling
extending...
extending... display message has disap-
peared from the multifunction display
R the ball coupling encounters an obstacle in
the swivel range
Folding in:
X Make sure that the vehicle is stationary and
the trailer cables are disconnected.
X Place the protective cap on the ball coupling.
X Shift the transmission to position P.
X Switch the ignition on.
X Pull switch :briefly.
After a short time, the ball coupling swivels in under the rear bumper. It can take up to seven
seconds before the ball coupling visibly swiv- els in. Towing a trailer
235Driving and parking Z
Page 340 of 397
Displaying service messages
X Switch the ignition on.
X Press the =or; button on the steering
wheel to select the Serv.
Serv.menu.
X Press the 9or: button to select the
ASSYST
ASSYST PLUS
PLUSsubmenu and confirm by press-
ing the abutton.
The service due date appears in the multi-
function display. Information about service
Resetting the ASSYST PLUS service
interval display !
If the ASSYST PLUS service interval display
has been inadvertently reset, this setting can
be corrected at a qualified specialist work-
shop.
Have service work carried out as described in the Service Booklet. This may otherwise lead
to increased wear and damage to the major
assemblies or the vehicle.
A qualified specialist workshop, e.g. a
Mercedes-Benz Service Centre, will reset the
ASSYST PLUS service interval display after the
service work has been carried out. You can also
obtain further information on maintenance
work, for example.
Special service requirements The prescribed service interval is based on nor-
mal operation of the vehicle. Service work will
need to be performed more often if the vehicle is
operated under arduous conditions or increased loads, for example:
R regular city driving with frequent intermediate
stops
R if the vehicle is primarily used to travel short
distances
R for frequent operation in mountainous terrain
or on poor road surfaces
R if the engine is often left idling for long periods
In these or similar operating conditions, have,
for example, the air filter, engine oil and oil filter changed more frequently. The tyres must be
checked more frequently if the vehicle is oper-
ated under increased loads. Further informationcan be obtained at a qualified specialist work-
shop, e.g. a Mercedes-Benz Service Centre. Driving abroad An extensive Mercedes-Benz Service network is
also available in other countries. You can obtain further information from any Mercedes-Benz
Service Centre. Care
General notes
H
Environmental note
Dispose of empty packaging and cleaning
cloths in an environmentally responsible man-
ner.
! For cleaning your vehicle, do not use any of
the following:
R dry, rough or hard cloths
R abrasive cleaning agents
R solvents
R cleaning agents containing solvents
Do not scrub.
Do not touch the surfaces or protective films
with hard objects, e.g. a ring or ice scraper.
You could otherwise scratch or damage the
surfaces and protective film.
! Do not park up your vehicle for a long period
of time immediately after cleaning, particu-
larly after cleaning the wheel rim with wheel
cleaner. Wheel cleaner may lead to increased corrosion of the brake discs and pads. You
should therefore drive for a few minutes after
cleaning. By heating up the brakes, the brake
discs and pads dry. The vehicle can then be
parked up for a long period of time.
Regular care of your vehicle is a condition for
retaining quality in the long term.
Use care products and cleaning agents recom-
mended and approved by Mercedes-Benz. Care
337Maintenance and care Z
Page 341 of 397
Washing the vehicle and cleaning the
paintwork
Automatic car wash G
WARNING
Braking efficiency is reduced after the vehicle has been washed. There is a risk of an acci-
dent.
After washing the vehicle, brake carefully
while paying attention to the traffic conditions in order to restore full braking efficiency.
! Before driving into an automatic car wash,
make sure that it is suitable for the dimen-
sions of the vehicle. In particular, make sure
that:
R there is enough ground clearance between
the vehicle underbody and the guide rails of the automatic car wash.
R the clearance width of the automatic car
wash is sufficient, particularly the width of
the guide rails
R you enter the automatic car wash straight
and in the centre of the guide rails in order
to avoid damaging the tyres or wheel rims.
Fold in the exterior mirrors before the vehicle is washed. The exterior mirrors could other-
wise be damaged.
! When DISTRONIC PLUS or the HOLD func-
tion is activated, the vehicle brakes automat- ically in certain situations.
To avoid damage to the vehicle, deactivate
DISTRONIC PLUS and the HOLD function in
the following or similar situations:
R when towing away
R in a car wash
! Make sure that:
R the side windows and sliding sunroof are
closed completely.
R the blower for the ventilation/heating is
switched off (OFF button is depressed).
R the windscreen wiper switch is at position
0.
The vehicle could otherwise be damaged.
! In car washes with a towing mechanism,
make sure that the automatic transmission is in transmission position N, otherwise the
vehicle could be damaged. R
Vehicles with a key:
do not remove the key from the ignition
lock. Do not open the driver's door or front-
passenger door when the engine is
switched off. Otherwise, the automatic
transmission selects park position Pauto-
matically and locks the wheels. You can
prevent this by shifting the automatic trans- mission to Nbeforehand.
R Vehicles with KEYLESS-GO:
do not open the driver's door or front-
passenger door when the engine is
switched off. Otherwise, the automatic
transmission selects park position Pauto-
matically and locks the wheels.
Observe the following to make sure that the
automatic transmission stays in position N:
X Make sure the vehicle is stationary and the
ignition is switched off.
X Turn the key to position 2in the ignition lock
(Y page 148).
Use the key instead of the Start/Stop button on vehicles with KEYLESS-GO.
X Depress the brake pedal and keep it
depressed.
X Shift the automatic transmission to position
N.
X Release the brake pedal.
X Release the electric parking brake.
X Switch off the ignition and leave the key in the
ignition lock.
You can wash the vehicle in an automatic car
wash from the very start.
If the vehicle is very dirty, wash off excess dirt
before cleaning the vehicle in an automatic car
wash.
After using an automatic car wash, wipe off the
wax from the windscreen and the windscreen
wiper blades. This will prevent smears and
reduce wiping noises caused by residue on the
windscreen.
Washing by hand In some countries, washing by hand is only
allowed at specially equipped washing bays.
Observe the legal requirements for each indi-
vidual country.
X Do not use hot water and do not wash the
vehicle in direct sunlight.
X Use a soft sponge to clean. 338
CareMaintenance and care
Page 343 of 397
These notes also apply to light-alloy wheels with
a clear matt finish.
i The vehicle should preferably be washed by
hand using a soft sponge, car shampoo and
plenty of water.
i Use only insect remover and car shampoo
from the range of recommended and
approved Mercedes-Benz care products. Cleaning vehicle parts
Cleaning the wheels G
WARNING
The water jet of circular-jet nozzles (dirt grind- ers) can cause damage not visible from the
outside to tyres or chassis components. Com-
ponents damaged in this way can unexpect-
edly fail. There is a risk of an accident.
Do not use high-pressure cleaners with circu-
lar-jet nozzles to clean the vehicle. Have dam- aged tyres or chassis components replaced
immediately.
! Do not use acidic wheel cleaning products
to remove brake dust. This could damage
wheel bolts and brake components.
! Do not park up your vehicle for a long period
of time immediately after cleaning, particu-
larly after cleaning the wheel rim with wheel
cleaner. Wheel cleaner may lead to increased corrosion of the brake discs and pads. You
should therefore drive for a few minutes after
cleaning. By heating up the brakes, the brake
discs and pads dry. The vehicle can then be
parked up for a long period of time.
Cleaning the windows G
WARNING
If the windscreen wipers are set in motion
when cleaning the windscreen or wiper
blades, you could become trapped. There is a danger of injury.
Always switch off the windscreen wipers and
the ignition before cleaning the windscreen or wiper blades. !
Do not use dry cloths, abrasive cleaning
agents, solvents or solvent-based cleaning
agents to clean the inside of the windows/
windscreen. Do not touch the inside of the
windows/windscreen with hard items such
as an ice scraper or a ring. Otherwise, the
windows/windscreen could be damaged.
! Clean the water drainage channels of the
windscreen and the rear window at regular
intervals. Deposits such as leaves, petals and
pollen may under certain circumstances pre-
vent water from draining away. This can lead
to corrosion damage and damage to elec-
tronic components.
X Clean the inside and outside of the windows
with a damp cloth and a cleaning agent that is
recommended and approved by Mercedes-
Benz.
Cleaning the wiper blades G
WARNING
If the windscreen wipers are set in motion
when cleaning the windscreen or wiper
blades, you could become trapped. There is a danger of injury.
Always switch off the windscreen wipers and
the ignition before cleaning the windscreen orwiper blades.
! Do not pull on the wiper blade. Otherwise,
the wiper blade could be damaged.
! Do not clean wiper blades too often and do
not rub them too hard. Otherwise, the graph-
ite coating could be damaged. This could
cause wiper noise.
! Hold the wiper arm securely when folding
back. The windscreen could be damaged if
the wiper arm hits against it suddenly.
X Fold the wiper arms away from the wind-
screen (Y page 129).
X Clean the wiper blades carefully using a damp
cloth.
X Fold the windscreen wipers back again before
switching on the ignition. 340
CareMaintenance and care
Page 359 of 397
X
Connect negative terminal ?of donor battery Bto earth point Aof your vehicle using the jump
lead, connecting the jump lead to donor battery Bfirst.
X Start the engine.
X Before disconnecting the jump leads, let the engines run for several minutes.
X First, remove the jump leads from earth point Aand negative terminal ?, then from positive
clamp ;and positive terminal =. Each time, begin at the contacts on your own vehicle first.
X After removing the jump leads, close cover :of positive terminal clamp ;.
X Have the battery checked at a qualified specialist workshop.
Jump-starting is not considered to be a normal operating condition.
i Jump-starting cables and further information regarding jump-starting can be obtained at any
qualified specialist workshop. Towing away and tow-starting
Important safety notes
G
WARNING
Safety-relevant functions are restricted or not
available if:
R the engine is not running.
R the brake system or the power steering is
malfunctioning
R the voltage supply or the vehicle's electrical
system is malfunctioning.
If your vehicle is towed, significantly greater
force may be required to steer the vehicle or
to brake. There is a risk of an accident.
In such circumstances, use a towing bar.
Make sure that the steering is moving freely
before towing. G
WARNING
When towing or tow-starting another vehicle
and its weight is greater than the permissible gross weight of your vehicle, the:
R towing eye may be torn off
R car/trailer combination may swerve or
even overturn
There is a risk of an accident.
When towing or tow-starting another vehicle,
its weight should not be greater than the per- missible gross weight of your vehicle. Details on the permissible gross vehicle weight
of your vehicle can be found on the vehicle iden-
tification plate (Y page 380).
! When Active Brake Assist, Distance Pilot
DISTRONIC or the HOLD function is activated, the vehicle brakes automatically in certain
situations.
To avoid damage to the vehicle, deactivate
these systems in the following or similar sit-
uations:
R when towing away
R in a car wash
! Make sure that the electric parking brake is
released. If the electric parking brake is faulty, visit a qualified specialist workshop.
! Only secure the tow cable or tow bar to the
towing eyes or, if available, to the trailer tow
hitch. You could otherwise damage the vehi-
cle.
! Observe the following points when towing
with a tow rope:
R Secure the tow rope on the same side on
both vehicles.
R Make sure that the tow rope is not longer
than legally permitted. Mark the tow rope in
the middle, e.g. with a white cloth
(30 x 30 cm). This will make other road
users aware that a vehicle is being towed.
R Only secure the tow cable to the towing
eyes or, if available, to the trailer tow hitch.
R Observe the brake lamps of the towing
vehicle while driving. Always maintain a dis- 356
Towing away and tow-startingBreakdown assistance
Page 364 of 397
Important safety notes
G
WARNING
If wheels and tyres of the wrong size are used, the wheel brakes or suspension components
may be damaged. There is a risk of an acci-
dent.
Always replace wheels and tyres with those
that fulfil the specifications of the original
part.
When replacing wheels, make sure to fit the
correct:
R designation
R type
When replacing tyres, make sure to fit the
correct:
R designation
R manufacturer
R type G
WARNING
A flat tyre severely impairs the driving, steer-
ing and braking characteristics of the vehicle.
There is a risk of accident.
Tyres without run-flat characteristics:
R do not drive with a flat tyre.
R immediately replace the flat tyre with your
emergency spare wheel or spare wheel, or
consult a qualified specialist workshop.
Tyres with run-flat characteristics:
R pay attention to the information and warn-
ing notices on MOExtended tyres (tyres
with run-flat characteristics).
Accessories that are not approved for your vehi-
cle by Mercedes-Benz or are not being used cor- rectly can impair operating safety.
Before purchasing and using non-approved
accessories, visit a qualified specialist work-
shop and enquire about:
R suitability
R legal stipulations
R factory recommendations Further information regarding wheels and tyres
can be found under "Wheel/tyre combinations"
(Y page 374).
You can ask for information regarding permitted
wheel/tyre combinations at a Mercedes-Benz
Service Centre.
Information on tyre pressure can be found:
R in the tyre pressure table in the fuel filler flap
R in the "Tyre pressure" section
Modification work on the brake system and
wheels is not permitted. The use of spacers or
brake dust shields is not permitted. This inva-
lidates the general operating permit for the vehi- cle.
i Further information on wheels and tyres can
be obtained at any qualified specialist work-
shop. Operation
Information on driving
Check the tyre pressures when the vehicle is
heavily laden and adjust prior to a trip.
While driving, pay attention to vibrations, noises
and unusual handling characteristics, e.g. pull-
ing to one side. This may indicate that the
wheels or tyres are damaged. If you suspect that a tyre is defective, reduce your speed immedi-
ately. Stop the vehicle as soon as possible to
check the wheels and tyres for damage. Hidden tyre damage could also be causing the unusual
handling characteristics. If you find no signs of
damage, have the tyres and wheels checked at a
qualified specialist workshop.
When parking your vehicle, make sure not to
squash the tyre sidewalls. If it is necessary to
drive over kerbs, speed humps or similar eleva- tions, try to do so slowly and at an obtuse angle.
Otherwise, the tyres, particularly the sidewalls,
may be damaged. Regular checking of wheels and tyres
G
WARNING
Damaged tyres can cause tyre inflation pres-
sure loss. As a result, you could lose control of your vehicle. There is a risk of accident. Operation
361Wheels and ty res
Z