2016 MERCEDES-BENZ GLS SUV washer fluid
[x] Cancel search: washer fluidPage 23 of 397

Folding the 2nd row of seats
forward manually ........................... 108
Folding the rear bench seat for-
wards/back ................................... 315
Important safety notes .................. 102
Overview ........................................ 102
Seat heating problem .................... 113
Seat ventilation problem ................ 113
Storing settings (memory func-
tion) ............................................... 118
Switching seat heating on/off ....... 112
Switching the seat ventilation on/
off .................................................. 113
Section
Sliding sunroof ................................ .97
Selector lever
Cleaning ......................................... 343
Sensors (cleaning instructions) .......341
Service
see ASSYST PLUS
Service Centre
see Qualified specialist workshop
Service menu (on-board com-
puter) ................................................. .251
Service message
see ASSYST PLUS
Service products
AdBlue ®
special additive s.............. 384
Brake fluid ..................................... 386
Coolant (engine) ............................ 386
Engine oil ....................................... 385
Fuel ................................................ 382
Important safety notes .................. 381
Washer fluid ................................... 387
Setting the air distribution ............... 136
Setting the airflow ............................ 137
Setting the date/time format
See also Digital Owner's Manua l... 303
Setting the language
See also Digital Owner's Manua l... 303
Setting the time
See also Digital Owner's Manua l... 303
Settings
Factory (on-board computer) ......... 255
On-board compute r....................... 251
SETUP (on-board computer) ............. 256Side lamps
Switching on/of f........................... 121
Side marker lamp Display mes-
sage .................................................... 270
Side windows
Convenience closing ........................ 95
Convenience opening ...................... 95
Convenience opening/closing
(air-recirculation mode) ................. 139
Hinged side windows ....................... 94
Important safety notes .................... 93
Opening/closing .............................. 94
Overview .......................................... 93
Problem (malfunction) ..................... 96
Resetting ......................................... 96
Reversing feature ............................. 93
Sidebag ................................................ 49
SIM card
Inserting ........................................ 309
Sliding sunroof
Important safety information ........... 97
Opening/closing .............................. 98
Problem (malfunction) ................... 100
Rain closing feature ......................... 98
Resetting ......................................... 98
see Panorama sliding sunroof
SMS
See also Digital Owner's Manua l... 303
Snow chains
Information .................................... 364
Socket
Luggage compartment ................... 324
Sockets
Centre console .............................. 324
General notes ................................ 324
Rear compartment ......................... 324
Sound
Switching on/of f........................... 304
Specialist workshop ............................ 30
Spectacles compartment ................. 314
Speed limiter
Display message ............................ 281
Important safety notes .................. 182
Selecting ........................................ 183
Variable, activating ........................ 183
Speed, controlling
see Cruise control 20
Index
Page 27 of 397
Leaving parked up .........................1
71
Locking (in an emergency) .............. .89
Locking (key) ................................... 81
Lowering ........................................ 373
Operating safety .............................. 27
Parking .......................................... 168
Pulling away ................................... 150
Raising ........................................... 371
Registration ..................................... 30
Securing from rolling away ............ 370
Towing away .................................. 356
Transporting .................................. 358
Unlocking (in an emergency) ........... 89
Unlocking (key) ................................ 81
Vehicle data ................................... 387
Vehicle battery
see Battery (vehicle)
Vehicle data ....................................... 387
Vehicle data (off-road driving)
Approach/departure angle ............ 389
Fording depth ................................ 388
Maximum gradient climbing abil-
ity .................................................. 389
Vehicle dimensions ........................... 387
Vehicle emergency locking ................ 89
Vehicle identification number
see VIN
Vehicle identification plate .............. 380
Vehicle level
AIRMATIC ...................................... 198
Vehicle level (display message) ....... 275
Vehicle tool kit .................................. 345
Video
Operating the DVD ......................... 247
See also Digital Owner's Manua l... 303
VIN ...................................................... 380
Seat ............................................... 381
Type plate ...................................... 380 W
Warning and indicator lamps ABS ................................................ 293
Brakes ........................................... 292
Distance Pilot DISTRONIC ............. 301
Distance warning signal ................. 301
ESP ®
.............................................. 295
ESP ®
OFF ....................................... 296 Fuel tank ........................................ 298
LIM (cruise control) ........................ 181
LIM (Distance Pilot DISTRONIC) .... 185
LIM (variable limiter) ...................... 183
Overview .......................................... 35
Parking brake ................................ 298
PASSENGER AIR BAG ...................... 43
Reserve fue l................................... 298
Seat belt ........................................ 291
Tyre pressure monitor ................... 302
Warning triangle ................................ 345
Washer fluid
Display message ............................ 289
Weather display (COMAND Online)
See also Digital Owner's Manua l... 303
Wheel and tyre combinations
Tyres .............................................. 374
Wheel bolt tightening torque ........... 373
Wheel chock ...................................... 370
Wheels
Changing a wheel .......................... 369
Changing/replacing ....................... 369
Checking ........................................ 361
Cleaning ......................................... 340
Emergency spare wheel ................. 375
Fitting a new wheel ........................ 372
Fitting a wheel ............................... 370
Important safety notes .................. 361
Information on driving .................... 361
Overview ........................................ 361
Removing a wheel .......................... 372
Snow chains .................................. 364
Storing ........................................... 370
Tightening torque ........................... 373
Wheel size/tyre size ...................... 374
Windowbag
Display message ............................ 267
Operation ......................................... 49
Windows
Cleaning ......................................... 340
see Side windows
Windscreen
Demisting ...................................... 137
Windscreen washer fluid
see Windscreen washer system
Windscreen washer system
Important safety notes .................. 387
Topping up ..................................... 336 24
Index
Page 131 of 397

X
Simultaneously press bulb holder ;and pull
lever =downwards.
X Press on housing cover :and turn it to the
right. Turn signals
X
Switch off the lights.
X Open the bonnet.
X Turn housing cover :anti-clockwise and
remove it.
X Turn bulb holder ;anti-clockwise and pull
out.
X Pull the bulb out of bulb holder ;.
X Insert new bulb into bulb holder ;.
X Insert bulb holder ;and turn it clockwise.
X Press on housing cover :and turn it to the
right. Windscreen wipers
Switching the windscreen wipers on/
off
! Do not operate the windscreen wipers when
the windscreen is dry, as this could damage
the wiper blades. Moreover, dust that has col-
lected on the windscreen can scratch the
glass if wiping takes place when the wind-
screen is dry.
If it is necessary to switch on the windscreen wipers in dry weather conditions, always
operate them using washer fluid.
! If the windscreen wipers leave smears on
the windscreen after the vehicle has been
washed in an automatic car wash, this may be
due to wax or other residue. Clean the wind- screen with washer fluid after an automatic
car wash.
! Intermittent wiping with rain sensor: due to
optical influences and the windscreen becom-
ing dirty in dry weather conditions, the wind-
screen wipers may be activated inadvertently. This could damage the windscreen wiper
blades or scratch the windscreen.
For this reason, you should always switch off
the windscreen wipers in dry weather. Combination switch
1 $ Windscreen wipers off
2 Ä Intermittent wipe, low (rain sensor set
to low sensitivity)
3 Å Intermittent wipe, high (rain sensor
set to high sensitivity)
4 ° Continuous wipe, slow
5 ¯ Continuous wipe, fast
B í Single wipe
C î Wipes with washer fluid
X Turn the key to position 1or 2in the ignition
lock (Y page 148).
X Turn the combination switch to the corre-
sponding position.
In the ÄorÅ position, the appropriate
wiping frequency is set automatically according to the intensity of the rain. In the Åposition,
the rain sensor is more sensitive than in the
Ä position, causing the windscreen wiper to
wipe more frequently.
Vehicles with MAGIC VISION CONTROL: the
washer fluid is fed through the wiper blades and when wiping with washer fluid îthe washer
fluid is emitted directly from the blades.
If the wiper blades are worn, the windscreen will
no longer be wiped properly. This could mean
you are unable to observe the traffic conditions. 128
Windscreen wipersLights and windscreen wipers
Page 132 of 397
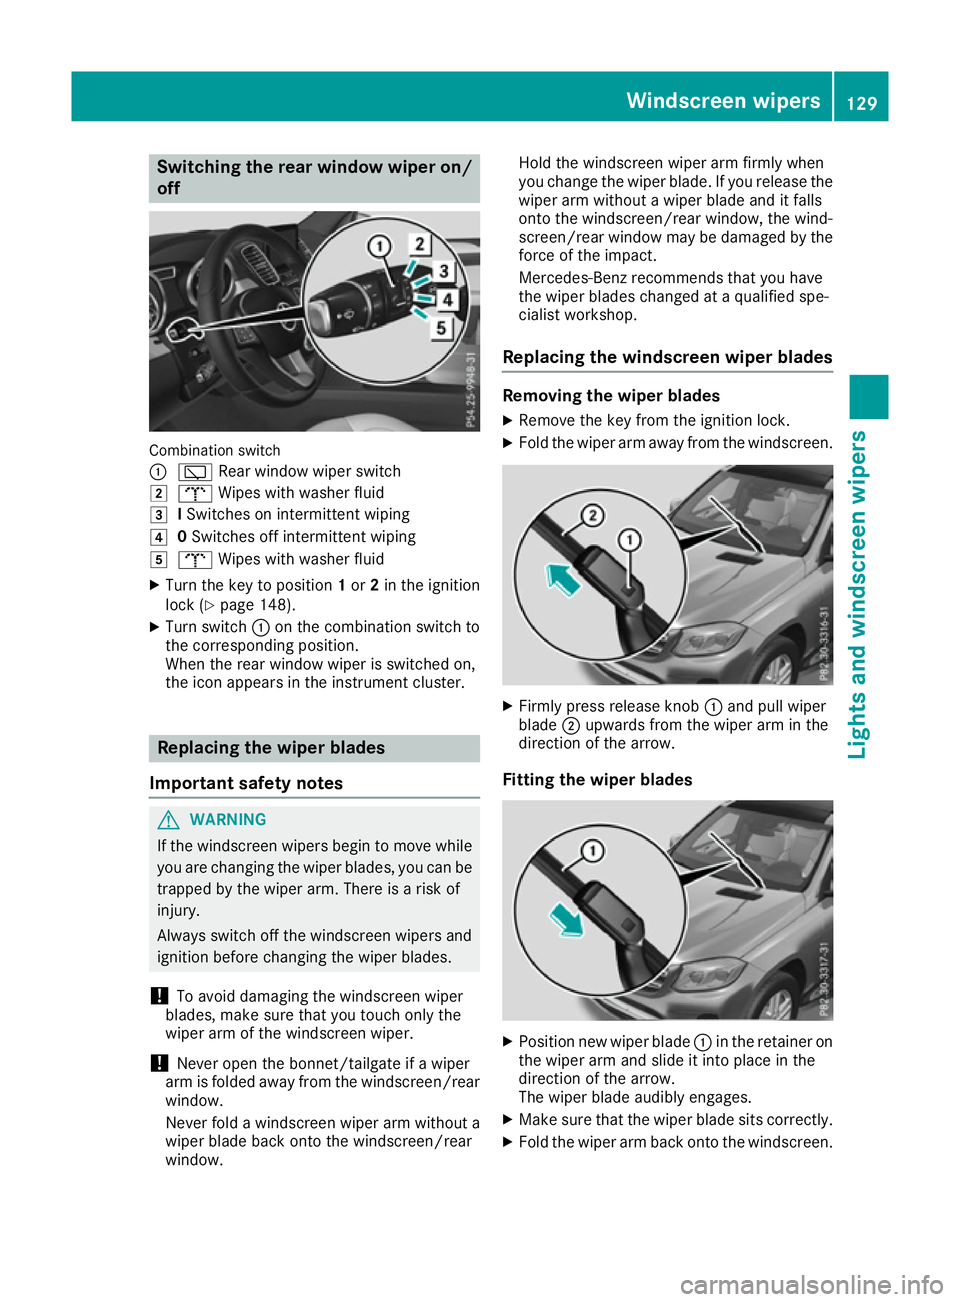
Switching the rear window wiper on/
off Combination switch
:
è Rear window wiper switch
2 b Wipes with washer fluid
3 ISwitches on intermittent wiping
4 0Switches off intermittent wiping
5 b Wipes with washer fluid
X Turn the key to position 1or 2in the ignition
lock (Y page 148).
X Turn switch :on the combination switch to
the corresponding position.
When the rear window wiper is switched on,
the icon appears in the instrument cluster. Replacing the wiper blades
Important safety notes G
WARNING
If the windscreen wipers begin to move while
you are changing the wiper blades, you can be trapped by the wiper arm. There is a risk of
injury.
Always switch off the windscreen wipers and
ignition before changing the wiper blades.
! To avoid damaging the windscreen wiper
blades, make sure that you touch only the
wiper arm of the windscreen wiper.
! Never open the bonnet/tailgate if a wiper
arm is folded away from the windscreen/rear
window.
Never fold a windscreen wiper arm without a
wiper blade back onto the windscreen/rear
window. Hold the windscreen wiper arm firmly when
you change the wiper blade. If you release the
wiper arm without a wiper blade and it falls
onto the windscreen/rear window, the wind-
screen/rear window may be damaged by the
force of the impact.
Mercedes-Benz recommends that you have
the wiper blades changed at a qualified spe-
cialist workshop.
Replacing the windscreen wiper blades Removing the wiper blades
X Remove the key from the ignition lock.
X Fold the wiper arm away from the windscreen. X
Firmly press release knob :and pull wiper
blade ;upwards from the wiper arm in the
direction of the arrow.
Fitting the wiper blades X
Position new wiper blade :in the retainer on
the wiper arm and slide it into place in the
direction of the arrow.
The wiper blade audibly engages.
X Make sure that the wiper blade sits correctly.
X Fold the wiper arm back onto the windscreen. Windscreen wipers
129Lights and windscreen wipers Z
Page 292 of 397
Display messages
Possible causes/consequences and
M
MSolutions Ð
Power steering mal‐ Power steering mal‐
function See Own‐ function See Own‐
er's Manual er's Manual The power steering assistance is faulty.
A warning tone also sounds.
G WARNING
You will need to use more force to steer.
There is a risk of an accident.
X Check whether you are able to apply the extra steering force
required.
If you are able to steer safely:
X Drive on carefully.
X Consult a qualified specialist workshop immediately.
If you are unable to steer safely:
X Do not drive on.
X Consult a qualified specialist workshop. Telephone Telephone
No
Noservice
service Your vehicle is outside the mobile phone network provider's trans-
mitter/receiver range.
X Wait until the mobile phone operational readiness symbol appears
in the multifunction display. ¥
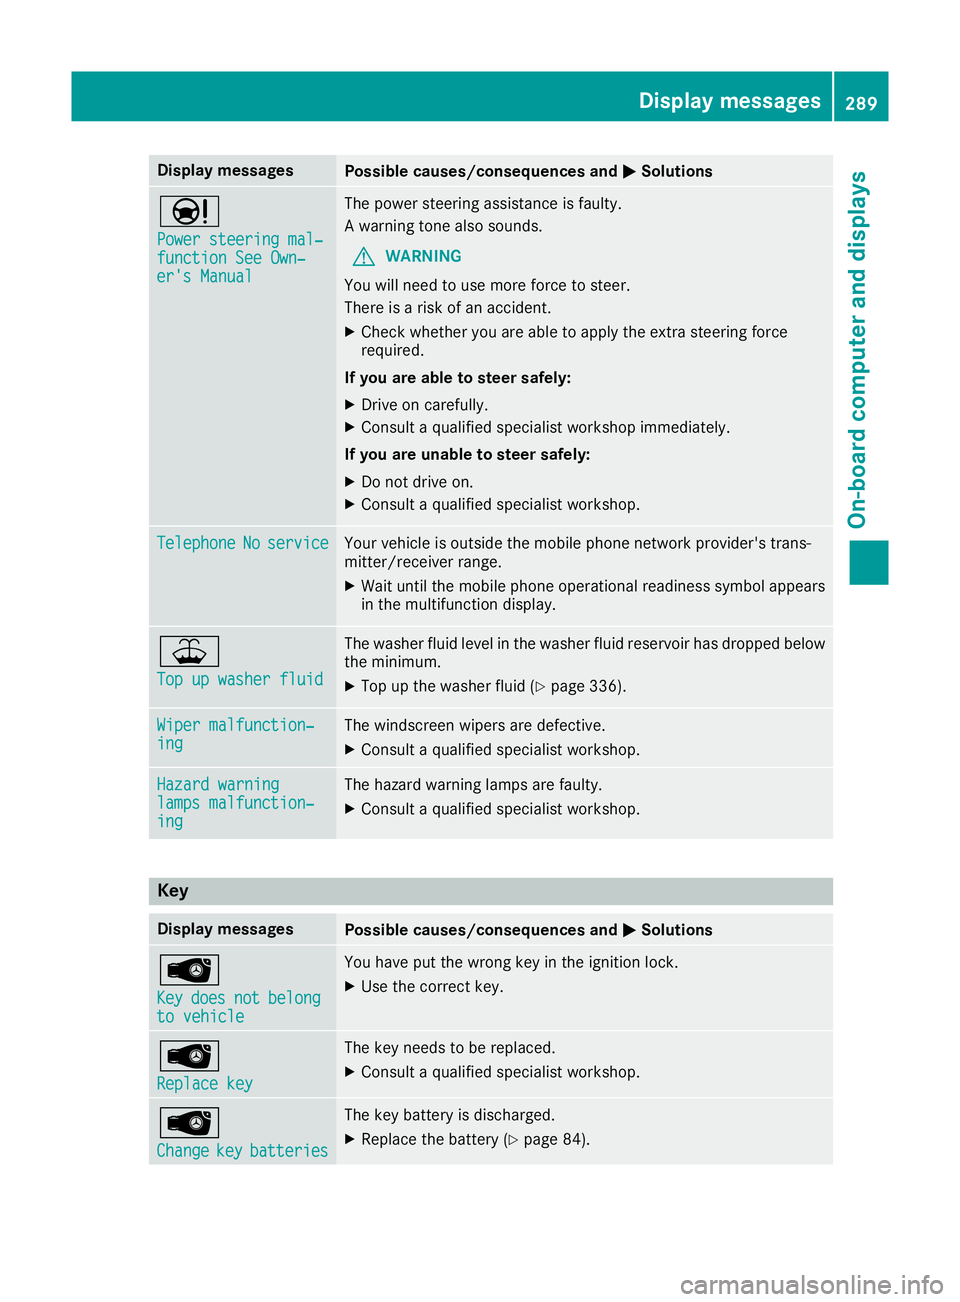
Top up washer fluid Top up washer fluid The washer fluid level in the washer fluid reservoir has dropped below
the minimum.
X Top up the washer fluid (Y page 336).Wiper malfunction‐
Wiper malfunction‐
ing ing The windscreen wipers are defective.
X Consult a qualified specialist workshop. Hazard warning
Hazard warning
lamps malfunction‐ lamps malfunction‐
ing ing The hazard warning lamps are faulty.
X Consult a qualified specialist workshop. Key
Display messages
Possible causes/consequences and
M
MSolutions Â
Key Key
does
does not
notbelong
belong
to vehicle
to vehicle You have put the wrong key in the ignition lock.
X Use the correct key. Â
Replace key Replace key The key needs to be replaced.
X Consult a qualified specialist workshop. Â
Change Change
key
keybatteries
batteries The key battery is discharged.
X Replace the battery (Y page 84). Display
messages
289On-board computer and displays Z
Page 339 of 397
X
Turn the key to position 0in the ignition lock
(Y page 148).
X On vehicles with KEYLESS-GO, press the
Start/Stop button (Y page 150).
X Press the Start/Stop button (Y page 150).
X Slowly turn cap :half a turn anti-clockwise
and allow excess pressure to escape.
X Turn cap :further anti-clockwise and
remove it.
If the coolant is at the level of marker bar =
in the filler neck when cold, there is enough
coolant in coolant expansion tank ;.
If the coolant level is approximately 1.5 cm
above marker bar =in the filler neck when
warm, there is enough coolant in coolant
expansion tank ;.
X If necessary, top up with coolant that has
been tested and approved by Mercedes-Benz.
X Replace cap :and turn it clockwise as far as
it will go.
Further information on coolant (Y page 386).
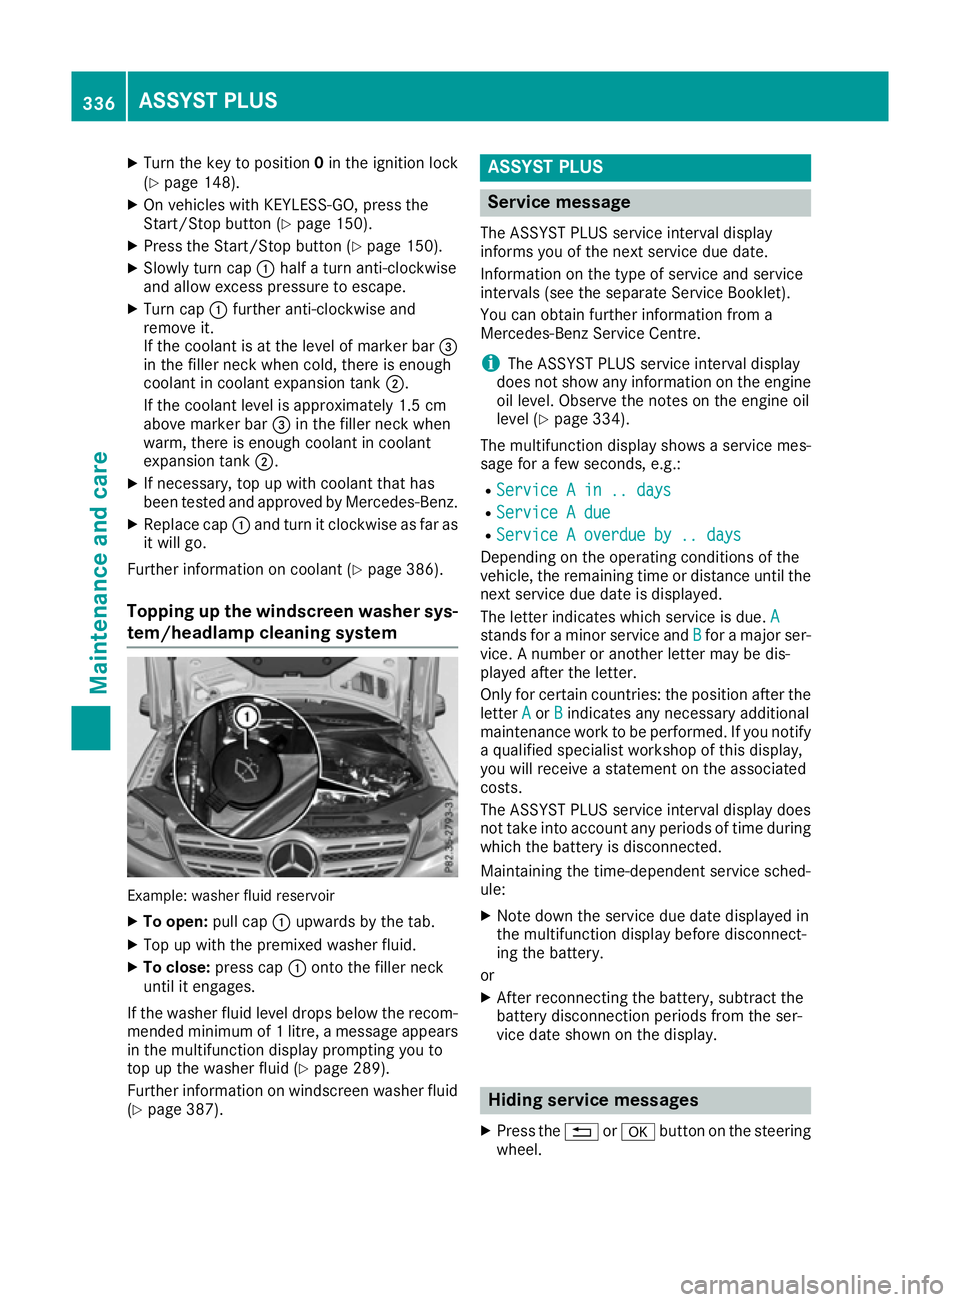
Topping up the windscreen washer sys- tem/headlamp cleaning system Example: washer fluid reservoir
X To open: pull cap:upwards by the tab.
X Top up with the premixed washer fluid.
X To close: press cap :onto the filler neck
until it engages.
If the washer fluid level drops below the recom- mended minimum of 1 litre, a message appears in the multifunction display prompting you to
top up the washer fluid (Y page 289).
Further information on windscreen washer fluid
(Y page 387). ASSYST PLUS
Service message
The ASSYST PLUS service interval display
informs you of the next service due date.
Information on the type of service and service
intervals (see the separate Service Booklet).
You can obtain further information from a
Mercedes-Benz Service Centre.
i The ASSYST PLUS service interval display
does not show any information on the engine oil level. Observe the notes on the engine oil
level (Y page 334).
The multifunction display shows a service mes-
sage for a few seconds, e.g.:
R Service A in .. days Service A in .. days
R Service A due
Service A due
R Service A overdue by .. days
Service A overdue by .. days
Depending on the operating conditions of the
vehicle, the remaining time or distance until the
next service due date is displayed.
The letter indicates which service is due. A A
stands for a minor service and B
Bfor a major ser-
vice. A number or another letter may be dis-
played after the letter.
Only for certain countries: the position after the letter A
A or B
Bindicates any necessary additional
maintenance work to be performed. If you notify
a qualified specialist workshop of this display,
you will receive a statement on the associated
costs.
The ASSYST PLUS service interval display does
not take into account any periods of time during which the battery is disconnected.
Maintaining the time-dependent service sched-
ule:
X Note down the service due date displayed in
the multifunction display before disconnect-
ing the battery.
or
X After reconnecting the battery, subtract the
battery disconnection periods from the ser-
vice date shown on the display. Hiding service messages
X Press the %ora button on the steering
wheel. 336
ASSYST PLUSMaintenance and care
Page 384 of 397

Vehicle identification plate (example: vehicles with
a trailer tow hitch – all other countries)
: Vehicle manufacturer (Daimler AG)
; EU type approval number (for certain coun-
tries only)
= VIN
? Maximum gross vehicle weight (kg)
A Maximum gross vehicle weight of vehicle
combination (kg)
B Permissible front axle load (kg)
C Permissible rear axle load (kg)
D Paint code
i The data shown on the vehicle identification
plate is sample data. This data is different for every vehicle and may differ from the data
shown here. You can find the data applicable to your vehicle on the vehicle's identification
plate. Vehicle identification number (VIN)
X
Open the front right-hand door.
X Open cover :in the direction of the arrow
and remove it.
The VIN can be seen.
The VIN can also be found on the vehicle iden-
tification plate (Y page 380). Engine number
The engine number is stamped into the crank-
case. You can obtain further information from
any qualified specialist workshop. Service products and capacities
Important safety notes
G
WARNING
Service product can be poisonous and haz-
ardous to health. There is a risk of injury.
Observe the instructions on the respective
original container when using, storing and dis- posing off service products. Always store ser-
vice products in the sealed original container. Always keep service products out of the reach
of children. H
Environmental note
Dispose of service products in an environ-
mentally-responsible manner.
Service products include the following:
R fuels
R exhaust gas aftertreatment additives, e.g.
AdBlue ®
R lubricants (e.g. engine oil, transmission oil)
R coolant
R brake fluid
R windscreen washer fluid
R climate control system refrigerant
Components and service products must be
matched. Only use products recommended by
Mercedes-Benz. Damage caused by the use of
products that have not been recommended is
not covered by the Mercedes-Benz warranty or
goodwill gestures. They are listed in this
Mercedes-Benz Owner's Manual in the appro-
priate section.
You can identify service products approved by
Mercedes-Benz by the following inscriptions on
the container:
R MB-Freigabe (e.g. MB-Freigabe 229.51)
R MB-Approval (e.g. MB-Approval 229.51)
Other designations or recommendations indi-
cate a level of quality or a specification in
accordance with an MB Sheet Number (e.g. MB Service products and capacities
381Technical data Z
Page 390 of 397
Windscreen washer system
Important safety notes G
WARNING
If windscreen washer concentrate comes into contact with hot components of the engine or
the exhaust system, it can ignite. There is a
risk of fire and injury.
Make sure the windscreen washer concen-
trate does not come into contact with the filler neck.
! Only use washer fluid that is suitable for
plastic lamp lenses, e.g. MB SummerFit or MB
WinterFit. Unsuitable washer fluid could dam-
age the plastic lenses of the headlamps.
! Only the washer fluids SummerFit and Win-
terFit can be mixed. Otherwise, the spraying
nozzles could become blocked.
Do not use distilled or de-ionised water. Other-
wise, the level sensor may give a false reading.
When handling washer fluid, observe the impor- tant safety notes on service products
(Y page 381).
At temperatures above freezing:
X Fill the washer fluid reservoir with a mixture of
water and washer fluid, e.g. MB SummerFit.
Mix 1 part MB SummerFit to 100 parts water.
At temperatures below freezing:
X Fill the washer fluid reservoir with a mixture of
water and washer fluid, e.g. MB WinterFit.
For the correct mixing ratio refer to the infor- mation on the antifreeze reservoir.
i Add washer fluid concentrate, e.g. MB Sum-
merFit or MB WinterFit, to the washer fluid all
year round. Vehicle data
General notes
Please note that for the specified vehicle data: R the heights specified may vary as a result of:
- tyres
- load
- condition of the suspension
- optional equipment
R optional equipment reduces the maximum
payload
R vehicle-specific weight information can be
found on the vehicle identification plate
(Y page 380)
R for certain countries only: you can find vehi-
cle-specific vehicle data in the COC docu-
ments (CERTIFICATE OF CONFORMITY).
These documents are delivered with your
vehicle
Observe the information relating to level con-
trol:
R AIRMATIC package (Y page 198)
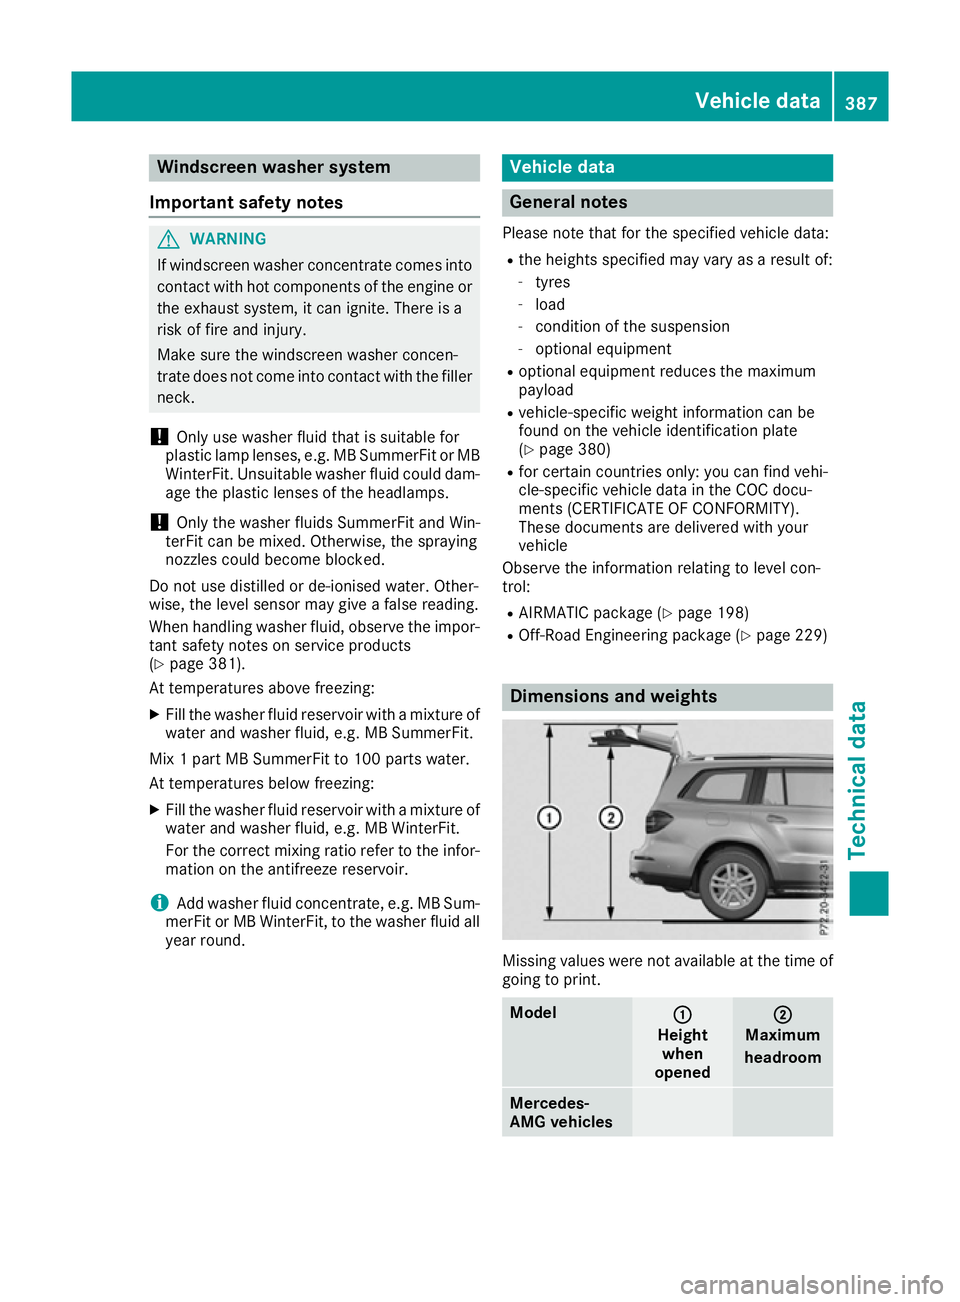
R Off-Road Engineering package (Y page 229) Dimensions and weights
Missing values were not available at the time of
going to print. Model
: :
Height when
opened ;
;
Maximum
headroom Mercedes-
AMG vehicles Vehicle data
387Technical data Z