2016 MERCEDES-BENZ GLS SUV ESP
[x] Cancel search: ESPPage 233 of 397
The vehicle is raised by 30 mm.
The vehicle changes from the Offroaddrive pro-
gram to the Comfortdrive program if you drive
faster than 110 km/h.
The Please Please reduce
reducespeed
speedmessage appears in
the multifunction display.
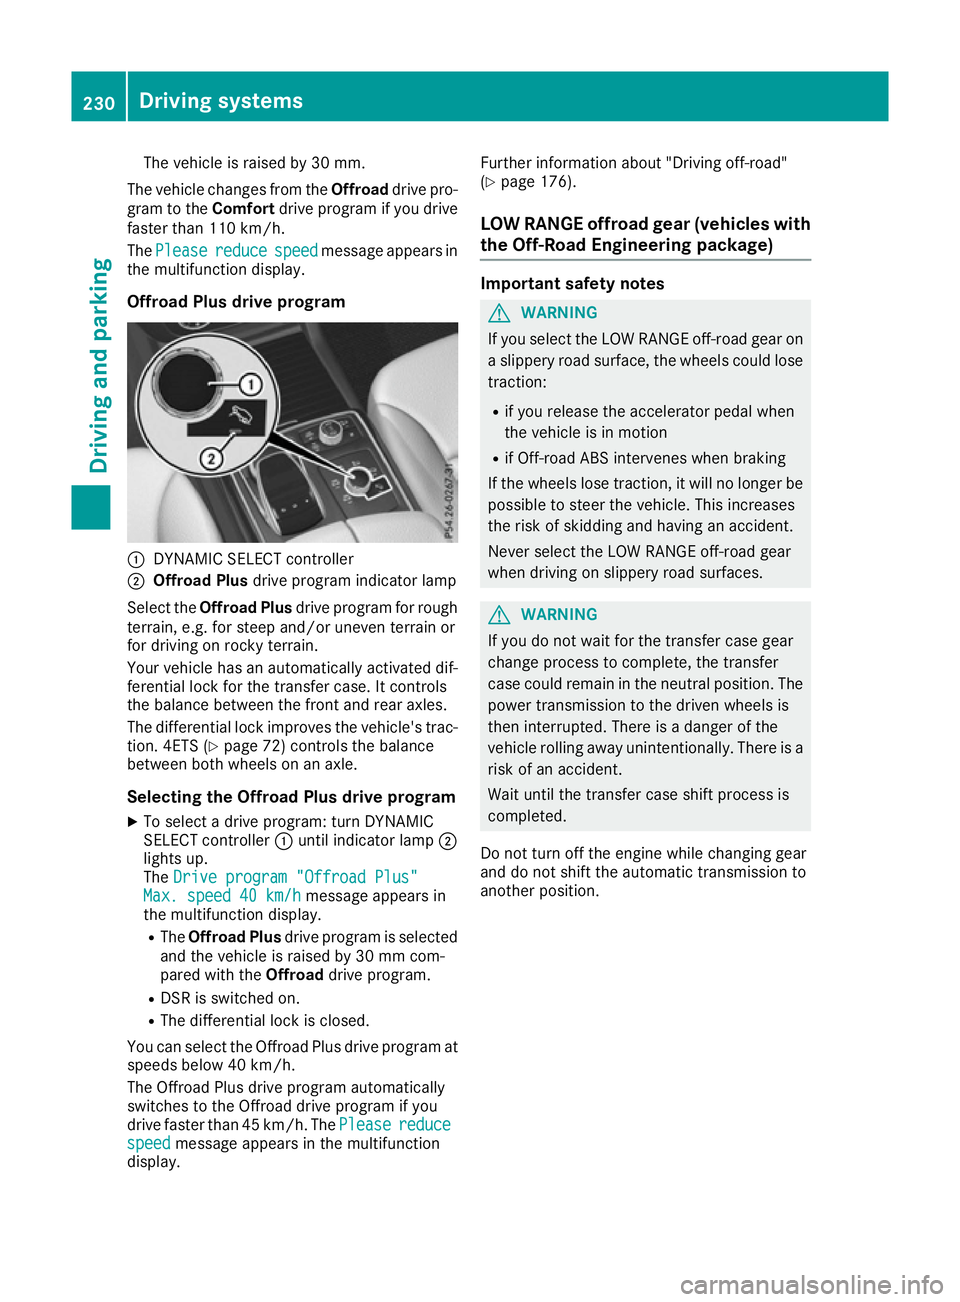
Offroad Plus drive program :
DYNAMIC SELECT controller
; Offroad Plus drive program indicator lamp
Select the Offroad Plus drive program for rough
terrain, e.g. for steep and/or uneven terrain or
for driving on rocky terrain.
Your vehicle has an automatically activated dif-
ferential lock for the transfer case. It controls
the balance between the front and rear axles.
The differential lock improves the vehicle's trac-
tion. 4ETS (Y page 72) controls the balance
between both wheels on an axle.
Selecting the Offroad Plus drive program X To select a drive program: turn DYNAMIC
SELECT controller :until indicator lamp ;
lights up.
The Drive program "Offroad Plus"
Drive program "Offroad Plus"
Max. speed 40 km/h
Max. speed 40 km/h message appears in
the multifunction display.
R The Offroad Plus drive program is selected
and the vehicle is raised by 30 mm com-
pared with the Offroaddrive program.
R DSR is switched on.
R The differential lock is closed.
You can select the Offroad Plus drive program at speeds below 40 km/h.
The Offroad Plus drive program automatically
switches to the Offroad drive program if you
drive faster than 45 km/h. ThePlease
Please reduce reduce
speed
speed message appears in the multifunction
display. Further information about "Driving off-road"
(Y
page 176).
LOW RANGE offroad gear (vehicles with
the Off-Road Engineering package) Important safety notes
G
WARNING
If you select the LOW RANGE off-road gear on a slippery road surface, the wheels could lose traction:
R if you release the accelerator pedal when
the vehicle is in motion
R if Off-road ABS intervenes when braking
If the wheels lose traction, it will no longer be
possible to steer the vehicle. This increases
the risk of skidding and having an accident.
Never select the LOW RANGE off-road gear
when driving on slippery road surfaces. G
WARNING
If you do not wait for the transfer case gear
change process to complete, the transfer
case could remain in the neutral position. The power transmission to the driven wheels is
then interrupted. There is a danger of the
vehicle rolling away unintentionally. There is a
risk of an accident.
Wait until the transfer case shift process is
completed.
Do not turn off the engine while changing gear
and do not shift the automatic transmission to
another position. 230
Driving systemsDriving and parking
Page 234 of 397
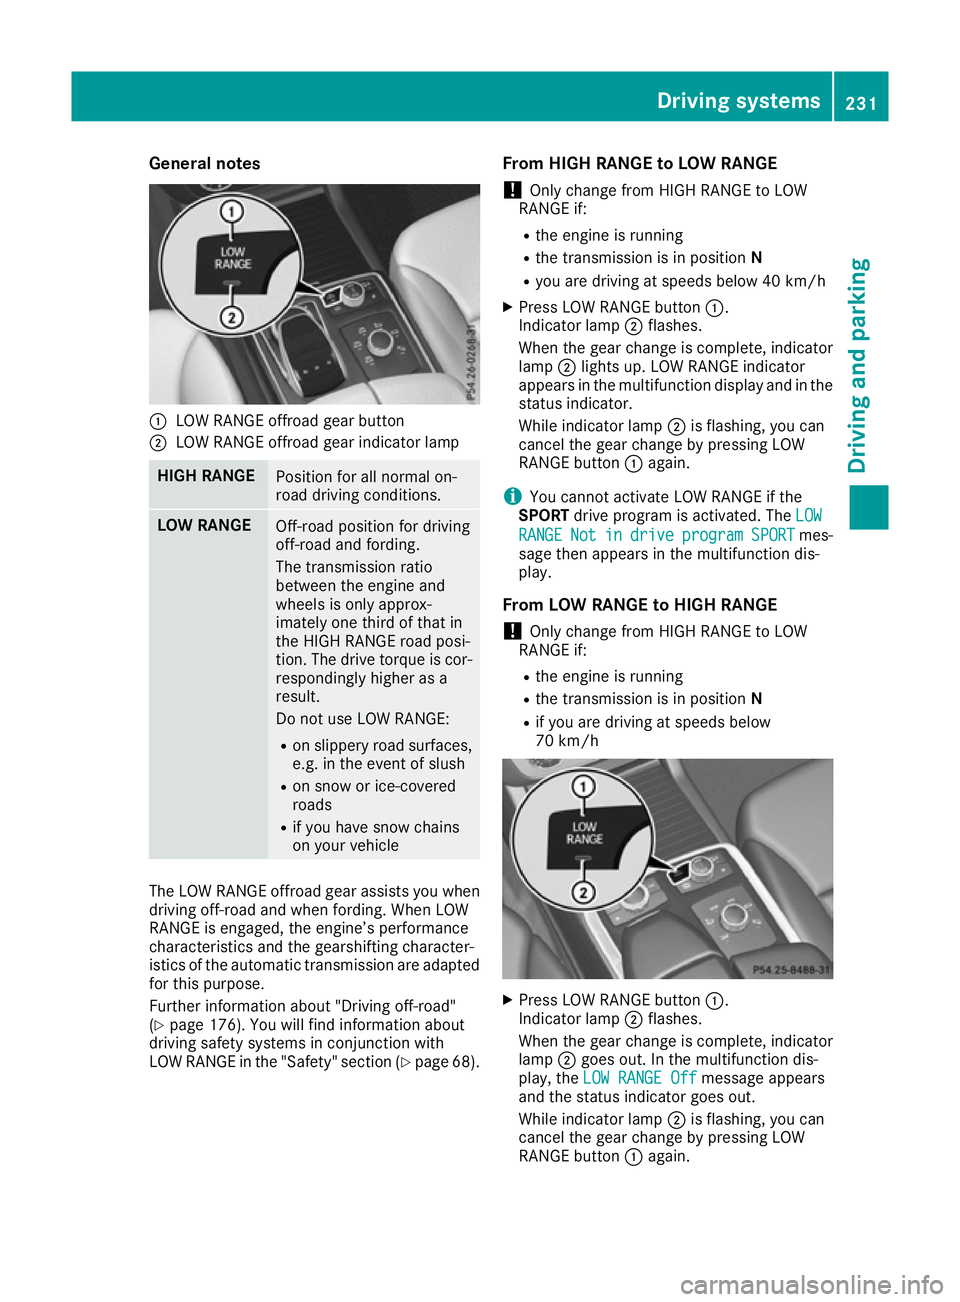
General notes
:
LOW RANGE offroad gear button
; LOW RANGE offroad gear indicator lamp HIGH RANGE
Position for all normal on-
road driving conditions.
LOW RANGE
Off-road position for driving
off-road and fording.
The transmission ratio
between the engine and
wheels is only approx-
imately one third of that in
the HIGH RANGE road posi-
tion. The drive torque is cor-
respondingly higher as a
result.
Do not use LOW RANGE:
R on slippery road surfaces,
e.g. in the event of slush
R on snow or ice-covered
roads
R if you have snow chains
on your vehicle The LOW RANGE offroad gear assists you when
driving off-road and when fording. When LOW
RANGE is engaged, the engine’s performance
characteristics and the gearshifting character-
istics of the automatic transmission are adapted
for this purpose.
Further information about "Driving off-road"
(Y page 176). You will find information about
driving safety systems in conjunction with
LOW RANGE in the "Safety" section (Y page 68).From HIGH RANGE to LOW RANGE
! Only change from HIGH RANGE to LOW
RANGE if:
R the engine is running
R the transmission is in position N
R you are driving at speeds below 40 km/h
X Press LOW RANGE button :.
Indicator lamp ;flashes.
When the gear change is complete, indicator
lamp ;lights up. LOW RANGE indicator
appears in the multifunction display and in the
status indicator.
While indicator lamp ;is flashing, you can
cancel the gear change by pressing LOW
RANGE button :again.
i You cannot activate LOW RANGE if the
SPORT drive program is activated. The LOW LOW
RANGE RANGE Not Notin
indrive
drive program
program SPORT
SPORTmes-
sage then appears in the multifunction dis-
play.
From LOW RANGE to HIGH RANGE ! Only change from HIGH RANGE to LOW
RANGE if:
R the engine is running
R the transmission is in position N
R if you are driving at speeds below
70 km/h X
Press LOW RANGE button :.
Indicator lamp ;flashes.
When the gear change is complete, indicator
lamp ;goes out. In the multifunction dis-
play, the LOW RANGE Off
LOW RANGE Off message appears
and the status indicator goes out.
While indicator lamp ;is flashing, you can
cancel the gear change by pressing LOW
RANGE button :again. Driving systems
231Driving and parking Z
Page 237 of 397
R
the permissible rear axle load of the towing
vehicle
R the maximum permissible gross vehicle
weight of both the towing vehicle and the
trailer
The applicable permissible values, which must
not be exceeded, can be found:
R in your vehicle documents
R on the identification plates of the trailer tow
hitch and the trailer
R on the vehicle identification plate
If the values differ, the lowest value applies.
You will find the values approved by the manu-
facturer on the vehicle identification plates and
those for the towing vehicle under "Technical
data" (Y page 390).
When towing a trailer, your vehicle's handling
characteristics will be different in comparison to
when driving without a trailer.
The vehicle/trailer combination:
R is heavier
R is restricted in its acceleration and gradient-
climbing capability
R has an increased braking distance
R is affected more by strong crosswinds
R demands more sensitive steering
R has a larger turning circle
This can impair the vehicle's handling charac-
teristics. Adapt your driving style accordingly.
Maintain a safe distance. Drive carefully.
When towing a trailer, always adjust your speed to the current road and weather conditions. Do
not exceed the maximum permissible speed for
your vehicle/trailer combination. Notes on towing a trailer
General notes !
If you have a trailer tow hitch retrofitted,
changes to the engine cooling system may be necessary, depending on the vehicle type.
If you have a trailer tow hitch retrofitted,
observe the anchorage points on the chassis.
Check the tyre pressures when towing a trailer.
You will find the values in the tyre pressure table in the vehicle fuel filler flap (Y page 364).Please note that when towing a trailer, the fol-
lowing driving systems have limited availability
or are not available at all.
R Parking Assist PARKTRONIC (Y page 201)
R Blind Spot Assist (Y page 219)
R Active Lane Keeping Assist (Y page 224)
R Parking Pilot (Y page 204)
On vehicles without level control, the height of
the ball coupling will alter according to the load
placed on the vehicle. If necessary, use a trailer
with a height-adjustable drawbar.
You will find permissible trailer loads under
"Technical data" (Y page 390).
Driving tips Observe the information on ESP
®
trailer stabili-
sation (Y page 74) and on pulling away with a
trailer (Y page 151).
Select the Comfortdrive program using the
DYNAMIC SELECT controller (Y page 155).
The maximum permissible speed for vehicle/
trailer combinations depends on the type of
trailer. Before beginning the journey, check the
trailer's documents to see what the maximum
permissible speed is for your trailer. Observe the legally prescribed maximum speed in the rele-
vant country.
For certain Mercedes-Benz vehicles, the maxi-
mum permissible rear axle load is increased
when towing a trailer. See the "Technical Data"
section to find out whether this applies to your
vehicle (Y page 390). If you utilise any of the
added maximum rear axle load when towing a
trailer, the vehicle/trailer combination may not
exceed a maximum speed of 100 km/h for rea-
sons concerning the operating permit. This also
applies in countries in which the permissible
maximum speed for vehicle/trailer combina-
tions is above 100 km/h.
When towing a trailer, your vehicle's handling
characteristics will be different to when driving
without a trailer and the vehicle will consume
more fuel.
Use the left-hand gearshift paddle to shift to a
lower gear on long and steep downhill gradients.
This also applies if you have activated cruise
control, the speed limiter or Distance Pilot
DISTRONIC.
This will use the braking effect of the engine, so
less braking will be required to maintain the
vehicle speed. This relieves the load on the 234
Towing a trailerDriving an
d parking
Page 240 of 397
Vehicles with the AIRMATIC package
!
Before beginning the journey, make sure
that the trailer support wheel is completely
raised. Otherwise, the trailer or the vehicle
could be damaged by the lowered trailer sup- port wheel during the journey.
X Shift the transmission to position P.
X Apply the electric parking brake.
X Start the engine.
X Vehicles with the Off-Road Engineering
package:
set the vehicle level to normal level
(Y page 192).
X Vehicles without the Off-Road Engineer-
ing package: select theComfortdrive pro-
gram using the DYNAMIC SELECT controller
(Y page 197).
X Switch off the engine.
X Close the doors and tailgate.
X Position the trailer horizontally behind the
vehicle.
X Couple up the trailer.
X Establish the electrical connection between
the vehicle and the trailer.
X Check that the trailer lighting system is work-
ing.
X Push the combination switch upwards and
downwards and check whether the corre-
sponding turn signal indicator on the trailer is
flashing.
A connected trailer is only detected when the
electrical connection is established correctly
and when the lighting system is working prop-
erly. The function of other systems also depends on this, for example:
R ESP ®
R Parking Assist PARKTRONIC
R Parking Pilot
R Active Blind Spot Assist
R Active Lane Keeping Assist
i Vehicles with the AIRMATIC package:
if
you couple up a trailer, the vehicle initially
remains at the selected level of the drive pro- gram set. Observe the following when cou-
pling up a trailer:
R If the normal level was not selected previ-
ously, the vehicle automatically adopts the normal level starting from a speed of 30 km/h. Even at higher speeds, it does not
drop below the normal level.
R Vehicle levels below the normal level are
not available.
R The raised level is available up to a speed of
30 km/h.
R This also applies when using accessories
that are plugged into the socket of the
trailer tow hitch (e.g. a bicycle rack).
R Before driving with a trailer, please observe
the information on the trailer support
wheel. Uncoupling a trailer
Important safety notes G
WARNING
If you uncouple a trailer with an engaged over- run brake, you could trap your hand between
the vehicle and the trailer drawbar. This poses a risk of injury.
Do not uncouple a trailer with an engaged
overrun brake. G
WARNING
Vehicles with level control:
If you disconnect the trailer cable, the vehicle is lowered. This can cause you or others to
become trapped between the vehicle body
and tyres, or underneath the vehicle. This
poses a risk of injury.
Make sure that no-one is in the immediate
vicinity of the wheel arch or underneath the
vehicle when disconnecting the trailer cable.
! Do not disconnect a trailer with an engaged
overrun brake. Otherwise, your vehicle could
be damaged by the rebounding of the overrun
brake.
! Remove the adapter cable before folding in
the ball coupling. You could otherwise dam-
age the rear bumper and the adapter cable.
Vehicles with the AIRMATIC package X
Shift the transmission to position P.
X Apply the electric parking brake. Towing a trailer
237Driving and parking Z
Page 241 of 397
X
Start the engine.
X Close the doors and tailgate.
X Secure the trailer against rolling away.
X Remove the trailer cable and decouple the
trailer.
X Switch off the engine. Trailer power supply
! You can connect accessories with a power
rating of up to 180 W to the permanent power
supply and with a power rating of up to 180 W to the power supply that is switched on via the ignition lock.
The trailer battery may not be charged from
the power supply.
When it leaves the factory, your vehicle's trailer
socket is equipped with a permanent power
supply and a power supply that is switched on
via the ignition lock.
The permanent power supply is supplied via
trailer socket pin 9.
The power supply that is switched on via the
ignition lock is supplied via trailer socket pin 10.
The trailer's permanent power supply is
switched off in the event of low vehicle supply
voltage and after six hours at the latest.
You can find more information about fitting the
trailer electrics at a qualified specialist work-
shop.
X To switch the connected power supply on
or off: turn the key to position 2or0respec-
tively (Y page 148). Failure check for LEDs
If LED lamps are fitted in the trailer, a malfunc-
tion message may appear in the multifunction
display even if there is no fault. The reason for
the error message may be that the current has
fallen below the minimum of 50 mA. To ensure reliable indication of the failure, each
LED chain in the trailer lighting must be guaran-
teed a minimum current of 50 mA. Trailer with 7-pin connector
General notes Trailer with 7-pin connector:
you can connect
to the 13-pin socket on the ball coupling using
an adapter or, if necessary, an adapter cable.
Both can be obtained at a qualified specialist
workshop.
Fitting the adapter !
Make sure that there is sufficient cable play
so that the cable cannot become detached
when cornering.
! Remove the adapter cable before folding in
the ball coupling. You could otherwise dam-
age the rear bumper and the adapter cable. X
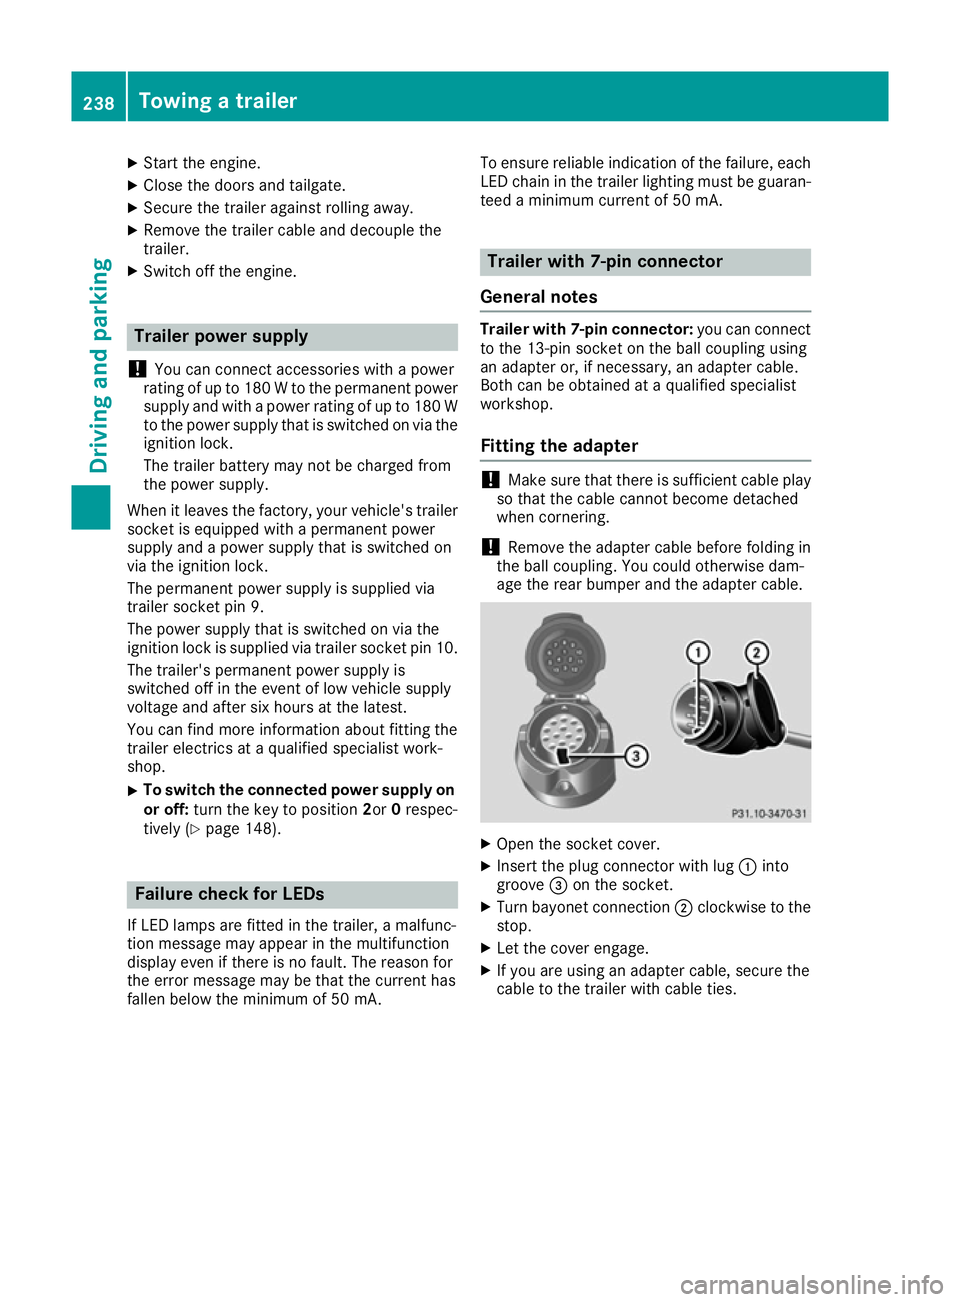
Open the socket cover.
X Insert the plug connector with lug :into
groove =on the socket.
X Turn bayonet connection ;clockwise to the
stop.
X Let the cover engage.
X If you are using an adapter cable, secure the
cable to the trailer with cable ties. 238
Towing a trailerDriving and parking
Page 251 of 397

TV operation
The preset position is also displayed only if the
channel :has been stored. Store TV channels
in the multimedia system.
X Switch on the multimedia system and select
TV; see the separate operating instructions.
X Press the =or; button on the steering
wheel to select the Audio
Audio menu.
X To select a stored channel: briefly press the
9 or: button.
X To select a channel from the channel list:
press and briefly hold the 9or: but-
ton.
i Depending on the digital TV broadcaster,
radio stations can also be received. The mul-
tifunction display shows TV (RADIO)
TV (RADIO). Telephone menu
Introduction G
WARNING
Operating the integrated information systems and communications equipment in the vehicle
while driving will distract you from traffic con-
ditions. You could then lose control of the
vehicle. There is a risk of an accident.
Only operate these devices if road traffic con-
ditions permit. If you are unsure about the
surrounding conditions, pull over to a safe
location and make entries only while the vehi-
cle is stationary.
When telephoning, you must observe the legal
requirements for the country in which you are
currently driving.
X Switch on the mobile phone (see the manu-
facturer's operating instructions).
X Switch on the multimedia system (see sepa-
rate operating instructions). X
Insert the mobile phone into the bracket
(Y page 325).
or X Establish a Bluetooth ®
connection to the mul-
timedia system; see the separate operating
instructions.
X Press the =or; button on the steering
wheel to select the Tel
Tel menu.
You will see one of the following display mes-
sages in the multifunction display:
R Telephone ready Telephone ready or the name of the net-
work provider: the mobile phone has found a network and is ready to receive.
R Telephone
Telephone No
No service
service: there is no network
available or the mobile phone is searching for
a network.
i You can obtain further information about
suitable mobile phones and connecting
mobile phones via Bluetooth ®
:
R at any Mercedes-Benz Service Centre
R on the Internet at http://www.mercedes-
benz.com/connect
Accepting a call If someone calls you when you are in the
Tel Tel
menu, a display message appears in the multi-
function display.
You can accept a call at any time irrespective of
the selected menu.
X Press the 6button on the steering wheel
to accept an incoming call.
Rejecting or ending a call You can end or reject a call even if you are not in
the Tel Tel menu.
X Press the ~button on the steering wheel
to reject or end an incoming call.
Selecting an entry from the telephone
book X
Press the =or; button on the steering
wheel to select the Tel
Tel menu.
X Press the 9,:ora button to
switch to the phone book.
X Authorise access to the phone book on the
phone. 248
Menus and submenusOn-board computer and displays
Page 256 of 397
X
Press :or9 to select the Limit Limit
speed (winter tyres): speed (winter tyres): function.
You will see the current setting.
X Press ato confirm.
X Press the :or9 button to adjust the
permanent speed limiter in increments of ten
(160 km/h 160 km/h to240 km/h
240 km/h). The Off
Off setting
switches the permanent speed limiter off.
X Press the abutton to store the entry.
Further information on the permanent speed
limiter (Y page 184).
Activating/deactivating the automatic
locking feature
If you activate the Automatic door locks
Automatic door locks
function, the vehicle is centrally locked above a speed of approximately 15 km/h.
X Press the =or; button on the steering
wheel to select the Settings
Settings menu.
X Press the :or9 button to select the
Vehicle
Vehicle submenu.
X Press ato confirm.
X Press the :or9 button to select the
Automatic door locks Automatic door locks function.
When the Automatic
Automatic door
doorlocks
locks function is
activated, the vehicle doors are displayed in
orange in the multifunction display.
X Press the abutton to save the setting.
For further information on the automatic locking
feature; see (Y page 88).
Activating/deactivating the acoustic
locking confirmation
If you switch on the Acoustic
Acoustic Lock Lockfunction, an
acoustic signal sounds when you lock the vehi-
cle.
X Press the =or; button on the steering
wheel to select the Settings Settingsmenu.
X Press the :or9 button to select the
Vehicle
Vehicle submenu.
X Press ato confirm.
X Press the :or9 button to select the
Acoustic Lock
Acoustic Lock function.
If the Acoustic Lock
Acoustic Lock function is activated,
the & symbol in the multifunction display
lights up orange.
X Press the abutton to save the setting. Heating submenu Auxiliary heating departure time
G
DANGER
If the exhaust pipe is blocked or sufficient
ventilation is not possible, toxic exhaust
fumes can enter the vehicle, especially car-
bon monoxide. This is the case, e.g. in
enclosed spaces, or if the vehicle is stuck in
snow. There is a risk of fatal injuries.
You should switch off the auxiliary heating in
enclosed spaces which do not have an extrac- tion system, e.g. a garage. If the vehicle is
stuck in snow and you must leave the auxiliary
heating running, keep the exhaust pipe and
the area around the vehicle clear of snow. To guarantee a sufficient supply of fresh air, open
a window on the side of the vehicle away from the wind. G
WARNING
When the auxiliary heating is switched on,
parts of the vehicle can become very hot.
Flammable materials such as leaves, grass or twigs may ignite if they come into contact
with:
R hot parts of the exhaust system
R the exhaust gas itself
There is a risk of fire.
When the auxiliary heating is switched on,
make sure that:
R no flammable materials come into contact
with hot vehicle components
R the exhaust gas can escape from the
exhaust pipe unhindered
R the exhaust gas does not come into contact
with flammable materials.
! Operating the auxiliary heating/ventilation
draws on the vehicle battery. After you have
heated or ventilated the vehicle a maximum of two times, drive for a longer distance.
Only vehicles with auxiliary heating have this
function. Menus and submenus
253On-board computer and displays Z
Page 259 of 397
A
Coolant temperature
B Transmission oil temperature
X Press the =or; button on the steering
wheel to select the AMG
AMG menu.
Upshift indicator: upshift indicatorUp
Up=
indicates that the engine has reached the
overrevving range when in the manual drive
program.
Engine/transmission oil temperature:
when the engine and transmission are at nor-
mal operating temperature, oil tempera-
ture ?and Bare displayed in white in the
multifunction display.
If the multifunction display shows oil temper- ature ?orB in blue, the engine or the
transmission are not yet at normal operating
temperature. Avoid using the full output of the engine during this time.
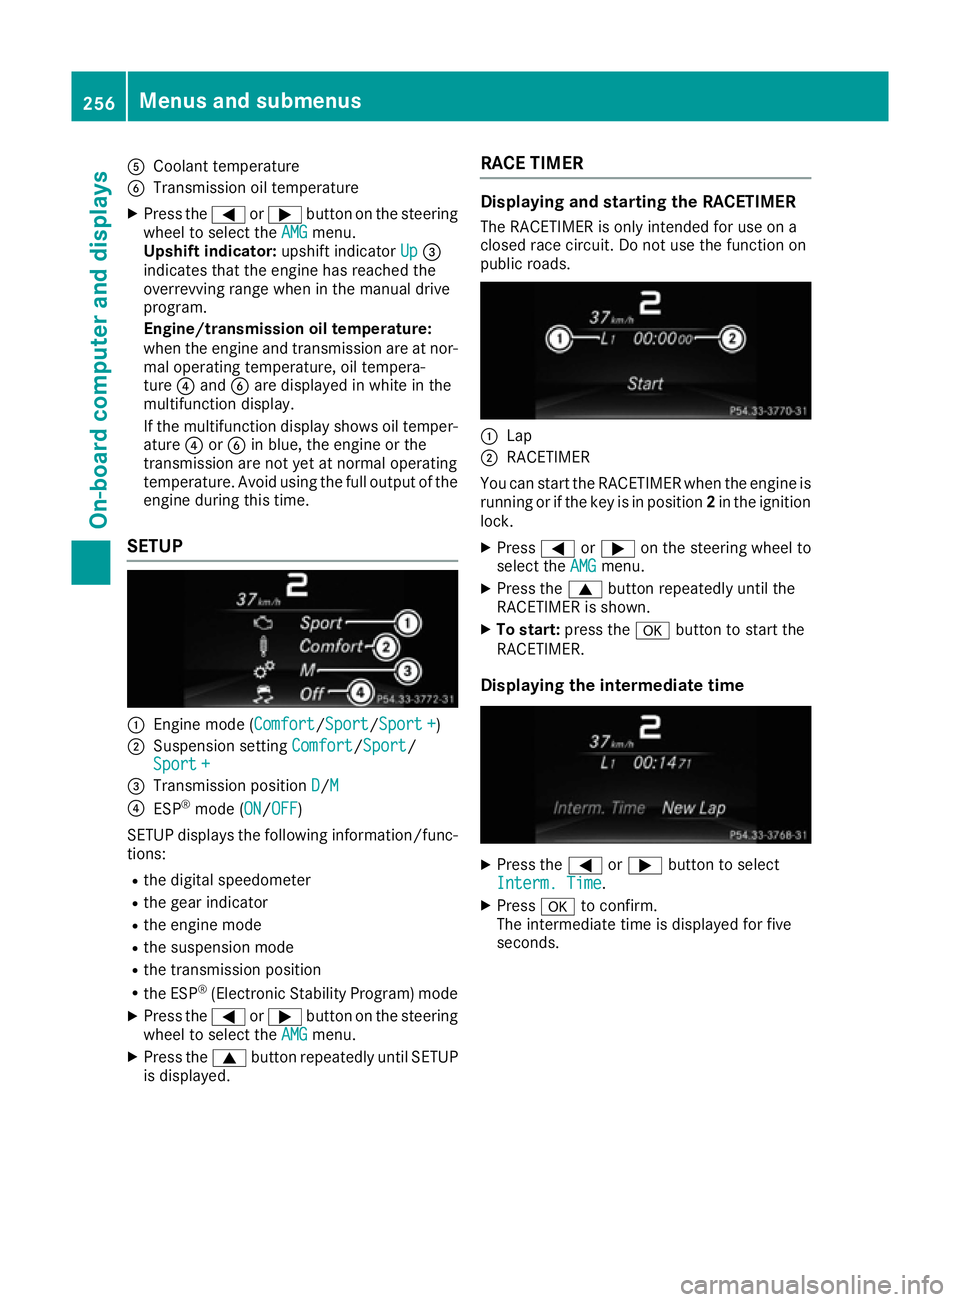
SETUP :
Engine mode (Comfort Comfort/SportSport/Sport + Sport +)
; Suspension setting Comfort
Comfort/Sport
Sport/
Sport +
Sport +
= Transmission position D
D/M
M
? ESP ®
mode ( ON
ON/OFFOFF)
SETUP displays the following information/func- tions:
R the digital speedometer
R the gear indicator
R the engine mode
R the suspension mode
R the transmission position
R the ESP ®
(Electronic Stability Program) mode
X Press the =or; button on the steering
wheel to select the AMG
AMG menu.
X Press the 9button repeatedly until SETUP
is displayed. RACE TIMER Displaying and starting the RACETIMER
The RACETIMER is only intended for use on a
closed race circuit. Do not use the function on
public roads. :
Lap
; RACETIMER
You can start the RACETIMER when the engine is running or if the key is in position 2in the ignition
lock.
X Press =or; on the steering wheel to
select the AMG AMGmenu.
X Press the 9button repeatedly until the
RACETIMER is shown.
X To start: press the abutton to start the
RACETIMER.
Displaying the intermediate time X
Press the =or; button to select
Interm. Time
Interm. Time.
X Press ato confirm.
The intermediate time is displayed for five
seconds. 256
Menus and submenusOn-board computer and displays