2016 MERCEDES-BENZ G-CLASS SUV ignition
[x] Cancel search: ignitionPage 137 of 261
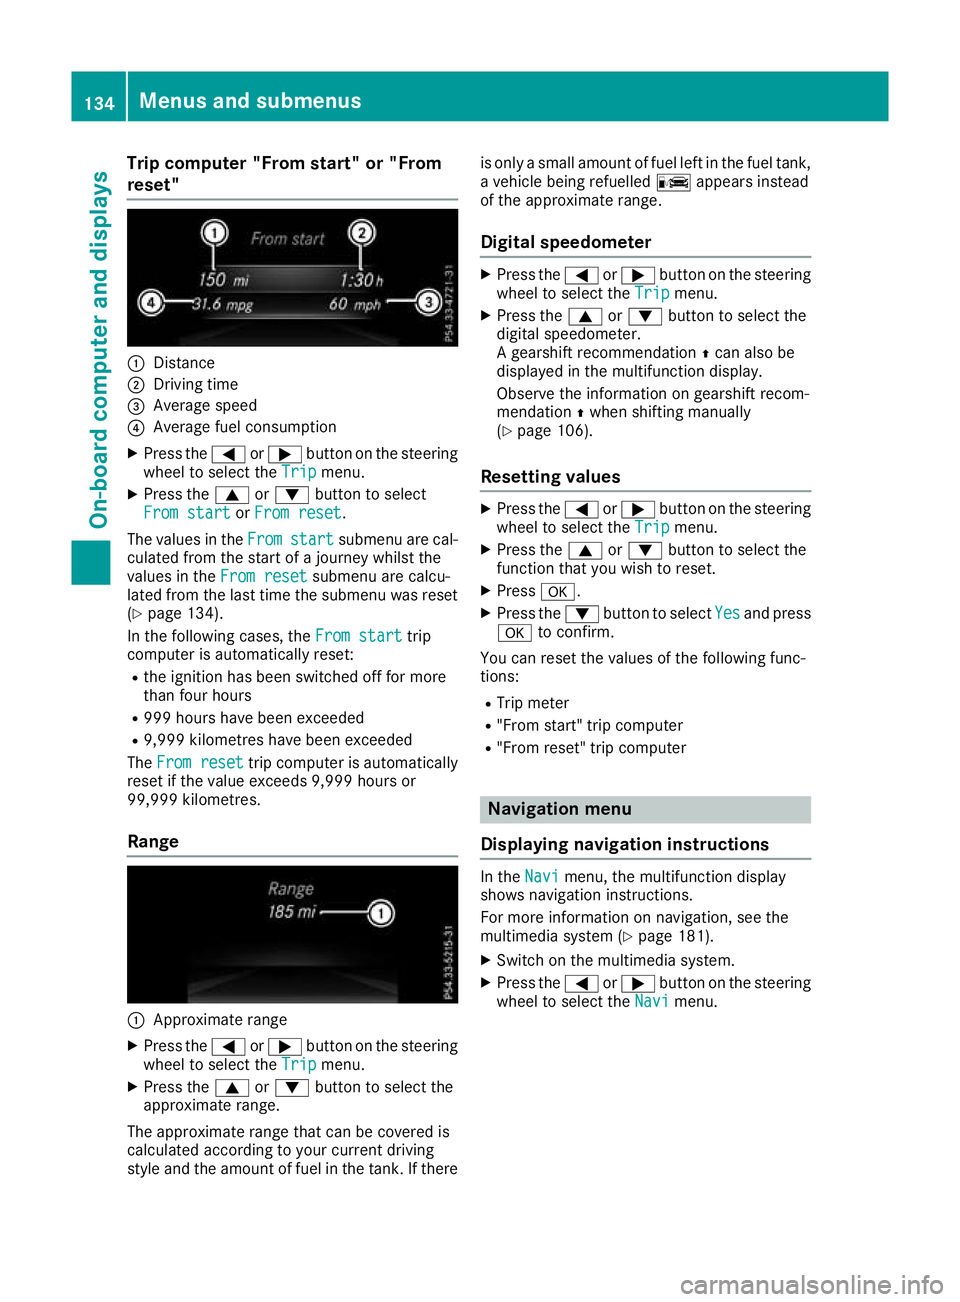
Trip compute
r"From start" or "From
reset" :
Distance
; Driving time
= Averag espeed
? Averag efuelconsumption
X Press the =or; button on the steering
whee ltoselect the Trip
Tripmenu.
X Press the 9or: button to select
Fro mstart
From start orFrom reset
From reset.
The valuesint heFrom
From start
start submenu are cal-
culated from the start of ajourney whilst the
valuesint heFrom reset
From reset submenu are calcu-
lated from the last time the submenu was reset
(Y page 134).
In the following cases, the From start
From start trip
computer is automaticallyr eset:
R the ignition has been switched off for more
than four hours
R 999 hours have been exceeded
R 9,999 kilometres have been exceeded
The From reset From reset trip computer is automatically
reset if the value exceeds 9,999 hours or
99,999 kilometres.
Range :
Approx imaterange
X Press the =or; button on the steering
whee ltoselect the Trip
Tripmenu.
X Press the 9or: button to select the
approximate range.
The approximate range tha tcan be covered is
calculate daccording to your current driving
style and the amount of fuel in the tank. If there is only
asmall amount of fuel left in the fuel tank,
av ehicle being refuelled Cappears instead
of the approximate range.
Digita lspeedometer X
Press the =or; button on the steering
wheel to select the Trip
Tripmenu.
X Press the 9or: button to select the
digital speedometer.
Ag earshift recommendation Zcan also be
displayed in the multifunction display.
Observe the information on gearshift recom-
mendation Zwhen shiftin gmanually
(Y page 106).
Resetting values X
Press the =or; button on the steering
wheel to select the Trip Tripmenu.
X Press the 9or: button to select the
function that you wish to reset.
X Press a.
X Press the :button to select Yes Yesand press
a to confirm.
You can reset the values of the following func-
tions:
R Trip meter
R "From start "trip computer
R "From reset" trip computer Navigat
ionm enu
Displaying navigatio ninstructions In the
Navi Navimenu, the multif unction display
shows navigation instructions.
For more information on navigation, see the
multimedia system (Y page 181).
X Switch on the multimedia system.
X Press the =or; button on the steering
wheel to select the Navi Navimenu. 134
Menu
sand submenusOn-boar dcomputer and displays
Page 141 of 261
i
Vehicles for the United Kingdom: this func-
tion is unavailable.
Selects language
X Press the =or; button on the steering
wheel to select the Settings
Settingsmenu.
X Press the :or9 button to select the
Instrument cluster
Instrument cluster submenu.
X Press ato confirm.
X Press :or9 to select the Language:
Language:
function.
You will see the current setting.
X Press ato confirm.
X Press the :or9 button to change the
setting.
X Press ato store the entry.
Time/date Setting the date
X Press the =or; button on the steering
wheel to select the Settings Settingsmenu.
X Press :or9 to select the Time/Date Time/Date
submenu.
X Press ato confirm.
X Press :or9 to select the Date: Date:func-
tion.
You will see the current setting.
X To set the date: pressaagain.
X Press =or; to switch between the
day, month and year.
X Press :or9 to set the day, month or
year.
X Press ato store the entry.
The display shows the selected date.
Setting the time X Press the =or; button on the steering
wheel to select the Settings
Settings menu.
X Press :or9 to select the Time/Date Time/Date
submenu.
X Press ato confirm.
X Press :or9 to select the Time:
Time:func-
tion.
You will see the current setting.
X To set the time: pressaagain.
X Press =or; to switch between hours
and minutes. X
Press :or9 to set the hours or
minutes.
X Press ato store the entry.
The display shows the selected time.
Lights Setting the daytime driving lights
The Daytime driving lights Daytime driving lights function can
only be switched on with the engine switched
off.
X Press the =or; button on the steering
wheel to select the Settings Settingsmenu.
X Press the :or9 button to select the
Lights
Lights submenu.
X Press ato confirm.
X Press the :or9 button to select the
Daytime driving lights
Daytime driving lights function.
If the Daytime
Daytime driving
drivinglights
lightsfunction has
been switched on, the cone of light and the
W symbol are shown in red in the multi-
function display.
X Press ato save the setting.
Further information on daytime driving lights
(Y page 74).
Surround lighting and exterior lighting
delayed switch-off X Press the =or; button on the steering
wheel to select the Settings Settingsmenu.
X Press the :or9 button to select the
Lights
Lights submenu.
X Press ato confirm.
X Press the :or9 button to select the
Surround lighting
Surround lighting function.
When the Surround lighting
Surround lighting function has
been activated, the cone of light is shown in
red in the multifunction display.
X Press ato save the setting.
Activating exterior lighting delayed switch-off
temporarily:
X Before leaving the vehicle, turn the key to
position 0in the ignition lock (Y page 96).
X Turn the key to position 2in the ignition lock
(Y page 96).
Exterior lighting delayed switch-off is deacti-
vated.
Exterior lighting delayed switch-off is reactiva-
ted the next time you start the engine. 138
Menus and submenusOn-boardc
omputer and displays
Page 142 of 261
i
Depending on your vehicle's equipment,
when the surround lighting and exterio rlight-
ing delaye dswitch-off ar eon, the following
light up:
R side lamps
R dipped-beam headlamps
Switchin gthe interior lighting delayed
switch-off on/off
If yo uactivate the Lighting
Lighting delayed
delayedsw.-off
sw.-off
function, the interio rlighting remains on for
20 second safter yo uremove the key fro mthe
ignition lock.
X Press the =or; button on the steering
whee ltoselect theSettings
Settings menu.
X Press the :or9 button to select the
Lights
Lights submenu.
X Press ato confirm.
X Press the :or9 button to select the
Lighting delaye dsw.-off
Lighting delayed sw.-off function.
If the Lighting delayed sw.-off
Lighting delayed sw.-off function
has been activated, the vehicle interior is dis-
played in red in the multifunction display.
X Press ato save the setting.
Vehicle Activating/deactivating the automatic
locking feature
If you activate the Automatic door locks Automatic door locks
function, the vehicle is centrallyl ockedabov ea
spee dofa pproximately 15 km/h.
X Press the =or; buttononthesteering
whee ltos elect the Settings
Settings menu.
X Press the :or9 buttontos elect the
Vehicle
Vehicle submenu.
X Press ato confirm.
X Press the :or9 button to select the
Automatic doo rlocks
Automatic door locks function.
When the Automatic
Automatic door
doorlocks
locks function is
activated, the vehicle doors are displayed in
red in the multifunction display.
X Press ato save the setting.
For further information on the automatic locking
feature; see (Y page 62). Activating/deactivating the acoustic
locking confirmation
If you swi tchont heAcoustic Acoustic Lock
Lockfunction ,an
acoustic signal sounds when you loc kthe vehi-
cle.
X Press the =or; buttononthesteering
whee ltos elect the Settings
Settings menu.
X Press the :or9 buttontos elect the
Vehicle
Vehicle submenu.
X Press ato confirm.
X Press the :or9 button to select the
Acoustic Lock
Acoustic Lock function.
If the Acoustic Lock
Acoustic Lock function is activated,
the & symbol in the multifunctio ndisplay
lights up red.
X Press ato save the setting.
Heating Auxiliary heating departure time
G
DAN
GER
If th eexhaust pipe is blocke dorsufficient
ventilation is no tpossible, toxic exhaust
fumes can ente rthe vehicle, especially car-
bon monoxide. This is th ecase, e.g. in
enclosed spaces, or if th evehicl eiss tuck in
snow. There is ariskoff atal injuries.
You should switch off th eauxiliary heating in
enclosed spaces whic hdonothav eane xtrac-
tion system, e.g. agarage. If th evehicl eis
stuck in snow and you mus tleav ethe auxiliary
heating running, keep th eexhaust pipe and
th ea rea around th evehicl eclear of snow. To
guarantee asufficien tsupply of fresh air, open
aw indow on th eside of th evehicl eaway from
th ew ind. G
WARNING
When th eauxiliary heating is switched on,
parts of the vehicl ecan become very hot.
Flammable materials such as leaves, grass or twigs may ignite if they come into contact
with:
R hot parts of the exhaust system
R the exhaust gas itself
There is arisk of fire. Menus and submenus
139On-boardcomputer and displays
Z
Page 144 of 261
X
Press the :or9 button to select the
Easy Entry/Exit
Easy Entry/Exit function.
If the Easy
Easy Entry/Exit
Entry/Exit function is activated,
the vehicle steering wheel appears in red in
the multifunction display.
X Press ato save the setting.
Further informatio nonthe EASY-ENTRY/EXIT
feature (Y page 72). Resetting to factory settings
X Press the =or; button on the steering
wheel to select the Settings
Settingsmenu.
X Press the :or9 button to select the
Factory setting Factory setting submenu.
X Press ato confirm.
The Reset
Reset all allsettings?
settings? displaymessage
appears.
X Press the :or9 button to select No
Noor
Yes
Yes.
X Press ato confirm the selection.
If you have selected Yes
Yesand confirmed, the
multifunction displays howsaconfirmation
message. Display messages
Intro
duction
General notes Display messages appear in th
emultifunction
display.
Display message swithg raphic symbols ar esim-
plified in the Owner' sManualand ma ydiffer
fro mt he symbols in the multifunctio ndisplay.
Please respond in accordance with the display
message sand follo wthe additional note sinthis
Owner' sManual.
Certain displa ymessage sareaccompanied by
an audibl ewarning tone or acontinuous warning
tone. When yo
ustop and park the vehicle, please
observe the notes on:
R HOLD function (Y page 122)
R Parking (Y page 113)
Hiding displa ymessages X
Press the aor% button on the steering
wheel.
The multifunction display hides the display
message.
High-priority display messages are shown in red in the multifunction display. Some high-priority
display messages cannot be hidden.
The multifunction display shows these mes-
sages continuously until the causes for the mes- sages have been remedied.
Message memor ymenu The on-board computer saves certain display
messages in the
message memory.Y ou can
call up the display messages:
X Press the =or; button on the steering
wheel to select the Serv. Serv.menu.
If there are display messages, the multifunc-
tion display shows 2messages
2m essages ,for example.
X Press the 9or: button to select the
entry, e.g. 2messages
2m essages.
X Press ato confirm.
X Press the 9or: button to scroll
through the display messages.
When the ignition is switched off, all display
messages are deleted apart from some high-
priority display messages. Once the causes of
the high-priorit ydisplay messages have been
rectified, these display messages are deleted as well. Display me
ssages
141On-board compute rand displays Z
Page 148 of 261

Display messages
Possible causes/consequence
sand M
MSolutions 6
Rear left malfunc‐ Rear left malfunc‐
tion Consult work‐ tion Consult work‐
shop shop
orRear right
Rear right
malfunction
malfunction Consult
Consult
workshop
workshop The rear left-hand or right-hand restraint system has malfunctioned.
The 6 warning lamp also lights up in the instrument cluster.
G WARNING
The airbags or belt tensioners may either be triggered unintentionally or, in the event of an accident, may not be triggered.
This poses an increased risk of injury.
X Consult aqualified specialist workshop. 6
Rear Rear
centre
centre malfunc‐
malfunc‐
tion Consult work‐
tion Consult work‐
shop shop The rear centre restraint system has malfunctioned. The
6warning
lamp also lights up in the instrument cluster.
G WARNING
The airbags or belt tensioners may either be triggered unintentionally or, in the event of an accident ,may not be triggered.
This poses an increased risk of injury.
X Consult aqualified specialist workshop. Lights
Display messages
Possible causes/consequence
sand M
MSolutions b
Left dipped beam Left dipped beam
(example) The bulb in question is faulty.
X Consult aqualified specialist workshop.
or X Check whether you are permitted to replace the bulb yourself
(Y page 78).
i LED light bulbs: the display message for the corresponding lamp
appears only when all the LEDsint he lamp have failed.b
Malfunction Malfunction
See
SeeOwn‐
Own‐
er's Manual
er's Manual The exterior lighting is faulty.
X Consult aqualified specialist workshop. b
AUTO lights inoper‐ AUTO lights inoper‐
ative ative The light sensor is faulty.
X
Consult aqualified specialist workshop. b
Remove key Remove key You have inserted the key into the ignition lock.
X Remove the key from the ignition lock. b
Switch off lights Switch off lights The lights are still switched on when you leave the vehicle.
Awarning
tonea lso sounds.
X Turn the light switch to the Ãposition. Display me
ssages
145On-board compute rand displays Z
Page 158 of 261
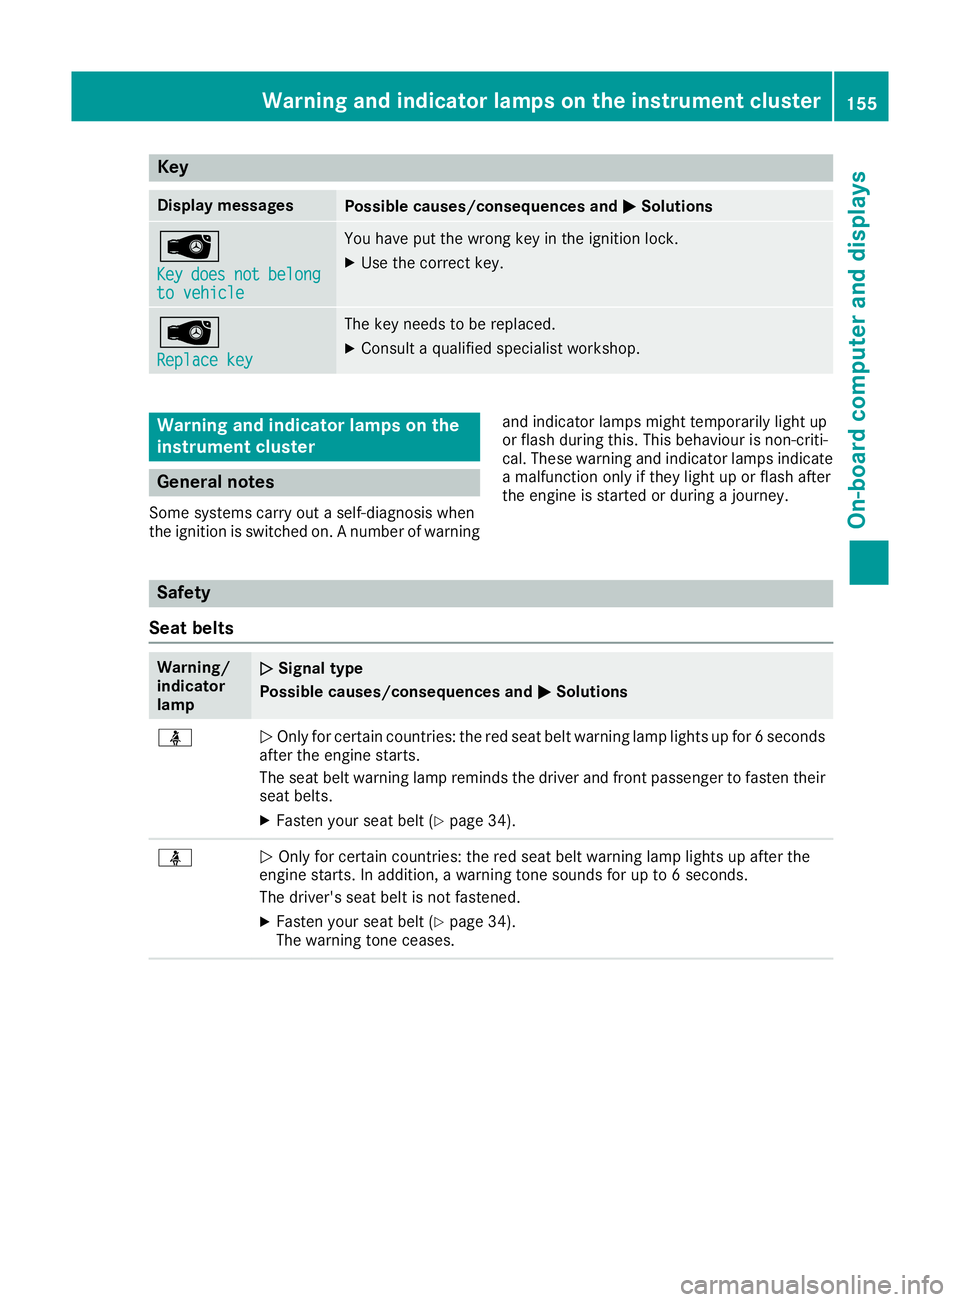
Key
Display messages
Possible causes/consequence
sand M
MSolutions Â
Key Key
does
does not
notbelong
belong
to vehicle
to vehicle You have put the wrong key in the ignition lock.
X Use the correct key. Â
Replace key Replace key The key needs to be replaced.
X Consult aqualified specialist workshop. Warning and indi
cator lamps on the
instrument cluster General notes
Some systems carry out aself-diagnosi swhen
the ignition is switched on. Anumber of warning and indicator lamps might tempo
rarily light up
or flas hdurin gthis. This behaviour is non-criti-
cal. Thes ewarning and indicator lamps indicate
am alfunctio nonlyift heylight up or flash after
th ee ngine is started or durin gajourney. Safety
Seat belts Warning/
indicator
lamp
N N
Signal type
Possible causes/consequences and M
MSolutions ü
N
Onl yfor certain countries: the red seat belt warning lamp lights up for 6seconds
after the engine starts.
The seat belt warning lamp reminds the driver and front passenger to fasten their
seat belts.
X Fasten your seat belt (Y page 34).ü
N
Only for certain countries: the red seat belt warning lamp lights up after the
engine starts. In addition, awarning tone sounds for up to 6seconds.
The driver's seat belt is not fastened.
X Fasten your seat belt (Y page 34).
The warning tone ceases. Warnin
gand indicator lamps on the instrument cluster
155On-boardcomputer and displays Z
Page 173 of 261
Function Page
K
TUNER
Selects th
eradio 176
Sets the waveband 176
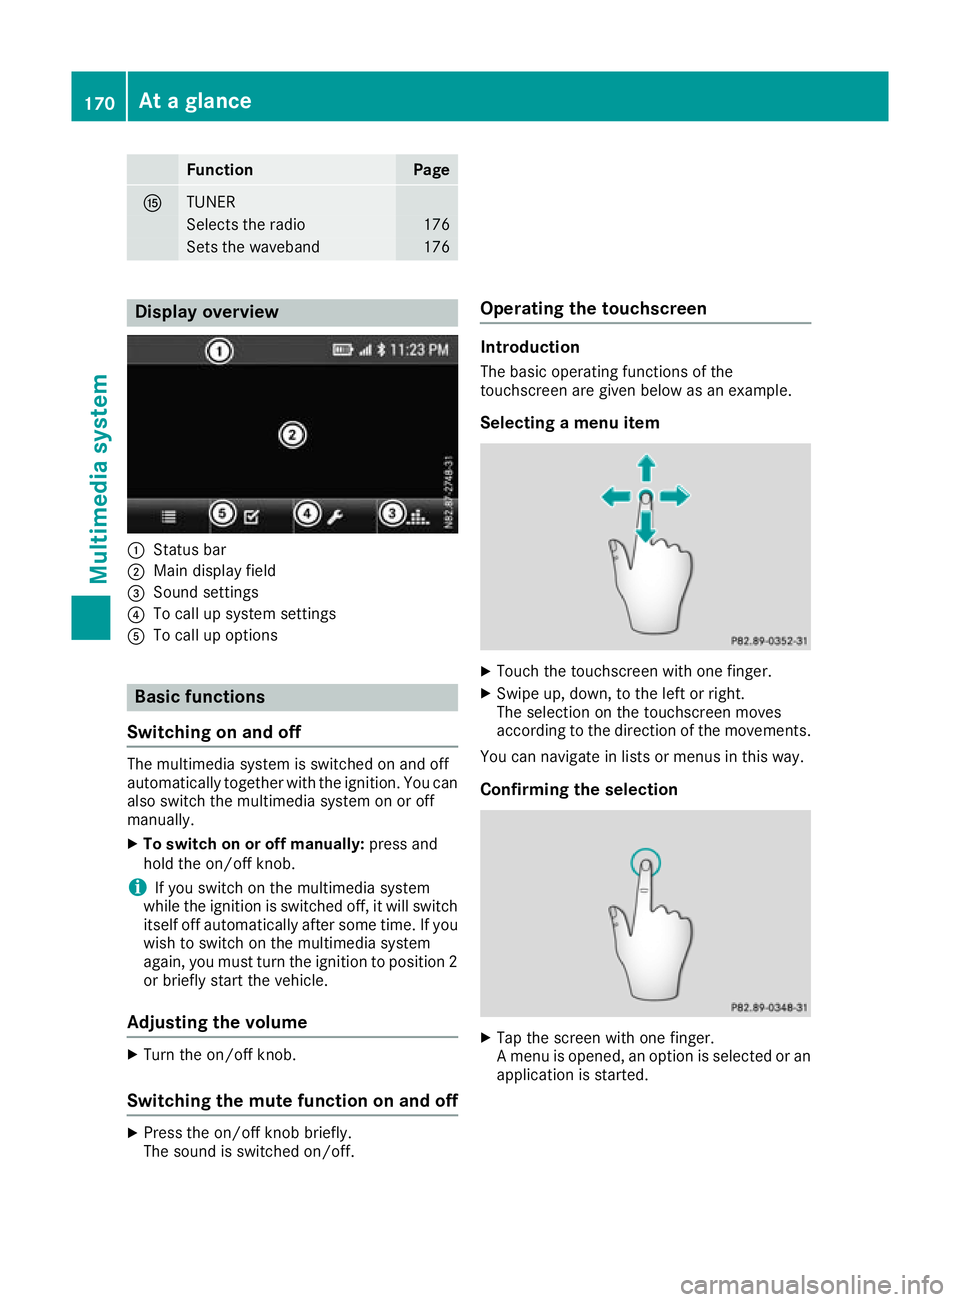
Display overview
:
Statu sbar
; Main display field
= Sound settings
? To cal lupsystem settings
A To cal lupoptions Basi
cfunctions
Switchin gonand off The multimedi
asystem is switched on and off
automatically together with the ignition. You can
also switch the multimedia system on or off
manually.
X To switch on or off manually: press and
hold the on/of fknob.
i If you switch on the multimedia system
while the ignition is switched off, it will switch
itself off automatically after some time. If you
wish to switch on the multimedia system
again, you must turn the ignition to position 2
or briefly start the vehicle.
Adjusting the volume X
Turn the on/of fknob.
Switching the mutef unction on and offX
Press the on/of fknobb riefly.
The sound is switched on/off. Operating the touchscreen Introduction
The basico perating function softhe
touchscree nare given below as an example.
Selecting amenui tem X
Touc hthe touchscreen with one finger.
X Swipe up, down, to the left or right.
The selection on the touchscreen moves
according to the direction of the movements.
You can navigate in lists or menus in this way.
Confirming the selection X
Tap the screen with one finger.
Am enu is opened, an option is selected or an
application is started. 170
At
ag lanceMultimedia system
Page 175 of 261
Setting the date
X
Select ¯.
X Select Date/Time
Date/Time.
X Select the date.
An input men uappears.
X Set the date using the arrows.
Setting the time X
Select ¯.
X Select Date/Time
Date/Time.
X Select the time.
An input menu appears.
X Set the time using the arrows. Synchronisin
gthe time
The following functions are available:
R RDS RDS:ift his function is activated, the time will
be regularly compared with the RDS 5
time
signal and adjusted if necessary
R GPS
GPS:ift his function is activated, the time will
be regularly compared with the GPS 6
time
signal and adjusted if necessary
R Manually
Manually:ift his function is activated, the
time set manually is maintained
X Select ¯.
X Select Time synchronizing
Time synchronizing.
X Select the desired setting.
The #dot indicates the current setting. Adjusting the standby time
If this function is activated, the mul timedia sys-
te mr emain sinstandby mod efor th eset time
after th eignition has been switched off .Ifthe
ignition is switched on again during this set time,
th en avigation system, for example, is available
again immediately.
X Select ¯.
X Select Standby
Standby.
X Selec tthe desired setting, 5minutes
5m inutes, 15 15
minutes
minutes, 30 minutes
30 minutes orOff
Off .
The #dot indicates the curren tsetting. Switching the button tone on/off
X Select ¯.
X Select Key tone
Key tone.
X The #dot indicates that the function is acti-
vated. Switching the AM waveband on/off
In order to select the AM waveband in radio
operation, the AM-Tuner AM-Tunermust be activated in
the system settings.
X To switch the AM waveband on/off: select
¯.
X Select AM-Tuner
AM-Tuner.
The #dot indicates that the function is acti-
vated. Display settings
The mul timedia system includes an optimised
display design fo rday and night mode.
X Select ¯.
X Select Day/night mode
Day/night mode.
X Selec tthe desire dsetting.
The #dot indicates th ecurren tsetting.
Wit hthe Auto
Auto setting ,the display design is
automatically adapted to th ebrightness of
th ea mbien tlight.
Afte rselecting Custom
Custom,aday mode bright-
ness scale appears.
X Se tthe desire dbrightness usin gthe arrows.
X Selec tSave ý.
An ight mode brightness scale appears.
X Se tthe desire dbrightness usin gthe arrows.
X Selec tSave ý. Control settings
The function of th econtrol knob in navigation
mod ecan be set in amultimedia system with
navigation.
The control knob can be set so that turning:
R zooms in or out of th emap
R jumps to th enextorp revious statio nortrack
5 Radio Dat aSystem.
6 Global Positionin gSystem. 172
System settingsMultimedia system