2016 MERCEDES-BENZ G-CLASS SUV ignition
[x] Cancel search: ignitionPage 55 of 261
Pets in the vehicle
G
WARNING
If you leave animals unsupervised or unse-
cured in the vehicle, they may push abutton
or as witch, for example.
They could:
R activate vehicl eequipment and become
trapped, for example
R switch vehicl esystems on or off, thus
endangering other road users
In the event of an accident, sudden braking or
abrupt changes of direction, unsecured ani-
mals coul dbeflung around the vehicle, injur-
ing the vehicl eoccupants. There is arisk of an
accident and injury.
Never leave animals unattended in the vehi-
cle. Always secure animals correctly during a
journey ,e.g. in an anima ltransport box. Driving safe
tysystems Drivin
gsafet ys ystems overview
In this section ,you will fin dinformati on about
th ef ollowin gdrivin gsafet ysystems:
R AB S(Anti-lock Braking System)
(Y page 52)
R BA S(Brake Assist System) (Y page 53)
R Adaptive brake lights (Y page 53)
R ESP ®
(Electronic Stability Program)
(Y page 53)
R EB D( electronic brak eforce distributi on)
(Y page 55)
R ADAPTIV EBRAKE (Y page 56) Important safety notes
If you fail to adapt your driving style or if you are
inattentive, th edriving safet ysystems can nei-
ther reduce th eriskofana ccidentnor override
th el aws of physics .Drivin gs afet ysystems are
merely aids designed to assist driving .You are
responsible for maintainin gthe distanc etothe
vehicl einfront,for vehicl espeed, for braking in
goo dtime, and for staying in lane. Always adapt
your driving style to suit th eprevailing road and weather conditions and maintain
asafe distance
fro mt hevehicle in front .Drive carefully.
The driving safet ysystems described work as
effectively as possible only when there is ade-
quate contac tbetween th etyres and th eroad
surface. Pay particular attention to th einforma-
tio nr egarding tyres, recommended minimum
tyr etread depths etc .inthe"Wheels and tyres"
sectio n(Ypage 235).
In wintry driving conditions ,always use winter
tyres (M+S tyres) and, if necessary, snow
chains. Only in this way will th edriving safety
systems described in this sectio nwork as effec-
tively as possible. ABS (Anti-lock Braking System)
Genera linformation AB
Sregulate sbrake pressure in such awaythat
the wheels do not lock when yo ubrake. This
allows yo utocontinue steering the vehicl ewhen
braking.
The yellow !ABS warning lamp in the instru-
ment cluster lights up when the ignition is
switched on. It goe soutwhen the engine is run-
ning.
ABS works from aspeed of abou t8km/h,
regardless of road-surface conditions. ABS
works on slippery surfaces ,evenw heny ou
brake onl ygently.
Important safety notes i
Observ
ethe "Important safety notes" sec-
tion (Y page 52). G
WARNING
If ABS is faulty, the wheels could lock when
braking. The steerability and braking charac-
teristics may be severely impaired.A ddition-
ally, further driving safety systems are deac-
tivated. There is an increased dange rofskid-
ding and accidents.
Drive on carefully.H ave ABS checked imme-
diately at aqualified specialist workshop.
If ABS is malfunctioning, other systems ,includ-
ing driving safety systems ,willa lsob ecome
inoperative. Observe the information on the ABS warning lamp (Y page158) and display mes- 52
Driving safety systemsSafety
Page 57 of 261
4ETS (Electronic Traction System)
i
Observ
ethe "Important safety notes" sec-
tion (Y page 52).
4ETS traction control is part of ESP ®
.
4ETS traction control is no longer active above a
speed of approximately 60 km/h.
Traction control brakes the drive wheels indi-
vidually if they spin. This enables you to pull
awaya nd accelerate on slippery surfaces, e.g. if
the road surface is slippery on one side. In addi-
tion, more drive torque is transferred to the
wheel or wheels with traction.
Traction control remains active if you deactivate
ESP ®
.
Important safety notes i
Observe the "Important safety notes" sec-
tion (Y page 52). G
WARNING
If ESP ®
is malfunctioning, ESP ®
is unable to
stabilise the vehicle. In addition, other driving
safety systems are switched off. This increa-
ses the risk of skidding and an accident.
Drive on carefully.H ave ESP®
checked at a
qualified specialist workshop.
! Only operate the vehicl
efor am aximu mof
ten seconds on abrake dynamometer. Switch
off the ignition.
Application of the brakes by ESP ®
may oth-
erwise destroy the brake system.
! Af
unction or performance test should only
be carrie dout on atwin-axle dynamometer.
Before you operate the vehicl eonsuch a
dynamometer, please consult aqualified
workshop. You coul dotherwise damage the
drive train or the brake system.
If the å ESP®
OFF warning lamp lights up
continuously,E SP®
is deactivated.
If the ÷ ESP®
warning lamp lights up contin-
uously,E SP®
is not available due to amalfunc-
tion.
Observe the information on warning lamps
(Y page1 59) and display messages which may
be displayed in the instrument cluster
(Y page1 42). Use only wheels with the recommended tyre
sizes. Only then will ESP ®
functio nproperly.
If differential locks are switched on, ABS,B AS
and ESP ®
switch off automatically.
Characteristics of ESP ® General information
If the ÷ ESP warning lamp goes out before
you begin the journey, ESP ®
is automatically
active.
If ESP ®
intervenes,t he÷ ESP®
warning lamp
flashes on the instrument cluster.
If ESP ®
intervenes:
X Do not deactivate ESP ®
under any circum-
stances.
X When pulling away, depress the accelerator
pedalo nly as far as is necessary.
X Adapt yourd riving style to suit the prevailing
road and weather conditions.
ECO start/stop function
The ECO start/stop function switches the
engine off automaticall yifthe vehicle stops
moving. When the vehicle pulls awaya gain, the
engine starts automatically. ESP ®
remains in its
previously selected status, e.g. if ESP ®
was
deactivated before the engine was automati-
callys witched off.
Deactivating/activating ESP ® Im
portant safety notes
i Observ
ethe "Importan tsafety notes" sec-
tio n(Ypage 52).
You can select between th efollowin gESP®
sta-
tuses:
R ESP ®
is activated
R ESP ®
is deactivated G
WARNING
If yo udeactivate ESP ®
,E SP ®
no longer sta-
bilises the vehicle. There is an increased risk
of skidding and an accident.
Only deactivate ESP ®
in the situations descri-
bed in the following. 54
Driving safety systemsSafety
Page 59 of 261
the brake syste
mchecked at aquali fied spe-
cialist workshop.
Observe information regarding indicator and
warning lamps (Y page 158)asw ellasd isplay
message s(Ypage 143). ADAPTIV
EBRAKE
ADAPTIV EBRAKE provides increased braking
safety. In addition to th ebraking function,
ADAPTIV EBRAKE also features th eHOLDF unc-
tion (Y page 122). Protectio
nagainst theft Immobiliser
The immobiliser prevents yourv ehiclefrom
bein gstarted without th ecorrect key.
X To activate: remove thekeyfrom th eignition
lock.
X To deactivate: switch on theignition.
When leaving th evehicle, always tak ethe key
wit hyou and loc kthe vehicle. The engin ecan be
started by anyone wit havalid ke ythatisl eft
inside th evehicle.
i The immobiliser is always deactivated when
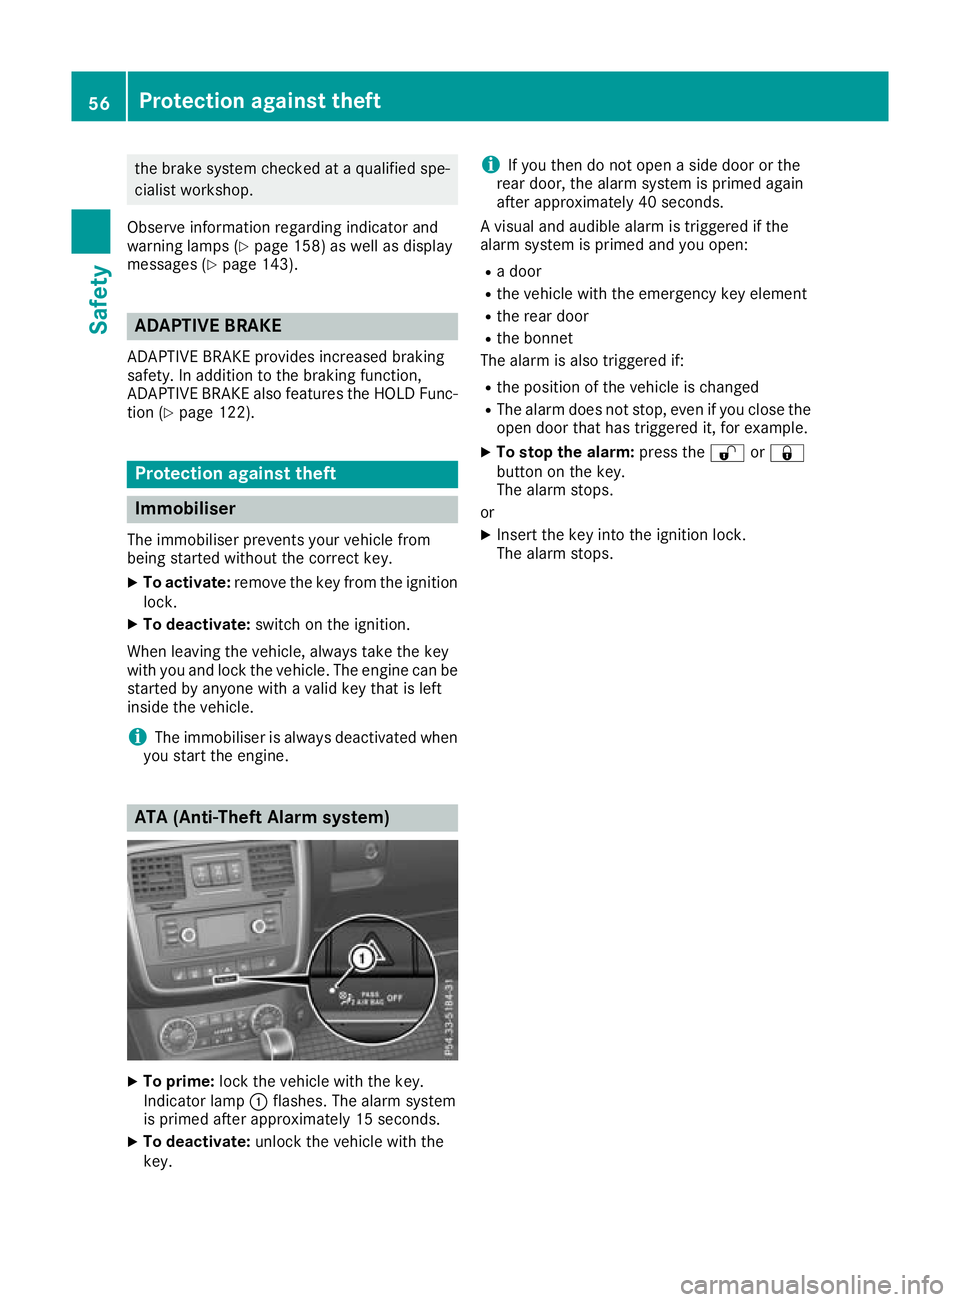
you start th eengine. ATA (Anti-Thef
tAlarms ystem) X
To prime: lockthe vehicl ewitht he key.
Indicato rlamp :flashes. The alarm system
is primed afte rapproximatel y15s econds.
X To deactivate: unlock the vehicl ewitht he
key. i
If you then do not open
aside door or the
rear door, the alarm system is primed again
after approximately 40 seconds.
Av isuala nd audible alarm is triggered if the
alarm system is primed and you open:
R ad oor
R the vehicle with the emergency key element
R the rear door
R the bonnet
The alarm is also triggered if:
R the positio nofthe vehicle is changed
R The alarm does not stop, even if you close the
open door that has triggered it, for example.
X To stop the alarm: press the%or&
button on the key.
The alarm stops.
or X Insert the key into the ignition lock.
The alarm stops. 56
Protectiona
gainst theftSafety
Page 61 of 261
The key centrally locks/unlocks:
R the doors
R the rear door
R the fuel filler flap
X To unlock centrally: press the%button.
If you do not open the vehicle within approx-
imately 40 seconds of unlocking:
R the vehicle locks again
R protection against theft is reactivated
X To lock centrally: press the&button.
i If the
& button is pressed when the driv-
er's door is open, the rear side door on the
driver's side is not locked either.
During unlocking, the turn signals flash once.
During locking, they flash three times.
You can also set an audibl esignal to confirm
that the vehicle has been locked. The audible
signal can be activated or deactivated using the
on-board computer (Y page 139).
Only when all the components have been locked is the visual or audibl elockingc onfirmation
issued.
When the surround lighting is activated via the
on-board computer, it lights up when it is dark
after the vehicle is unlocked with the key
(Y page 138). Changing the settings of the locking
system
You can change the settings of the lockin gsys-
tem. This mean sthato nlyt he driver' sdoor and
th ef uel fille rflap are unlocked when th evehicle
is unlocked. This is useful if you frequently travel
alone.
X To change th esetting: pressand hold down
the % and& buttons simultaneously
for about six seconds until th ebattery indica-
to rlamp flashes twice (Y page 59).
If th esettin goft helockin gsystem is changed
within th esignal range of th evehicle ,pressing
the & or% button:
R locks or
R unlock sthe vehicle The key now func
tions as follows:
X To unlock the driver's door and fuel filler
flap:
press the %button once.
X To unlock centrally: press the%button
twice.
X To lock centrally: press the&button.
X To restor ethe factory settings: press and
hold down the %and& button ssimul-
taneously for approximately six seconds until the battery check lamp flashes twice
(Y page 59). Emergency key element
Genera lnotes If the vehicl
ecan no longer be unlocked with the
key, use the emergency key element.
If you use the emergency key element to unlock
and open the driver's door, the anti-theft alarm
system willbet riggered. Switch off the alarm
(Y page 56).
If you unlock the vehicle using the emergency
key element, the fuel fillerf lap willnot be
unlocked automatically.
X To unlockt he fuel fillerf lap:insert the key
into the ignition lock.
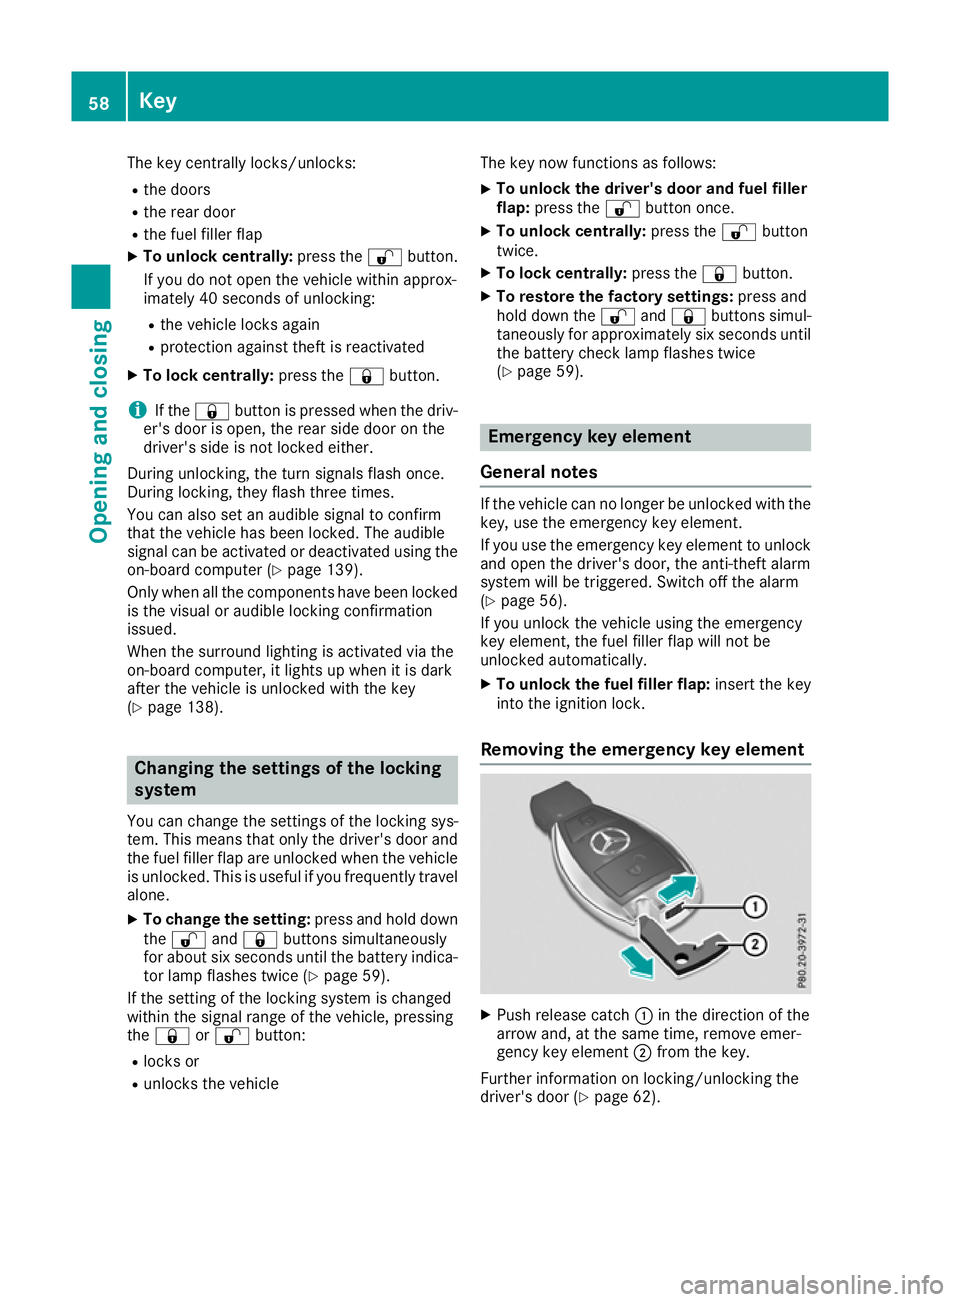
Removing the emergency key element X
Push releasec atch:in the direction of the
arrow and, at the same time, remove emer-
gency key element ;from the key.
Further information on locking/unlocking the
driver's door (Y page 62).58
KeyOpening and closing
Page 65 of 261

Centrally lockin
gand unlocking the
vehicle from th einside
You can centrally loc korunlock th evehicle from
th ei nside.
The butto nfor th ecentral lockin gdoes no tlock
or unlock th efuel fille rflap.
The switch for th ecentral lockin gisonthelower
sectio nofthecentr econsole. X
To unlock: press button :.
X To lock: press button ;.
United Kingdom only: if thevehicl ehasbeen
locked with the key ,the double lock functio nis
activate dasstandard. It is then not possibl eto
open the doors from insid ethe vehicle. Yo ucan
deactivate the double lock functio nbydeacti-
vating the interio rmotion sensor (se eDigital
Owner' sManual) .Opening/closing doors is
then possibl easfollows :the doors can be
opene dfrom inside. Yo ucan onl yopent he rear
side doors from insid ethe vehicl eifthey are not
secured by the child-proof locks (Y page 51).
i It is onl
ypossibl etol ockt he vehicl ecen-
trally if the driver's door is closed.
i The doors unlock automaticall
yinthe event
of an accident if the force of the impact
exceed sapredetermined level. Automatic locking feature
X
To deactivate: press and holdbutton :for
approximatel yfives econds unti latone
sounds.
X To activate: press and hol dbutton ;for
approximatel yfives econds unti latone
sounds.
If yo upress one of the two buttons and do not
hea rat one, the relevant setting ha salready
been selected.
The vehicl eislocked automaticall ywhent he
ignition is switched on and the wheels are turn-
ing.
Therefore, yo ucould be locked ou tif:
R the vehicl eisbeing pushed
R the vehicl eisbeing towed
R the vehicl eisbeing teste donadynamometer
Yo uc an also activate and deactivate the auto-
matic locking functio nusing the on-board com-
puter (Y page 139). Locking/unlocking the driver's door
with the emergenc
ykey 62
DoorsOpening and closing
Page 74 of 261
even suffer burn-like injuries. There is
arisk of
injury.
Therefore, do not switch on the seat heating
repeatedly.
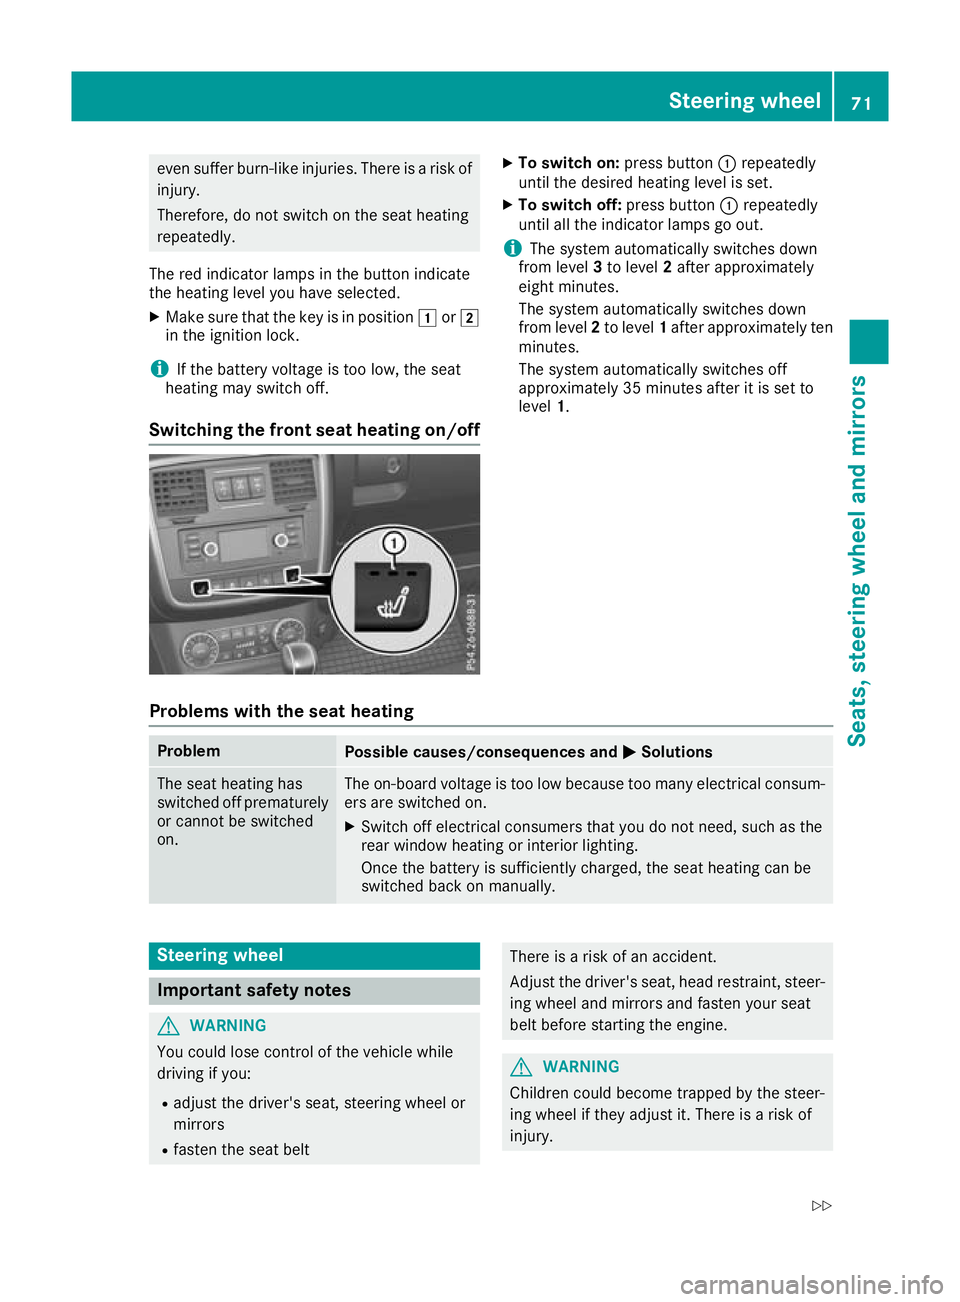
The red indicator lamps in the button indicate
the heating level you have selected.
X Make sure that the key is in position 1or2
in the ignition lock.
i If the batter
yvoltage is too low, the seat
heating may switch off.
Switching the front seat heating on/off X
To switch on: press button:repeatedly
until th edesir ed heating level is set.
X To switc hoff:press button :repeatedly
unti lallthe indicator lamps go out.
i The system automaticall
yswitches down
from level 3to level 2afte rapproximately
eight minutes.
The system automaticall yswitches down
from level 2to level 1afte rapp roximatel yten
minutes.
The system automaticall yswitches off
approximatel y35minutes afte ritisset to
level 1.
Problems wit hthe seat heating Problem
Possible causes/consequences and
M MSolutions The seat heating has
switched off prematurely
or cannot be switched
on. The on-board voltage is too low because too many electrical consum-
ers are switched on.
X Switch off electrical consumers that you do not need, such as the
rear window heating or interior lighting.
Once the battery is sufficiently charged, the seat heating can be
switched back on manually. Steering wheel
Important safety notes
G
WARNING
You could lose control of the vehicle while
driving if you:
R adjust the driver's seat, steering wheel or
mirrors
R faste nthe seat belt There is
arisk of an accident.
Adjust the driver's seat, head restraint, steer- ing wheel and mirrors and fasten your seat
belt before starting the engine. G
WARNING
Children could becom etrappe dbythe steer-
ing whee lifthey adjust it. There is arisk of
injury. Steering wheel
71Seats,steering wheela nd mirrors
Z
Page 75 of 261
When leaving the vehicle, alway
stake the key
with you and lock the vehicle. Never leave
children unattended in the vehicle.
The electrically adjustable steerin gwheel can
still be adjusted when there is no key in the igni-
tion lock. Adjust
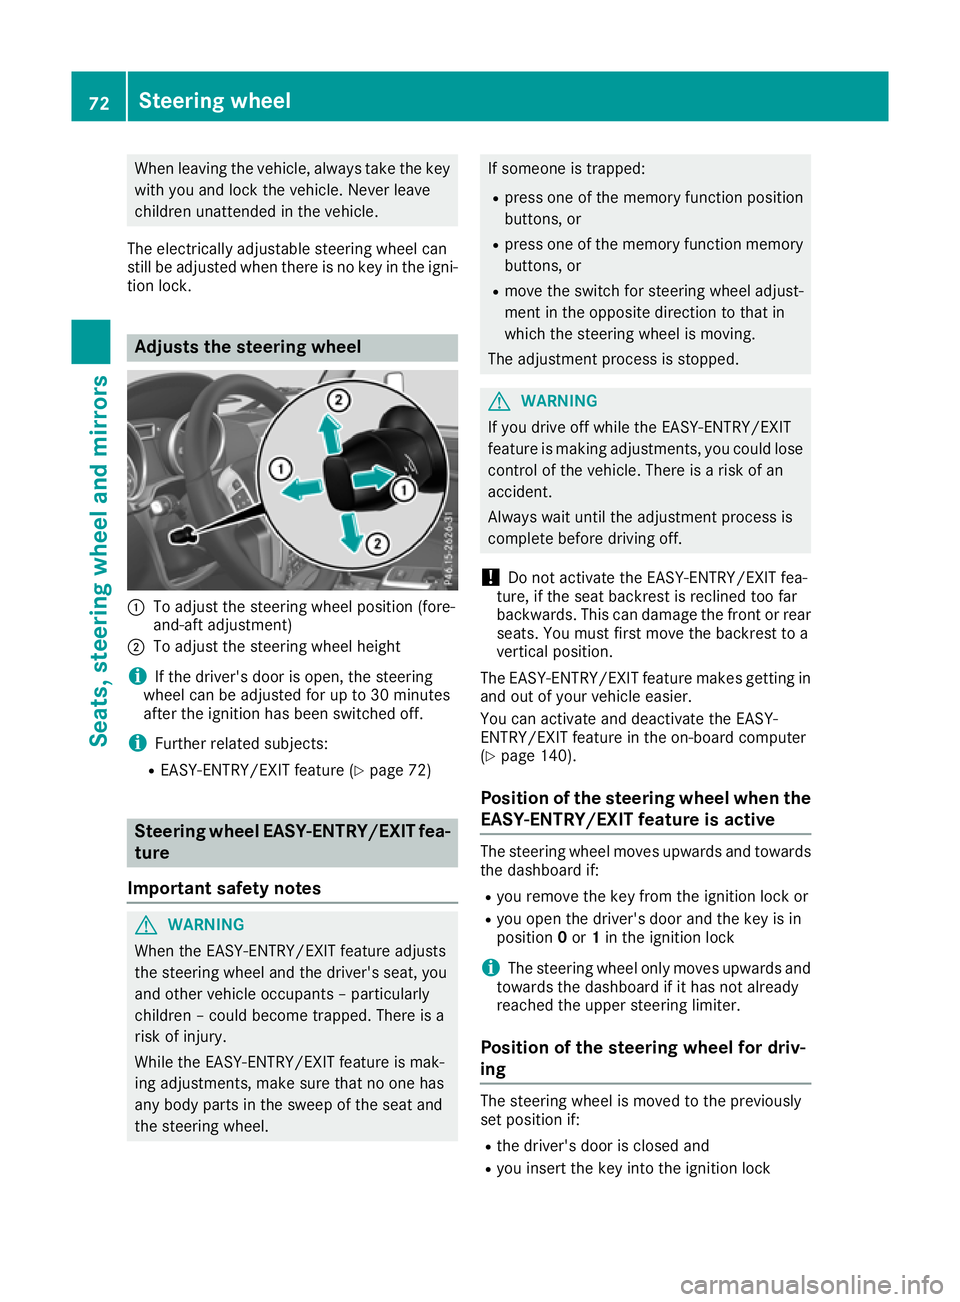
sthe steering wheel :
To adjust the steeri ngwheel position (fore-
and-aft adjustment)
; To adjust the steerin gwheel height
i If the driver's door is open, the steering
wheel can be adjusted for up to 30 minutes
after the ignition has been switched off.
i Further related subjects:
R EASY-ENTRY/EXIT feature (Y page 72)Steering wheel EASY-ENTRY/EXIT fea-
ture
Important safety notes G
WARNING
When the EASY-ENTRY/EXIT feature adjusts
the steering wheel and the driver's seat, you
and other vehicle occup ants –p articularly
children –couldb ecome trapped. There is a
risk of injury.
Whil ethe EASY-ENTRY/EXIT feature is mak-
ing adjustments, make sure that no one has
any body parts in the swee pofthe seat and
the steering wheel. If someone is trapped:
R press one of the memory function position
buttons, or
R press one of the memory function memory
buttons, or
R move the switch for steering wheel adjust-
ment in the opposite direction to that in
which the steering wheel is moving.
The adjustment process is stopped. G
WARNING
If you drive off while the EASY-ENTRY/EXIT
feature is making adjustments, you coul dlose
control of the vehicle. There is arisk of an
accident.
Always waitu ntil the adjustment process is
complete before driving off.
! Do not activate the EASY-ENTRY/EXIT fea-
ture, if the seat backrest is recline dtoo far
backwards. This can damage the front or rear seats. You must first move the backrest to a
vertical position.
The EASY-ENTRY/EXIT feature makes getting in
and out of yourv ehicleeasier.
You can activate and deactivate the EASY-
ENTRY/EXIT feature in the on-board computer
(Y page1 40).
Position of the steering wheel whent he
EASY-ENTRY/EXIT feature is active The steering wheel moves upwards and towards
the dashboard if:
R you remov ethe key from the ignition lock or
R you open the driver's door and the key is in
position 0or 1in the ignition lock
i The steerin
gwheel only moves upwards and
towards the dashboard if it has not already
reached the upper steerin glimiter.
Position of the steering wheel for driv-
ing The steerin
gwheel is moved to the previously
set position if:
R the driver's door is closed and
R you insert the key into the ignition lock 72
Steering wheelSeats, steering wheel and mirrors
Page 76 of 261
The last position of the steerin
gcolumn is stored
when you switch off the ignition. Mirrors
Rear-view mirror
G
WARNING
Electrolyte may escape if the glass in an auto- matic anti-dazzle mirro rbreaks. The electro-
lyte is harmfu land causes irritation. It must
not come into contact with yours kin, eyes,
respiratory organs or clothing or be swal-
lowed. There is arisk of injury.
If you come into contact with the electrolyte,
observe the following:
R Rinse off the electrolyte from yours kin
immediatel ywith water.
R Immediately rinse the electrolyte out of
youre yest horoughly with clea nwater.
R If the electrolyte is swallowed,i mmediately
rinse yourm outh out thoroughly.Don ot
induce vomiting.
R If electrolyte comes into contact with your
skin or hairoriss wallowed,seek medical
attention immediately.
R Immediately change out of clothing which
has come into contact with electrolyte.
R If an allergic reactio noccurs, seek medical
attention immediately.
X Adjust the rear-view mirror in such away that
you have agood view of road and traffic con-
ditions behind you.
The rear-view mirror automatically goes into
anti-dazzle mode if:
R the ignitio nisswitched on
R incident light from headlamps strikes the sen-
sor in the rear-view mirror
The rear-view mirror does not go into anti-dazzle
mode if reverse gearise ngaged or if the interior
lighting is switched on. Exterior mi
rrors
Adjusting th eexterio rmirror smanually X
Adjust th eexterio rmirrors in such awaythat
yo uc an get agoodo verview of roa dand traf-
fic conditions. Mirrors
73Seats, steering wheel and mirrors Z