2016 MERCEDES-BENZ G-CLASS SUV ignition
[x] Cancel search: ignitionPage 176 of 261
X
Select ¯.
X Select Controller setting
Controller setting.
X Select the desire dsetting.
The #dot indicates the current setting.
i If the
Change station/title
Change station/title function is
active and the navigation system is running in
the front, zooming into or ou tofthe map is
only possible via the touchscreen.
i In the 3D display
,you can only zoom ou tof
the map up to acertain scale .Ifyouzoom out
beyond this scale ,the map switches to a2D
display. Settin
gthe system language
X Select ¯.
X Select the Language
Language.
Al ist of available languages appears.
X Select the desired language.
The #dot indicates the active language. Raisin
gorlowering the volume of
audio sources
Yo uc an raise or lowe rthe volume of individual
audi osources relative to the volume set on the
multimedi asystem. For example, yo ucan set
traffic reports to play back louder than the cur-
rentl yset volume.
X Select ¯.
X Select Volume
Volume.
X Select the desire daudio source.
Am enu appears.
X Set the desire dvalue using the arrows.
X Select Save ý.
The menu is closed. Starting
aself diagnosis
The self-diagnosis checksw hether radio and
GPS signals are being received and whether all
loudspeakers are emittings ound.
X Select ¯.
X Select Self-diagnosis Self-diagnosis.
The diagnostics display appears.
X Select TEST
TEST.
The self diagnosis starts. Calling up version info
rmation
X Select ¯.
X Select Versio ninfo
Versio ninfo.
Information on th esoftwar estatus of th emul-
timedia system is displayed. Resettin
gthe multimedi asystem
Resetting to factory settings Thi
sfunction return sthe settings of the multi-
media system to the factor ysettings. This will
delete all personal settings.
X Select ¯.
X Select Factory reset Factory reset.
Ap rompt appears asking whether you wish to
reset the multimedia system.
X To reset: selectYES
YES.
The multimedia system is reset to its factory
settings.
Restarting the multimedia system In the following cases, restarting the multimedia
system may be useful:
R if the multimedia system is not operating cor-
rectly
R if malfunctions occur
R if the vehicl eisdisplayedatani ncorrect loca-
tion on the map
There are two methods of restarting the multi-
media system.
Method 1: restart using the on/off knob
X Remove any devices that may be connected
to the multimedia system.
X Press and hold the on/off knob for five sec-
onds.
The multimedia system restarts.
Method 2: restart using the RESET button on the
front of the device
X Remove any devices that may be connected
to the multimedia system.
X Switch off the ignition.
X Using apointed object, press the RESET but-
ton on the front of the multimedia system.
The multimedia system restarts. System settings
173Multimedia system Z
Page 212 of 261
Cigarett
elighter G
WARNING
Yo uc an burn yourself if you touch the hot
heating element or the socket of the cigarette lighter.
In addition, flammable materials can ignite if:
R the hot cigarette lighter falls
R ac hild hold sthe hot cigarette lighter to
objects, for example
There is arisk of fire and injury.
Always hold the cigarette lighter by the knob.
Always make sure that the cigarette lighter is
out of reach of children. Never leave children unattended in the vehicle. X
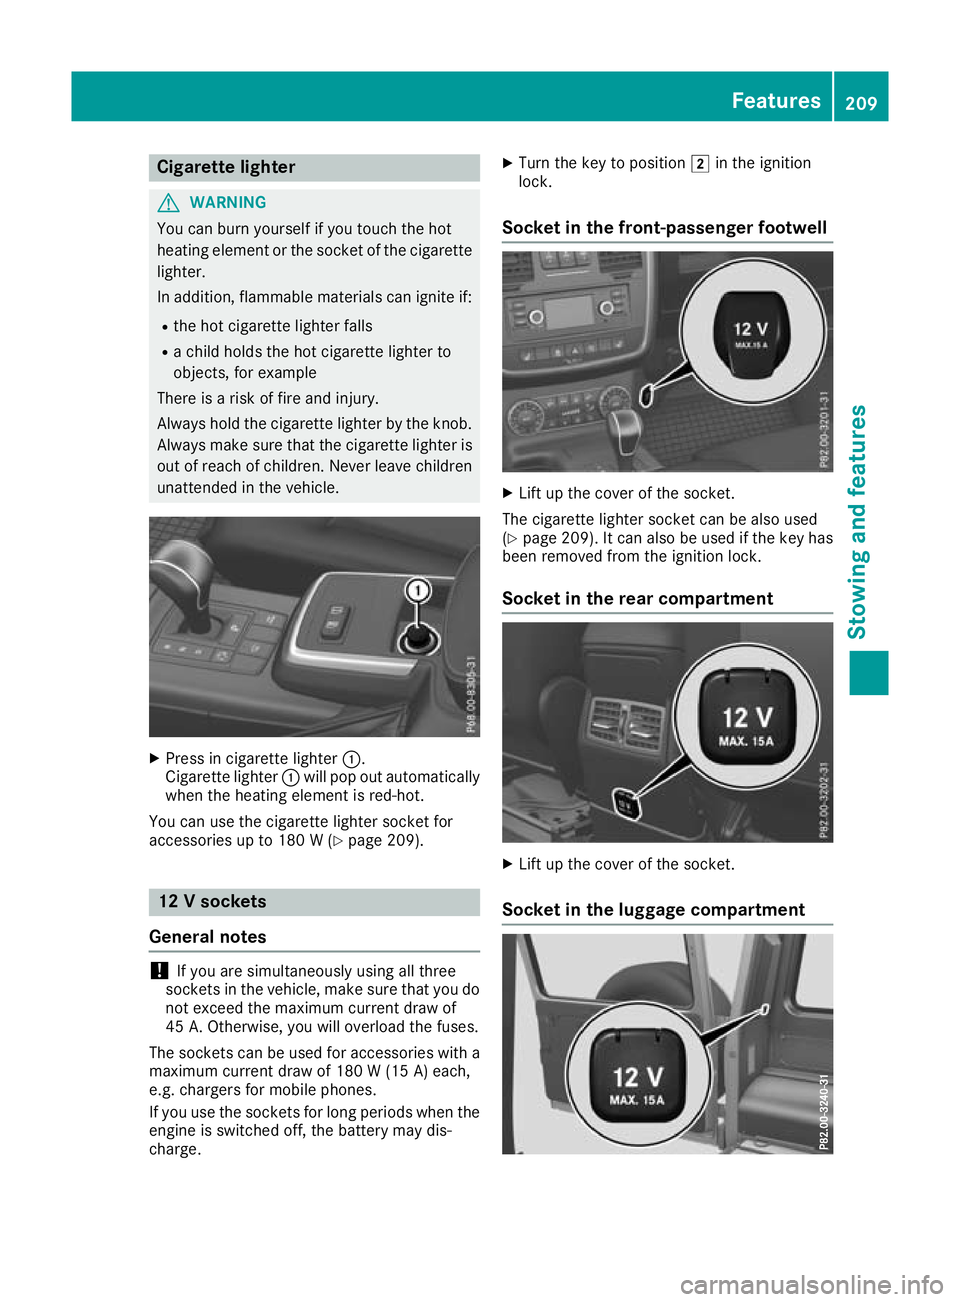
Pres sinc igarett elighter :.
Cigarette lighter :will pop out automatically
when the heating element is red-hot.
You can use the cigarett elighter socket for
accessories up to 180 W(Ypage 209). 12
Vsockets
General notes !
If you are simultaneously using all three
socketsint he vehicle, make sure that you do
not exceed the maximum current draw of
45 A. Otherwise, you will overload the fuses.
The sockets can be used for accessories with a maximum current draw of 180 W(15 A) each,
e.g. chargers fo rmobile phones.
If you use the sockets for long periods whe nthe
engine is switched off, the battery may dis-
charge. X
Turn the key to position 2in the ignition
lock.
Socket in the front-passenger footwell X
Lift up the cover of the socket.
The cigarette lighter socket can be also used
(Y page 209). It can also be used if the key has
been removed from the ignition lock.
Socket in the rear compartment X
Lift up the cover of the socket.
Socket in the luggag ecompartment Features
209Stowing and features Z
Page 214 of 261
Engine compartment
Bonnet
Importan tsafety notes G
WARNING
An unlocked bonne tmay open up when the
vehicl eisinm otion and block yourv iew.There
is ar isk of an accident.
Never unlock the bonnet when driving. Before
every trip, ensure that the bonnet is locked. G
WARNING
When being opened and closed ,the bonnet
may suddenly fall into the closed position.
There is arisk of injury to persons in the range
of movement of the bonnet.
Open and close the bonnet only when nobody
is in the range of movement. G
WARNING
If you open the bonnet while the engine is
overheating or while there is afire in the
engine compartment, you coul dcome into
contact with hot gase sorother leaking ser-
vice products. There is adange rofinjury.
Allow an overheating engine to cool down
before opening the bonnet. If there is afire in
the engine compartment, leave the bonnet
closed and notify the fire brigade. G
WARNING
The ignitio nsystem and the fuel injection sys-
tem operate with ahigh voltage. If you touch
the live components, you coul dreceive an
electric shock. There is adange rofinjury.
Never touch components of the ignitio nsys-
tem or the fuel injection system when the
ignitio nisswitched on. G
WARNING
There are moving components in the engine
compartment. Certain components may con-
tinue to move or suddenly move again even
after the ignitio nhas been switched off, e.g.
the radiator fan. There is arisk of injury. If you have to carry out work in the engine
compartment:
R switch off the ignition
R never touch the dangerou sarea ssurround-
ing moving components, e.g. the rotation
area of the fan
R remove jewellery and watches
R keep items of clothing and hair, for exam-
ple, awayf rom moving parts.
Do not touch the diagnostics socket when the
ignition is switched on.
Openin gthe bonnet G
WARNING
Certain components in the engine compart-
ment could be very hot, e.g. the engine, the
radiator and parts of the exhaust system.
There is arisk of injury when accessing the
engine compartment.
As far as possible,a llow the engine to cool
downa nd only touch the components descri-
bed in the following. G
WARNING
When the bonnet is open, and the windscreen wipers are set in motion, you can be injured by
the wiper linkage. There is arisk of injury.
Always switch off the windscreen wipers and
the ignitio nbefore opening the bonnet.
! Make sure that the windscreen wipers are
not folde dawayfrom the windscreen. Other-
wise, you coul ddamage the windscreen wip-
ers or the bonnet. Engine compartment
211Maintenanceand care Z
Page 215 of 261
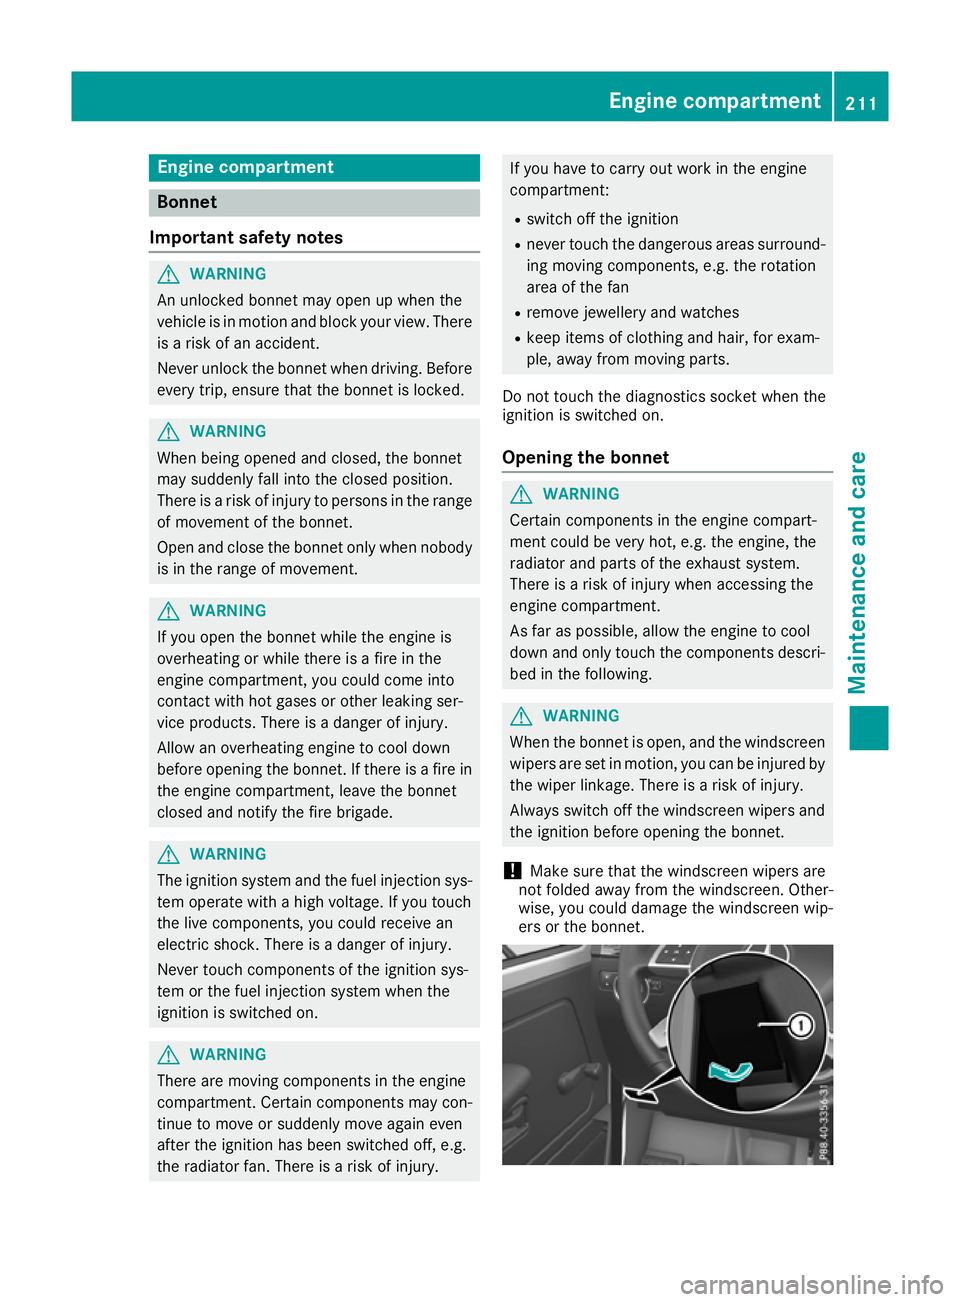
The bonnet release lever is in the footwell on the
left-hand side of the vehicle when viewed in the
direction of travel.
X Make sure that the windscreen wipers are
switched off.
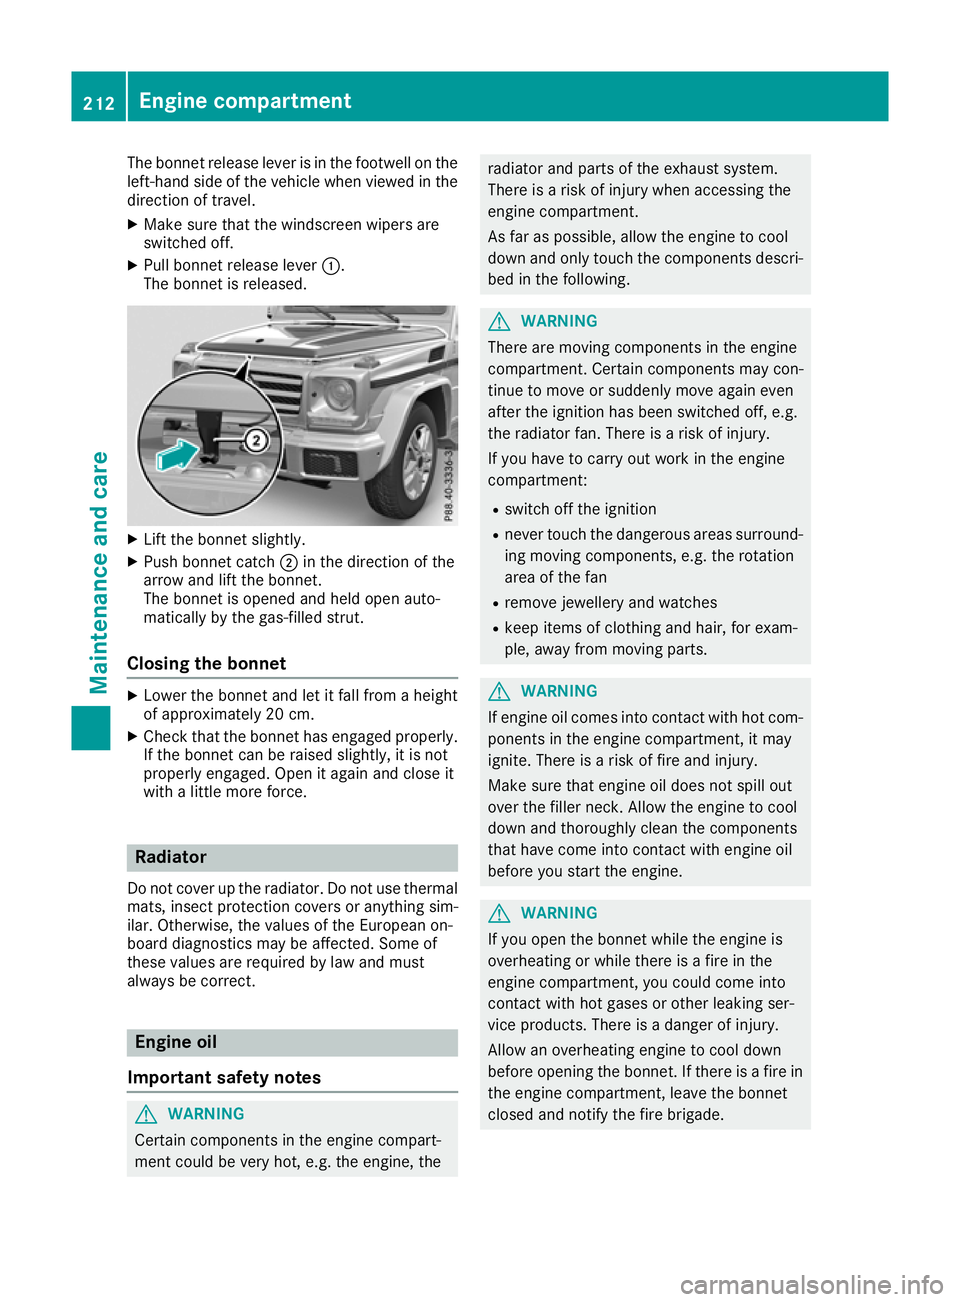
X Pull bonnet release lever :.
The bonnet is released. X
Lift the bonnet slightly.
X Push bonnet catch ;in the direction of the
arrow and lift the bonnet.
The bonnet is opened and held open auto-
matically by the gas-filled strut.
Closing the bonnet X
Lower the bonnet and let it fall from aheight
of approximately 20 cm.
X Check that the bonnet has engaged properly.
If the bonnet can be raiseds lightly, it is not
properl yengaged .Open it again and close it
with alittle more force. Radiator
Do not cover up the radiator. Do not use thermal mats, insect protection covers or anything sim-
ilar. Otherwise, the valuesoft he Europeanon-
board diagnostics may be affected .Some of
thes evalue sare required by la wand must
always be correct. Engine oil
Importan tsafety notes G
WARNING
Certain components in th eengine compart-
ment coul dbevery hot, e.g. the engine, the radiator and parts of the exhaust system.
There is
arisk of injury when accessing the
engine compartment.
As far as possible, allow the engine to cool
down and only touch the components descri- bed in the following. G
WARNING
There are moving components in the engine
compartment. Certain components may con-
tinue to move or suddenly move again even
after the ignitio nhas been switched off, e.g.
the radiator fan. There is arisk of injury.
If you have to carry out work in the engine
compartment:
R switch off the ignition
R never touch the dangerous area ssurround-
ing moving components, e.g. the rotation
area of the fan
R remove jewellery and watches
R keep items of clothing and hair, for exam-
ple,a wayfrom moving parts. G
WARNING
If engine oil comes into contact with hot com- ponents in the engine compartment, it may
ignite. There is arisk of fire and injury.
Make sure that engine oil does not spil lout
over the filler neck. Allow the engine to cool
downa nd thoroughly clea nthe components
that have come into contact with engine oil
before you start the engine. G
WARNING
If you open the bonnet while the engine is
overheating or while there is afire in the
engine compartment, you coul dcome into
contact with hot gase sorother leaking ser-
vice products. There is adange rofinjury.
Allow an overheating engine to cool down
before opening the bonnet. If there is afire in
the engine compartment, leave the bonnet
closed and notify the fire brigade. 212
Engine compartmentMaintenanc
eand care
Page 216 of 261
Note
sono illevel Depending on your drivin
gstyle ,the vehicle
consumes up to 0.8 litres of oi lper 1,000 km.
The oi lconsumption ma ybehighe rtha nt his
when the vehicl eisnew or if yo ufrequentl ydrive
at high engine speeds.
To check the oi llev el:
R park the vehicl eonalevel surface
R the engine shoul dbeswitched off for approx-
imatel yfivem inute sifthe engine is at normal
operating temperature
R if the engine is not at normal operating tem-
perature, e.g .ifthe engine wa sonlys tarted
briefly, wait approximately 30 minute sbefore
carrying out the measurement
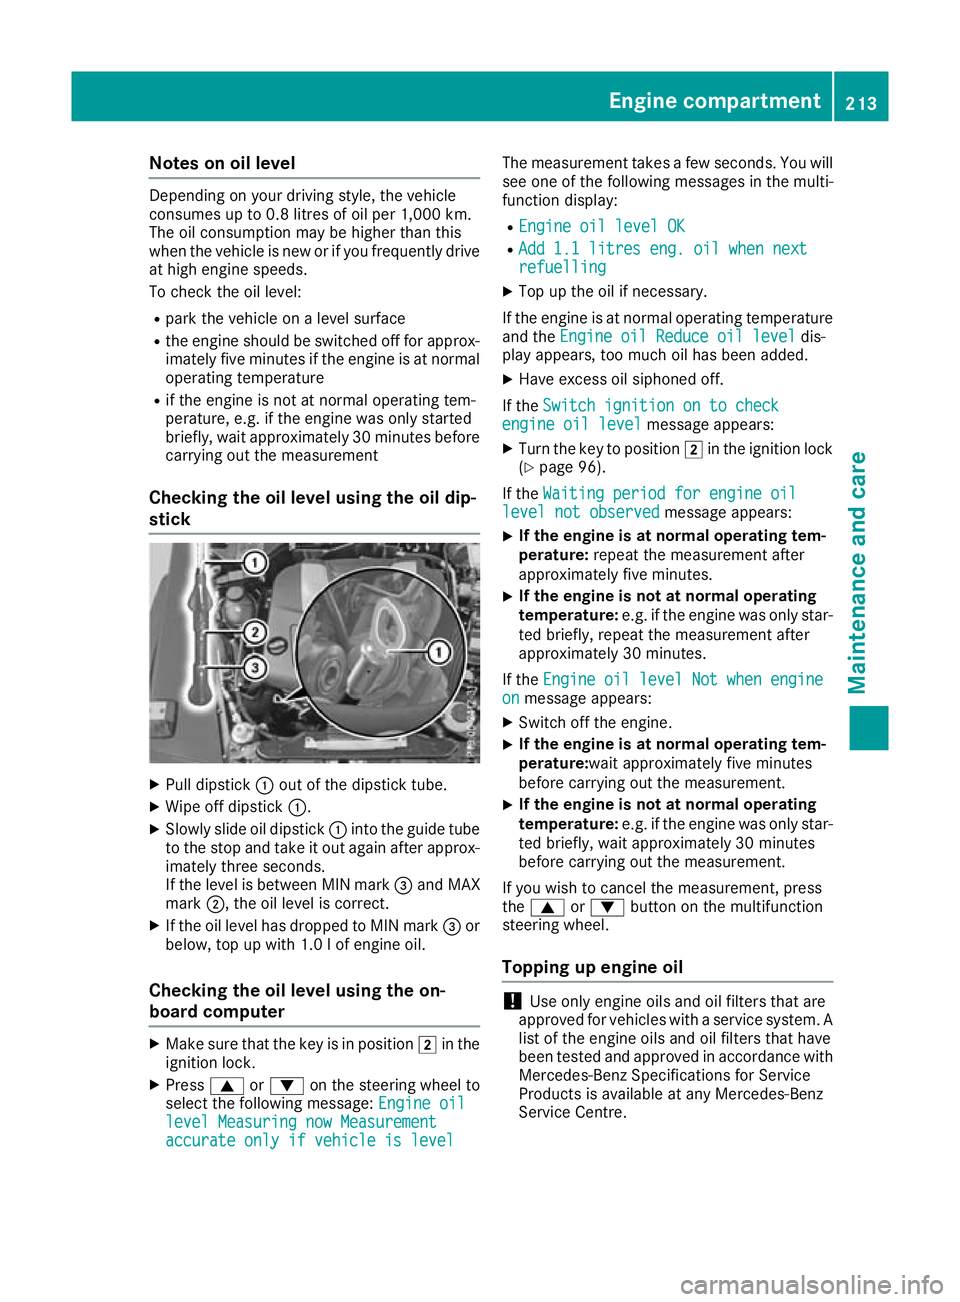
Checking the oil level using the oil dip-
stick X
Pull dipstick :out of the dipstick tube.
X Wipe off dipstick :.
X Slowly slide oil dipstick :into the guide tube
to the stop and take it out again after approx- imately three seconds.
If the level is between MIN mark =and MAX
mark ;,the oil level is correct.
X If the oil level has dropped to MIN mark =or
below, top up with 1.0 lofe ngine oil.
Checking the oil level using the on-
board computer X
Make sure that the key is in position 2in the
ignition lock.
X Press 9or: on the steering wheel to
select the following message: Engine oil Engine oil
level Measuring now Measurement level Measuring now Measurement
accurate only if vehicle is level accurate only if vehicle is level The measurement takes
afew seconds. You will
see one of the following messages in the multi-
function display:
R Engine oil level OK Engine oil level OK
R Add 1.1 litres eng. oil when next
Add 1.1 litres eng. oil when next
refuelling refuelling
X Top up the oil if necessary.
If the engine is at normal operating temperature and the Engine oil Reduce oil level
Engine oil Reduce oil level dis-
play appears, too much oil has been added.
X Have excess oil siphoned off.
If the Switch ignition on to check
Switch ignition on to check
engine oil level
engine oil level message appears:
X Turn the key to position 2in the ignition lock
(Y page 96).
If the Waiting period for engine oil
Waiting period for engine oil
level not observed
level not observed message appears:
X If the engine is at normal operating tem-
perature:
repeat the measurement after
approximately five minutes.
X If the engine is not at normal operating
temperature:
e.g. if the engine was only star-
ted briefly, repeat the measurement after
approximately 30 minutes.
If the Engine oil level Not when engine Engine oil level Not when engine
on
on message appears:
X Switch off the engine.
X If the engine is at normal operating tem-
perature:wait approximately five minutes
before carrying out the measurement.
X If the engine is not at normal operating
temperature:
e.g. if the engine was only star-
ted briefly, wait approximately 30 minutes
before carrying out the measurement.
If you wish to cancel the measurement ,press
the 9 or: button on the multifunction
steering wheel.
Topping up engineo il !
Use only engine oils and oil filters that are
approved for vehicles with aservice system. A
list of the engine oils and oil filters that have
been tested and approved in accordance with
Mercedes-Benz Specifications for Service
Products is available at any Mercedes-Benz
Service Centre. Engine compartment
213Maintenance and care Z
Page 217 of 261
The following cause engine failure or damage
to the exhaust system:
R Use of engine oils and oil filters that have
not been expressly approved for the service
system
R Replacement of engine oil and oil filter after
the replacement interval specified by the
service system has expired
R Use of engine oil additives
! Do not add too much oil. If the oil level is
above the "max" mark on the dipstick ,too
much oil has been added. This can lead to
damage to the engine or the catalytic con-
verter .Have excess oil siphoned off. H
Environmental note
When topping up the oil, take care not to spill
any. If oil enters the soil or waterways, it is
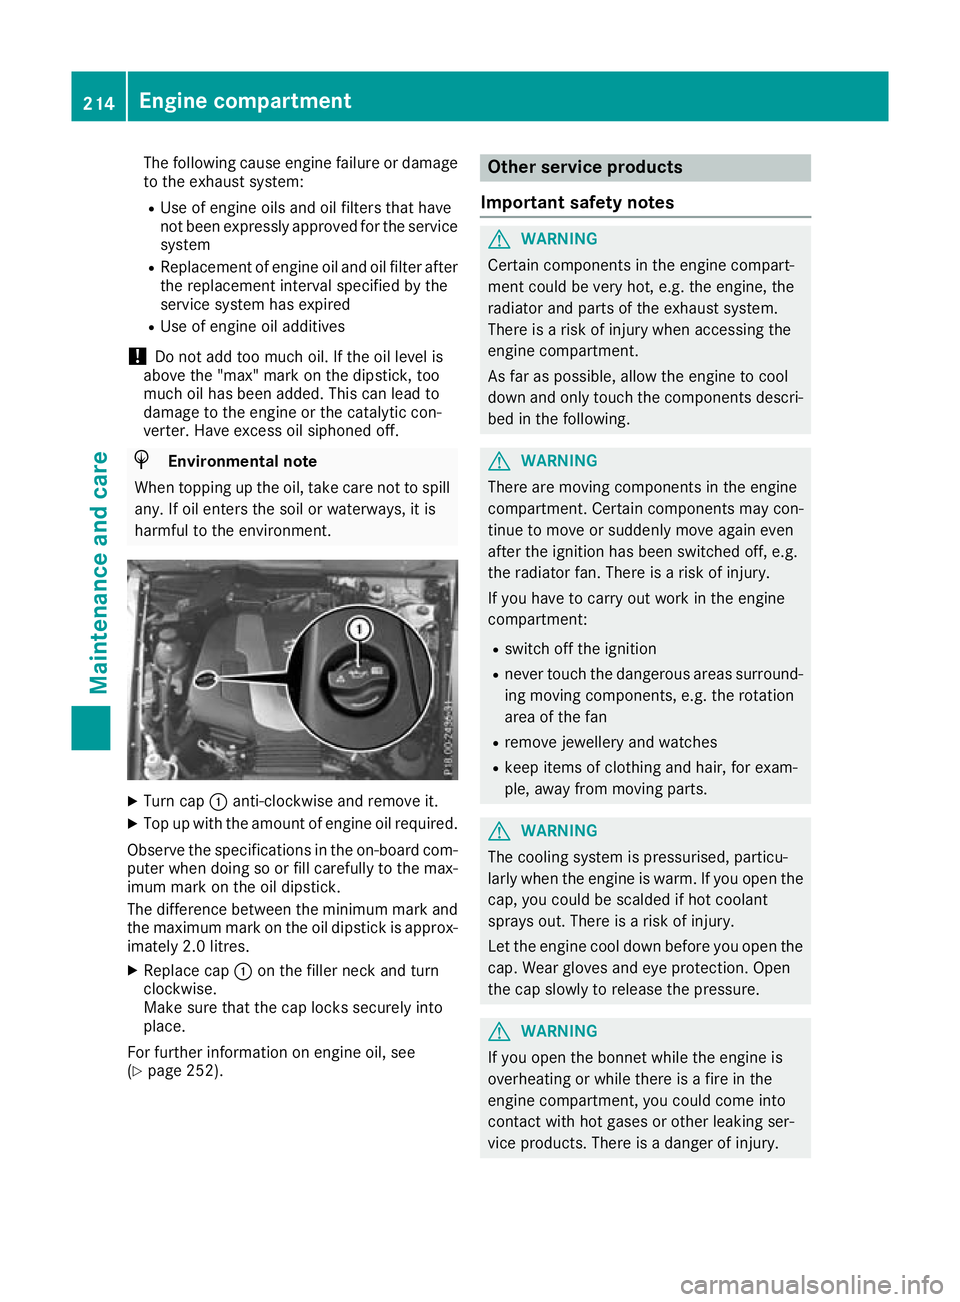
harmful to the environment. X
Turn cap :anti-clockwise and remove it.
X Top up with the amount of engine oil required.
Observe the specification sinthe on-board com-
puter when doing so or fill carefully to the max- imum mark on the oil dipstick.
The differenc ebetween the minimum mark and
the maximum mark on the oil dipstick is approx- imately 2.0 litres.
X Replace cap :on the filler neck and turn
clockwise.
Make sure that the cap locks securely into
place.
For further information on engine oil, see
(Y page 252). Other service products
Important safety notes G
WARNING
Certain components in the engin ecompart-
ment coul dbevery hot, e.g. the engine, the
radiator and parts of the exhaust system.
There is arisk of injury when accessing the
engine compartment.
As far as possible,a llow the engine to cool
downa nd only touch the components descri-
bed in the following. G
WARNING
There are moving components in the engine
compartment. Certain components may con-
tinue to move or suddenly move again even
after the ignitio nhas been switched off, e.g.
the radiator fan. There is arisk of injury.
If you have to carry out work in the engine
compartment:
R switch off the ignition
R never touch the dangerous area ssurround-
ing moving components, e.g. the rotation
area of the fan
R remove jewellery and watches
R keep items of clothing and hair, for exam-
ple,a wayfrom moving parts. G
WARNING
The cooling system is pressurised ,particu-
larl yw hen the engine is warm .Ifyou open the
cap, you coul dbescalded if hot coolant
sprays out. There is arisk of injury.
Let the engine cool downb efore you open the
cap. Wearg lovesand eye protection. Open
the cap slowly to release the pressure. G
WARNING
If you open the bonnet while the engine is
overheating or while there is afire in the
engine compartment, you coul dcome into
contact with hot gase sorother leaking ser-
vice products. There is adange rofinjury. 214
Engine compartmentMaintenanc
eand care
Page 218 of 261
Allow an overheating engine to coo
ldown
before opening the bonnet. If ther eisafirein
the engine compartment, leav ethe bonnet
closed and notify the fir ebrigade.
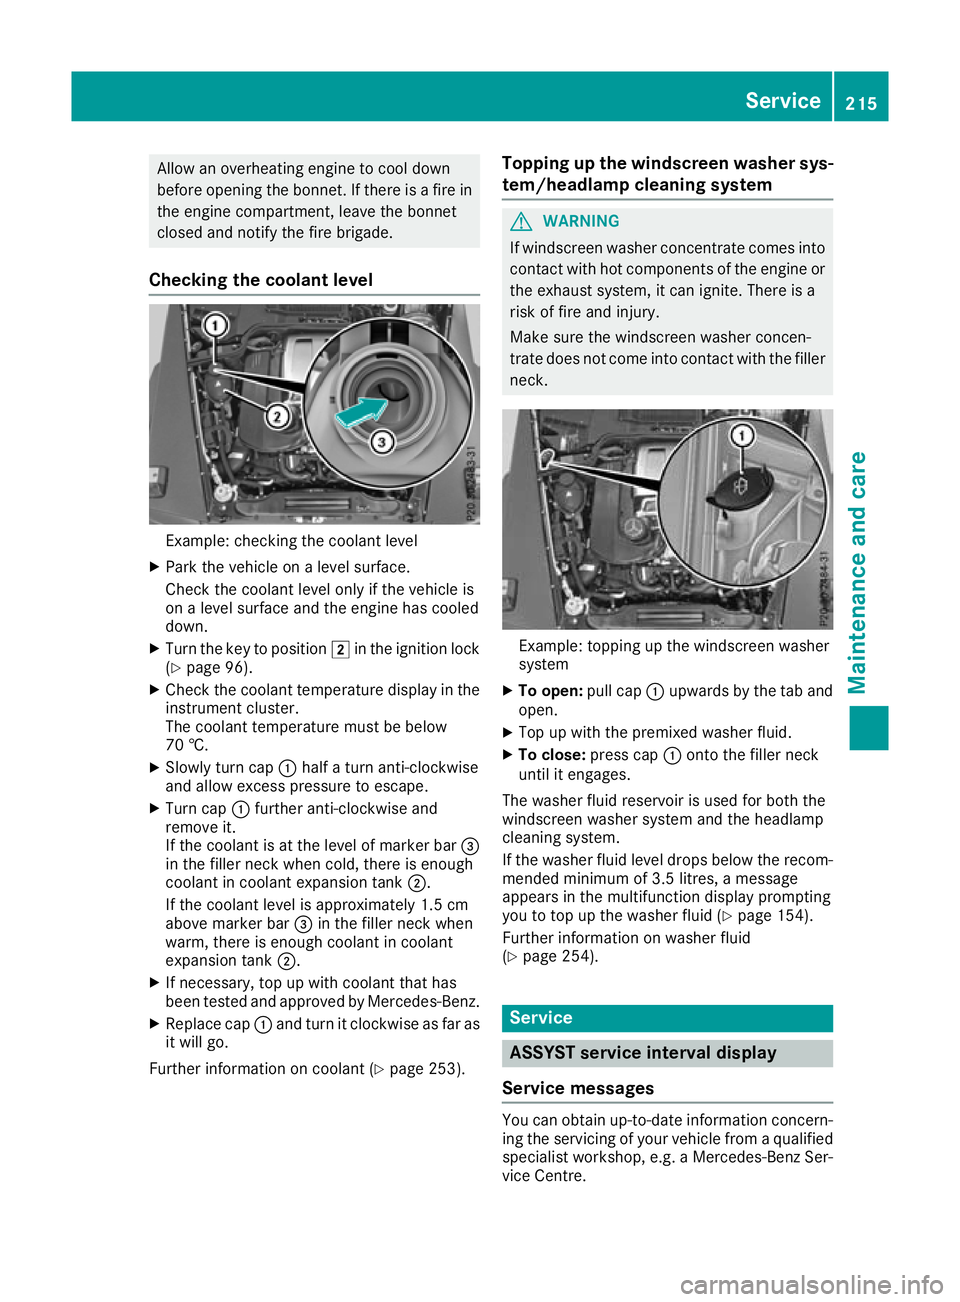
Checkin gthe coolant level Example: checking the coolant level
X Park the vehicl eonalevel surface.
Check the coolant level onl yifthe vehicl eis
on alevel surface and the engine ha scooled
down.
X Turn the key to position 2in the ignition lock
(Y page 96).
X Check the coolant temperatur edisplay in the
instrument cluster.
The coolant temperatur emustbeb elow
70 †.
X Slowl yturnc ap : half aturna nti-clockwise
and allo wexcess pressure to escape.
X Turn cap :furthe ranti-clockwise and
remove it.
If the coolant is at the level of marker bar =
in the fille rneck when cold, there is enough
coolant in coolant expansio ntank ;.
If the coolant level is approximately 1.5 cm
above marker bar =in the fille rneck when
warm, there is enoug hcoolant in coolant
expansio ntank ;.
X If necessary ,top up with coolant tha thas
been teste dand approved by Mercedes-Benz.
X Replace cap :and tur nitclockwise as fa ras
it will go.
Furthe rinformatio noncoolant (Y page 253). Topping up the windscreen washe
rsys-
tem/headlamp cleanin gsystem G
WARNING
If wind screen washer concentrate comes into
contact with hot components of the engine or
the exhaust system, it can ignite. There is a
risk of fire and injury.
Make sure the windscreen washer concen-
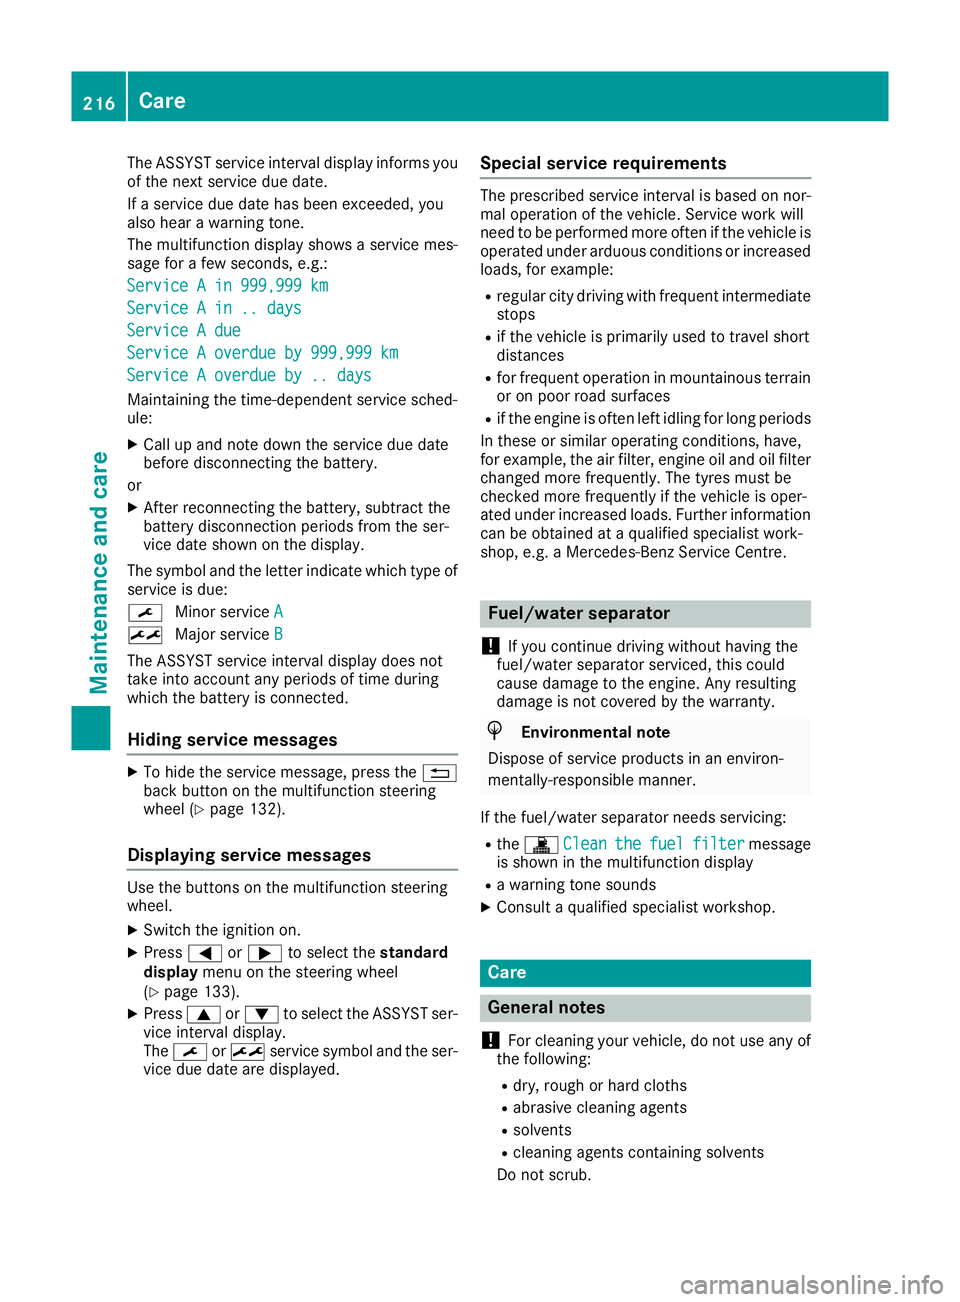
trate does not come into contact with the filler neck. Example: topping up the windscreen washer
system
X To open: pull cap:upwards by the tab and
open.
X Top up with the premixed washe rfluid.
X To close: press cap :onto the fille rneck
unti lite ngages.
The washe rfluid reservoi risusedf or both the
windscree nwashe rs ystem and the headlamp
cleaning system.
If the washe rfluid level drops belo wthe recom-
mended minimu mof3.5 litres ,amessage
appear sinthe multifunctio ndisplay prompting
yo utot op up the washe rfluid (Y page 154).
Furthe rinformatio nonwashe rfluid
(Y page 254). Service
ASSYST service interval display
Service messages Yo
uc an obtain up-to-dat einformation concern-
ing the servicin gofyour vehicle from aqualified
specialis tworkshop, e.g. aMercedes-Ben zSer-
vice Centre. Service
215Maintenance and care Z
Page 219 of 261
The ASSYST service interval display inform
syou
of the next service due date.
If as ervice due date has been exceeded, you
also hear awarning tone.
The multifunction display shows aservice mes-
sage for afew seconds, e.g.:
Service Ain999,999 km
Service Ain999,999 km
Service Ain..d ays
Service Ain..d ays
Service Adue
Service Adue
Service Aoverdue by 999,999 km
Service Aoverdue by 999,999 km
Service Aoverdue by .. days
Service Aoverdue by .. days
Maintaining the time-dependent service sched-
ule:
X Call up and noted own the service due date
before disconnectin gthe battery.
or X After reconnecting the battery, subtract the
battery disconnection periods from the ser-
vice date shown on the display.
The symbol and the letter indicate which type of service is due:
¯ Minor service A
A
± Major service B B
The ASSYST service interval display does not
take into account any periods of time during
which the battery is connected.
Hiding service messages X
To hide the service message, press the %
back button on the multifunction steering
wheel (Y page 132).
Displaying service messages Use the buttons on the multifunction steering
wheel.
X Switch the ignition on.
X Press =or; to select the standard
display menu on the steering wheel
(Y page 133).
X Press 9or: to select the ASSYST ser-
vice interval display.
The ¯ or± service symbol and the ser-
vice due date are displayed. Special service requirements The prescribed service interval is based on nor-
mal operation of the vehicle. Servic ework will
need to be performed more often if the vehicle is operated under arduous conditions or increased
loads, for example:
R regular city driving with frequent intermediate
stops
R if the vehicle is primarily used to travel short
distances
R for frequent operation in mountainous terrain
or on poor road surfaces
R if the engine is often left idling for long periods
In these or similar operating conditions, have,
for example, the air filter, engine oil and oil filter changed more frequently. The tyres must be
checked more frequently if the vehicle is oper-
ated under increased loads. Further information can be obtained at aqualified specialist work-
shop, e.g. aMercedes-Benz Servic eCentre. Fuel/water separator
! If you continue driving without having the
fuel/wate rseparato rserviced, this could
caus edamag etotheengine. An yresulting
damag eisnotcovered by th ewarranty. H
Environmenta
lnote
Dispose of servic eproduct sinane nviron-
mentally-responsible manner.
If th efuel/water separator needs servicing:
R the ! Clean
Clean the thefuel
fuel filter
filter message
is shown in th emultifunction display
R aw arning tone sounds
X Consult aqualifie dspecialist workshop. Care
General notes
! For cleaning your vehicle, do not use any of
the following:
R dry ,rough or hard cloths
R abrasive cleaning agents
R solvents
R cleaning agents containing solvents
Do not scrub. 216
CareMaintenanc
eand care