2016 MERCEDES-BENZ G-CLASS SUV instrument cluster
[x] Cancel search: instrument clusterPage 112 of 261
nozzle. Thi
sdischarge sany electrostatic
charge tha tmayhave buil tup.
Do not get back into the vehicl eduring the refu-
elling process ;otherwise, electrostatic charge
could buil dupagain. G
WARNING
If yo umix diesel fuel with petrol, the flash
point of this fuel mixture is lower than that of pure diesel fuel .When the engine is running,
components in the exhaust system may over-
heatu nnoticed. There is arisk of fire.
Never refue lwith petrol. Never add petrol to
diesel fuel.
! Do not use petrol to refue
lvehicles with a
diesel engine. Do not switch on the ignitio nif
you accidentally refue lwith the wrong fuel.
Otherwise, fuel can enter the fuel system.
Even smal lamounts of the wrong fuel could
result in damage to the fuel system and the
engine. The repair costs are high .Notify a
qualified specialist worksho pand have the
fuel tank and fuel lines drained completely.
! Overfilling the fuel tank coul
ddamage the
fuel system.
! Take care not to spil
lany fuel on painted
surfaces. You coul dotherwise damage the
paintwork.
! Use
afilter when adding fuel from afuel can.
The fuel lines and/or the fuel injection system coul dotherwise be blocked by particles from
the fuel can.
If you overfil lthe fuel tank, some fuel may spray
out when you remove the fuel pump nozzle.
Further information on fuel and fuel quality
(Y page2 50). Refuelling
General information Observe the important safety notes
(Y
page 108).
If you unlock/lock the vehicle from the outside, the fuel filler flap also unlocks/locks.
The positio nofthe8 fuel filler cap is dis-
played on the instrument cluster. The arrow next to the filling pump indicates the side of the vehi-
cle.
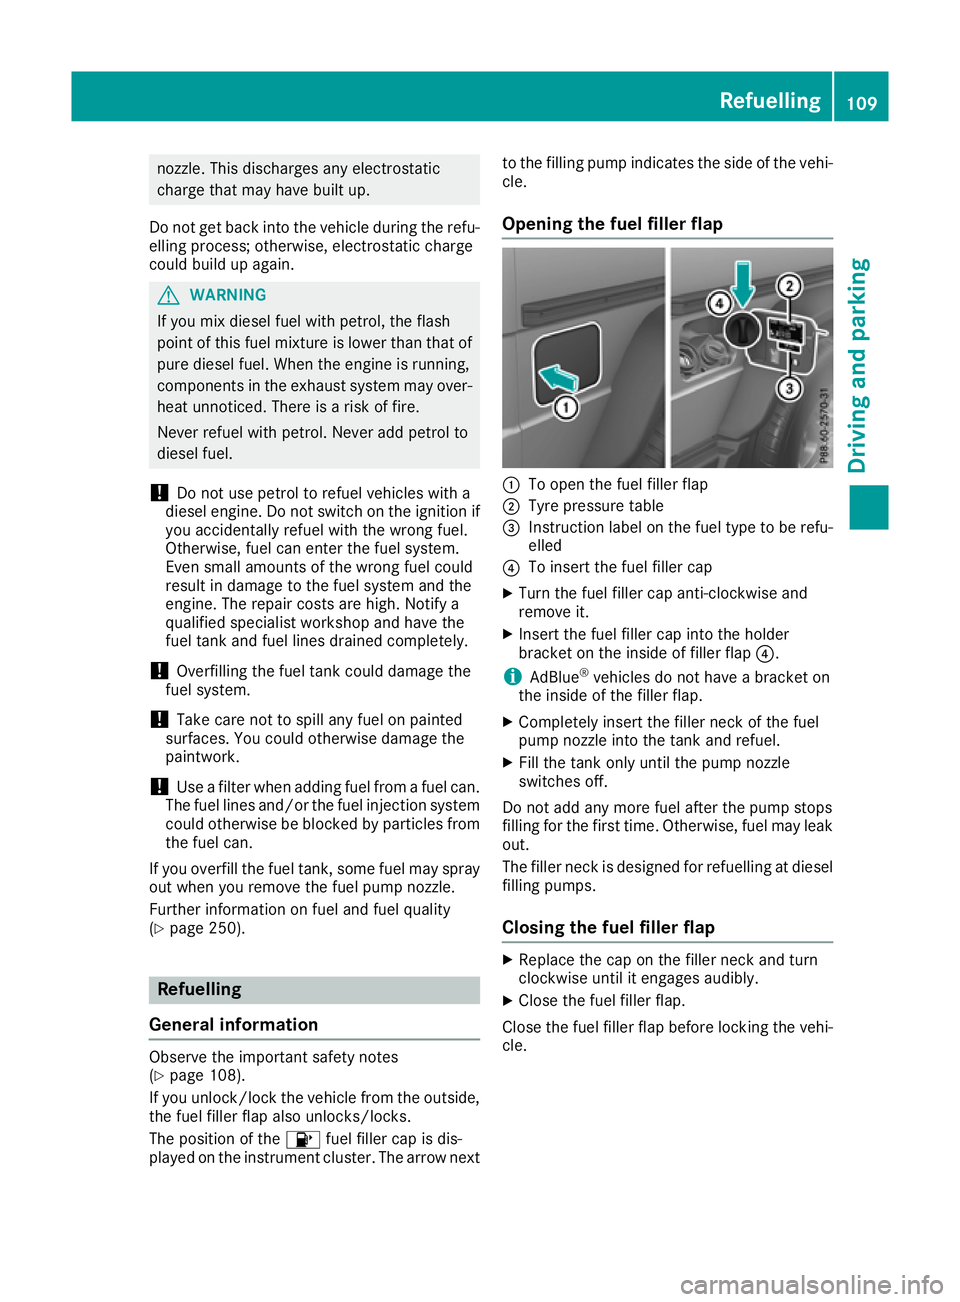
Opening the fuel filler flap :
To open the fuel filler flap
; Tyre pressure table
= Instruction label on the fuel type to be refu-
elled
? To insert the fuel filler cap
X Turn the fuel filler cap anti-clockwise and
remove it.
X Insert the fuel filler cap into the holder
bracket on the inside of filler flap ?.
i AdBlue ®
vehicles do not have abracket on
the inside of the filler flap.
X Completely insert the filler neck of the fuel
pump nozzle into the tank and refuel.
X Fill the tank only until the pump nozzle
switches off.
Do not add any more fuel after the pump stops
filling for the first time. Otherwise, fuel may leak out.
The filler neck is designed for refuelling at diesel
filling pumps.
Closing the fuel filler flap X
Replace the cap on the filler neck and turn
clockwise until it engages audibly.
X Clos ethe fuel filler flap.
Close th efuel filler flap before lockin gthe vehi-
cle. Refuelling
109Driving and parking Z
Page 118 of 261

X
To apply: pull parking brake lever ;up
firmly.
Whe nthe ignition is switched on, the red J
indicator lamp in the instrument cluster lights up.
X To release: pull parking brake lever ;
slightly.
X Press release button :and guid eparking
brake ;down to the stop.
The J indicator lamp in the instrument
cluster goe sout.
The vehicl ecan also be braked during an emer-
genc ybyu sing the parking brake.
X To brake in an emergency: press and hold
release button :and carefull ypullp arking
brake lever ;upwards.
If yo udrive on we troads or dirt-covered surfa-
ces, roa dsalta nd/or dirt could get into the
parking brake.
In order to prevent corrosion and areduction in
the braking powe rofthe parking brake, observe
the following:
R pull the parking brake upwards with release
button :depresse dfrom time to time before
beginning ajourney
R drive for approximatel y100 ma tamaximum
speed of 20 km/h Parkin
gupthe vehicle
If you leave the vehicle parked up for longer than
four weeks, the battery may be damaged by
exhaustive discharging.
If you leave the vehicle parked up for longer than
six weeks, it may suffer from lack of use.
X Contact aqualified specialist workshop and
seek advice.
i You can obtain information on trickle charg-
ers from aqualified specialist workshop. Driving tips
General drivin
gtips
Important safety notes G
WARNING
If you switch off the ignition while driving,
safety-relevant functions are only available wit
hlimitations, or not at all. This could affect,
for example, th epower steerin gand th ebrake
boosting effect .You will requir econsiderably
mor eeffort to steer and brake. Ther eisarisk
of an accident.
Do not switch off th eignitio nwhile driving.
Drive sensibly –savef uel Observe the following tips to save fuel:
X The tyre sshould always be inflated to the rec-
ommended tyre pressure.
X Remove unnecessary loads.
X Remove roof carriers when they are not nee-
ded.
X Warm up the engine at low engine speeds.
X Avoid frequent acceleration or braking.
X Have all service and maintenance work car-
ried out at the specified intervals.
Fuel consumption also increases when driving in
cold weather, in stop-start traffic, on short jour- neys and in hilly terrain. Short journeys
! Vehicles with
adiesel particle filter: if the
vehicle is mostly driven for short distances, it
is possible that malfunction smay occur dur-
ing the automatic cleaning of the diesel par-
ticle filter. This may lead to fuel collecting in
the engine oil and cause engine failure. There- fore, if you frequently drive short distances,
you should take a20minute trip on amotor-
way or rural road at least every 500km. Brakes
Imp ortant safety notes G
WARNING
If you shift dow nonaslippery road surface in
an attempt to increas ethe engine's braking
effect, the drive wheels coul dlose their grip.
This increases the risk of skidding and having
an accident.
Do not shift downf or additionalengine brak-
ing on aslippery road surface. Drivingt
ips
115Driving an dparking Z
Page 129 of 261
Engaging th
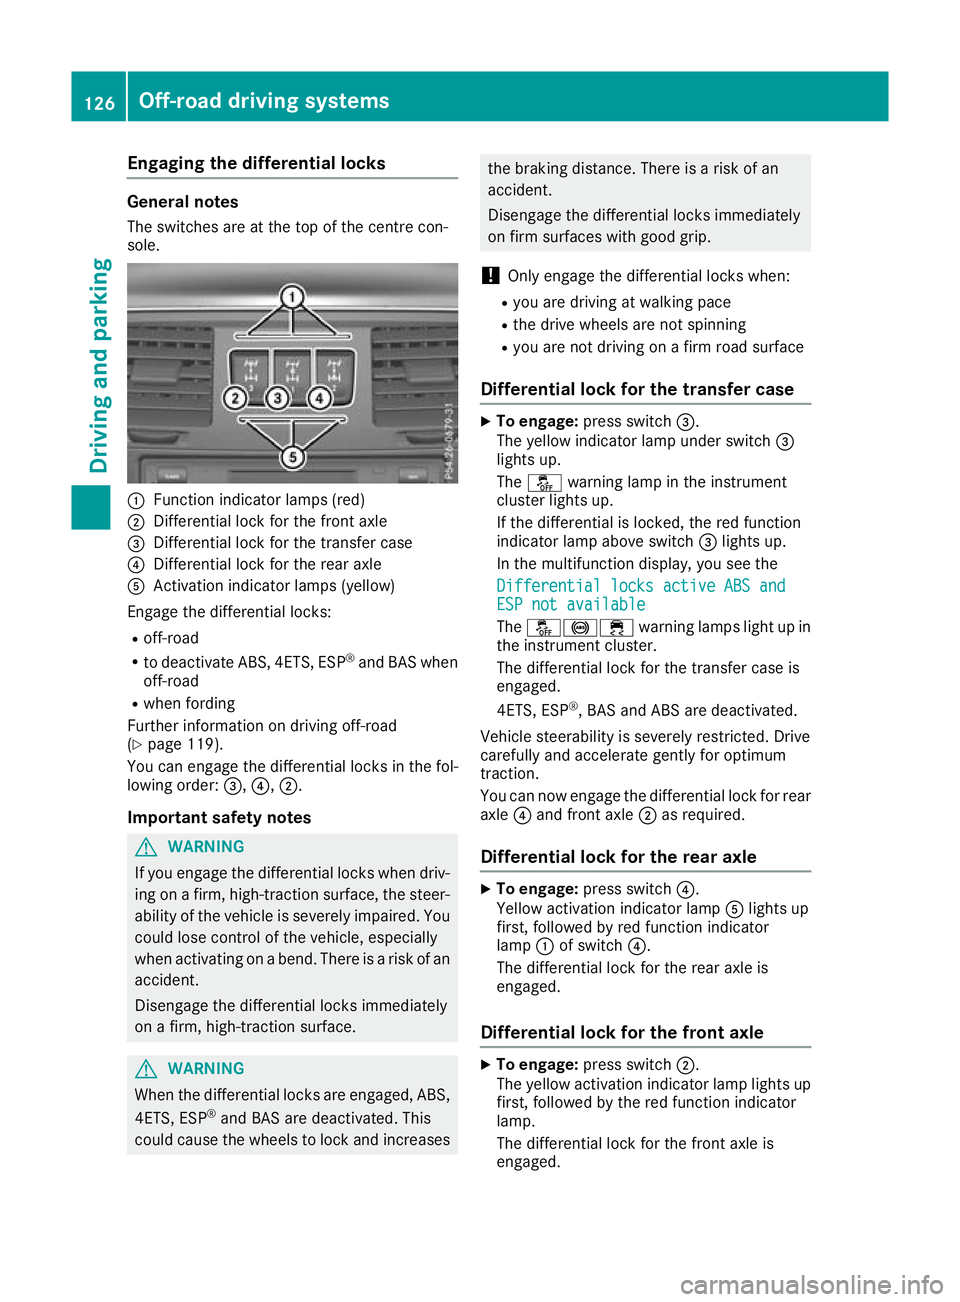
edifferential locks General notes
The switches are at the top of the centre con-
sole. :
Function indicato rlam ps (red)
; Differentia llock for the front axle
= Differentia llock for the transfe rcase
? Differentia llock for the rea raxle
A Activation indicator lamps (yellow)
Engag ethe differential locks:
R off-road
R to deactivate ABS, 4ETS, ESP ®
and BAS when
off-road
R whe nfording
Furthe rinformation on driving off-road
(Y page 119).
You can engage the differential locks in the fol-
lowing order: =,?,;.
Important safety notes G
WARNING
If you engag ethe differential locks when driv-
ing on afirm, high-traction surface, the steer-
ability of the vehicl eisseverely impaired .You
coul dlose control of the vehicle, especially
when activating on abend. There is arisk of an
accident.
Disengage the differential locks immediately
on afirm, high-traction surface. G
WARNING
When the differential locks are engaged, ABS, 4ETS, ESP ®
and BAS are deactivated. This
coul dcauset he wheels to lock and increases the braking distance. There is
ariskofan
accident.
Disengag ethe differential locks immediately
on fir msurfaces with good grip.
! Onl
yengag ethe differential locks when:
R youa redrivin gatw alking pace
R the drive wheels ar enot spinning
R youa renot drivin gonafirmr oads urface
Differential lock fo rthe transfe rcase X
To engage: press switch =.
The yellow indicator lamp under switch =
lights up.
The å warning lamp in the instrument
cluster lights up.
If the differential is locked ,the red function
indicator lamp above switch =lights up.
In the multifunctio ndisplay ,you see the
Differential locks active ABS and Differential locks active ABS and
ESP not available ESP not available
The å!÷ warninglamps light up in
the instrument cluster.
The differential lock for the transfer case is
engaged.
4ETS, ESP ®
,B AS and ABS are deactivated.
Vehicle steerability is severely restricted. Drive
carefully and accelerate gently for optimum
traction.
You can now engage the differential lock for rear axle ?and front axle ;as required.
Differential lockf or the rear axle X
To engage: press switch ?.
Yellow act ivation indicator lamp Alights up
first, followe dbyred functio nindicator
lamp :of switch ?.
The differential lock for the rea raxleis
engaged.
Differential lock for the fron taxle X
To engage: press switch ;.
The yellow activation indicator lamp lights up
first, followe dbythe red functio nindicator
lamp.
The differential lock for the front axl eis
engaged. 126
Off-road driving systemsDriving an
dparking
Page 134 of 261

Important safety notes
G
WARNING
Operating th eintegrated information systems
and communications equipment in the vehicle
while driving willd istract you from traffic con-
ditions. You coul dthen lose control of the
vehicle. There is arisk of an accident.
Only operate these devices if road traffic con-
ditions permit. If you are unsure about the
surrounding conditions, pullo ver toasafe
location and make entries only while the vehi-
cle is stationary.
You must observe the lega lrequirements for the
country in which you are currently driving when operating the on-board computer. G
WARNING
If the instrument cluster has failed or mal-
functioned, you may not recognise function
restrictions relevant to safety .The operating
safety of yourv ehiclemay be impaired .There
is ar isk of an accident.
Drive on carefully.H ave the vehiclechecked
at aq ualified specialist worksho pimmedi-
ately.
If the operating safety of yourv ehicleis
impaired ,park the vehicl esafel yass oon as pos-
sible. Contact aqualified specialist workshop.
! If
ab lackout lighting setting has been selec-
ted, the instrument cluster lighting is
switched off.
The instrument cluster and the display do not show any information.
The on-board computer show sonly display mes-
sage sorw arnings from certain systems on the
multifunction display.Y ou should therefore
make sure yourv ehicleiso perating safel yatall
times.
For an overview, see the instrument cluster illus-
tration (Y page26). Displays and operation
Instrument cluste
rlighting
The brightness control knob is locate donthe
botto mleftoft heinstrumen tcluster
(Y page 26).
X Turn th ebrightness control knob clockwise or
anti-clockwise.
i The ligh
tsensor on th einstrumen tcluster
automatically control sthe brightness of the
multifunction display.
In daylight, th edisplays in th einstrument
cluste rare no tlit. Re
vc ounter
! Do not drive in the overrevving range. Doing
so will damag ethe engine.
The red band in the rev counter indicates the
engine's overrevving range.
The fue lsuppl yisi nterrupted to protect the
engine when the red band is reached. Outside temperature display
You should pay specia lattention to road condi-
tion swhen temperatures are around freezing
point.
Bear in mind that the outside temperature dis-
play indicates the measured air temperature
and not the road surface temperature.
The outside temperature display is in the multi-
function display (Y page 133).
Changes in the outside temperature are dis-
played after ashort delay. Coolant temperatur
edisplay G
WARNING
If yo uopen the bonnet while the engine is
overheating or while there is afire in the
engine compartment, you coul dcome into
contact with hot gase sorother leaking ser-
vice products. There is adange rofinjury.
Allow an overheating engine to cool down
before opening the bonnet. If there is afire in Displays and operation
131On-boardcomputer and displays
Z
Page 140 of 261
X
Press the 6ora button to start dial-
ling.
or X To exit the redial memory: press the%
button. Assistance menu
Introduction In the
Assist.
Assist. menu, you have the following
options:
R Showin gthe assistance graphic
(Y page 137)
Showing the assistanc egraphic X
Press the =or; button on the steering
wheel to select the Assist.
Assist. menu.
X Press 9or: to select Assistance
Assistance
graphic
graphic.
X Press a.
The displa yisinoperative. Service menu
In the Serv.
Serv. menu, you have the following
options:
R Calling up display messages (Y page 141)
R Checking the tyre pressure electronically
(Y page 240)
R Calling up the service due date
(Y page 216)
R Checking the engine oil level (Y page 213)Settings menu
Introduction In the
Settings
Settings menu, you have the following
options:
R Changing the instrument cluster settings
(Y page 137)
R Changing the time/date settings
(Y page 138)
R Changing the light settings (Y page 138)
R Changing the vehicle settings (Y page 139)
R Changing the auxiliary heating settings
(Y page 139) R
Changing the convenience settings
(Y pag e140)
R Restorin gthe factory settings (Y page 141)
Instrumen tcluster Selecting the uni
tofmeasurement for dis-
tance
The Display unit Speed-/odometer: Display unit Speed-/odometer: func-
tion allowsy ou to choose whether certain dis-
playsa ppear in kilometres or miles in the mul-
tifunction display.
You can determine whether the multifunction
display shows certain messages in miles or kil-
ometres.
X Press the =or; button on the steering
wheel to select the Settings Settingsmenu.
X Press the :or9 button to select the
Instrument cluster
Instrument cluster submenu.
X Press ato confirm.
X Press the :or9 button to select the
Display unit Speed-/odometer
Display unit Speed-/odometer function.
You will see the selected setting: km
kmorMiles
Miles.
X Press ato save the setting.
The selected unit of measurement for distance
applies to the following:
R digital speedometer in the Trip Tripmenu
R the total distance recorder and the trip meter
R trip computer
R current consumption and the range
R the navigation instruction sintheNavi
Navi menu
R ASSYST service interval display
Selecting permanent display You can determine whether the multifunction
displayp ermanently shows your speed or the
outside temperature.
X Press the =or; button on the steering
wheel to select the Settings
Settingsmenu.
X Press the :or9 button to select the
Instrument cluster
Instrument cluster submenu.
X Press ato confirm.
X Press the :or9 button to select the
Permanent display:
Permanent display: function.
You will see the selected setting: outside
outside
temperature
temperature orDig. speedo [mph]
Dig. speedo [mph].
X Press ato save the setting.
i The speed is displayed in mph. Menus and submenus
137On-boardcomputer and displays Z
Page 141 of 261
i
Vehicles for the United Kingdom: this func-
tion is unavailable.
Selects language
X Press the =or; button on the steering
wheel to select the Settings
Settingsmenu.
X Press the :or9 button to select the
Instrument cluster
Instrument cluster submenu.
X Press ato confirm.
X Press :or9 to select the Language:
Language:
function.
You will see the current setting.
X Press ato confirm.
X Press the :or9 button to change the
setting.
X Press ato store the entry.
Time/date Setting the date
X Press the =or; button on the steering
wheel to select the Settings Settingsmenu.
X Press :or9 to select the Time/Date Time/Date
submenu.
X Press ato confirm.
X Press :or9 to select the Date: Date:func-
tion.
You will see the current setting.
X To set the date: pressaagain.
X Press =or; to switch between the
day, month and year.
X Press :or9 to set the day, month or
year.
X Press ato store the entry.
The display shows the selected date.
Setting the time X Press the =or; button on the steering
wheel to select the Settings
Settings menu.
X Press :or9 to select the Time/Date Time/Date
submenu.
X Press ato confirm.
X Press :or9 to select the Time:
Time:func-
tion.
You will see the current setting.
X To set the time: pressaagain.
X Press =or; to switch between hours
and minutes. X
Press :or9 to set the hours or
minutes.
X Press ato store the entry.
The display shows the selected time.
Lights Setting the daytime driving lights
The Daytime driving lights Daytime driving lights function can
only be switched on with the engine switched
off.
X Press the =or; button on the steering
wheel to select the Settings Settingsmenu.
X Press the :or9 button to select the
Lights
Lights submenu.
X Press ato confirm.
X Press the :or9 button to select the
Daytime driving lights
Daytime driving lights function.
If the Daytime
Daytime driving
drivinglights
lightsfunction has
been switched on, the cone of light and the
W symbol are shown in red in the multi-
function display.
X Press ato save the setting.
Further information on daytime driving lights
(Y page 74).
Surround lighting and exterior lighting
delayed switch-off X Press the =or; button on the steering
wheel to select the Settings Settingsmenu.
X Press the :or9 button to select the
Lights
Lights submenu.
X Press ato confirm.
X Press the :or9 button to select the
Surround lighting
Surround lighting function.
When the Surround lighting
Surround lighting function has
been activated, the cone of light is shown in
red in the multifunction display.
X Press ato save the setting.
Activating exterior lighting delayed switch-off
temporarily:
X Before leaving the vehicle, turn the key to
position 0in the ignition lock (Y page 96).
X Turn the key to position 2in the ignition lock
(Y page 96).
Exterior lighting delayed switch-off is deacti-
vated.
Exterior lighting delayed switch-off is reactiva-
ted the next time you start the engine. 138
Menus and submenusOn-boardc
omputer and displays
Page 146 of 261
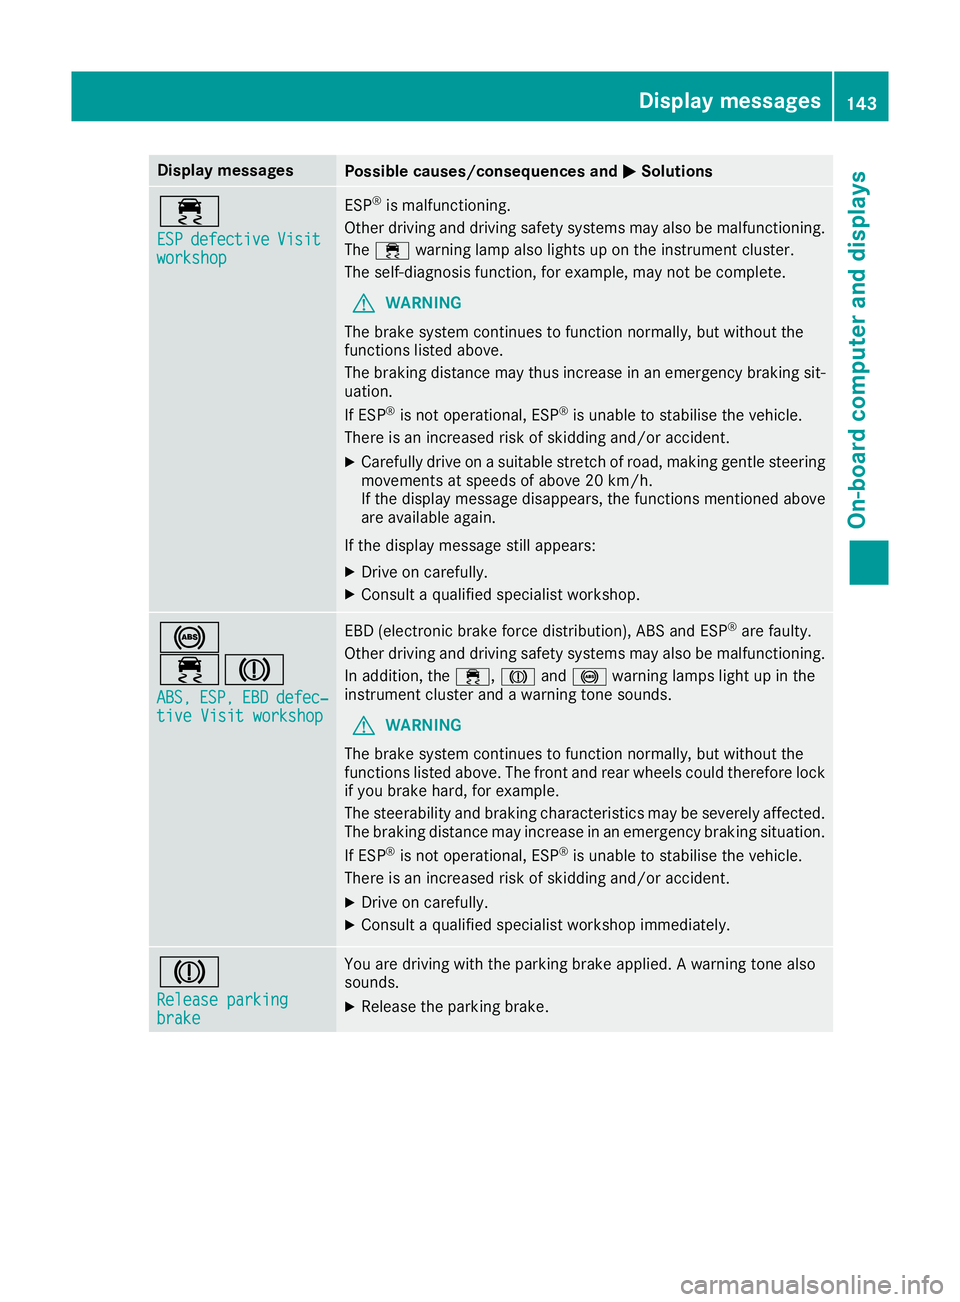
Display messages
Possible causes/consequence
sand M
MSolutions ÷
ESP ESP
defective
defective Visit
Visit
workshop
workshop ESP
®
is malfunctioning.
Other driving and driving safet ysystem smayalso be malfunctioning.
The ÷ warning lamp also lights up on the instrument cluster.
The self-diagnosi sfun ction, for example, ma ynot be complete.
G WARNING
The brake system continue stofunctio nnormally ,but withou tthe
functions listed above.
The braking distance ma ythu sincrease in an emergency braking sit-
uation.
If ESP ®
is not operational ,ESP ®
is unabl etostabilise the vehicle.
There is an increased ris kofskidding and/or accident.
X Carefully drive on asuitabl estretch of road, making gentle steering
movements at speeds of above 20 km/h.
If the displa ymessage disappears, the functions mentione dabove
ar ea vailable again.
If the displa ymessage still appears:
X Driv eonc arefully.
X Consult aquali fied specialis tworkshop. !
÷J
ABS, ABS, ESP,
ESP,EBD
EBDdefec‐
defec‐
tiv eVisit workshop
tive Visit workshop EBD (electron
icbrake force distribution), ABS and ESP ®
aref aulty.
Othe rdrivin gand drivin gsafety system smayalso be malfunctioning.
In addition, the ÷,Jand! warning lamps light up in the
instrument cluster and awarning tone sounds.
G WARNING
The brake system continue stofunctio nnormally ,but withou tthe
functions listed above .The front and rea rwheel scould therefore lock
if yo ubrake hard, for example.
The steerability and braking characteristics ma ybeseverely affected.
The braking distance ma yincrease in an emergency braking situation.
If ESP ®
is not operational ,ESP ®
is unabl etostabilise the vehicle.
There is an increased ris kofskidding and/or accident.
X Driv eonc arefully.
X Consult aquali fied specialis tworkshop immediately. J
Releas
eparking
Release parking
brake brake You are driving with the parking brake applied.
Awarnin gtonea lso
sounds.
X Release the parking brake. Display me
ssages
143On-board compute rand displays Z
Page 147 of 261
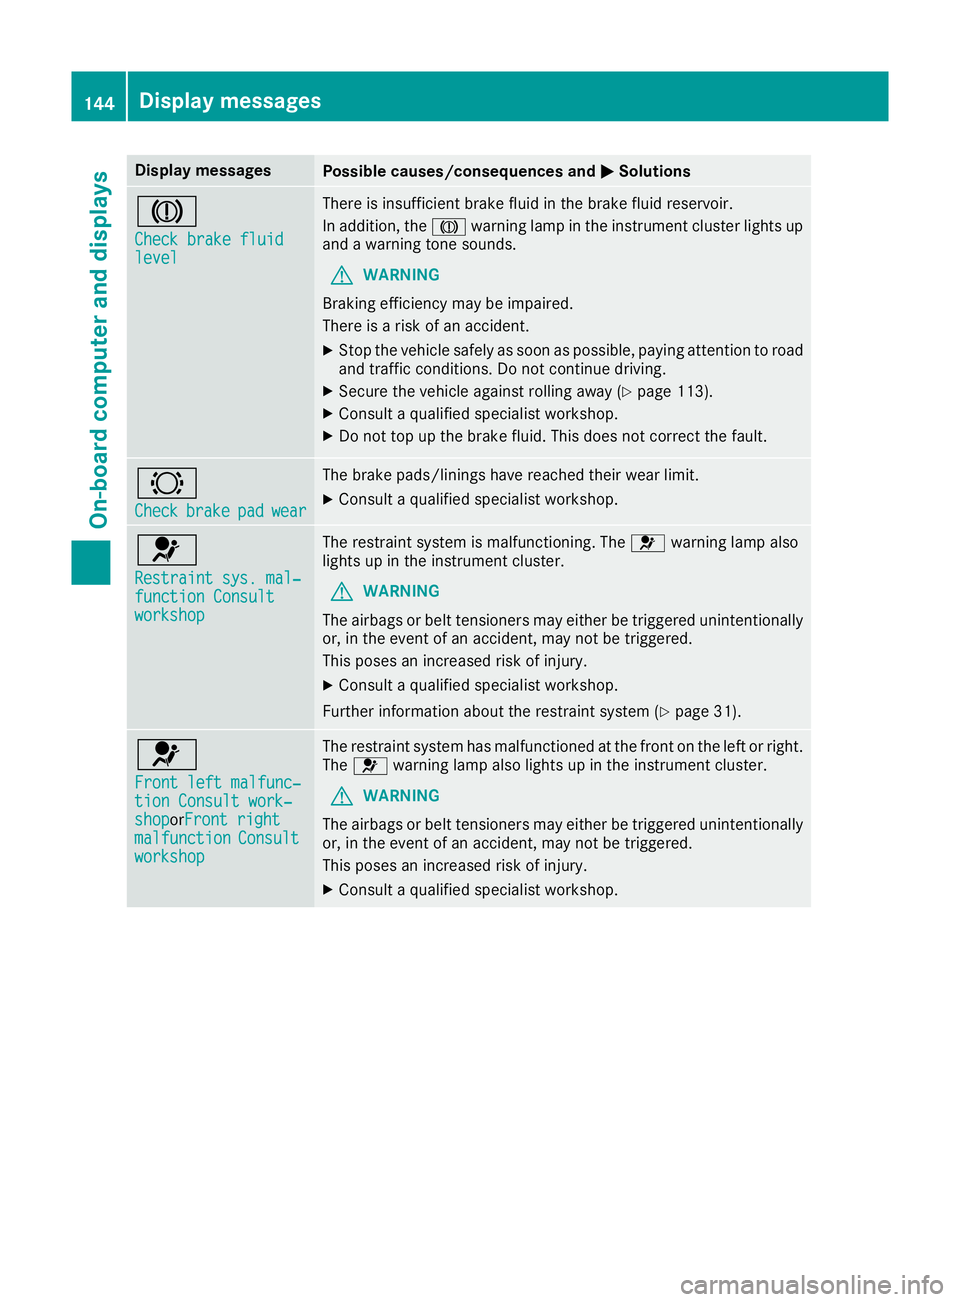
Display messages
Possible causes/consequence
sand M
MSolutions J
Check brake fluid Check brake fluid
level level There is insufficient brake fluid in the brake fluid reservoir.
In addition, the Jwarning lamp in the instrument cluster lights up
and awarning tones ounds.
G WARNING
Brakin gefficienc ymay be impaired.
There is arisk of an accident.
X Stop the vehicle safely as soon as possible, paying attention to road
and traffic conditions. Do not continue driving.
X Secure the vehicle against rolling away (Y page 113).
X Consult aqualified specialist workshop.
X Do not top up the brake fluid. This does not correc tthe fault. #
Check Check
brake
brakepad
padwear
wear The brake pads/linings have reached their wear limit.
X Consult aqualified specialist workshop. 6
Restraint sys. mal‐ Restraint sys. mal‐
function Consult function Consult
workshop workshop The restraint system is malfunctioning. The
6warning lamp also
lights up in the instrument cluster.
G WARNING
The airbags or belt tensioners may either be triggered unintentionally or, in the event of an accident ,may not be triggered.
This poses an increased risk of injury.
X Consult aqualified specialist workshop.
Further information about the restraint system (Y page 31).6
Front left malfunc‐ Front left malfunc‐
tion Consult work‐ tion Consult work‐
shop shoporFront right
Front right
malfunction
malfunction Consult
Consult
workshop
workshop The restraint system has malfunctioned at the front on the left or right.
The 6 warning lamp also lights up in the instrument cluster.
G WARNING
The airbags or belt tensioners may either be triggered unintentionally or, in the event of an accident ,may not be triggered.
This poses an increased risk of injury.
X Consult aqualified specialist workshop. 144
Display messagesOn-board computer and displays