2016 MERCEDES-BENZ G-CLASS SUV instrument cluster
[x] Cancel search: instrument clusterPage 57 of 261
4ETS (Electronic Traction System)
i
Observ
ethe "Important safety notes" sec-
tion (Y page 52).
4ETS traction control is part of ESP ®
.
4ETS traction control is no longer active above a
speed of approximately 60 km/h.
Traction control brakes the drive wheels indi-
vidually if they spin. This enables you to pull
awaya nd accelerate on slippery surfaces, e.g. if
the road surface is slippery on one side. In addi-
tion, more drive torque is transferred to the
wheel or wheels with traction.
Traction control remains active if you deactivate
ESP ®
.
Important safety notes i
Observe the "Important safety notes" sec-
tion (Y page 52). G
WARNING
If ESP ®
is malfunctioning, ESP ®
is unable to
stabilise the vehicle. In addition, other driving
safety systems are switched off. This increa-
ses the risk of skidding and an accident.
Drive on carefully.H ave ESP®
checked at a
qualified specialist workshop.
! Only operate the vehicl
efor am aximu mof
ten seconds on abrake dynamometer. Switch
off the ignition.
Application of the brakes by ESP ®
may oth-
erwise destroy the brake system.
! Af
unction or performance test should only
be carrie dout on atwin-axle dynamometer.
Before you operate the vehicl eonsuch a
dynamometer, please consult aqualified
workshop. You coul dotherwise damage the
drive train or the brake system.
If the å ESP®
OFF warning lamp lights up
continuously,E SP®
is deactivated.
If the ÷ ESP®
warning lamp lights up contin-
uously,E SP®
is not available due to amalfunc-
tion.
Observe the information on warning lamps
(Y page1 59) and display messages which may
be displayed in the instrument cluster
(Y page1 42). Use only wheels with the recommended tyre
sizes. Only then will ESP ®
functio nproperly.
If differential locks are switched on, ABS,B AS
and ESP ®
switch off automatically.
Characteristics of ESP ® General information
If the ÷ ESP warning lamp goes out before
you begin the journey, ESP ®
is automatically
active.
If ESP ®
intervenes,t he÷ ESP®
warning lamp
flashes on the instrument cluster.
If ESP ®
intervenes:
X Do not deactivate ESP ®
under any circum-
stances.
X When pulling away, depress the accelerator
pedalo nly as far as is necessary.
X Adapt yourd riving style to suit the prevailing
road and weather conditions.
ECO start/stop function
The ECO start/stop function switches the
engine off automaticall yifthe vehicle stops
moving. When the vehicle pulls awaya gain, the
engine starts automatically. ESP ®
remains in its
previously selected status, e.g. if ESP ®
was
deactivated before the engine was automati-
callys witched off.
Deactivating/activating ESP ® Im
portant safety notes
i Observ
ethe "Importan tsafety notes" sec-
tio n(Ypage 52).
You can select between th efollowin gESP®
sta-
tuses:
R ESP ®
is activated
R ESP ®
is deactivated G
WARNING
If yo udeactivate ESP ®
,E SP ®
no longer sta-
bilises the vehicle. There is an increased risk
of skidding and an accident.
Only deactivate ESP ®
in the situations descri-
bed in the following. 54
Driving safety systemsSafety
Page 58 of 261
It may be best to deactivate ESP
®
in the follow-
ing situations:
R when snow chains are used
R in deep snow
R on sand or gravel
R off-road
Spinning the wheelsr esults inacutting action,
which enhances traction.
Activate ESP ®
as soon as the situations descri-
bed above no longer apply. ESP ®
willo therwise
not be abletos tabilise the vehicle if the vehicle
starts to skid or awheel starts to spin.
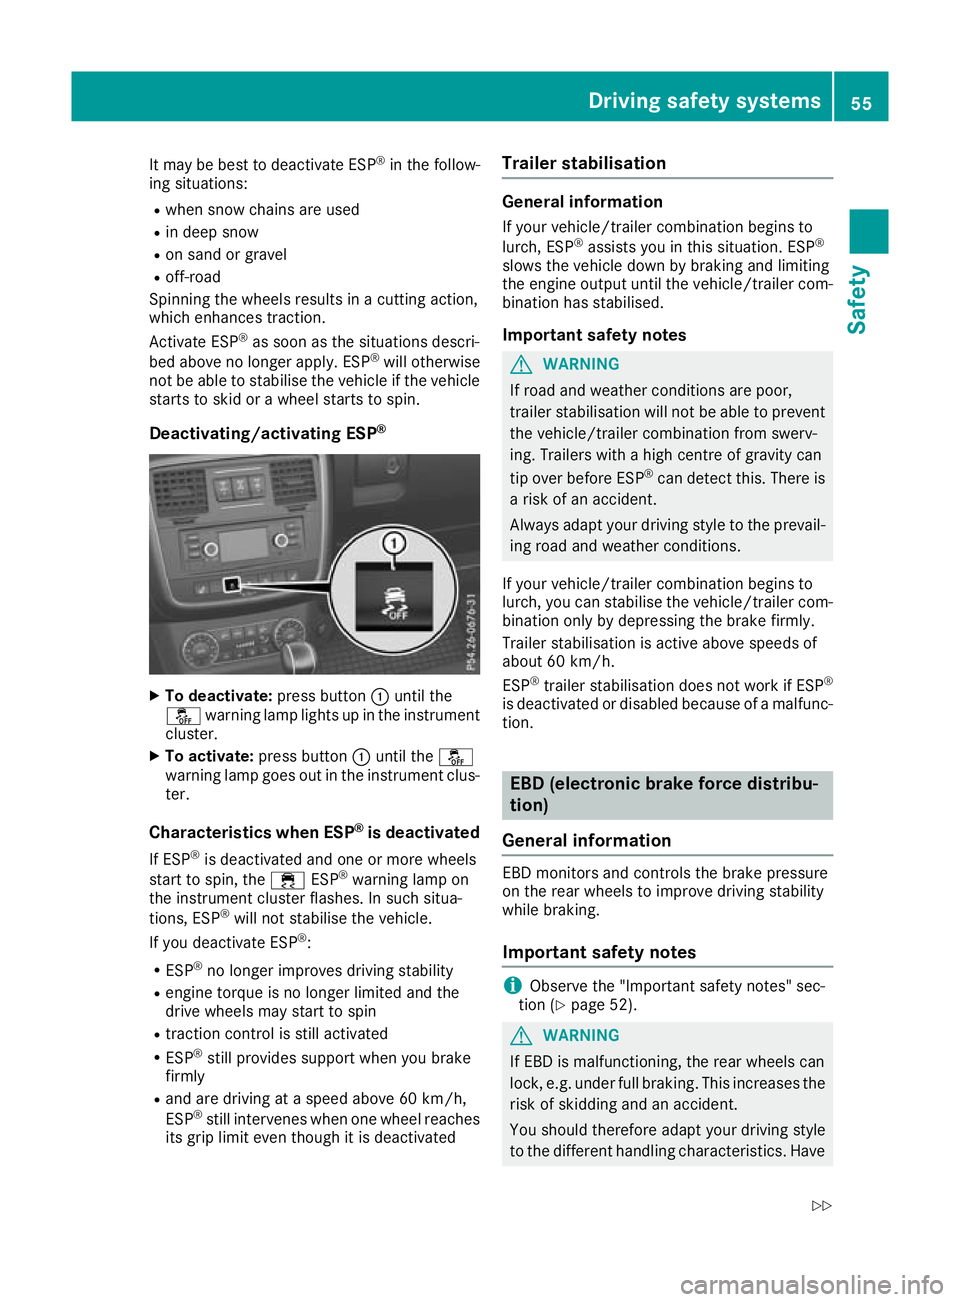
Deactivating/activating ESP ®X
To deactivate: press button:until the
å warning lamp lights up in the instrument
cluster.
X To activate: press button :until the å
warning lamp goes out in the instrument clus-
ter.
Characteristic swhenE SP®
is deactivated
If ESP ®
is deactivate dand one or more wheels
start to spin, the ÷ESP®
warning lamp on
the instrument cluster flashes. In such situa-
tions, ESP ®
will not stabilise the vehicle.
If yo udeactivate ESP ®
:
R ESP ®
no longer improve sdriving stability
R engine torque is no longer limite dand the
drive wheels may start to spin
R tractio ncontro lisstilla ctivated
R ESP ®
stil lprovides support when yo ubrake
firmly
R and are driving at aspeed above 60 km/h,
ESP ®
stil lintervene swheno ne whee lreaches
its gri plim it eve nthough it is deactivated Trailer stabilisation General information
If you rvehicle/trailer combinatio nbegins to
lurch, ESP ®
assists you in this situation. ESP ®
slowst he vehicle down by braking and limiting
the engine outpu tuntil the vehicle/trailer com-
binatio nhas stabilised.
Important safety notes G
WARNING
If road and weather conditions are poor,
trailer stabilisation willn ot be abletoprevent
the vehicle/trailer combination from swerv-
ing. Trailers with ahigh centre of gravity can
tip over before ESP ®
can detect this. There is
ar isk of an accident.
Always adapt yourd riving style to the prevail-
ing road and weather conditions.
If yourv ehicle/trailer combination begins to
lurch ,you can stabilise the vehicle/trailer com-
bination only by depressing the brake firmly.
Trailer stabilisation is active above speeds of
about 60 km/h.
ESP ®
trailer stabilisation does not work if ESP ®
is deactivated or disabledb ecause ofamalfunc-
tion. EB
D( electronic brak eforce distribu-
tion)
General information EB
Dm onitors and controls the brake pressure
on the rea rwheel stoi mprov edrivin gstability
whil ebraking.
Important safety notes i
Observ
ethe "Important safety notes" sec-
tion (Y page 52). G
WARNING
If EBD is malfunctioning, the rear wheels can
lock, e.g. under full braking. This increases the risk of skidding and an accident.
You should therefore adapt your driving style
to the different handling characteristics. Have Driving safe
tysystems
55Safety
Z
Page 70 of 261
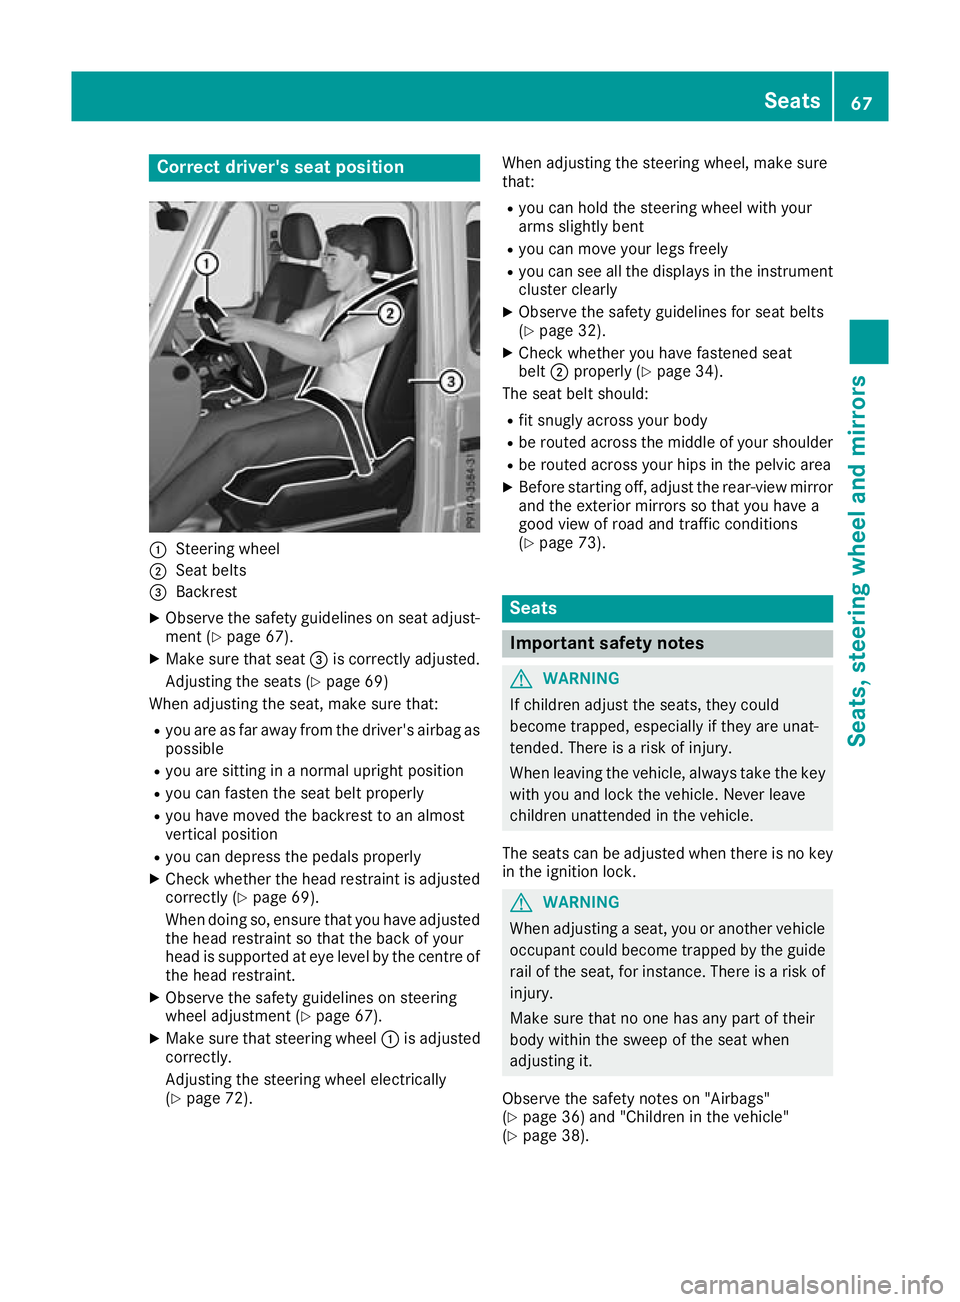
Correct driver's seat position
:
Steerin gwheel
; Seatbelts
= Backrest
X Observe the safety guideline sonseata djust-
ment (Y page 67).
X Make sure that seat =is correctly adjusted.
Adjusting the seats (Y page 69)
Whe nadjusting the seat, make sure that:
R youa re as far away from the driver' sairba gas
possible
R youa re sitting in anorma lupright position
R youc an fasten the sea tbeltp roperly
R youh avem ovedthe backrest to an almost
vertical position
R youc an depress the pedal sproperly
X Check whethe rthe hea drestraint is adjusted
correctly (Y page 69).
Whe ndoing so, ensure that yo uhavea djusted
the hea drestraint so that the back of your
hea diss upported at ey elev el by the centre of
the hea drestraint.
X Observe the safety guideline sonsteering
wheel adjustment (Y page 67).
X Make sure that steering wheel :is adjusted
correctly.
Adjusting the steering wheel electrically
(Y page 72). Whe
nadjustin gthe steerin gwheel, make sure
that:
R you can hold the steerin gwheel with your
arms slightly bent
R you can move your legs freely
R you can see all the displays in the instrument
cluster clearly
X Observe the safety guidelines for seat belts
(Y page 32).
X Check whether you have fastened seat
belt ;properly (Y page 34).
The seat belt should:
R fit snugly across your body
R be routed across the middle of your shoulder
R be routed across your hips in the pelvic area
X Befor estarting off, adjust the rear-view mirror
and the exterior mirrors so that you have a
good view of road and traffic conditions
(Y page 73). Seats
Important safety notes
G
WARNING
If children adjust the seats, they could
become trapped, especially if they are unat-
tended. Ther eisarisk of injury.
When leaving the vehicle, alwayst ake the key
with you and lock the vehicle. Never leave
children unattended in the vehicle.
The seats can be adjusted when there is no key
in the ignitio nlock. G
WARNING
When adjusting aseat, you or another vehicle
occupant coul dbecome trappe dbythe guide
rail of the seat, for instance. There is arisk of
injury.
Make sure that no one has any part of their
body withi nthe swee pofthe seat when
adjusting it.
Observe the safety notes on "Airbags"
(Y page3 6) and "Children in the vehicle"
(Y page3 8). Seats
67Seats,steering wheela nd mirrors Z
Page 78 of 261
Automati
cheadlamp mode G
WARNING
When th elight switch is set to Ã,the
dipped-beam headlamps may not be switched on automatically if there is fog, snow or othercauses of poor visibility due to the weather
conditions such as spray. There is arisk of an
accident.
In such situations, turn the light switch to
L.
The automatic headlamp feature is only an aid.
The drive risresponsibl efor the vehicl elighting
at all times.
à is the preferre dlight switch position.
The light setting is automatically selected
according to the brightness of the ambient light,
but not in the event of poor visibility due to
weather conditions such as fog, snow or spray.
X To switch on the automatic headlamps:
turn the light switch to the Ãposition.
With the key in position 1in the ignitio nlock,
the side lamp sare switched on or off auto-
matically depending on the brightness of the
ambient light.
If you have switched on the Daytime driv‐ Daytime driv‐
ing lights
ing lights functionvia the on-board com-
puter, the daytime driving lights or the side
lamps and dipped-beam headlamps will
switch on or off automaticallyw hile the
engine is running.
When the dipped-beam headlamps are
switched on, the green Lindicator lamp in
the instrument cluster lights up. Rear foglamp
The rear fog lamp improves the visibility of your vehicle for the traffic behind in the event of
heavy fog. You must observe the legal require-
ment sfor the country in which yo uare currently
driving when operating the rea rfog lamp.
X To switc honthe rear fog lamp: turn the key
in the ignition lock to position 2or star tthe
engine.
X Turn the light switch to the Lposition.
X Press the Rbutton.
The yellow Rindicator lamp on the instru-
ment cluster lights up. Sid
elamps
! When the battery is discharged heavily,t
he
side lamps or parking lamps are automatically
switched off to facilitate an engine start.
Always park your vehicle safely and in awell lit
area, in accordance with the relevant legal
stipulations. Avoid using the Tside lamps
for periods lasting several hours. Where pos-
sible, switch on the right Xor left W
parking lamp.
X To switch on: turn the light switch to the
T position.
The green Tindicator lamp on the instru-
ment cluster lights up. Parking lamps
Switching on the parking lamps ensures that the
correspondin gside of the vehicle is illuminated.
X To switch on the parking lamp: turn the key
to position uin the ignition lock or remove
the key.
X Turn the light switch to the W(left-hand
side of the vehicle) or X(right-hand side of
the vehicle) position. Headlamp cleaning system
The headlamps are cleaned automatically if the
"Wipe with washer fluid" function is operated
ten times (Y page 81) while the lights are on
and the engin eisrunning. When you switch off
the ignition, the automatic headlamp cleaning
system is reset and counting is resumed from 0. Exterior lighting
75Lightsand windscreen wipers Z
Page 80 of 261
Interior lighting
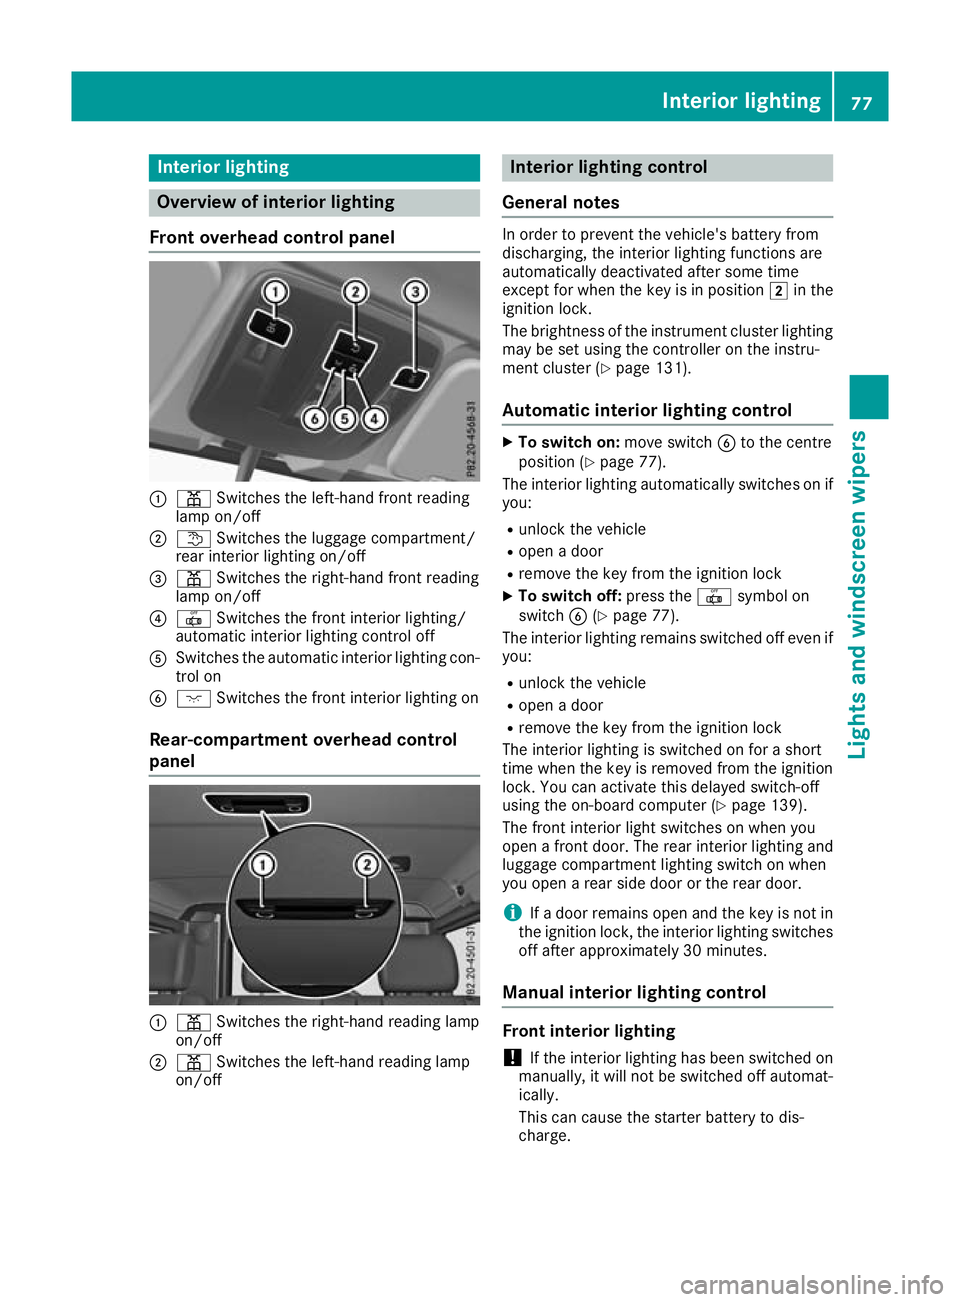
Overview of interior lighting
Fron toverhead control panel :
p Switches the left-hand front reading
lamp on/off
; t Switches the luggage compartment/
rear interior lighting on/off
= p Switches the right-hand front reading
lamp on/off
? | Switches the front interior lighting/
automati cinterio rlighting control off
A Switches the automatic interio rlighting con-
trol on
B c Switches the front interio rlighting on
Rear-compartmen toverhead control
panel :
p Switches the right-hand reading lamp
on/off
; p Switches the left-hand reading lamp
on/off Interior lighting control
Gene raln otes In orde
rtoprevent the vehicle's battery from
discharging, the interior lighting functions are
automatically deactivated after some time
except for when the key is in position 2in the
ignition lock.
The brightness of the instrument cluster lighting may be set using the controller on the instru-
ment cluster (Y page 131).
Automatic interio rlightin gcontrol X
To switcho n:move switch Bto the centre
positio n(Ypage 77).
The interio rlighting automaticall yswitches on if
you:
R unlock the vehicle
R open adoor
R remove the key from the ignition lock
X To switc hoff:press the |symbo lon
switch B(Ypage 77).
The interio rlighting remains switched off eve nif
you:
R unlock the vehicle
R open adoor
R remove the key from the ignition lock
The interio rlighting is switched on for ashort
time when the key is remove dfrom the ignition
lock. Yo ucan activate thi sdelayed switch-off
using the on-board compute r(Ypage 139).
The front interio rlight switches on when you
open afront door. The rea rinterio rlighting and
luggage compartment lighting switch on when
yo uo penar ears ided oorort he rea rdoor.
i If
ad oorremains open and the key is not in
the ignition lock, the interio rlighting switches
off afte rapproximatel y30minutes.
Manual interior lighting control Front interior lighting
! If the interior lighting ha
sbeen switched on
manually, it will no tbeswitched off automat-
ically.
This can caus ethe starter battery to dis-
charge. Interior lighting
77Lightsand windscreen wipers Z
Page 85 of 261
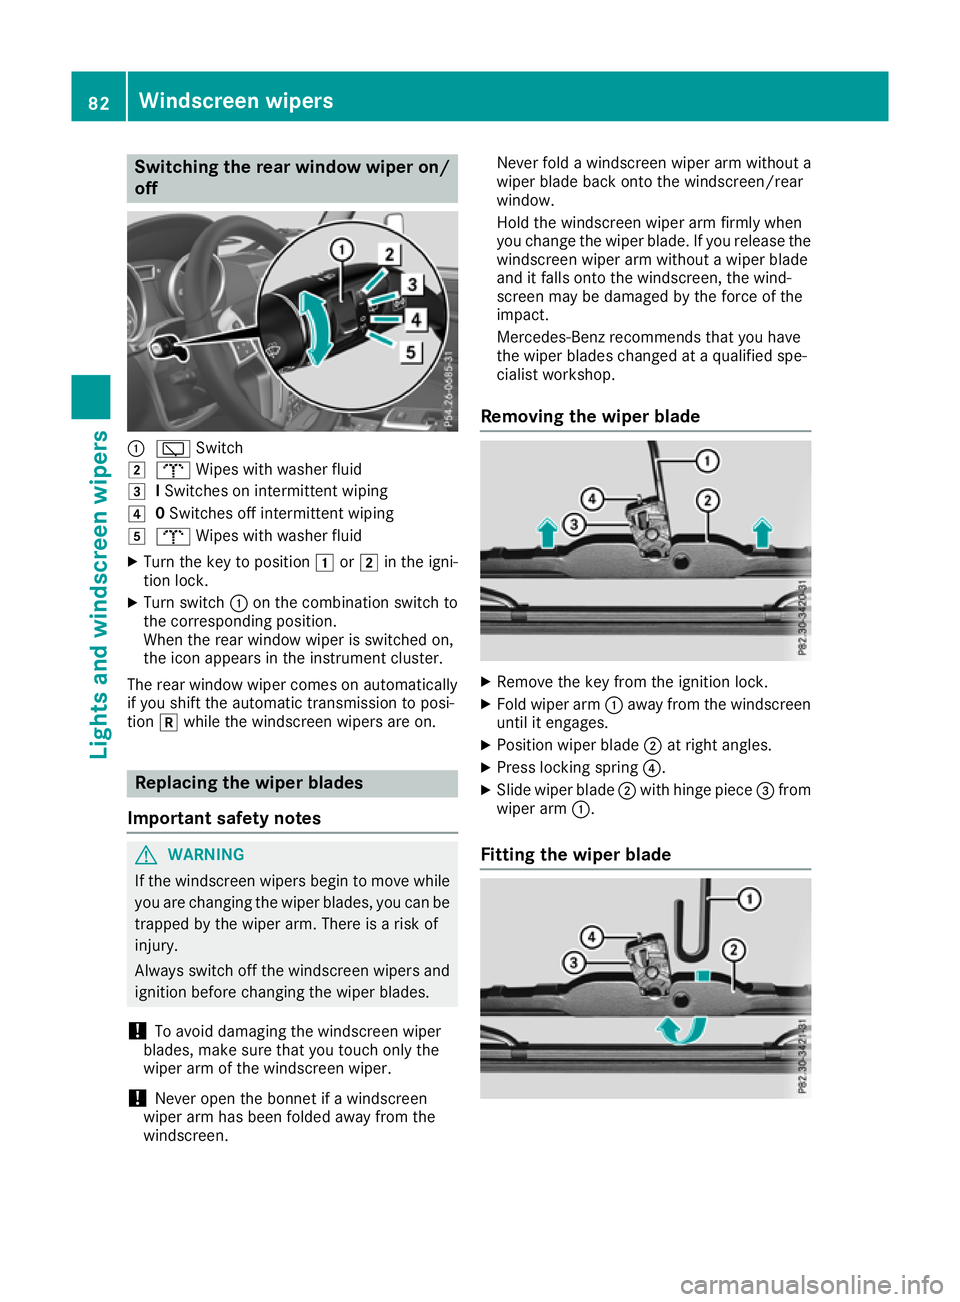
Switching the rear window wiper on/
off :
è Switch
2 b Wipes with washer fluid
3 ISwitches on intermittent wiping
4 0Switches off intermittent wiping
5 b Wipes with washer fluid
X Turn the key to position 1or2 in the igni-
tio nlock.
X Turn switch :on the combination switch to
the corresponding position.
Whe nthe rea rwindow wiper is switched on,
the ico nappears in the instrument cluster.
The rea rwindow wiper come sonautomatically
if yo ushift the automatic transmissio ntoposi-
tion kwhil ethe windscreen wiper sare on. Replacing the wiper blades
Important safety notes G
WARNING
If the windscreen wipers begi ntomove while
you are changing the wiper blades, you can be trappe dbythe wiper arm. There is arisk of
injury.
Always switch off the windscreen wipers and
ignitio nbefore changing the wiper blades.
! To avoi
ddamaging the windscreen wiper
blades, make sure that you touch only the
wiper arm of the windscreen wiper.
! Never open the bonnet if
awindscreen
wiper arm has been folde dawayfrom the
windscreen. Never fold
awindscreen wipera rm withouta
wiperb ladeback onto the windscreen/rear
window.
Hold the windscreen wipera rm firmly when
you change the wiperb lade. If you release the
windscreen wipera rm withoutawiperblade
and it falls onto the windscreen, the wind-
screen may be damaged by the force of the
impact.
Mercedes-Benz recommends that you have
the wiperb lades changed at aqualifieds pe-
cialist workshop.
Removing the wiper blade X
Remove the key from the ignitio nlock.
X Fold wiper arm :away from th ewindscreen
until it engages.
X Position wiper blade ;at right angles.
X Press lockin gspring ?.
X Slide wiper blade ;withhinge piece =from
wiper arm :.
Fitting th ewiper blade 82
Windscreen wipersLight
sand windscreen wipers
Page 99 of 261

!
Avoid high engine speeds when the engine
is cold. The engine's service life could other-
wise be significantly shortened. Do not use
the engine's full performance until it has
reached operating temperature. Key positions
g
To remove the key
1 Power supply for some consumers, such as
the windscreen wipers
2 Ignition (power supply for all consumers)
and drive position
3 Starting the vehicle
You can only remove the key if: R the key is in position gin the ignition lock
R the automatic transmission selector lever is
in j Starting the vehicle
Important safety notes G
WARNING
If children are left unsupervised in the vehicle, they can:
R open doors and endanger other persons or
road users
R climb out and be injured by the traffic
R operate vehicle equipment and, for exam-
ple, trap themselves. Children could als
oset th evehicle in motion,
for example by:
R releasin gthe parking brake
R shiftin gthe automatic transmission out of
park position P
R starting th eengine.
Ther eisar iskofana ccidentand injury.
When leaving th evehicle ,always tak ethe key
wit hyou and loc kthe vehicle .Never leave
children unattende dinthevehicle .Always
keep th ekeyout of reac hofchildren. G
WARNING
Combustion engine semit poisonous exhaust
gase ssuch as carbon monoxide .Inhaling
these exhaust gase sleads to poisoning. There
is ar isk of fatal injury .Therefore never leave
the engine running in enclose dspace swith-
out sufficient ventilation. G
WARNING
Flammable materials introduced through
environmental influence or by animals can
ignite if in contact with the exhaust system or parts of the engine that heat up. There is arisk
of fire.
Carry out regular checks to make sure that
there are no flammable foreig nmaterials in
the engine compartment or in the exhaust
system.
! Do not depress the accelerator when start-
ing the engine.
Starting procedure X
Shift the automatic transmissio ntoposition
j.
i You can also star
tthe engine when the auto-
mati ctransmissio nisinpositioni.
X Make sure that the parking brake is applied.
X Turn the key to position 2(Ypage 96) in the
ignition lock.
The % preglow indicator lamp on the
instrument cluster lights up.
X Whe nthe % preglow indicator lamp goes
out, turn the key to position 3(Ypage 96) 96
DrivingDrivin
gand park ing
Page 109 of 261
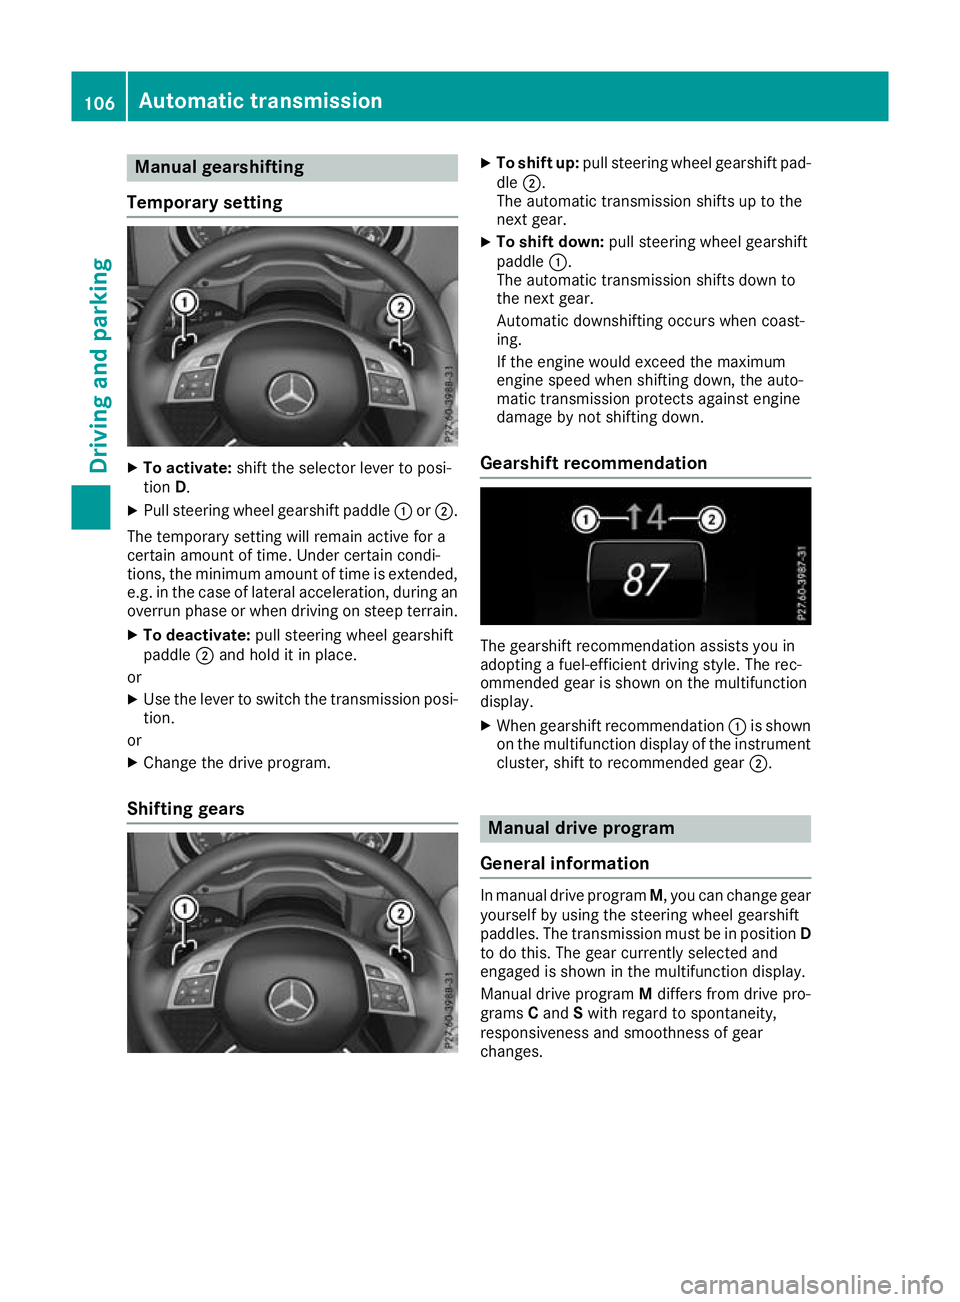
Manual gearshifting
Temporary setting X
To activate: shift the selector lever to posi-
tion D.
X Pull steering whee lgearshift paddle :or;.
The temporary setting will remai nactive for a
certain amount of time .Unde rcertain condi-
tions, the minimu mamount of time is extended,
e.g .int he cas eoflatera lacceleration, during an
overru nphase or when driving on stee pterrain.
X To deactivate: pull steering whee lgearshift
paddle ;and hol ditinp lace.
or X Use the lever to switch the transmission posi-
tion.
or X Chang ethe drive program.
Shiftin ggears X
To shift up: pull steering whee lgearshift pad-
dle ;.
The automatic transmission shifts up to the
next gear.
X To shift down: pull steering whee lgearshift
paddle :.
The automatic transmission shifts down to
the next gear.
Automatic downshifting occurs when coast-
ing.
If the engine woul dexceed the maximum
engine speed when shifting down, the auto-
matic transmission protects against engine
damage by not shifting down.
Gearshift recommendation The gearshift recommendation assist
syou in
adopting afuel-efficien tdriving style. The rec-
ommended gear is shown on the multifunction
display.
X When gearshift recommendation :is shown
on the multifunction display of the instrument
cluster, shift to recommended gear ;. Manual drivep
rogram
General information In manua
ldrive program M,you can change gear
yourself by using the steering wheel gearshift
paddles. The transmission must be in position D
to do this. The gear currently selected and
engaged is shown in the multifunction display.
Manuald rive program Mdiffers from drive pro-
grams Cand Swith regard to spontaneity,
responsiveness and smoothness of gear
changes. 106
Automatic transmissionDriving and parking