2016 MERCEDES-BENZ G-CLASS SUV instrument cluster
[x] Cancel search: instrument clusterPage 165 of 261

Engine
Warning/
indicator
lamp
N N
Signal type
Possible causes/consequences and M
MSolutions ;
N
The yellow engine diagnostics warning lamp lights up whil ethe engine is run-
ning.
There may be afault with the following, for example:
R engine management
R fuel injection system
R exhaust system
R fuel system
The emission limit values may be exceeded and the engine may be runnin gin
emergenc ymode.
X Consult aqualified specialist workshop immediately.
Vehicles with adiesel engine: the fuel tank has been run dry (Y page 110).
X Start the engine three to four times after refuelling.
If the yellow engine diagnostics warning lamp goes out, emergenc ymode is
cancelled. The vehicle does not have to be checked. 8
N
The yellow reserve fuel warning lamp lights up while the engine is running.
The fuel level has dropped into the reserve range.
Operation of the auxiliary heating is deactivated if the fuel level drops into the
reserve range.
X Refuel at the nearest filling station. %
N
On diesel engine vehicles, the preglow indicator lamp does not light up when the
key is in position 2(Y page 96).
The preglow system is malfunctioning.
X Consult aqualified specialist workshop immediately. ?
N
The red coolant warning lamp lights up while the engine is running and the
coolant temperature display is at the start of the scale.
The temperature sensor for the coolant temperature gauge is malfunctioning.
The coolant temperature is no longer being monitored. The engine could be dam-
aged if the coolant temperature is too high.
X Stop the vehicle immediately,p aying attention to road and traffic conditions,
and switch off the engine. Do not continue driving.
X Secure the vehicle against rolling away (Y page 113).
X Consult aqualified specialist workshop. 162
Warning and indicator lamps on the instrument clusterOn-board computer and displays
Page 166 of 261
Warning/
indicator
lamp
N N
Signa ltype
Possible causes/consequences and M
MSolutions ?
N
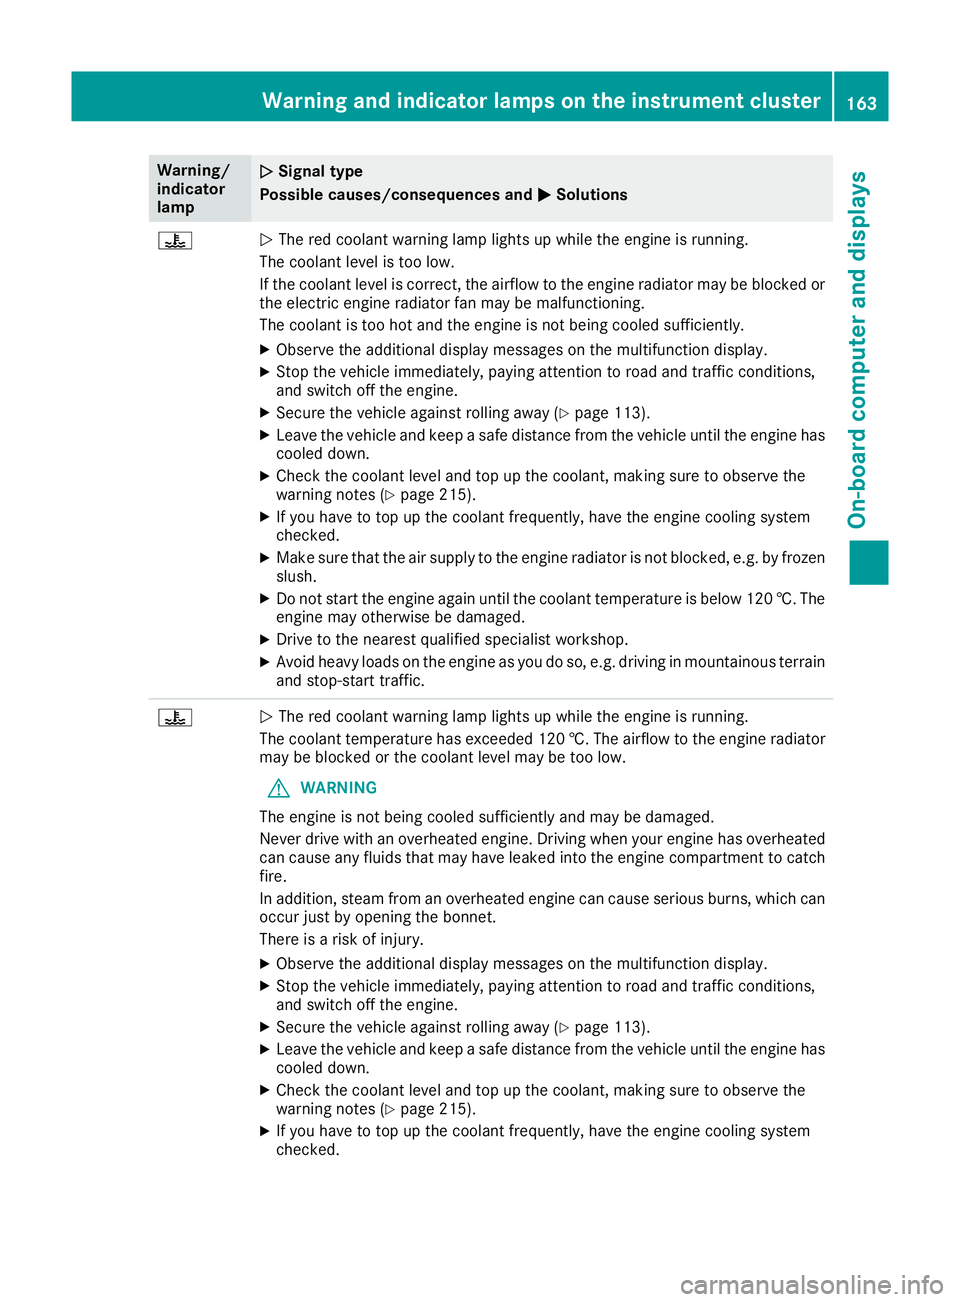
The red coolant warning lamp lights up while the engine is running.
The coolant level is too low.
If the coolant level is correct, the airflow to the engine radiator may be blocked or the electric engine radiator fan may be malfunctioning.
The coolant is too hot and the engine is not being cooled sufficiently.
X Observe the additional display messages on the multifunction display.
X Stop the vehicle immediately, paying attention to road and traffic conditions,
and switch off the engine.
X Secure the vehicle against rolling away (Y page 113).
X Leave the vehicle and keep asafe distance from the vehicle until the engine has
cooled down.
X Check the coolant level and top up the coolant, making sure to observe the
warning notes (Y page 215).
X If you have to top up the coolant frequently, have the engine cooling system
checked.
X Make sure that the air supply to the engine radiator is not blocked, e.g. by frozen
slush.
X Do not start the engine again until the coolant temperature is below 120 †. The
engine may otherwise be damaged.
X Drive to the nearest qualified specialist workshop.
X Avoid heavy loads on the engine as you do so, e.g. driving in mountainous terrain
and stop-start traffic. ?
N
The red coolant warning lamp lights up while the engine is running.
The coolant temperature has exceeded 120 †. The airflow to the engine radiator may be blocked or the coolant level may be too low.
G WARNING
The engine is not being cooled sufficiently and may be damaged.
Never drive with an overheated engine. Drivin gwhen your engine has overheated
can cause any fluids that may have leaked into the engine compartment to catch fire.
In addition, steam from an overheated engine can cause serious burns, which can
occur just by opening the bonnet.
There is arisk of injury.
X Observe the additional display messages on the multifunction display.
X Stop the vehicle immediately, paying attention to road and traffic conditions,
and switch off the engine.
X Secure the vehicle against rolling away (Y page 113).
X Leave the vehicle and keep asafe distance from the vehicle until the engine has
cooled down.
X Check the coolant level and top up the coolant, making sure to observe the
warning notes (Y page 215).
X If you have to top up the coolant frequently, have the engine cooling system
checked. Warning and indicato
rlamps on the instrument cluster
163On-boardcomputer and displays Z
Page 167 of 261
Warning/
indicator
lamp
N N
Signa ltype
Possible causes/consequences and M
MSolutions X
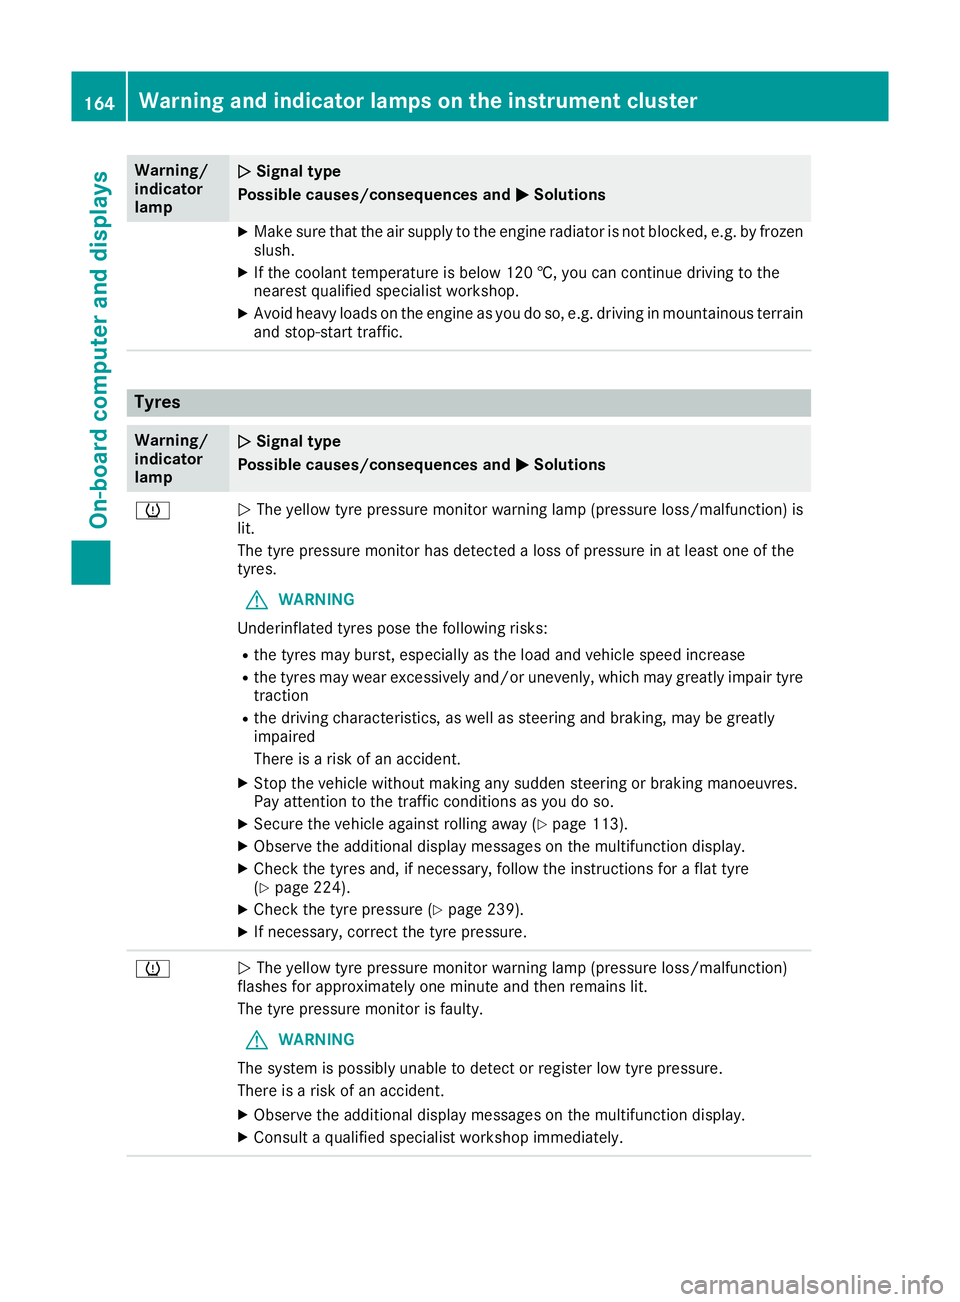
Make sure that the air supply to the engine radiator is not blocked, e.g. by frozen
slush.
X If the coolant temperature is below 120 †, you can continue driving to the
nearest qualified specialist workshop.
X Avoid heavy loads on the engine as you do so, e.g. driving in mountainous terrain
and stop-start traffic. Tyres
Warning/
indicator
lamp
N N
Signal type
Possible causes/consequences and M
MSolutions h
N
The yellow tyre pressure monitor warning lamp (pressure loss/malfunction) is
lit.
The tyre pressure monitor has detected aloss of pressure in at least one of the
tyres.
G WARNING
Underinflated tyres pose the following risks:
R the tyres may burst, especially as the load and vehicle speed increase
R the tyres may wear excessively and/or unevenly, which may greatly impair tyre
traction
R the driving characteristics, as well as steerin gand braking, may be greatly
impaired
There is arisk of an accident.
X Stop the vehicle without making any sudden steerin gorbraking manoeuvres.
Pay attention to the traffic conditions as you do so.
X Secure the vehicle against rolling away (Y page 113).
X Observe the additional display messages on the multifunction display.
X Check the tyres and, if necessary, follow the instructions for aflat tyre
(Y page 224).
X Check the tyre pressure (Y page 239).
X If necessary, correc tthe tyre pressure. h
N
The yellow tyre pressure monitor warning lamp (pressure loss/malfunction)
flashes for approximately one minute and then remains lit.
The tyre pressure monitor is faulty.
G WARNING
The system is possibly unable to detect or register low tyre pressure.
There is arisk of an accident.
X Observe the additional display messages on the multifunction display.
X Consult aqualified specialist workshop immediately. 164
Warning and indicator lamps on the instrument clusterOn-board computer and displays
Page 218 of 261
Allow an overheating engine to coo
ldown
before opening the bonnet. If ther eisafirein
the engine compartment, leav ethe bonnet
closed and notify the fir ebrigade.
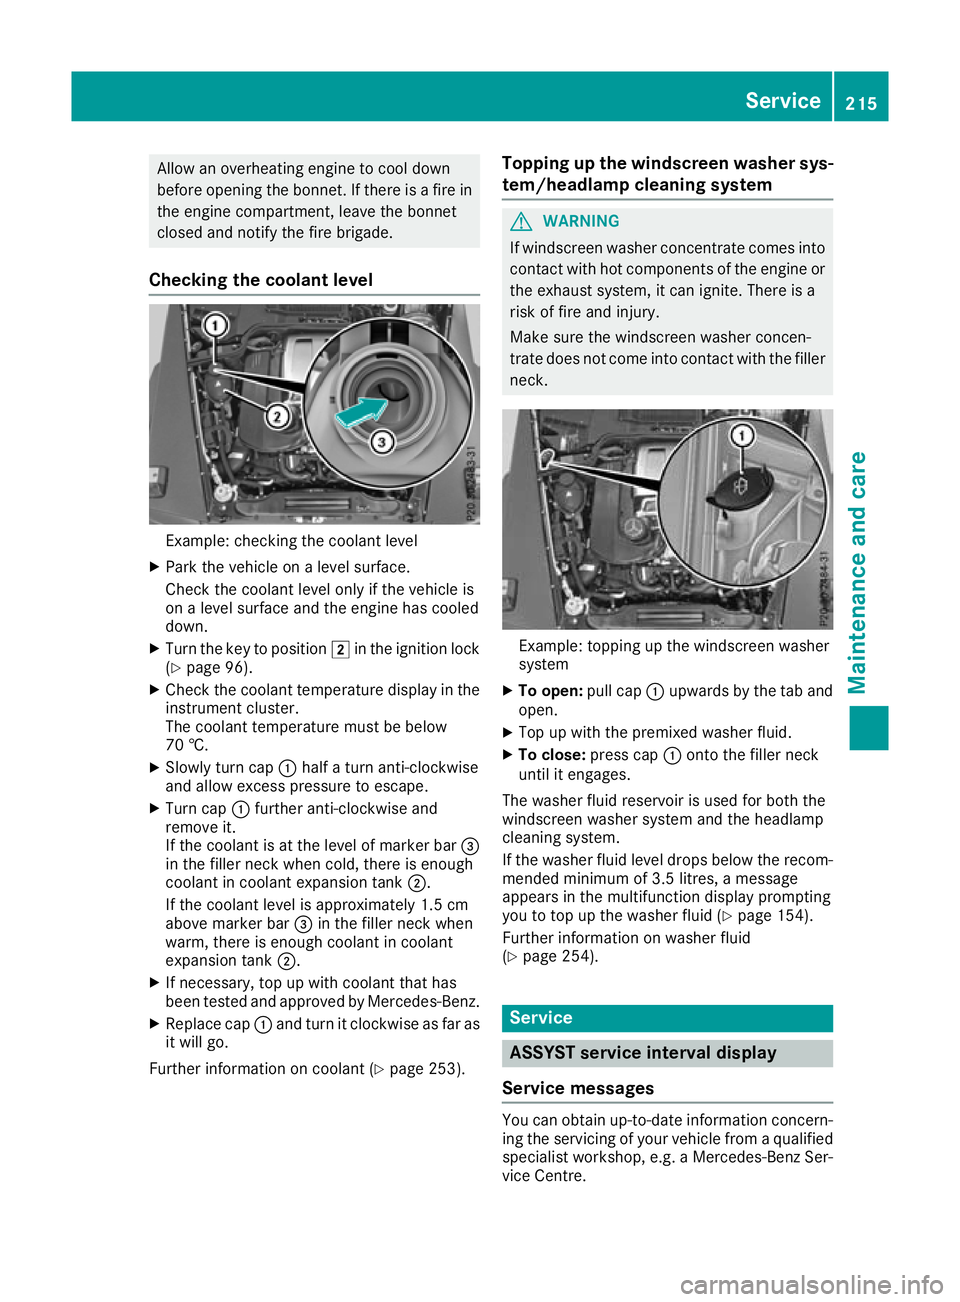
Checkin gthe coolant level Example: checking the coolant level
X Park the vehicl eonalevel surface.
Check the coolant level onl yifthe vehicl eis
on alevel surface and the engine ha scooled
down.
X Turn the key to position 2in the ignition lock
(Y page 96).
X Check the coolant temperatur edisplay in the
instrument cluster.
The coolant temperatur emustbeb elow
70 †.
X Slowl yturnc ap : half aturna nti-clockwise
and allo wexcess pressure to escape.
X Turn cap :furthe ranti-clockwise and
remove it.
If the coolant is at the level of marker bar =
in the fille rneck when cold, there is enough
coolant in coolant expansio ntank ;.
If the coolant level is approximately 1.5 cm
above marker bar =in the fille rneck when
warm, there is enoug hcoolant in coolant
expansio ntank ;.
X If necessary ,top up with coolant tha thas
been teste dand approved by Mercedes-Benz.
X Replace cap :and tur nitclockwise as fa ras
it will go.
Furthe rinformatio noncoolant (Y page 253). Topping up the windscreen washe
rsys-
tem/headlamp cleanin gsystem G
WARNING
If wind screen washer concentrate comes into
contact with hot components of the engine or
the exhaust system, it can ignite. There is a
risk of fire and injury.
Make sure the windscreen washer concen-
trate does not come into contact with the filler neck. Example: topping up the windscreen washer
system
X To open: pull cap:upwards by the tab and
open.
X Top up with the premixed washe rfluid.
X To close: press cap :onto the fille rneck
unti lite ngages.
The washe rfluid reservoi risusedf or both the
windscree nwashe rs ystem and the headlamp
cleaning system.
If the washe rfluid level drops belo wthe recom-
mended minimu mof3.5 litres ,amessage
appear sinthe multifunctio ndisplay prompting
yo utot op up the washe rfluid (Y page 154).
Furthe rinformatio nonwashe rfluid
(Y page 254). Service
ASSYST service interval display
Service messages Yo
uc an obtain up-to-dat einformation concern-
ing the servicin gofyour vehicle from aqualified
specialis tworkshop, e.g. aMercedes-Ben zSer-
vice Centre. Service
215Maintenance and care Z
Page 230 of 261

permit
schargin gofthe battery while it is fitted.
Contact aMercedes-Benz Service Centr efor
information and availability. Read the battery
charger's operatin ginstructions before charg-
ing the battery.
If the warning and indicator lamps do not light up on the instrument cluster when temperatures
are low, it is probably because the discharged battery has frozen. In this case, you may neither
jump-start the vehicle nor charge the battery.
The servic elife of abattery that has been
thawed may be reduced. The starting charac-
teristics may be impaired, especially at low tem- peratures. Have the thawed battery checked at
aq ualified specialist workshop. Jump-starting
For the jump-starting procedure, use only the jump-starting connection point, consisting of apos-
itive terminal and an earth point, in the engine compartment. G
WARNING
Batterya cid is caustic. There is arisk of injury.
Avoid contact with the skin, eyesorc lothing. Do not breathe in any battery gases. Do not leano ver
the battery .Keep the batterie sout of the reach of children. Immediately rinse off battery acid
thoroughly with plenty of clea nwaterand seek medical attention at once. G
WARNING
During charging and jump-starting, explosive gase scan escap efrom the battery .There is arisk
of an explosion.
Particularl yavoidfire, naked flames, creating sparks and smoking. Ensure there is sufficient
ventilation while charging and jump-starting. Do not leano verabattery. G
WARNING
During the charging process ,abattery produces hydrogen gas. If ashort circui toccurs or sparks
are created ,the hydrogen gas can ignite. There is arisk of an explosion.
R Make sure that the positive terminal of aconnected battery does not come into contact with
vehicl eparts.
R Never place metal objects or tools on abattery.
R It is important that you observe the described order of the battery terminal swhen connecting
and disconnecting abattery.
R When jump-starting, make sure that the battery pole swith identical polarity are connected.
R It is particularl yimportant to observe the described order when connecting and disconnecting
the jump leads.
R Never connect or disconnect the battery terminal swhile the engine is running. G
WARNING
Ad ischarged battery can freeze at temperatures below freezing point. When jump-starting the
vehicl eorcharging the battery ,gase scan escap efrom the battery .There is arisk of an explosion.
Allow the frozen battery to thaw out before charging it or jump-starting.
If the warning and indicator lamp sdonot light up on the instrument cluster when temperatures are
low,itisp robably because the discharged battery has frozen. In this case, you may neither jump-
start the vehicl enor charge the battery .The service life of abattery that has been thawe dmay be Jump-starting
227Breakdown assistance Z
Page 231 of 261
reduced. The starting characteristics may be impaired, especially at low temperatures. Have the
thawe dbattery checked at aqualified specialist workshop.
Do not use arapidc harging device to start the vehicle. If yourv ehicle's battery is discharged, the
engine can be jump-started from another vehicl eorfromasecond battery using jump leads.
Observe the following points:
R The battery is not accessible in all vehicles. If the other vehicle's battery is not accessible, jump-
start the vehicl eusing adonor battery or ajump-starting device.
R Do not start the engine if the battery is frozen. Let the battery thaw first.
R Jump-starting may be performe donly using batterie swithanominal voltag eof12V.
R Use only jump leads that have asufficient cross-section and insulated terminal clamps.
R If the battery is full ydischarged, leave the battery that is being used to jump-start connected for
af ew minutes before attempting to start. This charge sthe empty battery alittle.
R Make sure that the two vehicles do not touch.
Make sure that:
R The jump leads are not damaged.
R Non-insulated parts of the terminal clamp sdonot come into contact with other metal parts while
the jump leads are connected to the battery.
R The jump leads cannot come into contact with parts that can move when the engine is running,
such as the V-belt pulley or the fan.
X Apply the parking brake.
X Shift the automatic transmission to position P.
X Make sure that the ignitio nisswitched off. All indicator lamp sonthe instrument cluster must be
off.
X Switch off all electrica lconsumers, e.g. rear windo wheating, lighting etc.
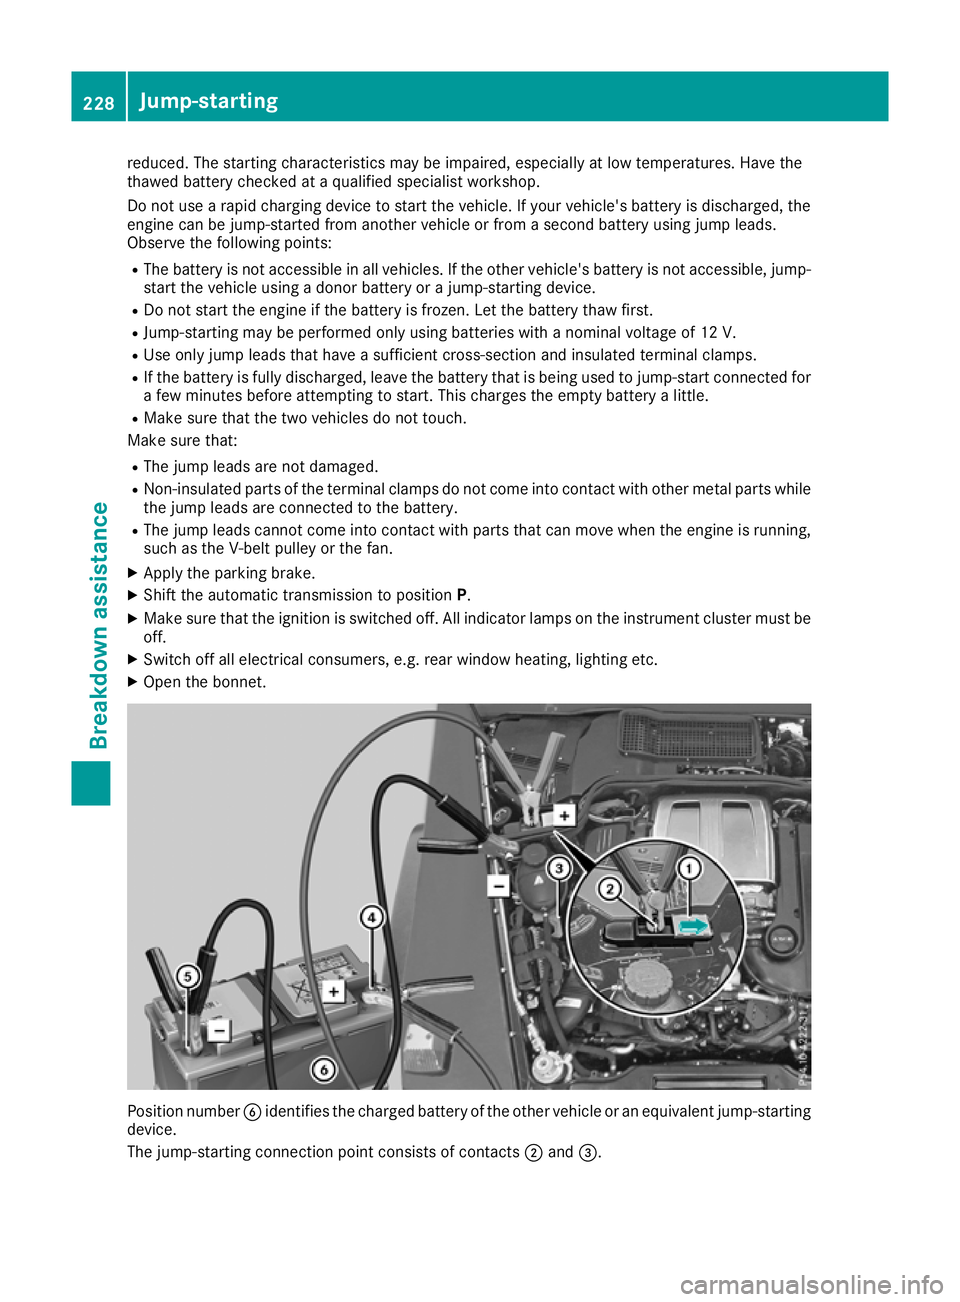
X Open the bonnet. Position number
Bidentifies the charged battery of the other vehicle or an equivalent jump-starting
device.
The jump-startin gconnection point consists of contacts ;and =. 228
Jump-startingBreakdowna
ssistan ce
Page 235 of 261
In th
eevent of damage to th eengine,
transmission or electrical system X
Shift th etransfer cas etoneutral position
Neutral (Ypage 125).
X Shif tthe automatic transmissio ntoposition
N.
In the even tofdamage to the transfer
case Have the propeller shafts between the axles and
the transfe rcase removed.
In the event of damage to the front axle Have the propeller shaft between the rea
raxle
and the transfe rcase removed.
The nhavet he vehicle towe dawayw itht he front
axl eraised.
In the event of damage to the rear axle Have the propeller shaft between the front axle
and the transfe rcase removed.
The nhavet he vehicle towe dwitht he rea raxle
raised and wheel rollers unde rthe front axle. Tow-start
ing( em ergency engine
starting)
! Do not tow-start vehicles with automatic
transmission. Yo ucould otherwis edamage
the automatic transmission.
Yo uc an find informatio non"Jump-starting"
under (Y page 227). Fuses
Importan
tsafety notes G
WARNING
If yo umanipulate, bridge or replace afaulty
fuse with afuse of ahigher amperage ,the
electric cables coul dbeoverloaded. This may
result in afire. There is arisk of an accident
and injury.
Always replace faulty fuses with specified new fuses of the correct amperage. The fuses in your vehicle disconnect fault
ycir-
cuits. If afuse blows, all the components in the
circuit and their functions will fail.
Blown fuses must be replaced with fuses of the same rating, which you can recognise by the
colour and fuse rating. The fuse ratings are listed
in the fuse allocation chart (Y page 233).
If the newly inserted fuse also blows, have the
cause traced and rectified at aqualified special-
ist workshop, e.g. aMercedes-Benz Service
Centre.
! Only use fuses that have been approved for
Mercedes-Benz vehicles and which have the
correc tfuse rating for the system concerned.
Otherwise, components or systems could be
damaged.
! Make sure that no moisture can enter the
fuse box when the cover is open.
! When closing the cover, make sure that it is
lying correctly on the fuse box. Moisture seep-
ing in or dirt could otherwise impair the oper-
ation of the fuses. Bef
orer eplacing afuse
Observ ethe important safety notes
(Y page 232).
X Switch off the engine.
X Switch off al lelectrical consumers.
X Remove the key from the ignition lock.
All indicator lamps on the instrument cluster
must be off.
X Secure the vehicl eagain st rolling away
(Y page 113).
The fuses are locate dinvarious fus eboxes:
R Main fus eboxon the front-passenger side of
the dashboard
R Fus eboxin the front-passenger footwell
R Fus eboxin the transmission tunnel
R Fus eboxin the luggage compartment
The fus ealloc ation chart and the spare fuses are
in the fus eboxon the dashboard on the front-
passenger side (Y page 233).
The fus eextractor is in the vehicl etool kit
(Y page 223). 232
FusesBreakdo
wn assis tance
Page 243 of 261

For further information on displaying this mes-
sage, refe rtothe "Checking the tyre pressure
electronically" section (Y page 240).
Important safety notes It is the driver's responsibility to set the tyre
pressure to the recommended cold tyre pres-
sure suitable for the operating situation
(Y page 238). Note that the correc ttyre pres-
sure for the current operating situation must
first be learnt by the tyre pressure monitor. If a
substantial loss of pressure occurs, the warning threshold for the warning message is aligned to
the learnt reference values. Restart the tyre
pressure monitor after adjusting to the cold tyre pressure (Y page 241). The current pressures
are saved as new reference values. This ensures that awarning message appears only if the tyre
pressure drops significantly.
The tyre pressure monitor does not warn you of
an incorrectly set tyre pressure. Observe the
notes on the recommended tyre pressure
(Y page 238).
The tyre pressure monitor is not abletow arn
you of asudden loss of pressure, e.g. if the tyre
is penetrated by aforeign object. In this event,
bring the vehicle to ahalt by braking carefully.
Avoid abrupt steering manoeuvres.
The tyre pressure monitor has ayellow h
warning lamp on the instrument cluster for indi-
cating apressure loss or malfunction. Depend-
ing on how the warning lamp flashe sorlights up,
at yre pressure that is too low or amalfunction in
the tyre pressure monitor is indicated:
R if the h warning lamp is lit continuously,
the tyre pressure on one or more tyres is sig-
nificantly too low. The tyre pressure monitor
is not malfunctioning.
R if the h warning lamp flashe sfor around a
minute and then remains lit constantly, the
tyre pressure monitor is malfunctioning.
In addition to the hwarning lamp,am essage
appears in the multifunction display. Observe
the information on display messages
(Y page 150).
It may take up to ten minutes for amalfunction
of the tyre pressure monitor to be indicated .A
malfunction willbei ndicated by thehtyre
pressure warning lamp flashing for approx-
imatel yone minute and then remaining lit. When
the faulth as been rectified, the htyre pres-
sure warning lamp goes out after driving for a
few minutes. The tyre pressure values indicated by the on-
board computer may differ from those meas-
ured at
afilling station using apressure gauge.
The tyre pressures shown by the on-board com-
puter refer to those measured at sea level. At
high altitudes, the tyre pressure values indica-
ted by apressure gauge are higher than those
shown by the on-board computer. In this case,
do not reduce the tyre pressures.
The operation of the tyre pressure monitor can
be affected by interferenc efrom radio transmit-
ting equipment (e.g. cordless headphones, two- way radios) that may be being operated in or
near the vehicle.
Checking the tyrep ressureelectroni-
cally X
Make sure that the key is in position 2in the
ignition lock.
X Press the =or; button on the steering
wheel to select the Serv.
Serv. menu.
X Press the 9or: button to select
Tyre pressure
Tyre pressure.
X Press the abutton.
The multifunction display shows the current
tyre pressure of each wheel.
If the vehicle has been parked for over
20 minutes, the Tyre pressures will be Tyre pressures will be
displayed
displayed after a
after afew
fewminutes
minutes of
ofdriv‐
driv‐
ing
ing message appears.
After ateach-in period, the tyre pressure moni-
tor automaticallyd etects new wheels or new
sensors. As long as aclear allocation of the tyre
pressure valuestot he individual wheels is not
possible,t heTyre
Tyre pressure
pressure monitor
monitoractive
active
displaym essage is shown instead of the tyre
pressure display. The tyre pressures are already being monitored.
If as pare wheel is fitted, the system may con-
tinue to show the tyre pressure of the wheel that has been removed for afew minutes. Please
note that in this case, the value displayed for the
replaced wheel does not indicate the current
tyre pressure of the spare wheel.
Warning messages of the tyre pressure monitor If the tyre pressure monitor detects
apressure
loss in one or more tyres, awarning messag eis
shown on the multifunction display. The yellow
h tyre pressure warning lamp then lights up. 240
Tyre pressureWheels and tyres