2016 MERCEDES-BENZ G-CLASS SUV warning
[x] Cancel search: warningPage 205 of 261
Rear benc
hseat Folding th
erearb ench seat forwards X
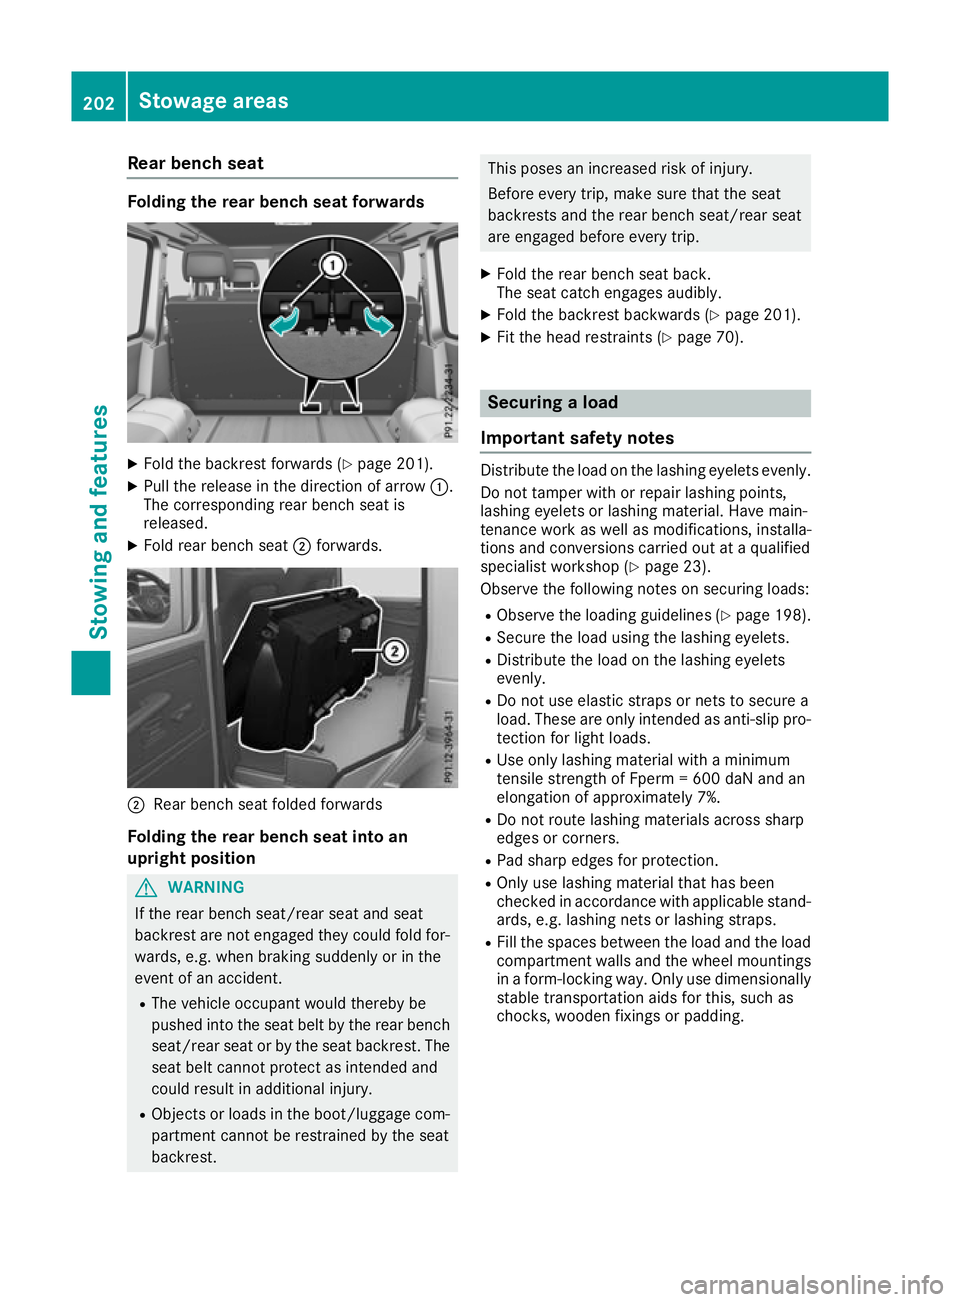
Fold th ebackrest forward s(Ypage 201).
X Pull the release in the directio nofarrow:.
The corresponding rea rbench sea tis
released.
X Fold rea rbench seat ;forwards. ;
Rear bench seat foldedf orwards
Folding th erearb ench sea tint oan
upright position G
WARNING
If th erear bench seat/rea rseat and seat
backrest are not engaged they coul dfold for-
wards, e.g. when braking suddenly or in the
event of an accident.
R The vehicl eoccupant would thereby be
pushed into the seat beltb ythe rear bench
seat/rea rseat or by the seat backrest. The
seat beltc annot protect as intended and
coul dresult in additiona linjury.
R Objects or loads in the boot/luggag ecom-
partment cannot be restrained by the seat
backrest. This poses an increased risk of injury.
Befor
eevery trip, make sure that the seat
backrest sand the rear bench seat/rear seat
are engaged before every trip.
X Fold the rear bench seat back.
The seat catche ngages audibly.
X Fold the backrest backwards (Y page 201).
X Fit the head restraints (Y page 70). Securing
aload
Important safety notes Distribute the load on the lashing eyelets evenly.
Do not tamper with or repair lashing points,
lashing eyelets or lashing mater ial.Hav emain-
tenance work as well as modifications, installa-
tions and conversions carrie doutataq uali fied
specialis tworkshop (Y page 23).
Observe the following note sonsecuring loads:
R Observe the loading guideline s(Ypage 198).
R Secure the load using the lashing eyelets.
R Distribute the load on the lashing eyelets
evenly.
R Do not us eelast ic straps or nets to secur ea
load .These ar eonlyi ntende dasanti-slip pro-
tection for light loads.
R Use onl ylas hing material with aminimum
tensil estrength of Fperm =600 da Nand an
elongation of approximately 7%.
R Do not route lashing material sacross sharp
edge sorc orners.
R Pa ds harp edge sfor protection.
R Onl yuselashing material tha thas been
checked in accordance with applicabl estand-
ards ,e.g.las hing nets or lashing straps.
R Fillthe space sbetween the load and the load
compartment wall sand the whee lmountings
in af orm-locking way. Onl yusedimensionally
stabl etransportatio naidsf or this, such as
chocks, wooden fixings or padding. 202
Stowag
eareasStowing and features
Page 206 of 261
Lashing eyelet
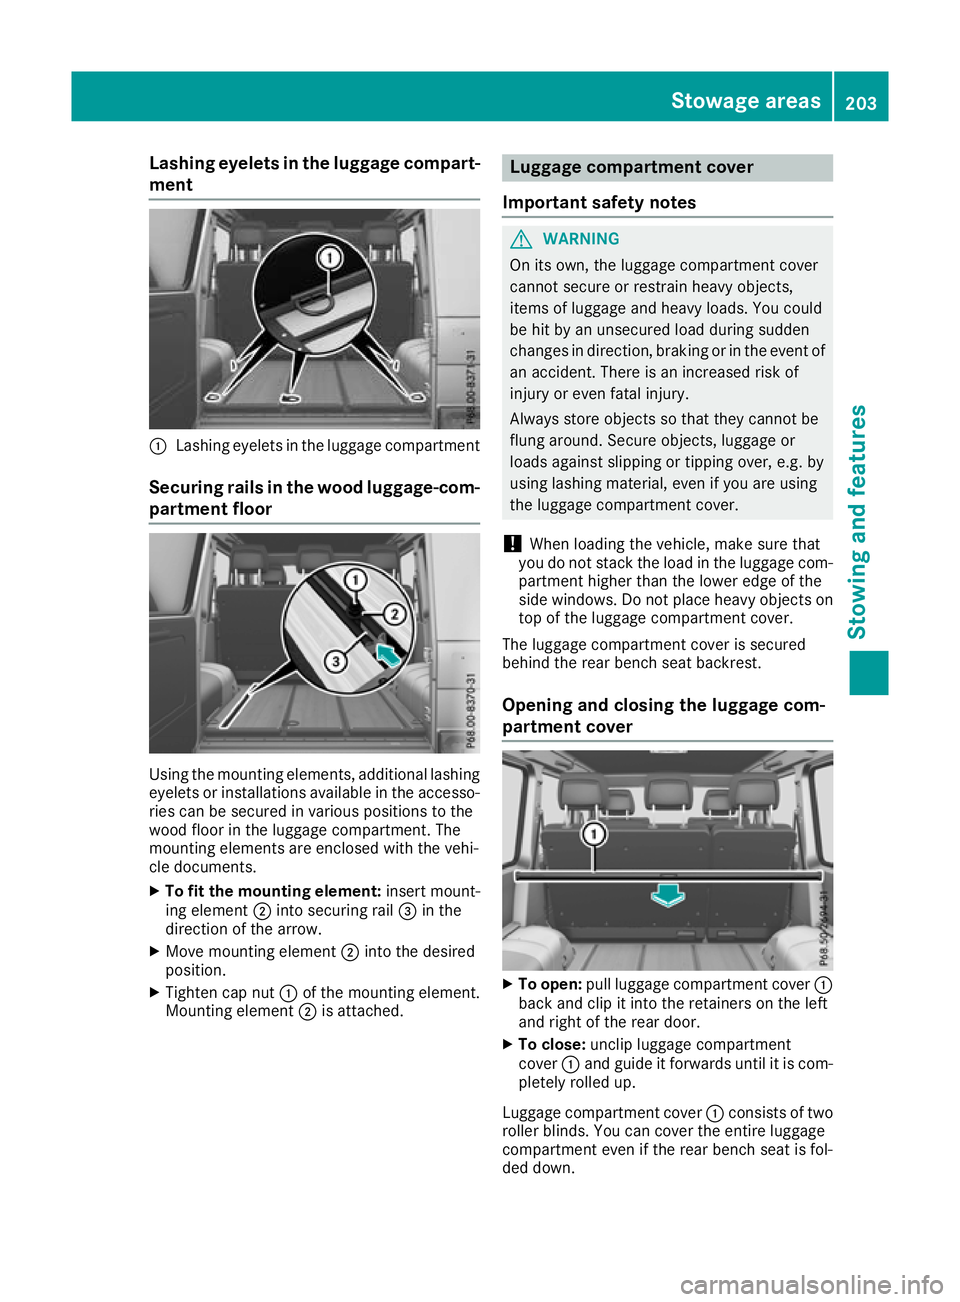
sintheluggage compart-
ment :
Lashing eyelets in the luggage compartment
Securing rails in the wood luggage-com- partm ent floor Using the mounting elements, additional lashing
eyelets or installation savailable in the accesso-
ries can be secured in various positions to the
wood floor in the luggage compartment.T he
mounting elements are enclosed with the vehi-
cle documents.
X To fit the mounting element: insert mount-
ing element ;into securing rail =in the
direction of the arrow.
X Move mounting element ;into the desired
position.
X Tighten cap nut :of the mounting element.
Mounting element ;is attached. Luggage com
partment cover
Important safety notes G
WARNING
On its own ,the luggage compartment cover
cannot secure or restrai nheav yobjects,
items of luggage and heav yloads. You could
be hit by an unsecured loadd uring sudden
changes in direction, braking or in the event of an accident. There is an increased risk of
injury or even fatal injury.
Always store objects so that they cannot be
flung around. Secure objects, luggage or
loads against slipping or tipping over, e.g. by
using lashing material, even if you are using
the luggage compartment cover.
! When loading the vehicle, make sure that
you do not stack the loadint he luggage com-
partment higher than the lower edge of the
side windows. Do not place heav yobjects on
top of the luggage compartment cover.
The luggage compartment cover is secured
behind the rear bench seat backrest.
Opening and closing the luggage com-
partment cover X
To open: pull luggage compartment cover :
back and clip it into the retainers on the left
and right of the rear door.
X To close: unclip luggage compartment
cover :and guid eitforward suntilitisc om-
pletel yrolle dup.
Luggage compartment cover :consists of two
rolle rblinds. Yo ucan cove rthe entire luggage
compartment eve nifthe rea rbench sea tisf ol-
de dd own. Stowag
eareas
203Stowing and features Z
Page 207 of 261
Fitting/removing th
eluggage compart-
men tcover X
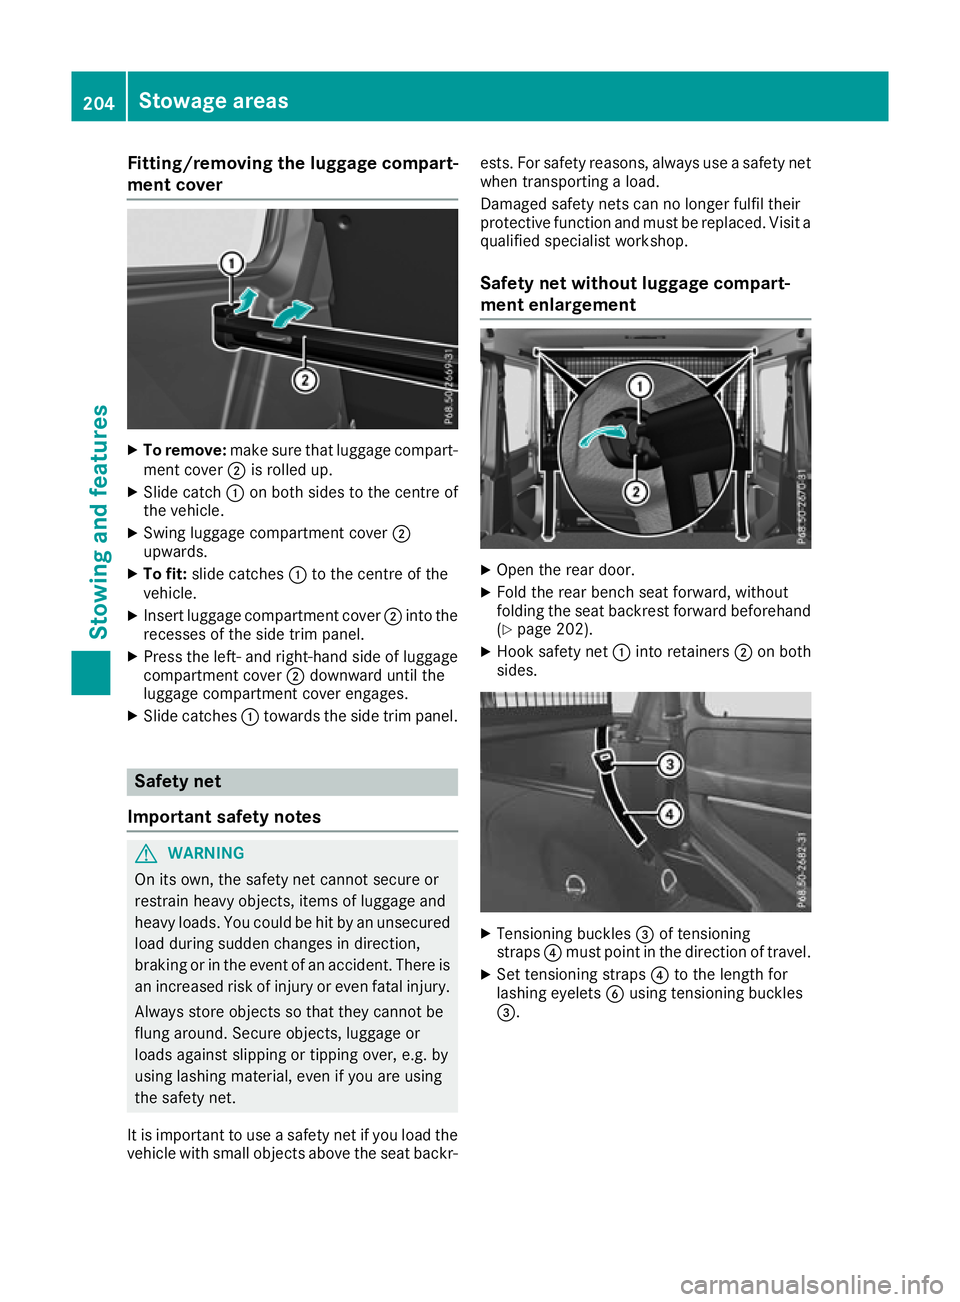
To remove: makesuret ha tlug gage compart-
ment cover ;is rolle dup.
X Slide catch :on both side stothe centre of
the vehicle.
X Swing luggage compartment cover ;
upwards.
X To fit: slidecatches :to the centre of the
vehicle.
X Insert luggage compartment cover ;into the
recesse softhe side trim panel.
X Press the left- and right-hand side of luggage
compartment cover ;downward unti lthe
luggage compartment cove rengages.
X Slide catches :toward sthe side trim panel. Safety net
Important safety notes G
WARNING
On its own, the safet ynet cannot secure or
restrai nheavy objects, items of luggage and
heavy loads. You coul dbehit by an unsecured
loadd uring sudden changes in direction,
braking or in the event of an accident. There is an increased risk of injury or even fatal injury.
Always store objects so that they cannot be
flung around. Secure objects, luggage or
loads against slipping or tipping over, e.g. by
using lashing material, even if you are using
the safety net.
It is important to use asafety net if you loadt he
vehicl ewith smal lobjects above the seat backr- ests
.For safety reasons, alway suseasafety net
when transporting aload.
Damaged safety netsc an no longer fulfil their
protective function and must be replaced. Visit a qualified specialist workshop.
Safet ynet without luggage compart-
ment enlargement X
Open the rear door.
X Fold the rear bench seat forward, without
folding the seat backrest forward beforehand
(Y page 202).
X Hook safety net :into retainers ;on both
sides. X
Tensionin gbuckles =of tensioning
straps ?must point in the direction of travel.
X Set tensioning straps ?to the length for
lashing eyelets Busing tensioning buckles
=. 204
Stowage areasStowing and features
Page 209 of 261
Releasin
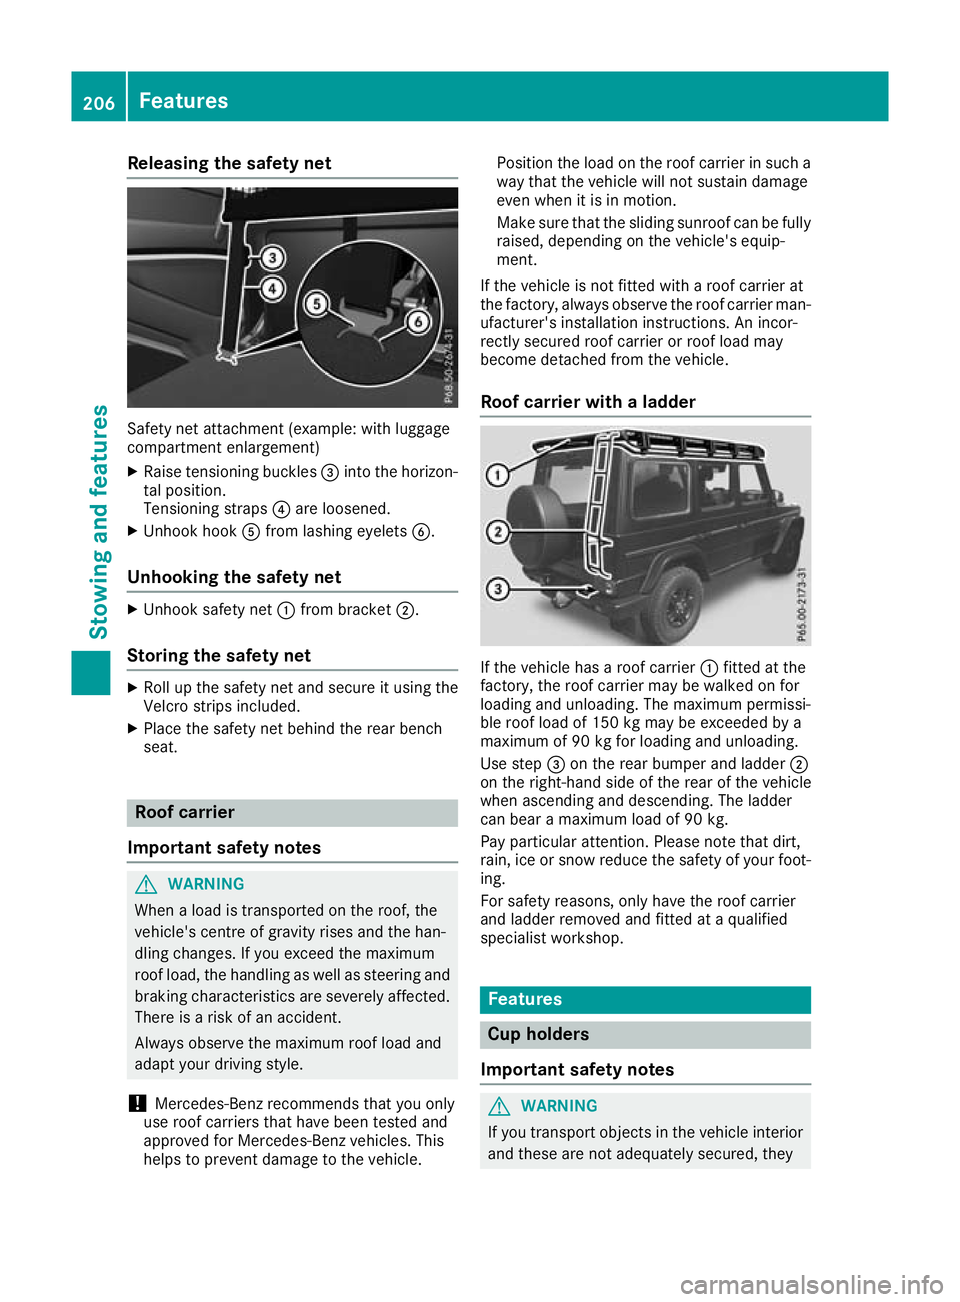
gthe safety net Safety net attachment (example
:withl ug gage
compartment enlargement)
X Raise tensioning buckles =into the horizon-
tal position.
Tensioning straps ?are loosened.
X Unhook hook Afrom lashing eyelets B.
Unhookin gthe safety net X
Unhook safety net :from bracket ;.
Storing the safety net X
Roll up the safety net an dsecure it usin gthe
Velcro strips included.
X Plac ethe safet ynetbehind th erear bench
seat. Roof carrier
Importan tsafety notes G
WARNING
When aloa dist ransported on the roof, the
vehicle's centre of gravity rises and the han-
dling changes .Ifyou exceed the maximum
roof load, the handling as wellass teering and
braking characteristics are severely affected.
There is arisk of an accident.
Always observe the maximu mroof loada nd
adapt yourd riving style.
! Mercedes-Benz recommends that you only
use roof carriers that have been tested and
approved for Mercedes-Benz vehicles. This
help stop revent damage to the vehicle. Position the load on the roof carrier in such a
way that the vehicle will not sustain damage
even when it is in motion.
Make sure that the sliding sunroof can be fully
raised, dependin gonthe vehicle's equip-
ment.
If the vehicle is not fitted with aroof carrier at
the factory, alway sobserve the roof carrier man-
ufacturer's installation instructions. An incor-
rectly secured roof carrier or roof load may
become detached from the vehicle.
Roof carrier with aladder If the vehicl
ehasaroof carrier :fitted at the
factory, the roof carrier may be walked on for
loading and unloading. The maximum permissi-
ble roof load of 150 kg may be exceeded by a
maximum of 90 kg for loading and unloading.
Use step =on the rear bumpera nd ladder;
on the right-hand side of the rear of the vehicle
when ascending and descending. The ladder
can bear amaximum load of 90 kg.
Pay particular attention. Please note that dirt,
rain, ice or snow reduce the safety of yourf oot-
ing.
For safety reasons, only have the roof carrier
and ladder removed and fitted at aqualified
specialist workshop. Features
Cup holders
Important safety notes G
WARNING
If you transport objects in the vehicle interior and these are not adequately secured, they 206
FeaturesStowing and features
Page 210 of 261
could sli
porbef lung around and thereby
strike vehicle occupants. In addition, cup
holders, ope nstowag espaces and mobile
phone brackets may not always be able to
hol dthe objects place dinthem in the event of
an accident. There is ariskofi njury, particu-
larly in the event of sharp braking or sudden
changes of direction.
R Alway sstow objects in such awaythat they
cannot be tosse dabout in these or similar
situations.
R Alway smake sure that objects do not proj-
ect from stowag espaces, luggage nets or
stowag enets.
R Ensure that closable stowag espaces are
shu tbefore beginning your journey.
R Alway sstow and secure heavy, hard, poin-
ted, sharp-edged, fragil eoroutsize objects
in the loa dcompartment. G
WARNING
The cup holder cannot secure adrinks con-
tainer in place during ajourney .Ifyou use a
cup holder during ajourney ,the drinks con-
tainer coul dbeflung around and liquid could
be spilt. Vehicle occupants coul dcome into
contact with the liquid and, in particular, be
scalded by hot liquid.Y ou couldbedistracted
from the traffic situation and lose control of
the vehicle. There is arisk of an accident and
injury.
Only use the cup holder when the vehicl eis
stationary. Only place containers of asuitable
size in the cup holder. Seal the container, in
particular when it contains hot liquid.
! Only use the cup holders for containers of
the right size and which have lids. The drinks
coul dotherwise spill.
Observe the loading guidelines (Y page198). Cu
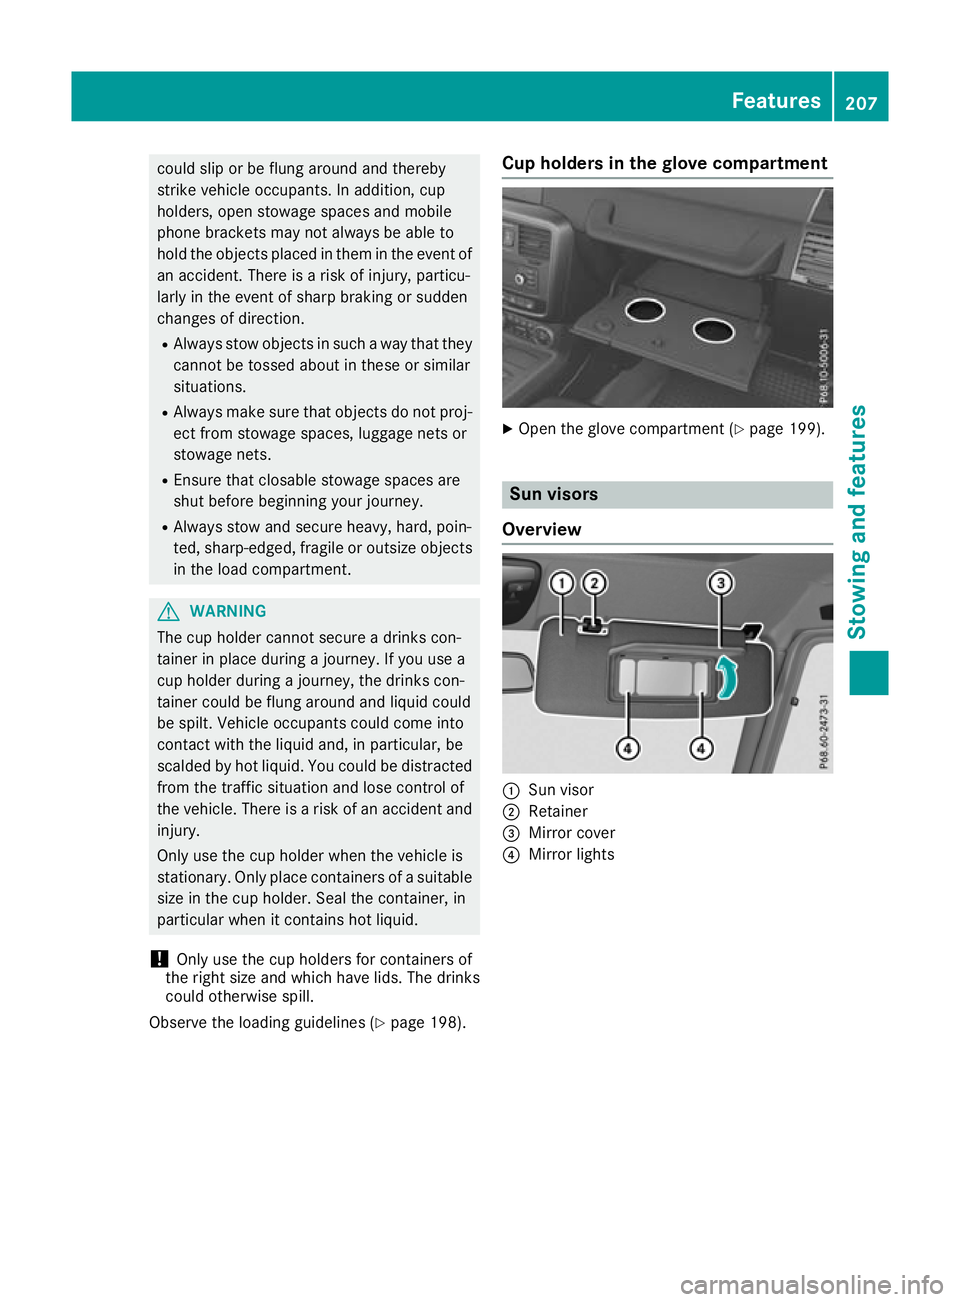
ph olders in th eglove compartment X
Ope nthe glove compartment (Y page 199). Sun visors
Overview :
Sun visor
; Retainer
= Mirror cover
? Mirror lights Features
207Stowing and features Z
Page 211 of 261
Vanity mirro
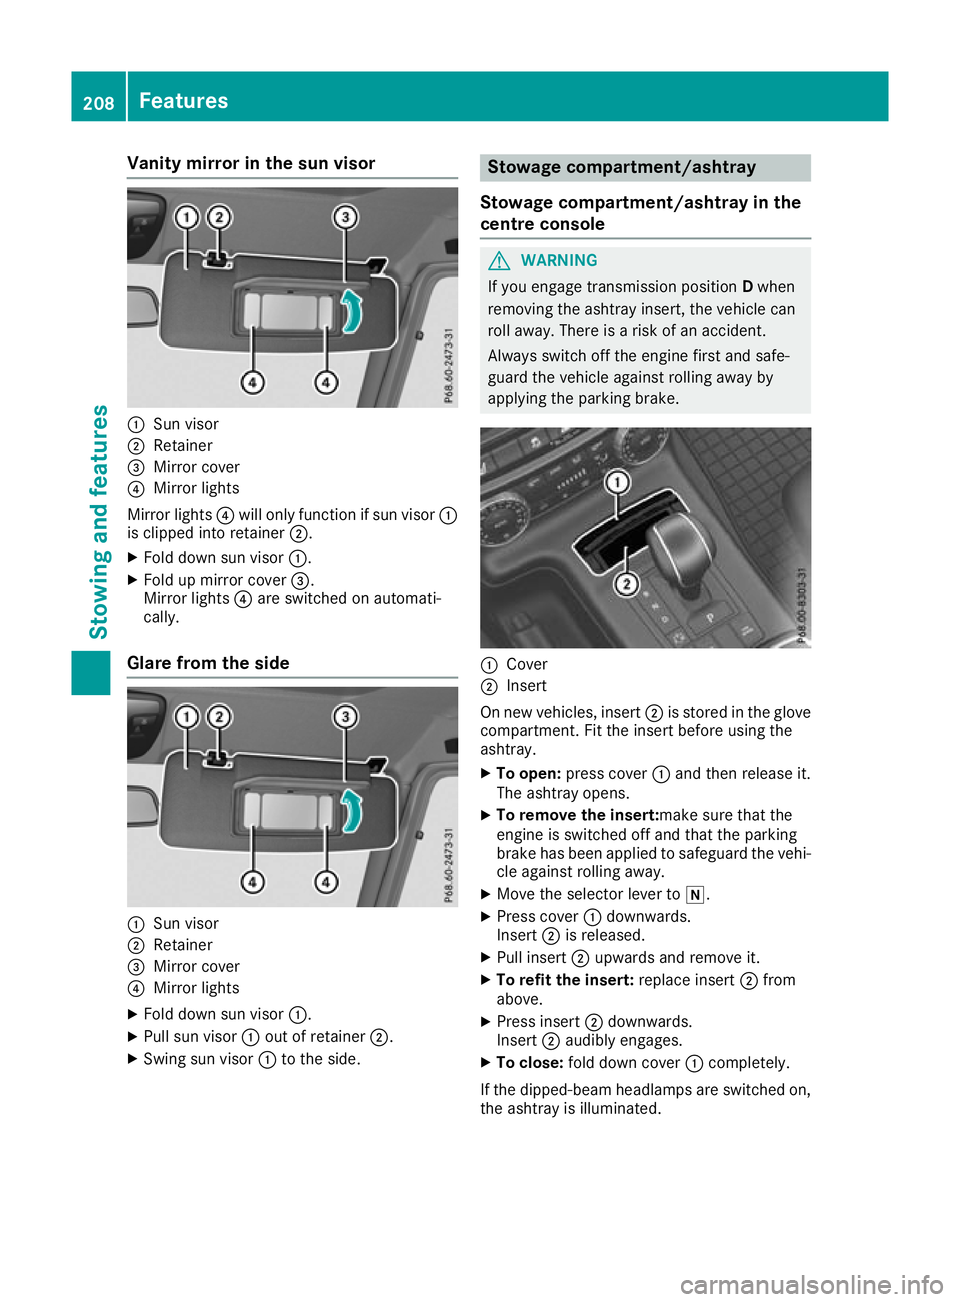
rint he sun visor :
Sun visor
; Retainer
= Mirror cover
? Mirror lights
Mirror lights ?will only function if su nvisor :
is clippe dinto retainer ;.
X Fol dd owns un visor :.
X Fol dupm irror cover =.
Mirror lights ?are switched on automati-
cally.
Glare from the side :
Sun visor
; Retainer
= Mirror cover
? Mirror lights
X Fol dd owns un visor :.
X Pull su nvisor :outofr etainer ;.
X Swing su nvisor :to the side. Stowag
ecompartment/ashtray
Stowage compartment/ashtray in the
centre console G
WARNING
If you engage transmission position Dwhen
removing the ashtray insert, the vehicle can
roll away. There is arisk of an accident.
Always switch off the engine first and safe-
guard the vehicl eagainst rolling awayby
applying the parking brake. :
Cover
; Insert
On new vehicles, insert ;is stored in the glove
compartment. Fi tthe insert before usin gthe
ashtray.
X To open: press cover :and then release it.
The ashtray opens.
X To remove th einsert:ma ke sure that the
engin eisswitched off and that th eparking
brak ehas been applied to safeguard th evehi-
cle against rolling away.
X Mov ethe selector leve rtoi.
X Press cover :downwards.
Insert ;is released.
X Pull insert ;upward sand remove it.
X To refit th einsert: replace insert ;from
above.
X Press insert ;downwards.
Insert ;audibly engages.
X To close: fold down cover :completely.
If th edipped-beam headlamps are switched on,
th ea shtray is illuminated. 208
Featu
resStowing and features
Page 212 of 261
Cigarett
elighter G
WARNING
Yo uc an burn yourself if you touch the hot
heating element or the socket of the cigarette lighter.
In addition, flammable materials can ignite if:
R the hot cigarette lighter falls
R ac hild hold sthe hot cigarette lighter to
objects, for example
There is arisk of fire and injury.
Always hold the cigarette lighter by the knob.
Always make sure that the cigarette lighter is
out of reach of children. Never leave children unattended in the vehicle. X
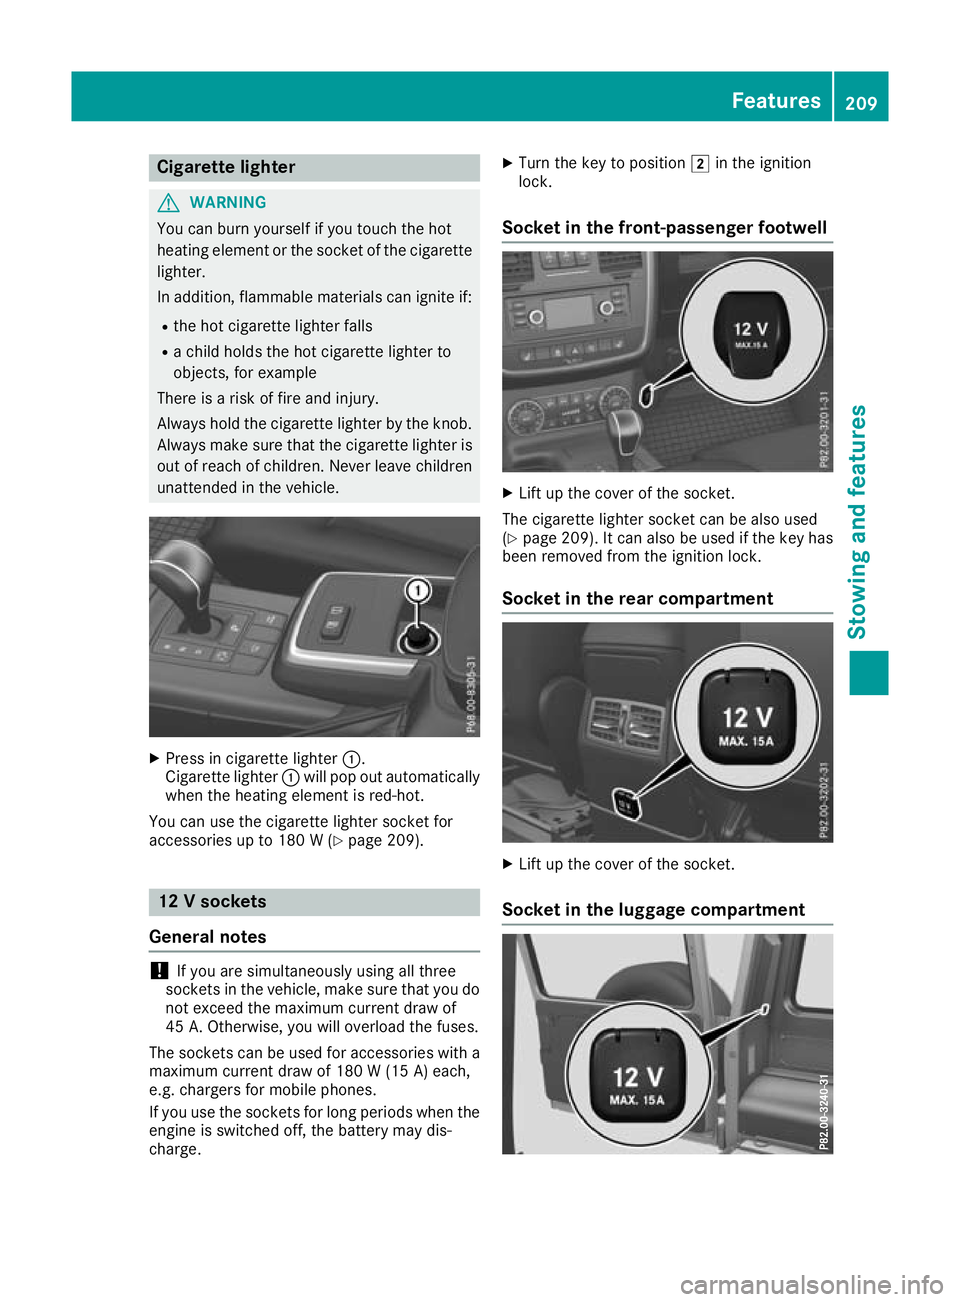
Pres sinc igarett elighter :.
Cigarette lighter :will pop out automatically
when the heating element is red-hot.
You can use the cigarett elighter socket for
accessories up to 180 W(Ypage 209). 12
Vsockets
General notes !
If you are simultaneously using all three
socketsint he vehicle, make sure that you do
not exceed the maximum current draw of
45 A. Otherwise, you will overload the fuses.
The sockets can be used for accessories with a maximum current draw of 180 W(15 A) each,
e.g. chargers fo rmobile phones.
If you use the sockets for long periods whe nthe
engine is switched off, the battery may dis-
charge. X
Turn the key to position 2in the ignition
lock.
Socket in the front-passenger footwell X
Lift up the cover of the socket.
The cigarette lighter socket can be also used
(Y page 209). It can also be used if the key has
been removed from the ignition lock.
Socket in the rear compartment X
Lift up the cover of the socket.
Socket in the luggag ecompartment Features
209Stowing and features Z
Page 214 of 261
Engine compartment
Bonnet
Importan tsafety notes G
WARNING
An unlocked bonne tmay open up when the
vehicl eisinm otion and block yourv iew.There
is ar isk of an accident.
Never unlock the bonnet when driving. Before
every trip, ensure that the bonnet is locked. G
WARNING
When being opened and closed ,the bonnet
may suddenly fall into the closed position.
There is arisk of injury to persons in the range
of movement of the bonnet.
Open and close the bonnet only when nobody
is in the range of movement. G
WARNING
If you open the bonnet while the engine is
overheating or while there is afire in the
engine compartment, you coul dcome into
contact with hot gase sorother leaking ser-
vice products. There is adange rofinjury.
Allow an overheating engine to cool down
before opening the bonnet. If there is afire in
the engine compartment, leave the bonnet
closed and notify the fire brigade. G
WARNING
The ignitio nsystem and the fuel injection sys-
tem operate with ahigh voltage. If you touch
the live components, you coul dreceive an
electric shock. There is adange rofinjury.
Never touch components of the ignitio nsys-
tem or the fuel injection system when the
ignitio nisswitched on. G
WARNING
There are moving components in the engine
compartment. Certain components may con-
tinue to move or suddenly move again even
after the ignitio nhas been switched off, e.g.
the radiator fan. There is arisk of injury. If you have to carry out work in the engine
compartment:
R switch off the ignition
R never touch the dangerou sarea ssurround-
ing moving components, e.g. the rotation
area of the fan
R remove jewellery and watches
R keep items of clothing and hair, for exam-
ple, awayf rom moving parts.
Do not touch the diagnostics socket when the
ignition is switched on.
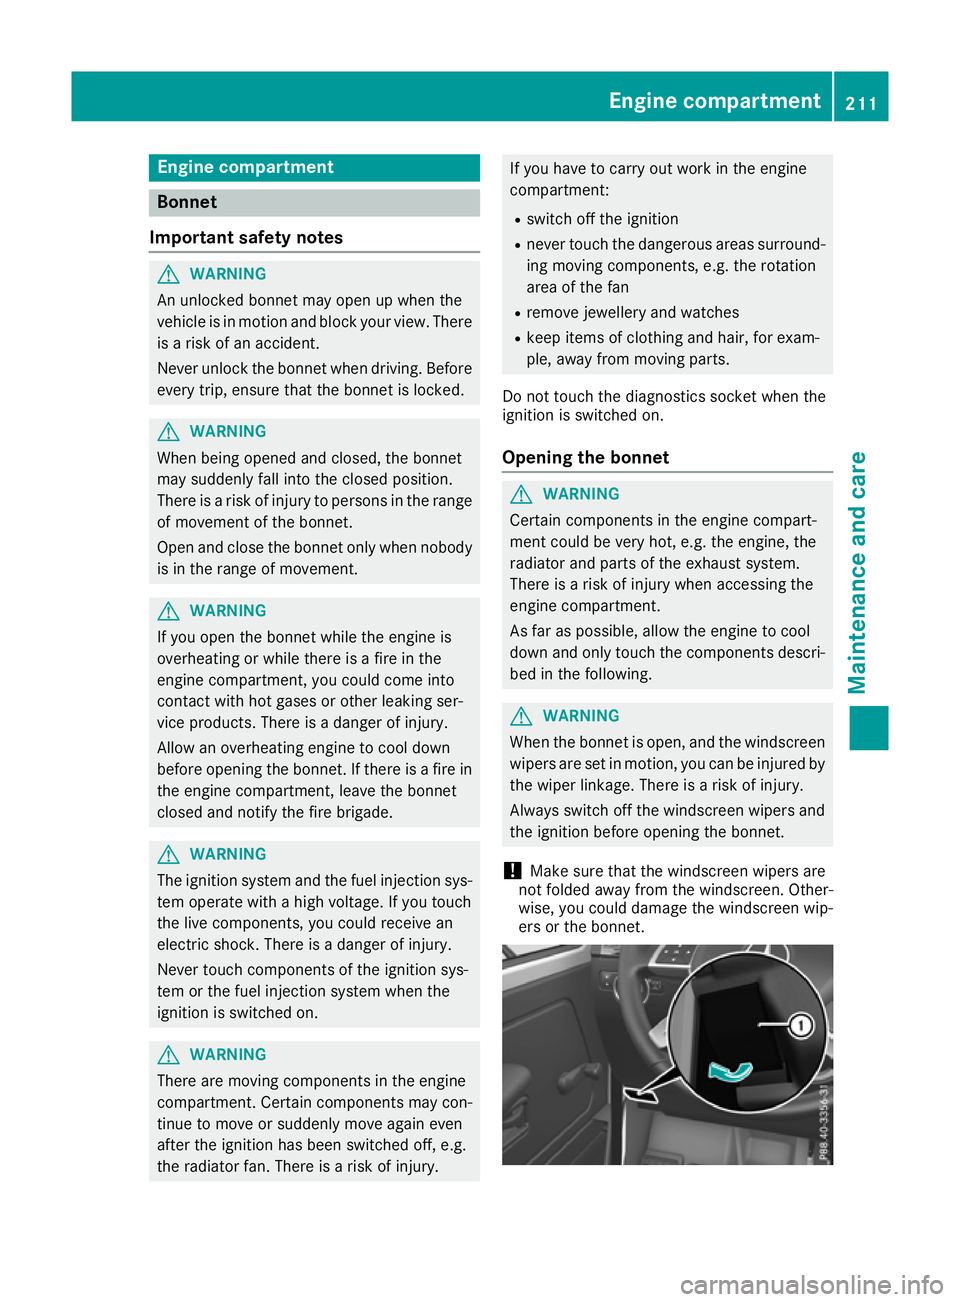
Openin gthe bonnet G
WARNING
Certain components in the engine compart-
ment could be very hot, e.g. the engine, the
radiator and parts of the exhaust system.
There is arisk of injury when accessing the
engine compartment.
As far as possible,a llow the engine to cool
downa nd only touch the components descri-
bed in the following. G
WARNING
When the bonnet is open, and the windscreen wipers are set in motion, you can be injured by
the wiper linkage. There is arisk of injury.
Always switch off the windscreen wipers and
the ignitio nbefore opening the bonnet.
! Make sure that the windscreen wipers are
not folde dawayfrom the windscreen. Other-
wise, you coul ddamage the windscreen wip-
ers or the bonnet. Engine compartment
211Maintenanceand care Z