2016 MERCEDES-BENZ G-CLASS SUV warning
[x] Cancel search: warningPage 247 of 261
X
Stop the vehicl eonsolid,non-slipper yand
level ground.
X Appl ythe parking brake.
X Move the front wheel stothe straight-ahead
position.
X Shif tthe automatic transmissio ntoposition
P.
X Switch off the engine.
X Ifat raile risc oupled to the vehicle, uncouple
it.
X Remove the vehicl etool sand jack from the
vehicl e(Ypage 223).
X Remove the spare wheel from the spare wheel
bracket (Y page 223).
X Secure the vehicl eagains trolling away.
Securing the vehicle against rolling
away X
Place chocks or other suitable items under
the front and rea rofthe wheel that is diago-
nally opposite the wheel you wish to change.
Raising the vehicle G
WARNING
If you do not position the jack correctl yatthe
appropriate jacking point of the vehicle, the
jack coul dtip over with the vehicl eraised.
There is arisk of injury.
Only position the jack at the appropriate jack-
ing point of the vehicle. The base of the jack
must be positioned vertically,d irectly under
the jacking point of the vehicle.
! Only position the jack at the appropriate
jacking point of the vehicle. Otherwise, you
coul ddamage the vehicle.
Observe the following whenr aisingthe vehi-
cle:
R Use only the vehicle-specific jack that has
been tested and approved by Mercedes-Benz
to rais ethe vehicle. If the jack is used incor-
rectly, it coul dtip over while the vehicl eis
raised.
R The jack is designed only to rais ethe vehicle
for ashort time while awhee lisb eing
changed .Itisnot permissible to use it to per-
form maintenance work under the vehicle. R
Avoid changing the whee lonuphilland down-
hill slopes.
R Before raising the vehicle, secur eitagainst
rolling away by applying the parking brake and
positioning whee lchocks. Do not release the
parking brake whil ethe vehicl eisraised.
R The jack must be place donafirm, flatand
non-slip surface. On aloo se surface, alarge,
fla tload-beari ng underlay must be used .Ona
slippery surface, anon-slip underlay must be
used ,e.g.u se arubber matont iles.
R Do not us ewoode nblocks or similar objects
as ajack underlay .Otherwise, the jack will not
be able to achieve its load-bearing capacity
du etot he restricte dheight.
R Ensure tha tthe distance between the under-
side of the tyr eand the ground does not
exceed 3cm.
R Do not place your hands or fee tunder the
raised vehicle.
R Do not li eunder the raised vehicle.
R Do not start the engine when the vehicl eis
raised.
R Do not open or close adoorw hent he vehicle
is raised.
R Ensure tha tnopersons ar epresent in the
vehicl ewhenr aisin gthe vehicle. X
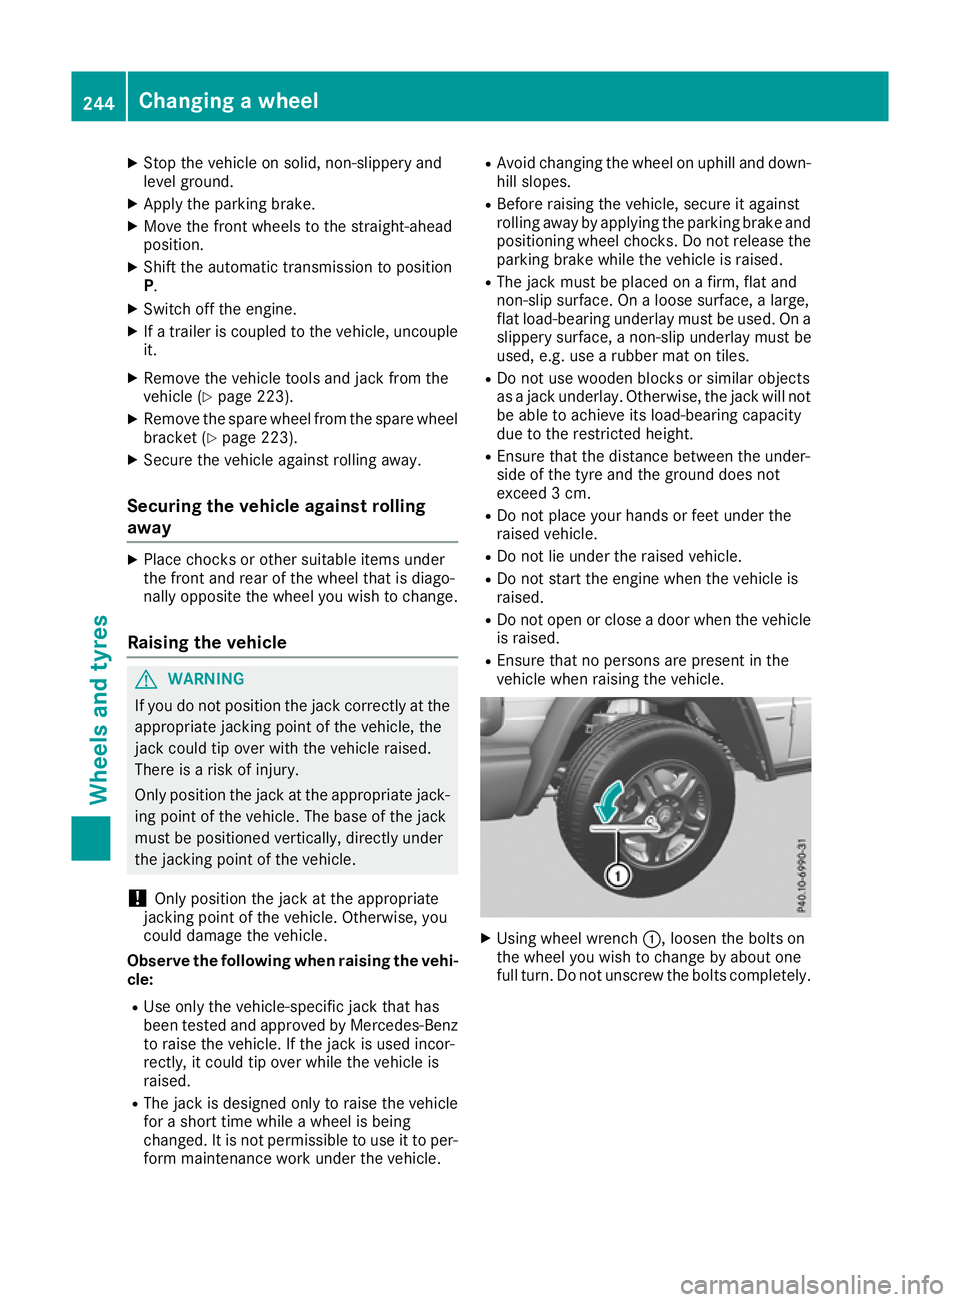
Using wheel wrench :,loosen the bolts on
the wheel you wish to change by abouto ne
full turn. Do not unscrew the bolts completely. 244
Changing
awheelWheels and tyres
Page 248 of 261
X
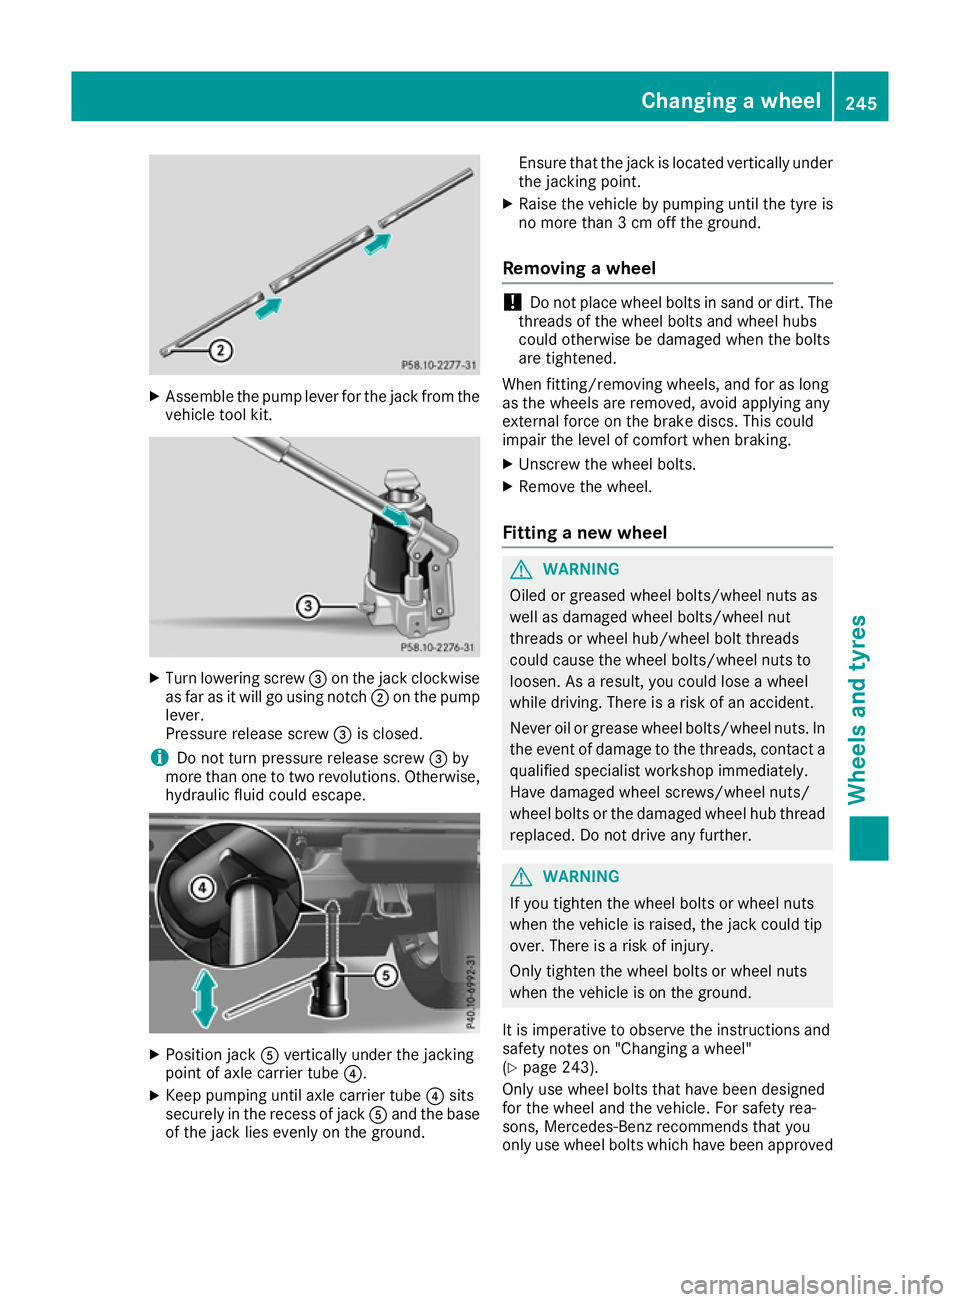
Assembl ethe pump lever for the jack from the
vehicl etool kit. X
Tur nlowering screw =on the jack clockwise
as far as it will go using notch ;on the pump
lever.
Pressure release screw =is closed.
i Do not turn pressure release screw
=by
more than one to two revolutions. Otherwise,
hydrauli cfluid could escape. X
Position jack Avertically under the jacking
point of axle carrier tube ?.
X Keep pumping until axle carrier tube ?sits
securely in the recess of jack Aand the base
of the jack lies evenly on the ground. Ensure that th
ejack is locate dverticall yunder
the jacking point.
X Rais ethe vehicl ebypumping unti lthe tyr eis
no mor ethan3cmo ff the ground.
Removing awheel !
Do no
tplace wheel bolts in sand or dirt. The
threads of the wheel bolts and wheel hubs
could otherwise be damagedw hen the bolts
are tightened.
When fitting/removing wheels, and for as long
as the wheels are removed, avoid applying any
external force on the brake discs. This could
impair the level of comfort when braking.
X Unscrew the wheel bolts.
X Remove the wheel.
Fitting anew wheel G
WARNING
Oiled or greased wheel bolts/wheel nuts as
well as damaged wheel bolts/wheel nut
threads or wheel hub/wheel bolt threads
could cause the wheel bolts/wheel nuts to
loosen. As aresult, you coul dlose awheel
while driving. There is arisk of an accident.
Never oil or grease whee lbolts/wheel nuts. In
the event of damage to the threads, contact a
qualified specialist worksho pimmediately.
Have damaged whee lscrews/wheel nuts/
whee lbolts or the damaged whee lhub thread
replaced. Do not drive any further. G
WARNING
If you tighten the whee lbolts or whee lnuts
when the vehicl eisraised, the jack coul dtip
over. There is arisk of injury.
Only tighten the whee lbolts or whee lnuts
when the vehicl eisonthe ground.
It is imperative to observe the instructions and
safety notes on "Changing awheel"
(Y page2 43).
Only use whee lbolts that have been designed
for the whee land the vehicle. For safety rea-
sons, Mercedes-Benz recommends that you
only use whee lbolts which have been approved Changing
awheel
245Wheels an dtyres Z
Page 249 of 261

for Mercedes-Benz vehicles and the respective
wheel.
X Clean the whee land whee lhub contact sur-
faces.
X Place the new whee lonthe whee lhub and
pus hito n.
X Tighten the whee lbolts until they are finger-
tight.
Lowering the vehicle G
WARNING
The wheels coul dwork loos eifthe whee lnuts
and bolts are not tightened to the specified
tightening torque .There is arisk of accident.
Have the tightening torque immediately
checked at aqualified specialist workshop
after awhee lisc hanged.
X Slowl yopen the pressure release screw on
the jack using the pump leve rbyapprox-
imatel yone full turn and carefully lower the
vehicl e(Ypage2 44).
X You can put the jack aside. X
Tighten the wheel bolts evenl yinacrosswise
pattern in the sequence indicated (: toA).
The specified tightening torque is 130 Nm.
X Dismantle the pump lever.
X Push the jack piston back in and close the
drain plug.
X Use the nuts to secure the faulty wheel to the
spare wheel bracket (Y page 223).
X Stow the jack and the vehicle tools in the
vehicle again.
X Check the tyre pressure of the newly fitted
wheel and adjust it if necessary.
Observe the recommended tyre pressure
(Y page 238). If you are drivin
gwith the emergency spare
wheel fitted, the tyre pressure monitor cannot
function reliably.R estart the tyre pressure mon-
itor only once the defective wheel has been
replaced with anew wheel.
All fitted wheelsm ust be equipped with func-
tioning sensors for the tyre pressure monitor. Wheel and tyre combinations
You can ask for information regarding permitted
wheel/tyre combinations at aMercedes-Benz
Service Centre.
! For safety reasons, Mercedes-Benz recom-
mends that you only use tyres, wheels and
accessories which have been approved by
Mercedes-Benz for you rvehicle. These are
speciall yadapted to the various driving safety
systems, such as ABS or ESP ®
.
Only use the tyres, wheels and accessories
tested and recommende dbyMercedes-Benz.
Certain characteristics, such as handling,
vehicl enoise emissions, fuel consumption,
etc. may otherwise be adversely affected.
Other wheel sizes may caus ethe tyres to
come into contact with the vehicl ebody and
axle components, whe nunder load. This may
result in damage to the tyre or the vehicle.
Mercedes-Benz is not responsibl efor any
damage caused by using tyres, wheels or
accessories other than those recommended.
Informatio nontyres, wheels and permissible
combinations can be obtained at aqualified
specialist workshop.
! Retreaded tyres are neither tested nor rec-
ommende dbyMercedes-Benz, since previ-
ous damage cannot alwaysbed etected on
retreaded tyres. As aresult, Mercedes-Benz
cannot guarantee vehicl esafety if retreaded
tyres are fitted. Do not fit use dtyres if you
have no information about their previous
usage.
! Large wheels: the lower the section width
for acertain wheel size, the lower the ride
comfort is on poor road surfaces. Rol lcomfort
and suspension comfort are reduced and the risk of damage to the wheels and tyres as a
result of driving over obstacles increases.
The recommende dtyre pressures for various
operating conditions can be found on the tyre 246
Wheel and tyre combinationsWheels and tyres
Page 251 of 261

Information on technica
ldata
i The technical dat
awere determine din
accordanc ewithEUD irectives .All dat aapply
to th evehicle's standard equipment. The data
may therefor ediffer for vehicles wit hoptional
equipment. You can obtain further informa-
tion from aMercedes-Ben zServic eCentre. Vehicle electronics
Tampering with th
eengin eelect ron-
ics
! Onl
yhavew orkc arrie douton the engine
electronics and its associated parts, such as
contro lunits, sensors, actuating components
and connector leads, at aquali fied specialist
workshop .Vehicl ecomponents ma yother-
wise wear mor equickl yand the vehicle's
operating permi tmaybe invalidated. Fittin
gtwo-way radios and mobile
phones (RF transmitters) G
WARNING
If RF transmitters ar etampere dwith or not
properly retrofitted, the electromagnetic radi- ation they emit can interfere with the vehicle
electronics. This may jeopardise the opera-
tional safety of the vehicle. There is arisk of an
accident.
You should have all work on electrica land
electronic components carrie dout at aquali-
fied specialist workshop. G
WARNING
If you operate RF transmitters incorrectly in
the vehicle, the electromagnetic radiation
coul dinterfere with the vehicl eelectronics,
e.g.:
R if the RF transmitter is not connected to an
exterior aerial
R the exterior aerial has been fitted incor-
rectly or is not alow-reflection type
This coul djeopardise the operating safety of
the vehicle. There is arisk of an accident. Have the low-reflection exterior aeria
lfitted at
aq ualifie dspecialist workshop .Wheno per-
ating RF transmitters in the vehicle, always
connect them to the low-reflection exterior
aerial.
! The operating permit may be invalidated if
the instructions for installatio nand use of RF
transmitters are not observed.
In particular, the following conditions mus tbe
complied with:
R only approve dwavebands may be used.
R observe the maximum permissibl eoutput
in these wavebands.
R only approve daerialp ositions may be
used.
Excessive levels of electromagnetic radiation
may cause damag etoyourh ealth and to the
health of others .The use of an exterior aerial
takes into consideration the scientific discus-
sio ns urrounding the possible health risk posed
by electromagnetic fields. Approve
daerialp ositions
: Front roo farea
; Rear wings
Whe nfitting an aeria lonthe front roo fareaof
vehicles with aslidin gsunroof, observe the
sweeping rang eofthe roof.
On the rea rwings, it is recommended tha tyou
position the aeria lonthe side of the vehicle
closes ttothe centre of the road.
Use Technical Specification ISO/T S21609
(Roa dVehicles –"EM Cg uideli nesfor installa-
tio nofa ftermarket radio frequency transmitting
equipment") when retrofitting RF transmitters
(radi ofrequency) .Com plyw itht he lega lrequire-
ments for add-on parts.
If your vehicl ehasfittings for two-wa yradio
equipment, us ethe power supply or aeria lcon- 248
Vehiclee
lectronicsTechnical data
Page 253 of 261
Vehicl
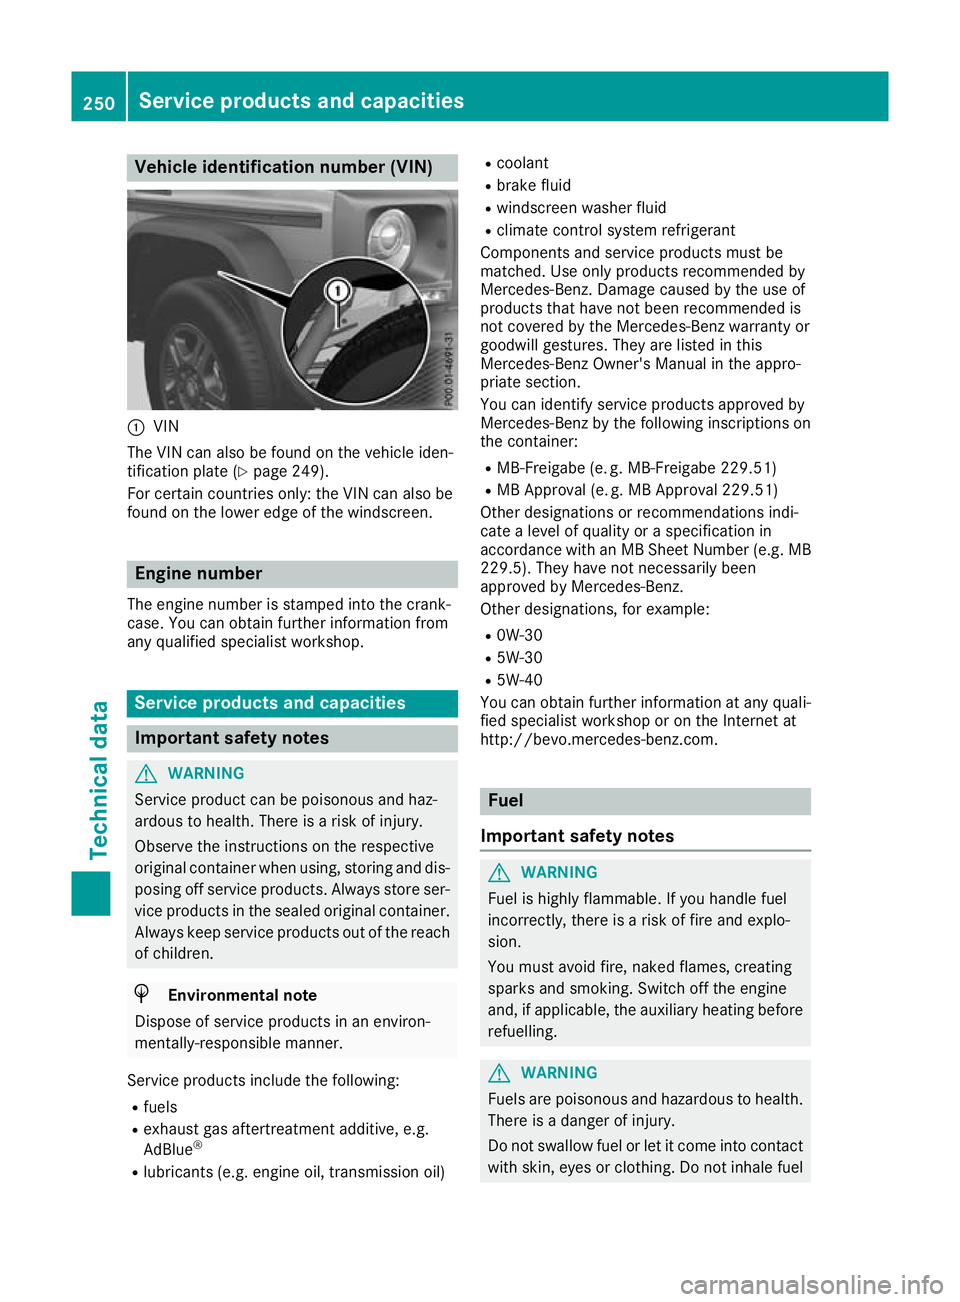
eidentificatio nnumber (VIN) :
VIN
The VIN can alsobef ound on the vehicle iden-
tification plate (Y page 249).
For certain countries only: the VIN can also be
found on the lower edge of the windscreen. Engine number
The engine number is stampe dintot he crank-
case. You can obtain further informatio nfrom
any qualified specialist workshop. Service products and capacities
Important safety notes
G
WARNING
Servic eproduct can be poisonous and haz-
ardous to health. There is arisk of injury.
Observe the instructions on the respective
original container when using, storing and dis- posing off service products. Always store ser-
vice products in the sealed original container. Always keep service products out of the reach
of children. H
Environmental note
Dispose of service products in an environ-
mentally -responsible manner.
Servic eproduct sinclude th efollowing:
R fuels
R exhaust gas aftertreatmen tadditive, e.g.
AdBlue ®
R lubricant s(e.g .engine oil, transmission oil) R
coolant
R brake fluid
R windscreen washer fluid
R climat econtrol system refrigerant
Components and service products mus tbe
matched. Use only products recommended by
Mercedes-Benz. Damage caused by the us eof
products that have not bee nrecommended is
not covered by the Mercedes-Benz warranty or
goodwil lgestures. The yare listed in this
Mercedes-Benz Owner's Manua linthe appro-
priate section.
You can identify service products approved by
Mercedes-Benz by the following inscriptions on
the container:
R MB-Freigabe (e. g. MB-Freigabe 229.51)
R MB Approva l(e. g. MB Approva l229.51)
Other designations or recommendations indi-
cate alevel of quality or aspecification in
accordance with an MB Shee tNumber (e.g .MB
229.5). The yhaven ot necessaril ybeen
approved by Mercedes-Benz.
Other designations ,for example:
R 0W-30
R 5W-30
R 5W-40
You can obtain further information at any quali-
fie ds pecialist worksho poronthe Internet at
http://bevo.mercedes-benz.com. Fuel
Important safety notes G
WARNING
Fuel is highly flammable .Ifyou handl efuel
incorrectly ,there is arisk of fire and explo-
sion.
You must avoi dfire, naked flames, creating
sparks and smoking. Switch off the engine
and, if applicable,t he auxiliary heating before
refuelling. G
WARNING
Fuel sare poisonous and hazardous to health.
There is adange rofinjury.
Do not swallowf uel or let it come into contact
with skin, eyesorc lothing. Do not inhal efuel 250
Service products and capacitiesTechnical data
Page 254 of 261
vapours. Keep fuel
sout of the reach of chil-
dren.
If you or others come into contact with fuel,
observe the following:
R Wash the fuel off any affected area sofskin
with water and soap immediately.
R If you get fuel in youre yes, rinse them thor-
oughly with clea nwater immediately. Seek
immediate medical attention.
R If fuel is swallowed,s eek immediate medi-
cal attention. Do not induce vomiting.
R Change any clothing that has come into
contact with fuel immediately.
Tank capacity Model Total capa-
city G3
50dPROFESSIONAL Approx.
96.0 l Model Of which
reserve fuel G3
50dPROFESSIONAL Approx.
14.0 l Diesel
Fuel grade
G
WARNING
If you mix diesel fuel with petrol, the flash
point of this fuel mixture is lower than that of pure diesel fuel.W hen the engine is running,
components in the exhaust system may over-
heatu nnoticed. There is arisk of fire.
Never refue lwith petrol. Never add petrol to
diesel fuel.
! When refuelling, only use diesel fuel that
conforms to the European standard EN 590 or is of equivalent quality .Fuel that does not
conform to EN 590 can leadtoi ncreased wear
as wellasd amage to the engine and exhaust
system. !
Do not use the following:
R marine diesel
R heating oil
R bio-diesel
R vegetable oil
R petrol
R paraffin
R kerosene
Do not mix such fuels with diesel fuel and do
not use any special additives. Otherwise,
engine damage may occur.
! Vehiclesw
ith diesel particle filters: in
countries outside the EU, only use low sulphur
Euro diesel with asulphurc ontent of under
50 ppm. Otherwise, the emission control sys- tem could be damaged.
You will usually find information aboutt he fuel
quality on the pump. If you cannot find the label
on the petrol pump, ask the filling station staff.
Information on refuelling (Y page 109).
Low outside temperatures In winter months, diesel fuel with an improved
cold flow quality is available. In Europe, the
EN 590 standard defines various climate-
dependent temperature categories. Malfunc-
tions can be avoided by refuelling with diesel
fuel that corresponds to the climatic specifica-
tions outlined in EN 590. At unusually low out-
side temperatures, it is possible that the flow
characteristics of the diesel fuel could be insuf- ficient. Accordingly, diesel fuel from warmer
areas may not be suitablef or operation in colder
climatic conditions.
i Further information on country-specific fuel
properties and fuel types with low-tempera-
ture resistance can be obtained from oil com- panies, e.g. at filling stations. AdBlue
®
Important safety notes Comply with the important safety notes for ser-
vice produc tswhen handlin gAdBlue ®
(Y page 250). Service products and capacities
251Technical data Z
Page 256 of 261
i
If the engine oils listed on the table are not
available, you may top up with the following
engine oils until the next oil change:
R MB-Freigabe or MB-Approval 229.3, 229.5
or ACEA C3
It may be used only once and the topping-up
quantity must not exceed 1.0 l.
Fillin gcapaciti es Th
ef ollowing values refer to an oil change,
including the oil filter. Model Replacement
amount G3
50dPROFESSIONAL 12.5 l
Ad
diti ves !
Do not use any additives wit
hthe engine oil.
This could damage the engine. Brake fluid
G
WARNING
The brake fluid continuously absorbs mois-
ture from the air. This results in the boiling
point of the brake fluid lowering. If the boiling
point of the brake fluid is too low, vapour
pockets may form when the brakes are sub-
jected to aheavy load. This would impair brak-
ing efficiency. There is arisk of an accident.
Have the brake flui drenewe datthe prescri-
bed intervals.
Comply with the important safety notes for ser- vice products when handling brake fluid
(Y page2 50).
Only use brake flui dapproved by Mercedes-
Benz according to MB-Freigabe or MB-Approval
331.0.
Information about approved brake flui dcan be
obtained at any qualified specialist worksho por
on the Internet at
http://bevo.mercedes-benz.com.
i Have the brake flui
dregularl yreplaced at a
qualified specialist worksho pinaccordance
with the replacement interval sand the
replacement confirmed in the service report. Coolant
Im portant safety notes G
WARNING
If antifreeze come sinto contact with hot com-
ponents in the engine compartment, it may
ignite. There is arisk of fire and injury.
Let the engine cool downb efore you top up
the antifreeze .Make sure that antifreeze is
not spilled next to the filler neck. Thoroughly
clea nthe antifreeze from components before
starting the engine.
! Only add coolant that has been premixed
with the desired antifreeze protection. You
coul dotherwise damage the engine.
Further information on coolants can be found in the Mercedes-Benz Specifications for Ser-
vice Products, MB Specifications for Service
Products 310.1, e.g. on the Internet at
http://bevo.mercedes-benz.com .Orcontact
aq ualified specialist workshop.
! Always use
asuitable coolant mixture, even
in countries where high temperatures prevail.
Otherwise, the engine cooling system is not
sufficiently protected from corrosio nand
overheating.
i Have the coolant regularl
yreplaced at a
qualified specialist worksho pand the replace-
ment confirmed in the service report.
Comply with the important safety notes for ser- vice products when handling coolant
(Y page2 50).
The coolant is amixture of water and anti-
freeze/anti-corrosion additive. It is responsible
for the following:
R anti-corrosion protection
R antifreeze protection
R raising the boiling point
If antifreeze/corrosio ninhibitor is present in the
correct concentration, the boiling point of the
coolant willbea round 130 †. Service products and capacities
253Technical data Z
Page 257 of 261

The antifreeze/corrosion inhibitor concentra-
tion in the engine cooling system should:
R be at least 50%. This will protec tthe engine
cooling system against freezin gdown to
approximately -37 †.
R not exceed 55% (antifreez eprotection down
to -45 †). Heat will otherwise not be dissipa-
ted as effectively.
Mercedes-Benz recommends an antifreeze/
corrosion inhibitor in accordanc ewith MB Spec-
ifications for Servic eProducts 310.1.
i When the vehicle is first delivered, it is filled
with acoolant mixture that ensures adequate
antifreeze and corrosion protection.
i The coolant is checked at specified intervals
at aq ualified specialist workshop. Windscreen and headlamp cleaning
system
Importants afety notes G
WARNING
If windscreen washer concentrate comes into contact with hot components of the engine or
the exhaust system, it can ignite. There is a
risk of fire and injury.
Make sure the windscreen washer concen-
trate does not come into contact with the filler neck.
! Do not use distille
dorde-ionised water in
the washer flui dreservoir. Otherwise, the
leve lsensor may be damaged.
! Only the washer fluids SummerFi
tand Win-
terFit can be mixed. Otherwise, the spraying
nozzles coul dbecome blocked.
Do not use distilledord e-ionised water.Other-
wise, the leve lsensor may give afalser eading.
When handling washer fluid, observe the impor- tant safety notes on service products
(Y page2 50).
At temperatures above freezing:
X Fill the washer flui dreservoir with amixture of
water and washer fluid, e.g. MB SummerFit.
Mix 1part MB SummerFi tto100 parts water. At temperatures belo
wfreezing:
X Fillthe washe rfluid reservoi rwitham ixture of
water and washe rfluid ,e.g.MBW interFit.
For the correct mixing ratio ,refer to the infor-
matio nont he antifreeze reservoir.
i Add washe
rfluid concentrate ,e.g.MBS um-
merFit or MB WinterFit, to the washe rfluid all
year round. Vehicl
edata General notes
Please note that for the specified vehicle data:
R the heig htss pecified may vary as aresulto f:
- tyres
- load
- condition of the suspension
- items of optional equipment
R items of optional equipment reduce the max-
imum payload
R vehicle-specific weight information can be
found on the vehicle identification plate
(Y page 249)
R onlyf or certain countries: you can find vehi-
cle-specific vehicle data in the COC docu-
ments (CERTIFICATE OF CONFORMITY).
These documents are delivered with your
vehicle. Dimensions and weights254
Vehicle dataTechnical data