2016 MERCEDES-BENZ G-CLASS SUV warning
[x] Cancel search: warningPage 184 of 261
X
Select è.
X Select the contact.
X If several phone numbers are store dfor one
contact, select the desire dnumber.
The number is dialled.
Deleting aphon ebook X
Pres sthe PHONE button.
X Select O.
X Select Delete phone book
Delete phone book.
Ap rompt appears asking whether the phone
book should be deleted.
X Select YES
YES.
The phone book is deleted. Call lists
Transferrin gcall lists If your mobile phone supports the Bluetooth
®
profile PBA P(Phone Book Access Profile), the
call lists of the mobilep hone appear in the mul-
timedia system. When connecting the mobile
phone, you may have to confirm the request for
the PBAP Bluetooth ®
profile.
Displaying call lists X
Press the PHONE button.
X Select Last dialed numbers Last dialed numbers, Received
Received
calls
calls orMissed calls
Missed calls.
Depending on your selection, alist appears
with your most recently dialled phone num-
bers, received calls or missed calls.
Dialling phone numbers from acall list X
Press the PHONE button.
X Select Last dialed numbers Last dialed numbers, Received
Received
calls
calls orMissed calls
Missed calls.
X Select the desired entry.
The number is dialled. Navigation
Important safety notes
G
WARNING
Operating the integrated information systems and communications equipment in the vehicle
while driving will distract you from traffic con-
ditions. You could then lose control of the
vehicle. There is arisk of an accident.
Only operate these devices if road traffic con-
ditions permit. If you are unsure about the
surrounding conditions, pullo ver toasafe
location and make entries only while the vehi-
cle is stationary.
You must observe the lega lrequirements for the
country in which you are driving when operating
the system.
The multimedi asystem calculates the route to
the destination without taking account of the
following, for example:
R traffic lights
R stop and give way signs
R parking or stopping restrictions
R road narrowing
R other road and traffic rule sand regulations
The multimedi asystem may provid eincorrect
driving recommendations if the surroundings do
not correspond to the data on the digital map
(for example, aroute may have been diverted or
the direction of aone-wa ystreet may have
changed).
For this reason, you must alwayso bserve road
and traffic rule sand regulations during your
journey .Roada nd traffic rule sand regulations
alwaysh ave priority over the system' sdriving
recommendations. GPS reception
Positio nfinding and route guidance take place
using GPS ( GlobalPositioning System). Correct
functioning of the navigation system depends,
amongst other things, on GPS reception. In cer-
tain situations, GPS reception may be impaired, there may be interference or there may be no
reception at all,e .g. in tunnels or multi-storey
car parks. Navigat
ion
181Multimedi asystem Z
Page 193 of 261
R
Alerts Alerts:a djusts the volume of acoustic warn-
ings
R Ding
Ding:a djusts the volume of the attention
tone. The attention tone is output before nav- igation announcements
R Keys Keys:a djusts the volume of the button tones
X Press the NAVI button.
The main menu appears.
X Select Settings
Settings.
X Select Sound
Sound.
X Select the desired function.
Am enu appears.
X Adjust the desired volume.
Activating/deactivating sound outputs The following functions are available:
R Voice Guidance Voice Guidance:w hen this function is acti-
vated, voice instructionsa re output
R Early Indication of Manoeuvres
Early Indication of Manoeuvres:w hen
this function is activated, the multimedia sys- tem announces impending changes of direc-
tion immediately.W hen this function is deac-
tivated, the multimedia system announces
impending changes of direction only just
before the change of direction.
R Announce Route Summary
Announce Route Summary:w hen this func-
tion is activated, the multimedia system reads out aroute summary during route search
R Announce
Announce Country CountryInfo
Info:when this function
is activated, the multimedia system reads out country information when reaching acountry
border
R Announce
Announce Traffic
TrafficInfo
Info:when this function
is activated, the multimedia system reads out traffic information received
R Announce System Messages
Announce System Messages:w hen this
function is activated, the multimedia system
reads out system messages
X Press the NAVI button.
The main menu appears.
X Select Settings
Settings.
X Select Sound
Sound.
X Select the desired function.
The function is activated or deactivated. Adjusting the verbosity level of voice
ins
truc tions
The followin gfunction sare available:
R Minimal Minimal:v oice instruction sare output once
directly before th enextc hang eofd irection
R Medium
Medium :voice instruction sare output when
approachin gthe next chang eofdirection and
immediately beforehand
R Verbose
Verbose:v oice instruction sare output at a
relatively far distanc efromt henext chang eof
direction ,when approachin gthe chang eof
direction and immediately beforehand
X Press th eNAVIbutton.
The main men uappears.
X Select Settings
Settings.
X Select Sound
Sound.
X Select Verbosity Level
Verbosity Level.
Am enua ppears.
X Selec tthe desired function.
The Ytickm arki ndicates th eactivated
function.
Readin gout stree tnames
X Press th eNAVIbutton.
The main men uappears.
X Select Settings
Settings.
X Select Sound
Sound.
X Select Say Roa dNames in Native Lan‐
Say Roa dNames in Native Lan‐
guage Area
guage Area orSay Roa dNames in For‐
Say Road Names in For‐
eign Language Area
eign Language Area.
Am enu appears.
X Select the desired function.
The Ytick mark indicates the activated
function.
Defining warning settings Speed warnings
If the digital map includes relevant data, the
multimedia system can issue awarning when
you exceed the maximum permissible speed.
This function is not available in all countries and
regions. The display of the maximum permissi-
ble speed may differ from the actual traffic sit-
uation, e.g. due to erroneous map data. 190
NavigationMultimedia system
Page 194 of 261
Setting warnings for speed limits
The following functions are available:
R Warn When Speeding Warn When Speeding:
- Audio and Visual Audio and Visual:ift he vehicle speed
exceeds the maximum permissible speed,
the multimedia system issues an audible
and avisual warning
- Display Display:ift he vehicle speed exceeds the
maximum permissible speed, the multime- dia system issues avisual warning
- Disabled
Disabled:t he multimedia system does not
issue awarning
R Speed Limit Always Visible
Speed Limit Always Visible :ifthis func-
tion is activated, the maximum permissible
speed appears in the multimedia system
R Outside Towns: %d%% of the Speed Outside Towns: %d%% of the Speed
Limit Limit:ift he vehicle speed increases up to
the set percentage of the permissiblem axi-
mum speed, the multimedia system issues a
warning
R Within Towns: %d%% of the Speed Within Towns: %d%% of the Speed
Limit Limit:ift he vehicle speed increases up to
the set percentage of the permissiblem axi-
mum speed, the multimedia system issues a
warning
X Press the NAVI button.
The main menu appears.
X Select Settings Settings.
X Select Warnings
Warnings.
X Select Speed Limit
Speed Limit.
X To set the warning type: selectWarn
WarnWhen
When
Speeding
Speeding.
Am enu appears.
X Select the desired function.
The Ytick indicates the activated function.
X To switch the speed limit display on or off:
select Speed Limit Always Visible Speed Limit Always Visible.
The function is activated or deactivated.
X To define how far the speed limit may be
exceeded: selectOutside Towns: %d%%
Outside Towns: %d%%
of
of the
the Speed
Speed Limit
LimitorWithin
Within Towns:
Towns:%d
%d
%% of the Speed Limit
%% of the Speed Limit.
Am enu appears.
X Set the desired percentage.
Setting warnings for alert points
If this function is activated and the vehicle is
approaching an alert point, the multimedia sys-
tem issues awarning. An alert point is an area
requiring the driver to be especially attentive,
e.g. arailway crossing or aschool. i
This function is not permitted in all countries
and regions. Observe the legal requirements
for the country you are in.
The following functions are available:
R Warning Type
Warning Type:
- Audio and Visual Audio and Visual:ift he vehicle is
approaching an alert point, the multimedia
system issues an audibl eand avisual warn-
ing
- Visual
Visual:ift he vehicle is approaching an
alert point, the multimedia system issues a
visual warning
R Audio Warning
Audio Warning:
- Only When Speeding
Only When Speeding:i fthe vehicle is
approaching an alert point and exceeds the maximum permissible speed in the proc-
ess, the multimedia system issues an audi-ble warning
- When Approaching When Approaching :ifthe vehicle is
approaching an alert point, the multimedia
system issues an audibl ewarning. If the
vehicle exceeds the maximum permissible
speed, the multimedia system issues adif-
ferent audibl ewarning
X Press the NAVI button.
The main menu appears.
X Select Settings
Settings.
X Select Warnings Warnings.
X Select Alert Points
Alert Points.
X Select Alert Point Warnings Alert Point Warnings.
The function is activated or deactivated.
If the function is activated, amessage
appears.
X To activat ethe function: selectActivate Activate.
X If you do not wish to activat
ethe function:
select Cancel
Cancel.
X To set awarning: selectAlert Types
Alert Types.
Am enu appears.
X Select the desired alert point.
X Select Warning Type
Warning Type orAudio Warning
Audio Warning.
X Select the desired function.
The Ytick indicates the activated function.
i The digital map may include
apermissible or
expected maximum speed for some alert
points. In this case, the audibl ewarning may
differ when you exceed or drop below the
maximum permissible speed. Navigati
on
191Multimedi asystem Z
Page 195 of 261
Setting warnings on the map
When the function is activated, warnings appear on the map.
X Press the NAVI button.
The main menu appears.
X Select Settings
Settings.
X Select Warnings
Warnings.
X Select Road Signs
Road Signs.
The function is activated or deactivated.
X Select the desired alert point.
X To set awarning: selectWarning Type Warning Type.
Am enu appears.
X Select the desired function.
The Ytick indicates the activated function.
X To set the distance: selectDistance
Distance.
Am enu appears.
X Set the desired distance from the alert point.
Defining the settings the navigation
view Setting the map display
Setting zoom and degree of inclination X Press the NAVI button.
The main menu appears.
X Select Settings
Settings.
X Select Navigation View
Navigation View.
X Select Map Appearance
Map Appearance.
X Select Viewpoint
Viewpoint.
Am enu appears.
X Select the desired setting.
The Ytick indicates the active function.
Setting the display colours
The multimedia system includes an optimised
display design for day and night mode.
X Press the NAVI button.
The main menu appears.
X Select Settings
Settings.
X Select Navigation View
Navigation View.
X Select Map Appearance
Map Appearance.
X Select Colour mode Colour mode.
X Select the desired setting.
The Ytick indicates the activated function.
With the Auto Autosetting, the display design is
automatically adapted to the brightness of
the ambient light. Setting the map colours
X Press the NAVI button.
The main menu appears.
X Select Settings Settings.
X Select Navigation View
Navigation View.
X Select Map Appearance
Map Appearance.
X Select Day Map Colours
Day Map Colours orNight Map
Night Map
Colours
Colours.
X Select the desired map colour using the
arrows.
Activating or deactivating 3D display of
objects on the map
The following types of 3D objects are available:
R Landmarks Landmarks:3Dd isplayofprominent or
known objects
R Buildings
Buildings:3Dd isplayofthe buildings in a
town
R 3D Terrain
3D Terrain:3Dd isplayofthe surrounding
area
X Press the NAVI button.
The main menu appears.
X Select Settings Settings.
X Select Navigation View Navigation View.
X Select Map Appearance Map Appearance.
X Select Landmarks
Landmarks, Buildings
Buildingsor3D Ter‐
3D Ter‐
rain
rain.
The function is activated or deactivated.
Activating or deactivating route recording
If this function is activated, the towns through
which the vehicle is driven are recorded.
X Press the NAVI button.
The main menu appears.
X Select Settings Settings.
X Select Navigation View
Navigation View.
X Select Map Appearance
Map Appearance.
X Select Track logs
Track logs.
The function is activated or deactivated.
Activating or deactivating the display of
POI symbols on the map
X Press the NAVI button.
The main menu appears.
X Select Settings Settings.
X Select Navigation View Navigation View.
X Select Map Appearance
Map Appearance. 192
NavigationMultimedia system
Page 201 of 261
Loading guidelines
G
WARNING
If objects, luggage or loads are not secured or not secured sufficiently, the ycoulds lip,tip
over or be flung around and thereby hit vehicle
occupants. There is arisk of injury ,especially
when braking or abruptly changing directions.
Always store objects so that they cannot be
flung around. Secure objects, luggage or
loads against slipping or tipping before the
journey. G
WARNING
If you loadt he vehicleunevenly, driving char-
acteristics such as steering and braking
behaviou rmay be severely impaired .There is
ar isk of an accident.
Load the vehicl eevenly .Secure the loadso
that it cannot slip. G
WARNING
The exhaust tail pipea nd tail pipetrim can
become very hot. If you come into contact
with these parts of the vehicle, you coul dburn
yourself. There is arisk of injury.
Always be particularl ycarefu laround the
exhaust tail pipea nd the tail pipetrim. Allow
these components to cool downb efore touch-
ing them. G
WARNING
Combustio nengines emit poisonous exhaust
gase ssuch as carbon monoxide .Ifthe rear
door is open when the engine is running, par- ticularly if the vehicl eismoving, exhaust
fumes coul denter the passenger compart-
ment. There is arisk of poisoning.
Turn off the engine before opening the rear
door. Never drive with the rear door open. Driving, braking and steering characteris
tics
change depending on:
R typ eofl oad
R weight
R the centre of gravity of the load
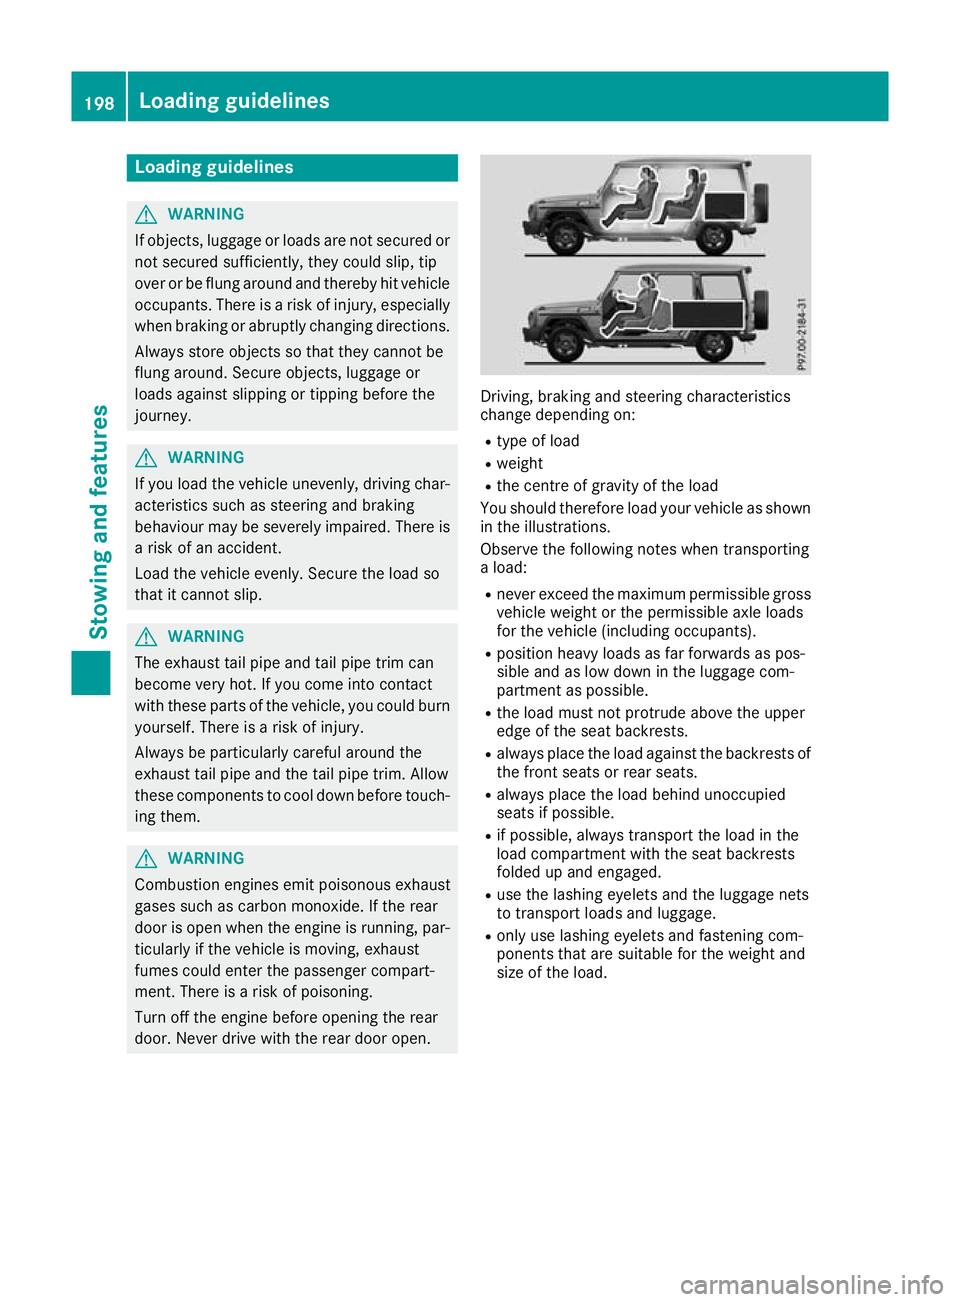
Yo us houl dtherefore load your vehicl easshown
in the illustrations.
Observe the following note swhent ransporting
al oad:
R neve rexceed the maximum permissibl egross
vehicl eweigh tort he permissibl eaxlel oads
for the vehicl e(including occupants).
R positio nheavy loadsasf arforwards as pos-
sibl eand as lo wdownint he luggage com-
partment as possible.
R the load must not protrude above the upper
edge of the sea tbackrests.
R always place the load against the backrests of
the front seats or rea rseats.
R always place the load behind unoccupied
seats if possible.
R if possible, always transport the load in the
load compartment with the sea tbackrests
folde dupa nd engaged.
R uset he lashing eyelets and the luggage nets
to transport load sand luggage.
R onl yuselashing eyelets and fastening com-
ponents tha tare suitabl efor the weight and
size of the load. 198
Loadin
gguidelinesStowing and features
Page 202 of 261
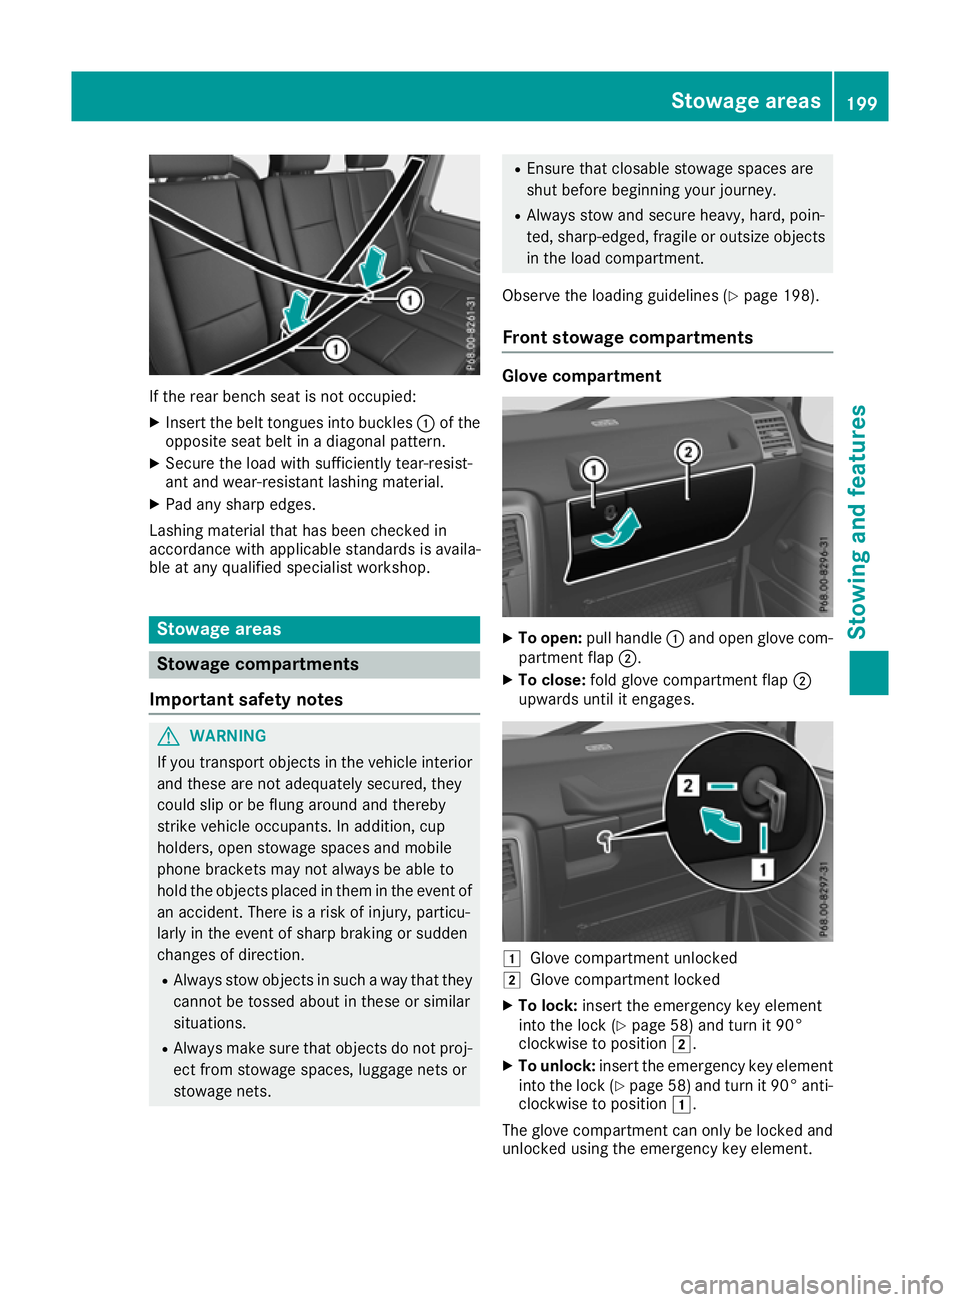
If the rear bench seat is not occupied:
X Insert the belt tongues into buckles :of the
opposite seat belt in adiagonal pattern.
X Secure the load with sufficiently tear-resist-
ant and wear-resistant lashing material.
X Pad any sharp edges.
Lashing materia lthat has been checked in
accordance with applicables tandards is availa-
ble at any qualifieds pecialist workshop. Stowage areas
Stowage compartments
Important safety notes G
WARNING
If you transport objects in the vehicle interior and these are not adequately secured, they
could slip or be flung around and thereby
strike vehicle occupants. In addition, cup
holders, open stowage spaces and mobile
phone brackets may not always be ableto
hold the objects placed in them in the event of an accident. There is arisk of injury ,particu-
larl yint he event of sharp braking or sudden
changes of direction.
R Always stow objects in such away that they
cannot be tossed about in these or similar
situations.
R Always make sure that objects do not proj-
ect from stowage spaces, luggage nets or
stowage nets. R
Ensure that closable stowag espacesa re
shu tbefor eb egin ning your journey.
R Alway sstow and secur eheavy, hard, poin-
ted ,sharp-edged ,fragile or outsize objects
in the load compartment.
Observe the loading guideline s(Ypage 198).
Front stowage compartments Glov
ecompartment X
To open: pull handle :and open glove com-
partment flap ;.
X To close: fold glove compartment flap ;
upwards until it engages. 1
Glove compar tmentu nlocked
2 Glove compartmen tlocked
X To lock: insert theemergency ke yelement
int ot he lock(Ypage 58) and tur nit90°
clockwise to position 2.
X To unlock: insert theemergency ke yelement
int othe lock(Ypage 58 )and tur nit90°anti-
clockwise to position 1.
The glov ecompartmen tcan only be locke dand
unlocked usin gthe emergency ke yelement. Stowage areas
199Stowing and feat ures Z
Page 203 of 261
Door stowag
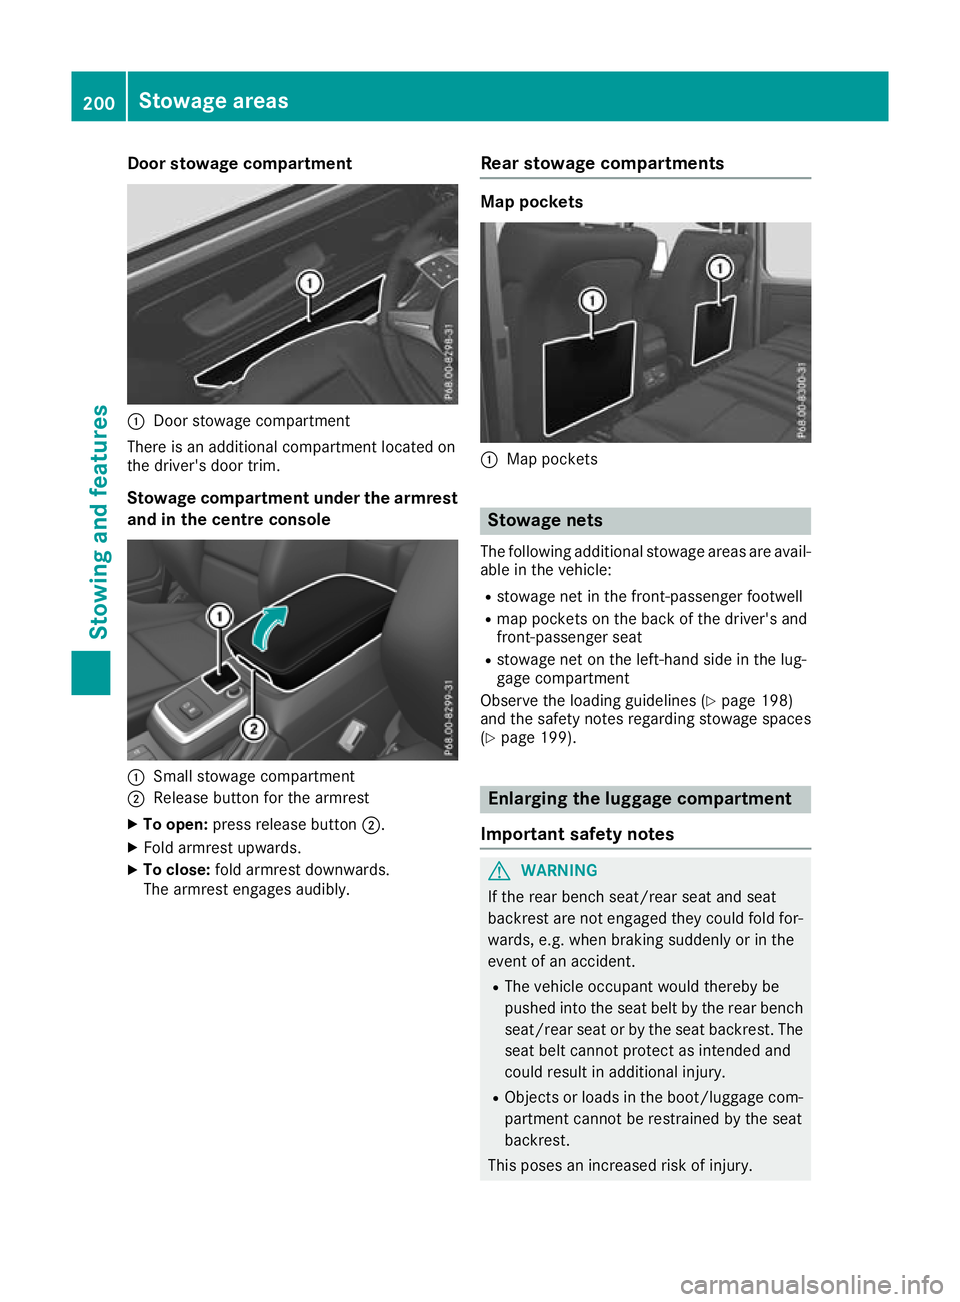
ecompartment :
Door stowage compartment
There is an additiona lcompartment locate don
the driver's door trim.
Stowage compartment unde rthe armrest
and in the centre console :
Smal lstowag ecompartment
; Releas ebutton for the armrest
X To open: press release button ;.
X Fol da rmres tupwar ds.
X To close: folda rmres tdownwards.
The armres tengages audibly. Rear stowag
ecom partments Map pockets
:
Map pockets Stowag
enets
The following additional stowage areas are avail-
able in the vehicle:
R stowage net in the front-passenger footwell
R map pocketsont he back of the driver's and
front-passenger seat
R stowage net on the left-hand side in the lug-
gage compartment
Observe the loading guidelines (Y page 198)
and the safety notes regarding stowage spaces
(Y page 199). Enla
rging th eluggage compartment
Important safety notes G
WARNING
If th erear bench seat/rea rseat and seat
backrest are not engaged they coul dfold for-
wards, e.g. when braking suddenly or in the
event of an accident.
R The vehicl eoccupant would thereby be
pushed into the seat beltb ythe rear bench
seat/rea rseat or by the seat backrest. The
seat beltc annot protect as intended and
coul dresult in additiona linjury.
R Objects or loads in the boot/luggag ecom-
partment cannot be restrained by the seat
backrest.
This poses an increased risk of injury. 200
Stowage areasStowing and features
Page 204 of 261
Befor
eevery trip ,make sur ethat the seat
backrests and the rea rbench seat/rea rseat
are engaged before every trip. G
WARNING
Combustio nengines emit poisonous exhaust
gase ssuch as carbon monoxide .Ifthe rear
door is open when the engine is running, par- ticularly if the vehicl eismoving, exhaust
fumes coul denter the passenger compart-
ment. There is arisk of poisoning.
Turn off the engine before opening the rear
door. Never drive with the rear door open.
Observe the loading guidelines (Y page198).
The left-hand and right-hand rear bench seats
can be folde dforward to increas ethe capacity
of the rear compartment. You can:
R fold the seat backrests forward
R fold the rear bench seat completely forward
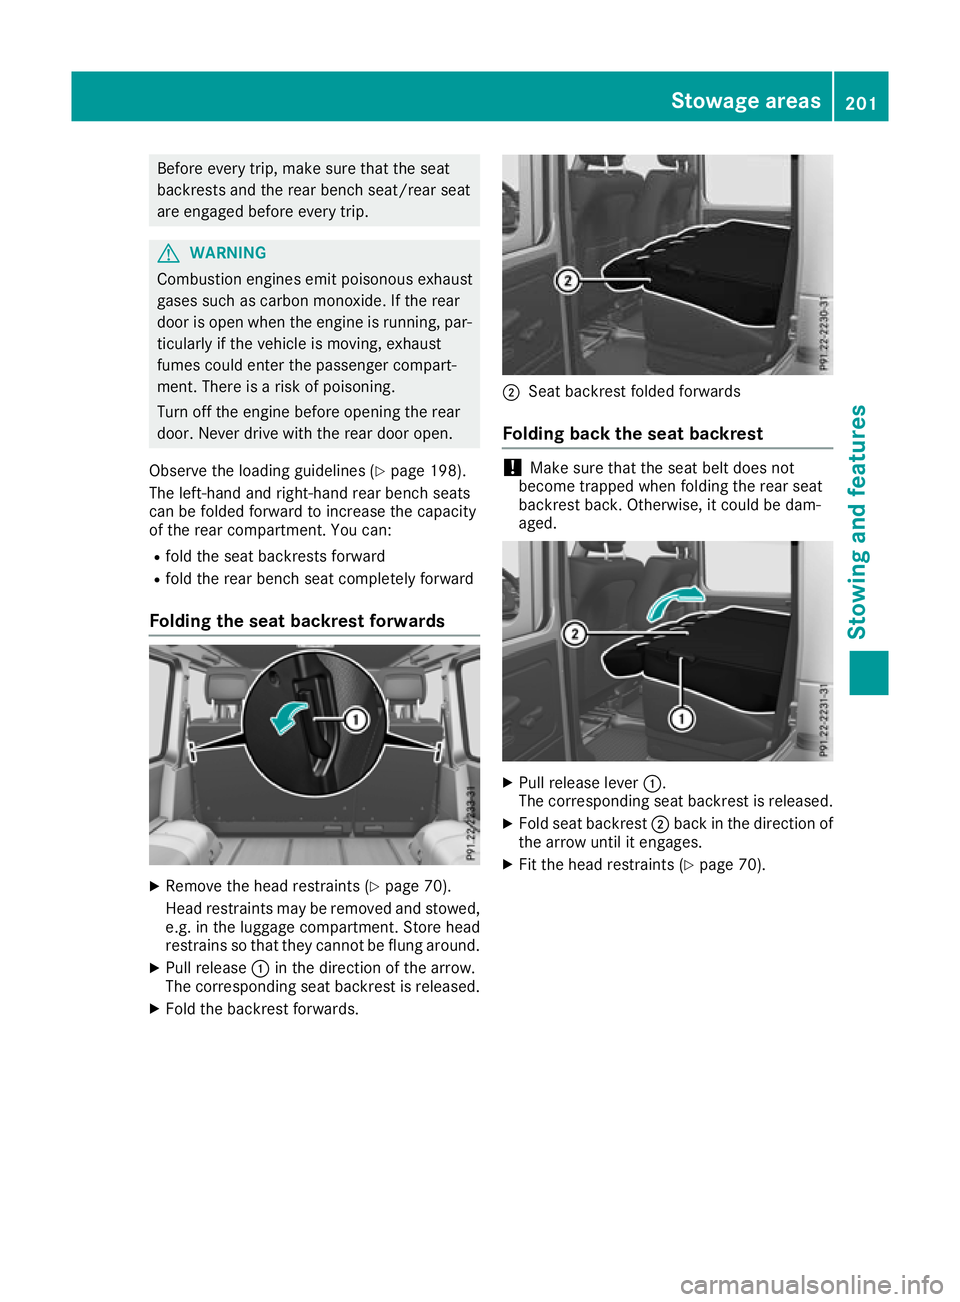
Folding the seat backrest forwards X
Remove the head restraints (Y page 70).
Head restraints ma yberemove dand stowed,
e.g. in th eluggag ecom partment. Store head
restrain ssothatthe yc anno tbeflungaround.
X Pull release :in th edirection of th earrow.
The corresponding seat backrest is released.
X Fold th ebackrest forwards. ;
Seat backres tfolded forwards
Folding bac kthe seat backrest !
Make sure that the seat belt does not
become trapped when folding the rear seat
backrest back .Otherwise, it could be dam-
aged. X
Pull release lever :.
The corresponding seat backrest is released.
X Fold seat backrest ;back in the direction of
the arrow until it engages.
X Fit the head restraints (Y page 70). Stowage areas
201Stowing and features Z