2016 MERCEDES-BENZ G-CLASS SUV weight
[x] Cancel search: weightPage 20 of 261
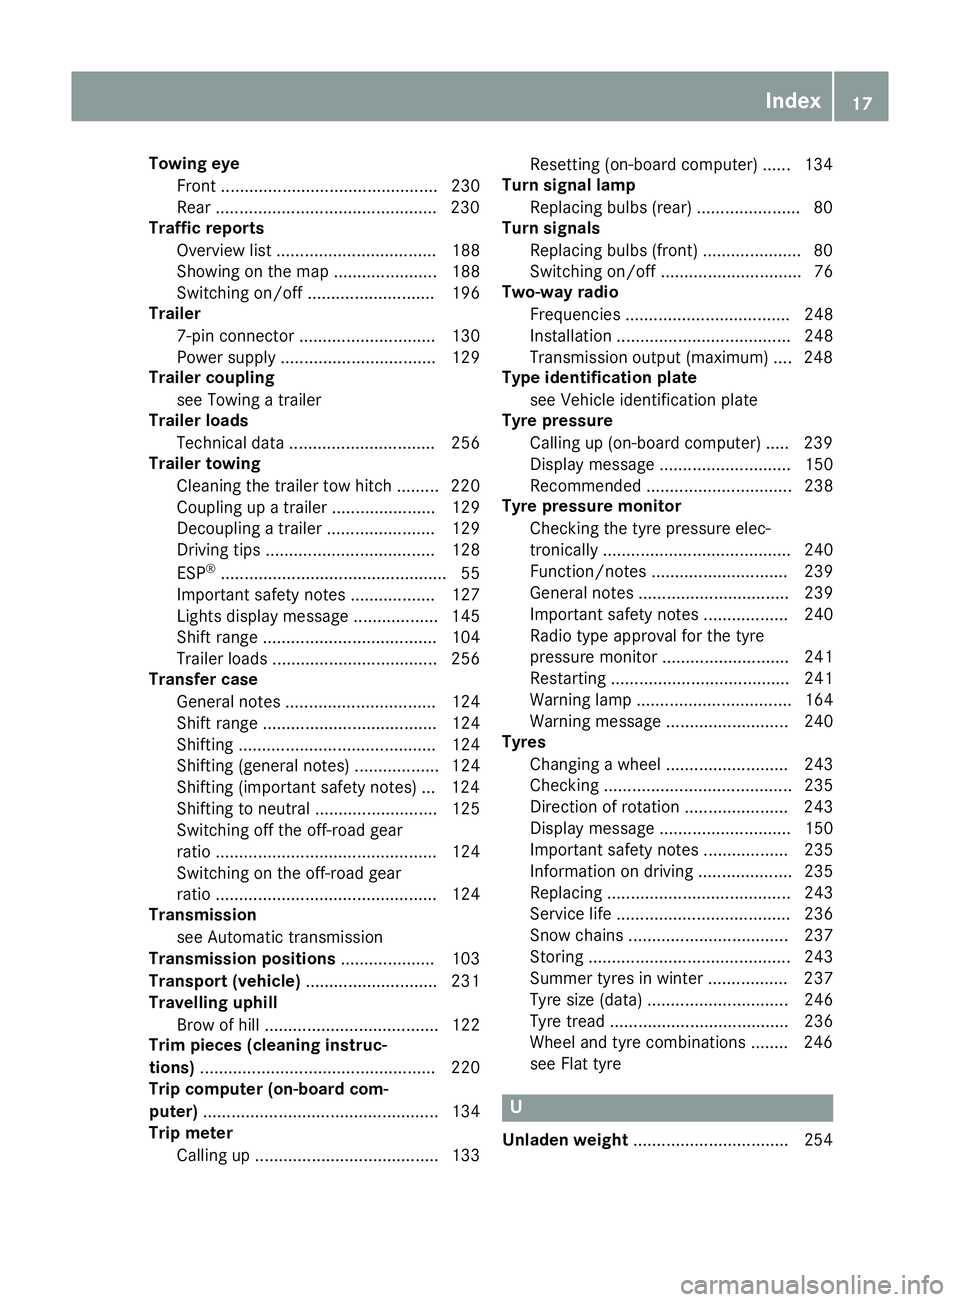
Towin
geye
Front .............................................. 230
Rear .............................................. .230
Traffic reports
Overview lis t.................................. 188
Showing on the map ...................... 188
Switching on/of f........................... 196
Trailer
7-pi nconnecto r............................. 130
Power supply ................................. 129
Trailer coupling
see Towing atrailer
Trailer loads
Technica ldata. .............................. 256
Trailer towing
Cleaning the traile rtow hitch ......... 220
Coupling up atraile r...................... 129
Decoupling atraile r....................... 129
Driving tip s.................................... 128
ESP ®
................................................ 55
Important safety notes .................. 127
Lights display message .................. 145
Shift rang e..................................... 104
Trailer load s................................... 256
Transfer case
Genera lnotes ................................ 124
Shift rang e..................................... 124
Shifting .......................................... 124
Shifting (general notes ).................. 124
Shifting (important safety notes )... 124
Shifting to neutral .......................... 125
Switching off the off-road gear
rati o............................................... 124
Switching on the off-road gear
rati o............................................... 124
Transmission
see Automati ctransmission
Transmissio npositions .................... 103
Transport (vehicle) ............................ 231
Travellin guphill
Brow of hill ..................................... 122
Trim piece s(clea ning instruc-
tions) .................................................. 220
Trip computer (on-board com-
puter) .................................................. 134
Trip meter
Calling up ....................................... 133 Reset
ting(on-boar dcom puter) ...... 134
Turn signal lamp
Replacin gbulbs (rear) ...................... 80
Turn signals
Replacin gbulbs (front) .................... .80
Switching on/of f.............................. 76
Two-wa yradio
Frequencie s................................... 248
Installation ..................................... 248
Transmission outpu t(maximum) .... 248
Type identificatio nplate
see Vehicl eide ntification plate
Tyre pressure
Calling up (on-board computer) ..... 239
Displa ymessage ............................ 150
Recommended ............................... 238
Tyre pressure monitor
Checking the tyre pressure elec-
tronically ........................................ 240
Function/note s............................. 239
Genera lnotes ................................ 239
Important safety notes .................. 240
Radi otypea pproval for the tyre
pressure monitor ........................... 241
Restarting ...................................... 241
Warning lamp ................................. 164
Warning message .......................... 240
Tyres
Changing awheel .......................... 243
Checking ........................................ 235
Directio nofrotation ...................... 243
Displa ymessage ............................ 150
Important safety notes .................. 235
Information on driving .................... 235
Replacing ....................................... 243
Service life ..................................... 236
Snow chains .................................. 237
Storing ........................................... 243
Summer tyre sinwinter ................. 237
Tyre size (data ).............................. 246
Tyre trea d...................................... 236
Wheel and tyre combinations ........ 246
see Fla ttyre U
Unlade nweight .................................2 54 Index
17
Page 23 of 261

Environmental protection
General notes
H
Environmenta
lnote
Daimler' sdeclared polic yisone of compre-
hensive environmental protection.
Our objectives are to use th enatural resour-
ces whic hformt hebasis of our existence on
this plane tsparingl yand in amanner which
takes th erequirements of bot hnature and
humanity int oconsideration.
You to ocan help to protect th eenvironment
by operatin gyour vehicle in an environmen-
tally-responsible manner.
Fuel consumption and th erateofe ngine,
transmission ,brak eand tyr ewear depen don
th ef ollowing factors:
R operatin gcondition sofyour vehicle
R your personal driving style
You can influenc ebothf actors. Therefore,
please bear th efollowing in mind:
Operatin gconditions:
R avoid shor ttrips, as these increase fuel
consumption.
R observe th ecorrec ttyrep ressure.
R do not carry any unnecessar yweight in the
vehicle.
R remove th eroof rac koncey ou no longer
nee dit.
R ar egularly serviced vehicle will contribute
to environmental protection .You should
therefore adher etotheservic eintervals.
R all maintenanc ework should be carried out
at aq ualifie dspecialist workshop.
Personal driving style:
R do not depress th eaccelerator pedal when
starting th eengine.
R do not warm up th eengine when th evehicle
is stationary.
R driv ecarefully and maintain asafe distance
fro mt hevehicle in front.
R avoid frequent, sudden acceleration and
braking. R
change gear in good time an duseeach gear
only up to Ôof its maximum engine speed.
R switch off the engine in stationar ytraffic.
R monitor the vehicle's fue lconsumption. Returnin
ganend-of-life vehicle
EU countrie sonly:
Mercedes-Benz will take back your end-of-life
vehicl efor environmentally friendl ydisposa lin
accordance with the Europea nUnion(EU) End-
Of-Life Vehicles Directive.
An etwork of return points and disassembly
plants ha sbeene stablished for yo utoreturn
your vehicle. Yo ucan leave it at any of these
points free of charge .Thism akesani mportant
contribution to closing the recycling circl eand
conserving resources.
For further information abou tthe recycling and
disposa lofend-of-life vehicles, and the take-
back conditions ,pleas evisit the national
Mercedes-Benz website for your country. Genuine Mercedes-Benz parts
H
Environmental note
Daimle rAGalso supplies reconditioned
assemblies and part swhicha re of th esame
qualit yasnew parts. For these, th esame war-
ranty applies as for new parts.
! Airbags and seat belt tensioners
,aswell as
control unit sand sensor sfor these restraint
systems, may be installe dinthefollowing
areas of your vehicle:
R doors
R door pillars
R door sills
R seats
R dashboard
R instrumen tcluster
R centr econsole
Do not install accessories such as audio sys-
tem sint hese areas. Do not carry out repairs
or welding. You could impair th eoperating
efficiency of th erestraint systems. 20
Introduction
Page 42 of 261
Mercedes-Ben
zstrongly advises that you install
the child restraint system on arear seat. Chil-
dren are generally better protected there.
If ac hild younger than twelve years old and
under 1.50 minh eight is travellin ginthe vehi-
cle:
R always secur ethe child in achild restraint
system suitable for Mercedes-Ben zvehicles.
The child restraint system must be appropri-
ate to the age, weight and size of the child.
R be sure to observe the instructions and safety
notes in this section in addition to the child
restraint system manufacturer' sinstallation
instructions. G
WARNING
If you leave children unattende dint he vehi-
cle, they may be abletos et the vehiclein
motion if, for example, they:
R release the parking brake
R shift the automatic transmission out of park
position P
R start the engine
In addition, they may operate vehicl eequip-
ment and become trapped. There is arisk of
an accident and injury.
When leaving the vehicle, alwayst ake the key
with you and lock the vehicle. Never leave
children unattended in the vehicle. G
WARNING
If persons (particularly children) are exposed
to heatorc old foraprolonged period, there is
ar isk of serious or even fatal injuries. Never
leave persons (particularly children) unatten-
ded in the vehicle. G
WARNING
If the child restraint system is placed in direct sunlight, the parts coul dbecome very hot.
Childre ncouldbes uffer burns by touching
these parts, in particular on the metallic parts
of the child restraint system. There is arisk of
injury.
If you and yourc hild leave the vehicle, always
make sure that the child restraint system is
not in direct sunlight. Cove ritwithablanket, for example. If the child restraint system has
been expose
dtodirect sunlight, leave it to
cool dow nbefore securing the child in it.
Never leave children unattende dinthe vehi-
cle.
Always ensure that all vehicl eoccupants have
their sea tbelts fastened correctly and are sitting
properly .Particular attention must be pai dto
children.
Observ ethe safety notes on the sea tbelt
(Y pag e32) and the information on the correct
use of the sea tbelt( Y pag e33). Chil
dseat lock G
WARNING
If th eseat beltisr eleased while driving, the
child restraint system willnol onger be
secure dproperly.T he child seat lock is disa-
bleda nd the inertia real draw sinaportion of
the seat belt. The seat beltc annot be imme-
diately refastened. There is an increased risk
of injury ,possibly even fatal.
Stop the vehicl eimmediately, paying atten-
tion to road and traffic conditions. Reactivate the child seat lock and secure the child
restraint system properly.
All seat belts except the driver's seat belta re
equipped with achild seat lock. When enabled,
the child seat lock function ensure sthat the seat
beltd oes not slacken once the child restraint
system is secured.
Installing achild restraint system:
X Always comply with the child restraint system
manufacturer's installation instructions.
X Pullt he seat belts moothly out of the belts ash
guide.
X Engage the seat beltt ongue in the beltbuckle.
Activating the child seat lock: X Pullt he seat belto ut fullyand let the inertia
reel retract it again.
Whil ethe seat beltisr etracting, you should
hear aratcheting sound .The child seat lock
function is enabled.
X Push the child seat restraint system downso
that the seat beltist ight and does not loosen. Children in the vehicle
39Safety Z
Page 44 of 261
weight is greater than 22 kg who are secured
using th esafet ybelt integrated in th echild
restrain tsystem. The chil dcould, for example,
not be restrained correctly in th eeven tofan
accident. This poses an increase drisk of
injury or even fatal injury.
If th echildw eighs mor ethan2 2kg,only use
ISOFI Xchildr estrain tsystems with which the
chil disa lso secured with th evehicle seat belt.
Als osecure th echildr estrain tsystem with the
Top Tether belt ,ifavailable.
When fittin gachildr estrain tsystem, be sure to
observe th emanufacturer's installation and
operatin ginstructions and th einstructions for
correc tuse of th echildr estrain tsystem
(Y page 46).
Before ever ytrip, mak esure that th eISO FIX
chil drestrain tsystem is engaged correctly in
bot hISO FIXs ecurin grings.
! When fittin
gthe chil drestrain tsystem,
mak esure that th eseat belt for th ecentre
seat does not get trapped. Otherwise, the
seat belt could be damaged. X
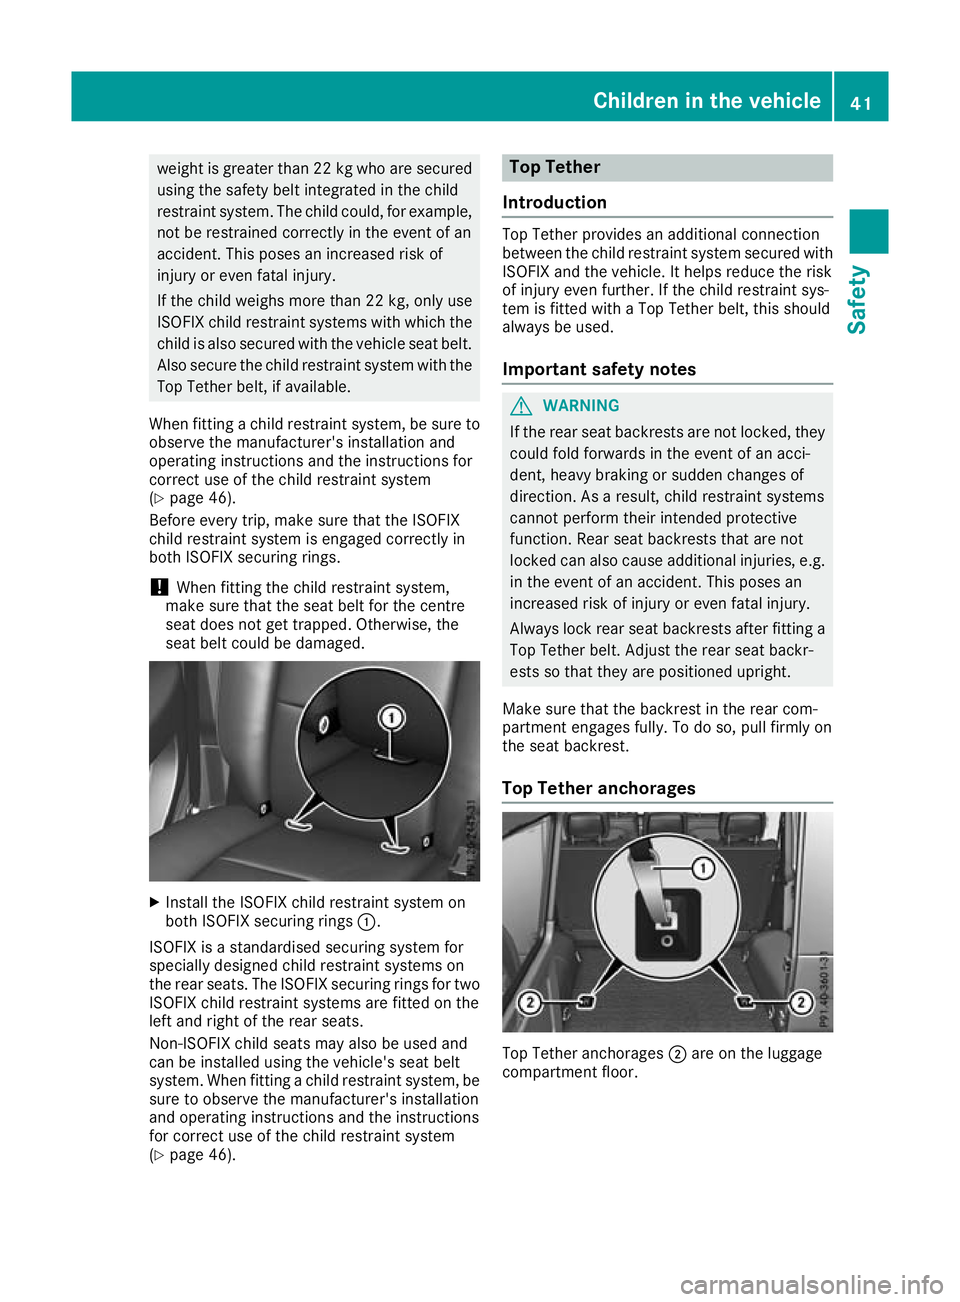
Instal lthe ISOFIX child restraint system on
both ISOFIX securing rings :.
ISOFIX is astandardised securing system for
specially designed child restraint systems on
the rear seats. The ISOFIX securing rings for two ISOFIX child restraint systems are fitted on the
left and right of the rear seats.
Non-ISOFIX child seats may also be used and
can be installe dusing the vehicle's seat belt
system. When fitting achild restraint system, be
sure to observe the manufacturer's installation
and operating instructions and the instructions
for correct use of the child restraint system
(Y page 46). Top Tether
Introduction Top Tether provides an additional connection
betwee nthe child restraint system secured with
ISOFIX and the vehicle. It helps reduce the risk
of injury even further. If the child restraint sys-
tem is fitted with aTop Tether belt, this should
alway sbeu sed.
Important safety notes G
WARNING
If the rear seat backrests are not locked, they
could fold forwards in the event of an acci-
dent, heavy braking or sudden changes of
direction .Asaresult, child restraint systems
cannot perform their intended protective
function. Rears eat backrests that are not
locked can alsoc auseadditiona linjuries, e.g.
in the event of an accident. This poses an
increased risk of injury or even fatal injury.
Always lock rear seat backrests after fitting a Top Tether belt. Adjust the rear seat backr-
ests so that they are positioned upright.
Make sure that the backrest in the rear com-
partment engages fully. To do so, pullf irmly on
the seat backrest.
Top Tether anchorages Top Tethe
ranchorages ;are on the luggage
compartment floor. Children in the vehicle
41Safety Z
Page 50 of 261

"Suitabilit
yoftheseat sfor attaching an ISOFIX
child restraint system".
Semi-universal child restraint systems are indi-
cated by th etext"semi-universal" on the
approval label. Thes ecan be used if th evehicle
and th eseat are listed in th echild restraint sys-
te mm anufacturer' svehicle model list .For more
information, contact th echild restraint system
manufacturer or visit their website.
Child restrain tsystem on th efront-
passenger seat – if it is absolutely necessary to
secure achild in achild restraint system on the
front-passenger seat:
X Always pay attentio ntotheinstruction sunder
"Child restraint system on th efront-
passenger seat "(Ypage 43).
Ther eyou will fin dinstruction sonhow to cor-
rectly rout ethe shoulder belt strap from the belt sash guide to the shoulder belt guide on
the child restraint syste
m(Ypage 45).
X Move the front-passenger seat as far back as
possible and int othe lowest position.
X Move the backrest to an almost vertical posi-
tion.
The entire base of the child restraint system
must always rest on the seat cushion of the
front-passenger seat. The backrest of a
forward-facin gchild restraint system must, as
far as possible, rest flat against the backrest
of the front-passenger seat. The child
restraint system must not touch the roof or be
put under strain by the head restraint .Adjust
the angle of the seat backrest and the head
restraint position accordingly. Also observe
the child restraint system manufacturer's
installation instructions.
Suitability of the seats for attaching belt-secured child restraint systems If you use
ababy car seat of category 0or0+orarearward-facing child restraint system of category
Ionar ear seat, you must adjust the driver's or front-passenger seat so that the seat does not touch
the child restraint system.
If you use acategory I, forward-facing child restraint system, you shouldr emove the head restraint
from the respective seat, if possible (Y page 70). The backrest of the child restraint system must,
as far as possible, lie flat against the backrest of the seat.
Make sure that the child's feet do not touch the front seat. If necessary ,move the front seat forward
slightly.
For certain child restraint systems in weight categories II or III, this can mean that the area of use
is restricted. The maximum size setting of the child restraint system may not be possible due to
possible contact with the roof.
Alwayso bserve the notes in the "Child restraint system" section (Y page 40) and the child restraint
system manufacturer's installation instructions.
When you remove the child restraint system, you must replace the head restraints again immedi-
ately (Y page 70). All vehicle occupants must adjust their head restraints correctly before begin-
ning the journey.
Legend for the table:
XS eat that is unsuitable for children in this weight category.
US uitable for child restraint systems in th e"Universal" categor ytha ta re approve dfor use in this
weigh tcategory.
LS uitable for child restraint systems as recommended; see th e"Recommended child restraint
systems "table (Y page 49). Children in th
evehicle
47Safety Z
Page 51 of 261
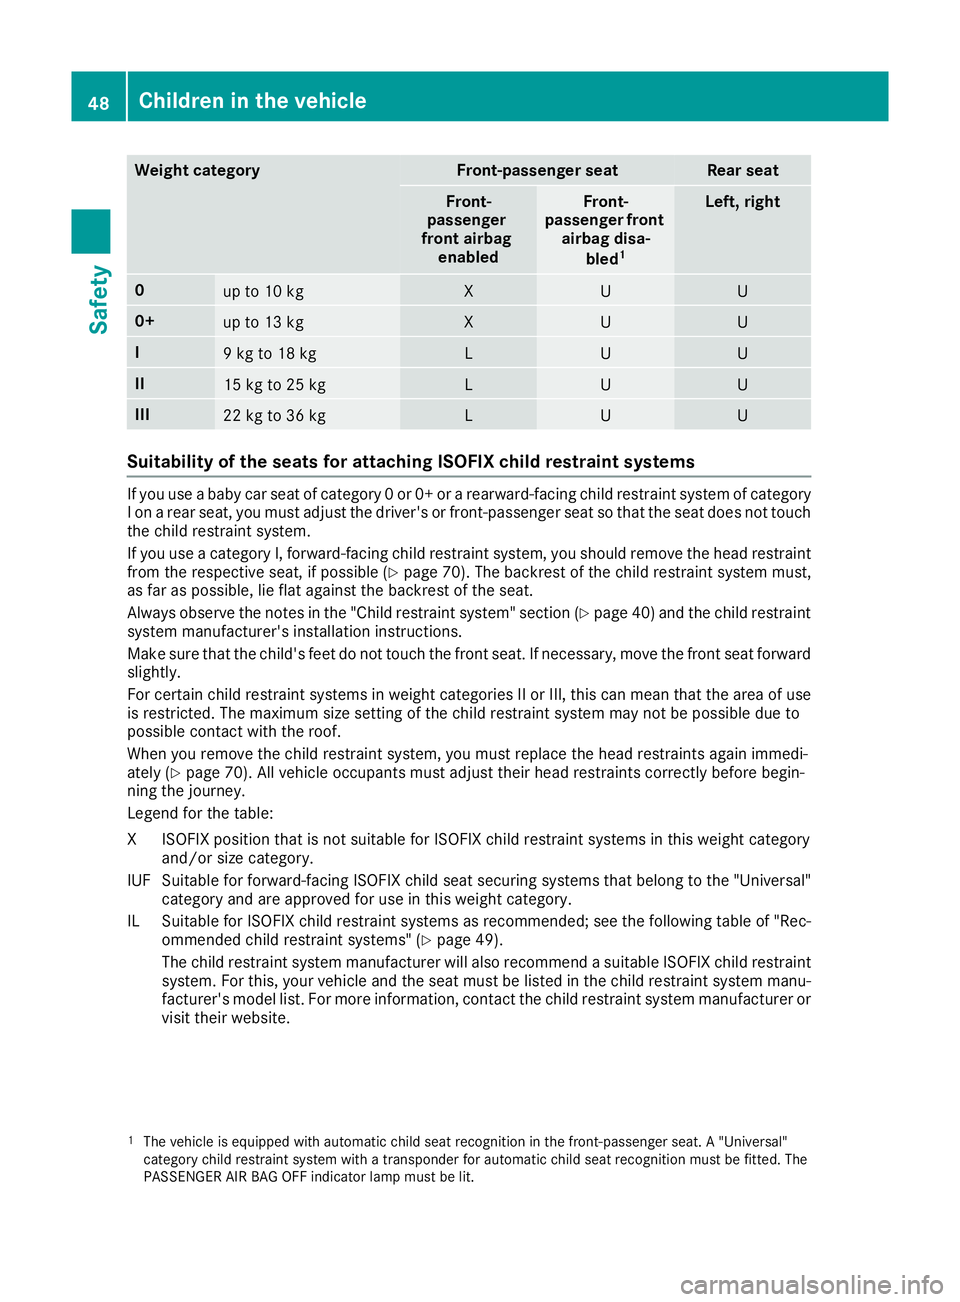
Weight category Front-passenger seat Rear seat
Front-
passenger
front airbag enabled Front-
passenger front airbag disa-
bled 1 Left, right
0
up to 10 kg X U U
0+
up to 13 kg X U U
I
9kgto18kg L U U
II
15 kg to 25 kg L U U
III
22 kg to 36 kg L U U
Suitability of the seat
sfor attaching ISOFIXc hild restraint systemsIf you use
ababy car seat of category 0or0+orarearward-facing child restraint system of category
Ionar ear seat, you must adjust the driver's or front-passenger seat so that the seat does not touch
the child restraint system.
If you use acategory I, forward-facing child restraint system, you shouldr emove the head restraint
from the respective seat, if possible (Y page 70). The backrest of the child restraint system must,
as far as possible, lie flat against the backrest of the seat.
Alwayso bserve the notes in the "Child restraint system" section (Y page 40) and the child restraint
system manufacturer's installation instructions.
Make sure that the child's feet do not touch the front seat. If necessary ,move the front seat forward
slightly.
For certain child restraint systems in weight categories II or III, this can mean that the area of use
is restricted. The maximum size setting of the child restraint system may not be possible due to
possible contact with the roof.
When you remove the child restraint system, you must replace the head restraints again immedi-
ately (Y page 70). All vehicle occupants must adjust their head restraints correctly before begin-
ning the journey.
Legend for the table:
XI SOFIX position that is not suitabl efor ISOFIX chil drestraint systems in this weight category
and/or size category.
IUF Suitable for forward-facing ISOFIX chil dseats ecuring systems that belong to the "Universal"
categor yand are approved for us einthis weight category.
IL Suitable for ISOFIX chil drestraint systems as recommended; see the following table of "Rec-
ommended chil drestraint systems "(Y page 49).
The chil drestraint system manufacturer will also recommend asuitabl eISOFIX chil drestraint
system. For this ,you rvehicl eand the sea tmustb elisted in the chil drestraint system manu-
facturer' smodel list. For more information, contac tthe chil drestraint system manufacturer or
visit thei rwebsite.
1 The vehicl eisequipped with automatic child seat recognition in the front-passenger seat. A"Universal"
category child restraint system with atransponder for automatic child seat recognition must be fitted. The
PASSENGER AIR BAG OFF indicator lamp must be lit. 48
Children in the vehicleSafety
Page 52 of 261
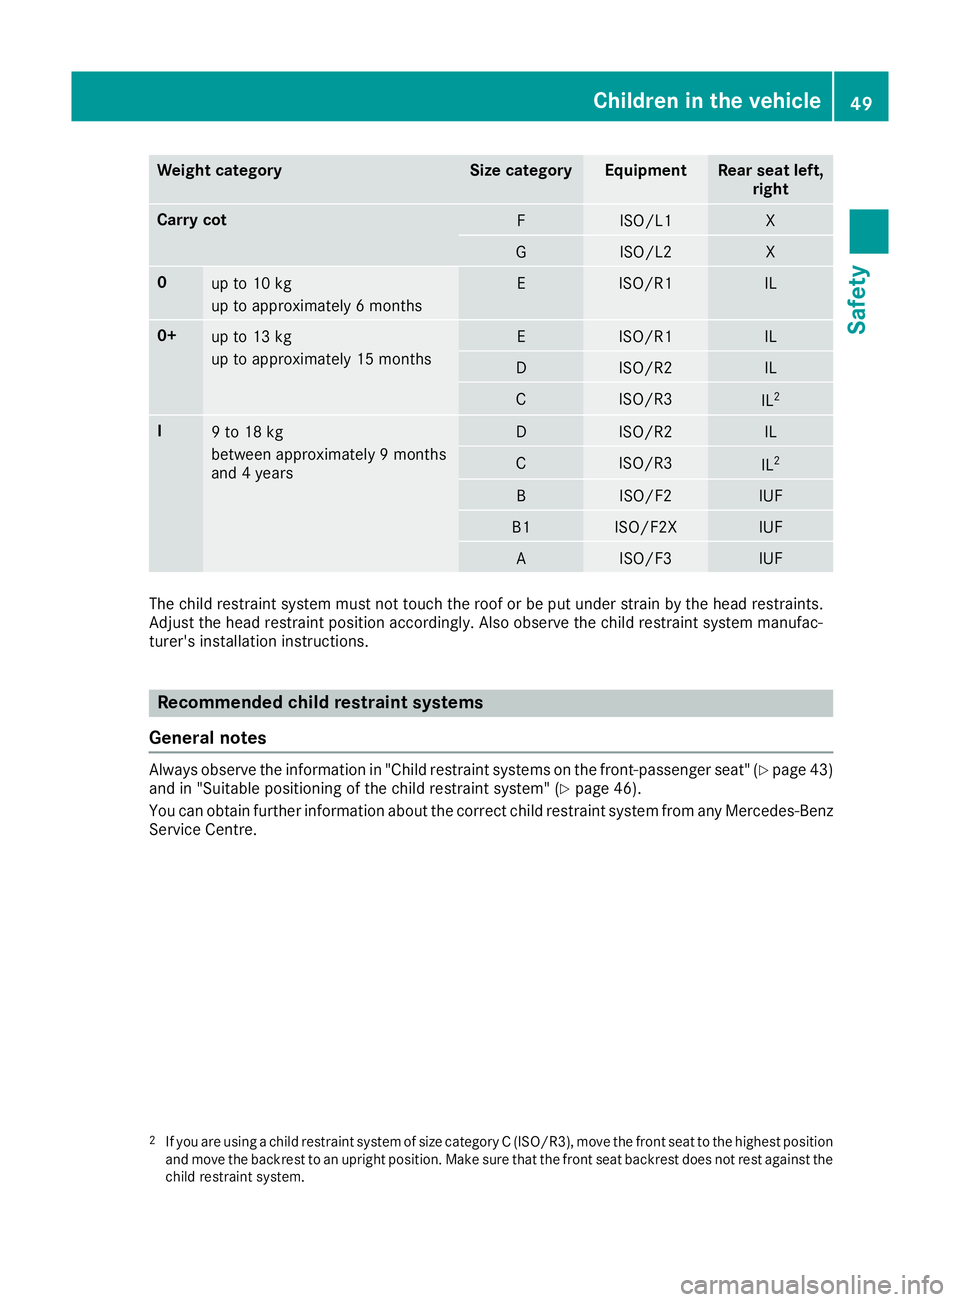
Weight category Size category Equip
ment Rear seat left,
right Carry cot
F ISO/L1 X
G ISO/L2 X
0
up to 10 kg
up to approximately
6months E ISO/R1 IL
0+
up to 13 kg
up to approximately 15 months E ISO/R1 IL
D ISO/R2 IL
C ISO/R3
IL
2 I
9to18kg
between approximately
9months
and 4years D ISO/R2 IL
C ISO/R3
IL
2 B ISO/F2 IUF
B1 ISO/F2X IUF
A ISO/F3 IUF
The chil
drestraint system must not touch the roof or be put under strain by the head restraints.
Adjust the head restraint position accordingly. Also observe the child restraint system manufac-
turer's installation instructions. Recommended child restrain
tsystems
General notes Alway
sobserve the informatio nin"Childrestraint system sonthe front-passenger seat" (Y page 43)
and in "Suitabl epositioni ng of the child restraint system "(Ypage 46).
Yo uc an obtai nfurthe rinformatio nabout the correct child restraint system from any Mercedes-Benz
Service Centre.
2 If you are usin gachild restraint system of size category C(ISO/R3), move the front seat to the highest position
and move the backrest to an upright position. Make sure that the front seat backrest does not rest against the child restraint system. Children in the vehicle
49Safety Z
Page 53 of 261
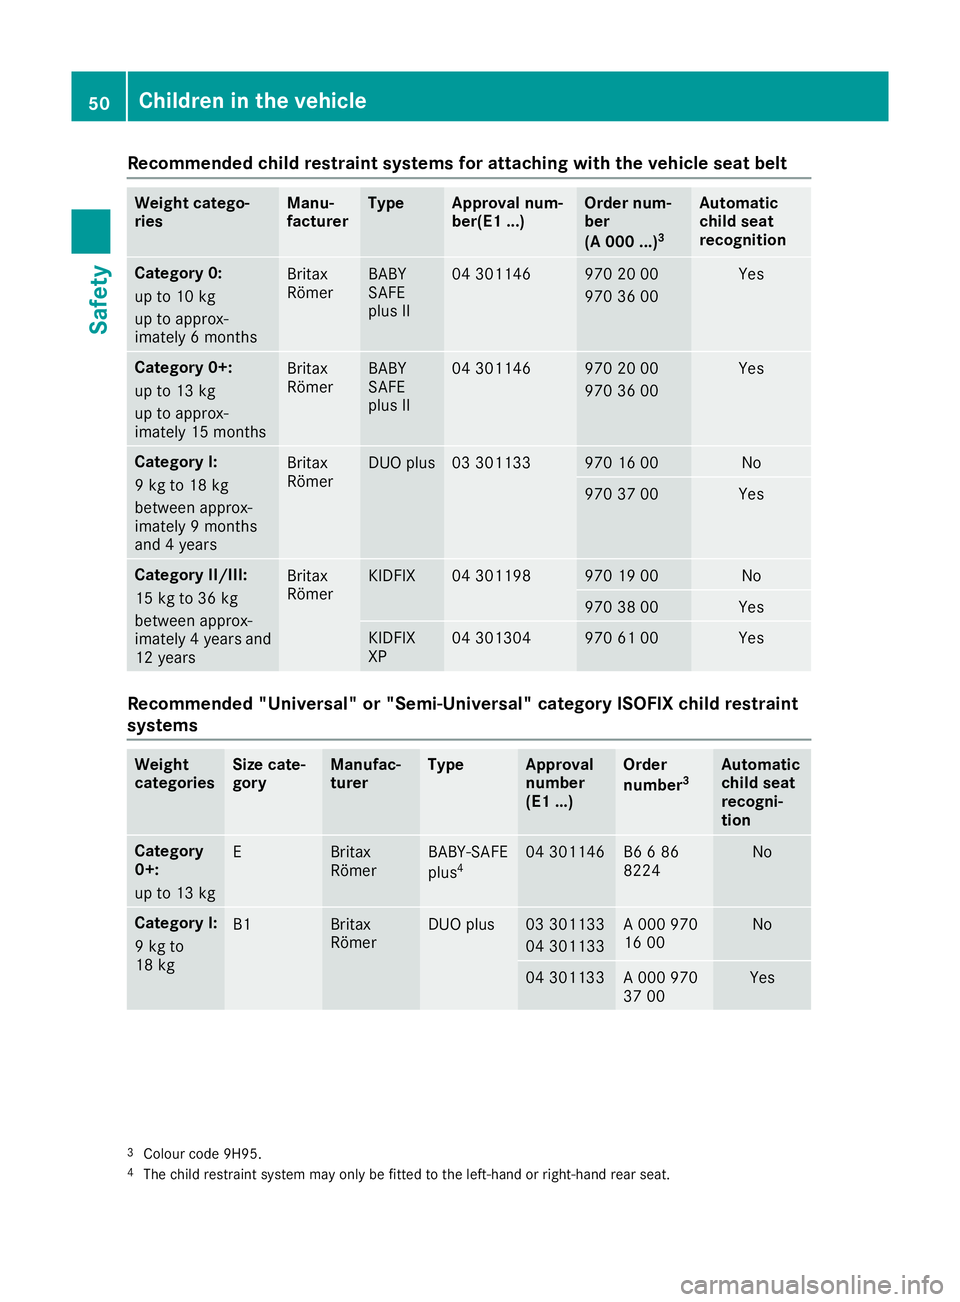
Recommende
dchild restraint systems for attaching with the vehicle seat belt Weight catego-
ries Manu-
facturer Type Approval num-
ber(E
1...) Order num-
ber
(A 000 ...)
3 Automatic
childs
eat
recognition Category 0:
up to 10 kg
up to approx-
imately
6months Britax
Römer BABY
SAFE
plus II 04 301146 97
02000
970 36 00 Yes
Categor
y0+:
up to 13 kg
up to approx-
imately 15 months Britax
Römer BABY
SAFE
plus II 04 301146 97
02000
970 36 00 Yes
Categor
yI:
9k gto18kg
between approx-
imately 9months
and 4years Britax
Römer DU
Op lus 03 301133 970 16 00 No
970 37 00 Yes
Categor
yII/III:
15 kg to 36 kg
between approx-
imately 4years and
12 years Britax
Römer KIDFIX 04 301198 97
01900 No
970 38 00 Yes
KIDFIX
XP 04 301304 970 61 00 Yes
Recommended "Universal" or "Semi-Universal" category ISOFIX child restraint
systems
Weight
categories Size cate-
gory Manufac-
turer Type Approval
number
(E1 ...) Order
number
3 Automatic
child seat
recogni-
tion Category
0+:
up to 13 kg
E Britax
Römer BABY-SAFE
plus
4 04 301146 B6
686
8224 No
Category I:
9kgto
18 kg
B1 Britax
Römer DU
Op lus 03 301133
04 301133 A0
00 970
16 00 No
04 301133 A0
00 970
37 00 Yes
3
Colour code 9H95.
4 Thec hild restraint system may onl ybefitted to th eleft-hand or right-han drear seat. 50
Children in th
evehicleSafety