2016 MERCEDES-BENZ G-CLASS SUV weight
[x] Cancel search: weightPage 120 of 261
Alway
sreplace al lbrake discs and brake pads/
lining sonana xleatt he same time .Alway sfit
new brake pads/lining swhenr eplacing brake
discs.
The vehicl eisequippe dwithl ightweight brake
discs to which the whee lassembl ywithr im and
threaded connectio nism atched.
The us eofbrake discs othe rtha nt hose
approved by Mercedes-Benz ma yalter track
width and is subject to approval, if applicable.
Whe nhandling the brake discs, shock-type
load ssuchast hoseexperience dwhenc hanging
wheels ,can lead to areduction in comfort when
driving with lightweight brake discs. Avoid
shock-typ eloads on the lightweight brake discs,
particularly on the brake plate. Driving on slippe
rysurfaces
! Where possible, avoid spinnin
gthe drive
wheels when pulling away on slipper yroads.
You could otherwise damage th edrive train.
Thi stypeofd amage is no tcovered by the
term soft heMercedes-Ben zwarranty.
X Engage th edifferential locks if necessary
(Y page 126). Drivin
gonw et roads
Aquaplaning If wate
rhas accumulated to acertain depth on
the road surface, there is adanger of aquaplan-
ing occurring, even if:
R you are driving at low speeds
R the tyres have adequate tread depth
For this reason, drive in the following manner in the event of heavy rain or in conditions in which
aquaplaning can occur:
R lowery ours peed
R avoid tyre ruts
R avoid sudden steering movements
R brake carefully
Drivin gonflooded roads !
Bear in mind that vehicles travelling in front
or in the opposite direction create waves. This may cause the maximum permissibl ewater
depth to be exceeded. These notes must be observed under all cir-
cumstances. You could otherwise damage
the engine, the electronics or the transmis-
sion.
If you must drive on stretches of road on which
water has collected, please bear in mind that:
R in the case of standing water, the water level
must be no higher than the lower edge of the
vehicle body
R you should drive no faster than walking pace
Off-road fording !
Under no circumstances should you accel-
erate before entering the water. The bow
wave could cause water to enter and damage
the engine and neighbouring assemblies.
! Do not open any of the vehicle's doors while
fording. Otherwise, water could get into the
vehicle interior and damage the vehicle's
electronics and interior equipment.
i You may only drive through fresh water.
R Observe the safety notes (Y page 119) and
general notes (Y page 119) on driving off-
road
R Establish how deep the water is and the char-
acteristics of the body of water before fording
R Switch off automatic climate control
R Vehicles with auxiliary heating/ventila-
tion: switch the auxiliary heating/ventilation
off
R Shift the transfer case to the LOW RANGE
off-road driving position (Y page 124)
R Engage the differential locks if necessary
(Y page 119)
R Avoid high engine speeds
R Enter and exit the water at aflat place and at
as teady walking pace
R Drive slowly and at aconstant speed through
the water
R Ensure that abow wave does not form as you
drive
R Do not stop and do not switch off the engine.
Water offers ahigh degree of resistance, the
ground is slippery and, in some cases, unsta- ble. Therefore, it is difficult and dangerous to pull awayinw ater
R Cleana ny mud from the tyre tread after ford-
ing
R Apply the brakes to dry them after fording Driving tips
117Driving and parking Z
Page 130 of 261

Disengaging th
ediffere ntial locks You can disengage the differential lock
sinthe
followin gorder: ;,?, =.
X To simultaneously disengage all differen-
tia
llocks: press switch =.
Yellow activatio nindicator lamps Aand red
function indicator lamps :go out.
After approximately three seconds of normal
driving, ABS, 4ETS, ESP ®
and BA Sare activa-
ted.
The Differential lock sactive ABS
Differential lock sactive ABS
and ESP not available
and ESP not available message disap-
pear sint he multifunction displaya nd the
å!÷warnin glamps in th einstru-
men tcluster go out.
X Shif tthe transfer case to the HIGH RANGE
on-road position (Y page 124).
If red function indicator lamps :do not go out
when disengagin gthe differential locks:
X Observe th etraffic situation.
X Make slight steerin gmovements while the
vehicle is in motion.
Red function indicator lamps :go out when
th ed ifferential lock sare disengaged. Towing
atrailer Importan
tsafety notes G
WARNING
Th eb raking system can overheat if you leave
yourf oot on the brake peda lwhile driving.
This increases the braking distance and could
even caus ethe braking system to fail .There is
ar isk of an accident.
Never use the brake peda lasafootrest. Do
not simultaneously depress both the brake
peda land the accelerator peda lwhile driving. G
WARNING
You coul dlose control of the vehicle/trailer
combination if it begins to swerve .The vehi-
cle/trailer combination coul deven overturn.
There is arisk of an accident.
On no account should you attempt to
straighten out the vehicle/trailer combina-
tion by increasing speed. Decrease your speed and do not countersteer. Brake if nec-
essary.
G
WARNING
If the ballc oupling is not fitted correctly and
the bolts supplied are not tightened to the
specified tightening torque ,the trailer could
come loose. There is arisk of an accident.
Always fit the ballc oupling as described.
Observe the specified tightening torque when fitting the coupling. G
WARNING
If the maximu mpermissible loadf orac arrier
system is exceeded, the carrie rcouldc ome
loos efrom the vehicl eand endange rother
road users. There is arisk of an accident and
injury.
Never exceed the maximu mpermissible load
when using acarrier.
! If you have
atrailer tow hitch retrofitted,
changes to the engine cooling system may be necessary, depending on the vehicl etype.
If you have atrailer tow hitch retrofitted,
observe the anchorage points on the chassis.
Retrofitting atrailer tow hitch is only permissible
if at railer loadiss pecified in yourv ehicledocu-
ments. If this is not the case, then the vehicl eis
not approved for towing atrailer.
For more information, please contact aqualified
specialist workshop.
Exceeding the maximu mpermissible nose-
weight of the trailer drawbar on the ballc oupling
may caus edamage.
Damag emay be caused to the following:
R towing vehicle
R trailer
R ballc oupling
R trailer tow hitch
The vehicle/trailer combination coul dbecome
unstable.
The vehicle/trailer combination coul dalso
become unstable if the noseweight used is lower
than the minimu mpermissible noseweight. Towin
gatrailer
127Driving an dparking Z
Page 131 of 261

To avoid hazardous situations:
R make sure to check the noseweight before
each journey
R the noseweight should be as close as possible
to the maximum noseweight
R do not exceed the maximum permissible
noseweight
R the noseweight must not be lower than the
minimum permissible noseweight
Make sure that the following values are not
exceeded:
R the permissible noseweight
R the permissible trailer load
R the permissible rear axle load of the towing
vehicle
R the maximum permissible gross vehicle
weight of both the towing vehicle and the
trailer
When reversin gthe towing vehicle, make sure
there is nobody between the trailer and the vehi- cle.
The applicable permissible values, which must
not be exceeded, can be found:
R in your vehicle documents
R on the type plates for the trailer
R on the vehicle identification plate
If the values differ, the lowest value applies.
You will find the values approved by the manu-
facturer on the identification plates and for the
towing vehicle under "Technical data"
(Y page 256).
When reversin gthe towing vehicle, make sure
there is nobody between the trailer and the vehi- cle.
Couple and uncouple the trailer carefully. If youdo not couple the trailer to the towing vehicle
correctly, the trailer could become detached.
When towing atrailer, your vehicle's handling
characteristics will be different from when driv-
ing without atrailer.
The vehicle/trailer combination:
R is heavier
R is restricted in its acceleration and gradient-
climbing capability
R has an increased braking distance
R is affected more by stron gcrosswinds
R demands more sensitiv esteering
R has alarger turnin gcircle This can impair the vehicle's handling charac-
teristics. Adapt your driving style accordingly.
Maintain asafe distance. Drive carefully.
When towing atrailer, alway sadjust your speed
to the current road and weather conditions. Do
not exceed the maximum permissible speed for
your vehicle/trailer combination. Notes on to
wingatrailer
General notes When towing
atrailer, set the tyre pressure on
the rear axle of the towing vehicle for amaxi-
mum load. Further information on the tyre pres-
sure table in the fuel filler flap (Y page 109).
The height of the ball coupling changes with the load of the vehicle. If necessary, use atrailer
with aheight-adjustable drawbar.
You will find permissible trailer loads under
"Technical data" (Y page 256).
Driving tips X
Observe the information on ESP ®
trailer sta-
bilisation (Y page 55).
X On long and steep downhill gradients, select
shift range 1,2or 3(Y page 105) in good time.
X If necessary, shift the transfer case to LOW
RANGE (Ypage 124).
This will use the braking effect of the engine, so less braking will be required to maintain
the vehicle speed. This relieves the load on
the brake system and prevents the brakes
from overheating and wearing too quickly. If
you need additional braking, depress the
brake pedal repeatedly rather than continu-
ously.
The maximum permissible speed for vehicle/
trailer combinations depends on the type of
trailer. Before beginnin gthe journey, check the
trailer's documents to see what the maximum
permitted speed is. Observe the maximum per-
missible speed in the relevant country.
For certain Mercedes-Benz vehicles, the maxi-
mum permissibler ear axle load is increased
when towing atrailer. See the "Technical data"
section to find out whether this applies to your
vehicle (Y page 256). In the event of increased
rear axle load, the car/trailer combination may
not exceed amaximum speed of 100 km/h for
reasons concerning the operating permit. This 128
Towing
atrailerDriving and parking
Page 198 of 261
Setting map view and alignment
The following options are available:
R 3D map: the map view is aligned to the direc-
tion of travel
R 2D map in direction of travel: the map view is
aligned to the direction of travel. The direction
of travel is alwaysatt he top.
R North-oriented 2D map: the map view is dis-
played so that northisa lwaysatthe top
X Press the NAVI button.
The main menu appears.
X Dependin gonthe current setting, select 3D 3D,
2D
2D or2D
2DLL.
In accordance with your selection, the setting
changes to 3D
3D, 2D
2Dor2D
2DLL.
Defining regional settings Setting the user interface language
X Press the NAVI button.
The main menu appears.
X Select Settings Settings.
X Select Regional
Regional.
X Select Language
Language.
Al ist of available languages appears.
X Select the desired language.
The multimedia system is restarted with the
selected language set.
Setting the language for voice output
X Press the NAVI button.
The main menu appears.
X Select Settings Settings.
X Select Regional
Regional.
X Select Voice Language
Voice Language.
Al ist of the available languages and speakers
appears.
X Select the desired language and speaker.
The selected language and speaker are adop-
ted for the voice output.
Setting units and formats The following functions are available:
R Distance
Distance
R Fuel consumption Fuel consumption
R Weight
Weight
R Time Format
Time Format
R Date Format
Date Format R
Date Delimiter
Date Delimiter
R Coordinate Display Format
Coordinate Display Format
X Press the NAVI button.
The main menu appears.
X Select Settings
Settings.
X Select Regional Regional.
X Select Units &Formats
Units &Formats.
X Select the desired function.
Am enu appears.
X Select the desired setting.
The Ytick indicates the activated function.
Setting the time zone and daylight saving
time
X Press the NAVI button.
The main menu appears.
X Select Settings
Settings.
X Select Regional Regional.
X Select Time Zone
Time Zone.
X To set the time zone automatically: select
Automatic Time Zone
Automatic Time Zone.
Am enu appears.
X Select the desired setting.
The Ytick indicates the activated function.
X To set the time zone manually: select
Automatic Time Zone Automatic Time Zone.
Am enu appears.
X Select Manual Time Zone Manual Time Zone.
The Ytick indicates the activated function.
X Select Time Zone
Time Zone.
X Set the desired time zone using the slider.
X To activate or deactivate daylight saving
time:
select Daylight Saving Time Daylight Saving Time.
The function is activated or deactivated.
Activating or deactivating menu anima-
tions If this function is activated, buttons in menus,
keyboard displays and screen transitions are
animated.
X Press the NAVI button.
The main menu appears.
X Select Settings Settings.
X Select Display
Display.
X Select Menu Animations
Menu Animations.
The function is activated or deactivated. Navigation
195Multimedia system Z
Page 201 of 261
Loading guidelines
G
WARNING
If objects, luggage or loads are not secured or not secured sufficiently, the ycoulds lip,tip
over or be flung around and thereby hit vehicle
occupants. There is arisk of injury ,especially
when braking or abruptly changing directions.
Always store objects so that they cannot be
flung around. Secure objects, luggage or
loads against slipping or tipping before the
journey. G
WARNING
If you loadt he vehicleunevenly, driving char-
acteristics such as steering and braking
behaviou rmay be severely impaired .There is
ar isk of an accident.
Load the vehicl eevenly .Secure the loadso
that it cannot slip. G
WARNING
The exhaust tail pipea nd tail pipetrim can
become very hot. If you come into contact
with these parts of the vehicle, you coul dburn
yourself. There is arisk of injury.
Always be particularl ycarefu laround the
exhaust tail pipea nd the tail pipetrim. Allow
these components to cool downb efore touch-
ing them. G
WARNING
Combustio nengines emit poisonous exhaust
gase ssuch as carbon monoxide .Ifthe rear
door is open when the engine is running, par- ticularly if the vehicl eismoving, exhaust
fumes coul denter the passenger compart-
ment. There is arisk of poisoning.
Turn off the engine before opening the rear
door. Never drive with the rear door open. Driving, braking and steering characteris
tics
change depending on:
R typ eofl oad
R weight
R the centre of gravity of the load
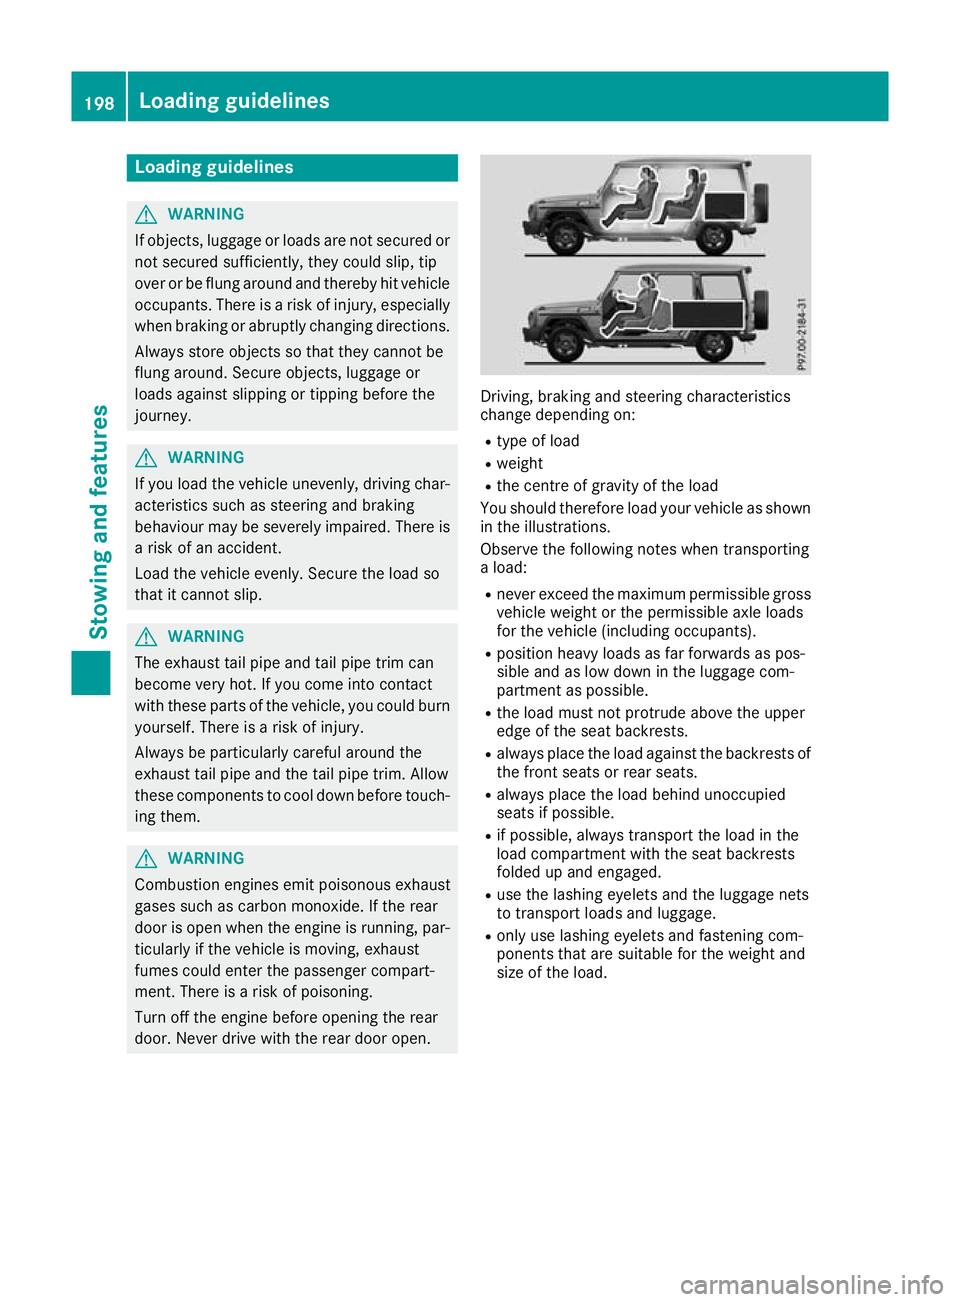
Yo us houl dtherefore load your vehicl easshown
in the illustrations.
Observe the following note swhent ransporting
al oad:
R neve rexceed the maximum permissibl egross
vehicl eweigh tort he permissibl eaxlel oads
for the vehicl e(including occupants).
R positio nheavy loadsasf arforwards as pos-
sibl eand as lo wdownint he luggage com-
partment as possible.
R the load must not protrude above the upper
edge of the sea tbackrests.
R always place the load against the backrests of
the front seats or rea rseats.
R always place the load behind unoccupied
seats if possible.
R if possible, always transport the load in the
load compartment with the sea tbackrests
folde dupa nd engaged.
R uset he lashing eyelets and the luggage nets
to transport load sand luggage.
R onl yuselashing eyelets and fastening com-
ponents tha tare suitabl efor the weight and
size of the load. 198
Loadin
gguidelinesStowing and features
Page 232 of 261

X
Lift up cover :of positive terminal ;in the direction of the arrow.
X Connect positive terminal ;on yourv ehicle to positive terminal ?of donor battery Busing the
jump lead, Alwaysb eginw ith positive terminal ;on youro wn vehicle first.
X Start the engine of the donor vehicle and run it at idling speed.
X Connect negative terminal Aof donor battery Bto earth point =of yourv ehicle using the jump
lead, connecting the jump leadtod onor batteryBfirst.
X Start the engine.
X Before disconnecting the jump leads, let the engines run for several minutes.
X First, remove the jump leads from earth point =and negative terminal A,then from positive
terminal ;and positive terminal ?.Each time, beginatt he contacts on youro wn vehicle.
X Close cover :of positive terminal ;after removing the jump leads.
X Have the battery checked at aqualifieds pecialist workshop.
Jump-starting is not considered to be anormal operating condition.
i Jump-starting cablesa
nd further information regarding jump-starting can be obtained at any
qualifieds pecialist workshop. Towinga
wayand tow-starting Importan
tsafety notes G
WARNING
Safety-relevant function sare restricted or not
available if:
R the engine is not running.
R the brake system or the power steering is
malfunctioning
R the voltag esupply or the vehicle's electrical
system is malfunctioning.
If yourv ehicleist owed,s ignificantly greater
force may be required to steer the vehicl eor
to brake. There is arisk of an accident.
In such circumstances, use atowing bar.
Make sure that the steering is moving freely
before towing. G
WARNING
If the steering whee llock is engaged, the vehi-
cle can no longer be steered .There is arisk of
an accident.
Always switch on the ignitio nwhen towing
with atow rope or atowing bar. G
WARNING
When towing or tow-starting another vehicle
and its weight is greater than the permissible gross weight of yourv ehicle, the:
R towing eye may be torn off
R car/trailer combination may swerve or
even overturn
There is arisk of an accident.
When towing or tow-starting another vehicle,
its weight should not be greater than the per- missible gross weight of yourv ehicle.
Detail sonthe permissible gross vehicl eweight
of yourv ehiclecan be found on the vehicl eiden-
tification plate (Y page249).
! You may tow the vehicl
efor am aximu mof
50km. Atowing spee dof50km/h must not
be exceeded.
For towing distances over 50 km, the entire
vehicl emust be lifted up and transported.
! Only secure the tow cabl
eortowing bar to
the towing eyes. You coul dotherwise damage
the vehicle.
! Observe the following points when towing
with atow rope:
R Secure the tow rope on the same side on
both vehicles.
R Make sure that the tow rope is not longer
than legally permitted. Mark the tow rope in the middle, e.g. with awhite cloth Towin
gawayand tow-starting
229Breakdown assis tance Z
Page 246 of 261
Brazil
Este equipamento opera em caráte
rsecundário,
isto é, não tem direito àproteçã ocontra inter-
ferênci aprejudicial ,mesmo de estaçõe sdo
mesmo tipo, enão pode causa rinterferência a
sistemas operando em caráte rprimário. Changin
gawheel Flat tyre
You can fin dinformation on what to do in the
event of aflat tyr eunder "Breakdown assis-
tance" (Y page 224). Interchanging th
ewheels G
WARNING
Interchangin gthe front and rear wheels may
severely impair the driving characteristics if
the wheels or tyres have different dimensions. The whee lbrakes or suspension components
may alsobed amaged. There is arisk of acci-
dent.
Interchange front and rear wheels only if the
wheels and tyres are of the same dimensions.
! On vehicles fitted with
atyre pressure mon-
itor, electronic components are located in the wheel.
Tyre-fitting tools should not be appliedint he
area of the valve ,asthis coul ddamage the
electronic components.
Only have tyres changed at aqualified spe-
cialist workshop.
Interchanging front and rear wheels of differing
dimensions can render the genera loperating
permi tinvalid.
Always pay attention to the instructions and
safety notes under "Changing awheel"
(Y page2 43). The wear patterns on the front and rear tyres
diffe
rdepending on the operating conditions.
Interchange the wheels before aclear wear pat-
tern has formed on the tyres. Frontt yres typi-
cally wear more on the shoulders, while rear
tyres wear more in the centre.
On vehicles that have front and rear wheels of
the same size, you can interchange the wheels
every 5,000 to 10,00 0kmd epending on the
degree of tyre wear. Ensure that the direction of
rotation is maintained.
Clean the contact surfaces of the wheel and the
brake disc thoroughly every time awheel is
interchanged. Check the tyre pressure and reac-
tivate the tyre pressure monitor if necessary
(Y page 241). Direction of rotation
Tyres with aspecifie ddirection of rotation have
additional benefits, e.g. if there is ariskofa qua-
planing. You will only gain these benefit sifthe
correc tdirection of rotation is observed.
An arrow on th esidewall of th etyrei nd icates its
correc tdirection of rotation.
You may fit th espar ewhee lagainst th edirection
of rotation .Observ ethe time restriction on use
as well as th espeed limitation specifie donthe
spar ewheel. Storin
gwheels
Storet yres that are not being used in acool, dry
and preferably dark place. Protect the tyres
against oil, grease, petrol and diesel. Fitting
awheel
Preparing th evehicle G
WARNING
If yo uremove the spar ewhee lfrom the spare
whee lbracket, the weight distributio nofthe
vehicl echanges .Ifyou have already raised
the vehicle, the jack coul dtip over. There is a
risk of injury.
Remove the spar ewhee lfrom the spar ewheel
bracket before raising the vehicle. Changing
awheel
243Wheels an dtyres Z
Page 252 of 261
nections intende
dfor us ewitht he basi cfittings.
Be sure to observe the manufacturer' saddi-
tional instructions when installing.
Deviations in respect of wavebands, maximum
transmission outputs or aeria lpositions must be
approved by Mercedes-Benz.
The maximu mtransmission outpu t(PE AK) at the
base of the aeria lmustn ot exceed the following
values: Waveband Maximum
transmissi on
output Short wave
3-54M
Hz 100 W
4mw
aveband
68 -87.5 MHz 30 W
2mw
aveband
144 -174 MHz 50 W
Trunked radio/Tetra
380
-460 MHz 10 W
70 cm waveband
400
-460 MHz 35 W
Mobilec
ommunications
(2G/3G/4G) 10 W
The following can be used in the vehicle without
restrictions:
R RF transmitters with amaximum transmis-
sion output of up to 100 mW
R RF transmitters with transmitter frequencies
in the 380 –410 MHz waveband and amaxi-
mum transmission output of up to 2W
(trunked radio/Tetra)
R Mobile phones (2G/3G/4G)
There are no restriction swhen positionin gthe
aerial on the outside of the vehicle for the fol-
lowing wavebands:
R Trunked radio/Tetra
R 70 cm waveband
R 2G/3G/4G Identification plates
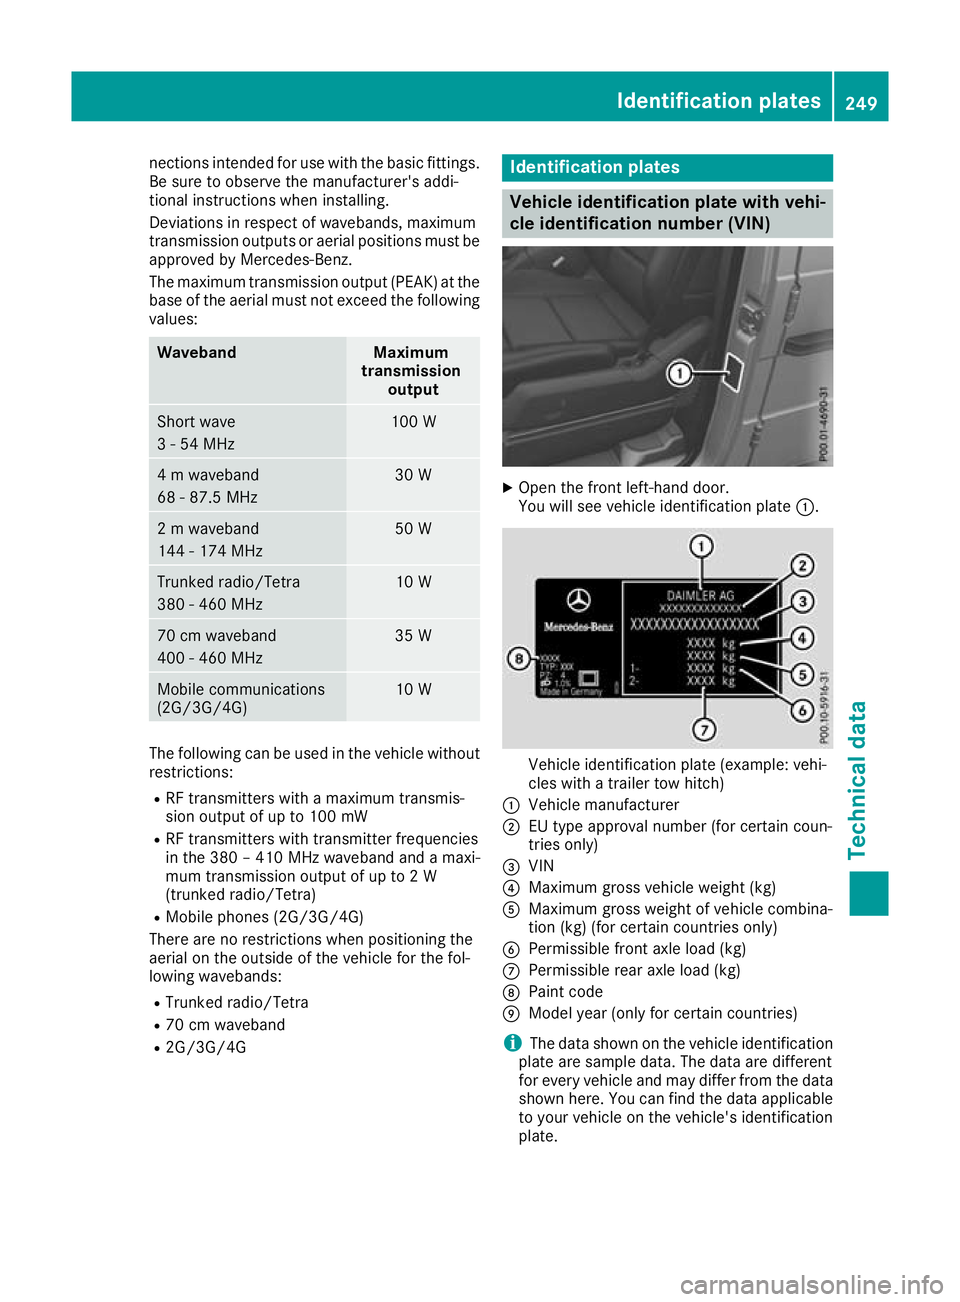
Veh
icle identificatio nplate with vehi-
cl ei dentificatio nnumber (VIN) X
Ope nthe front left-hand door.
You will see vehicle identification plate :. Vehicle identification plate (example: vehi-
cles with
atrailer tow hitch)
: Vehicle manufacturer
; EU type approvaln umber (for certain coun-
tries only)
= VIN
? Maximum gross vehicle weight( kg)
A Maximum gross weightofv ehicle combina-
tion (kg) (for certain countries only)
B Permissiblef ront axle load (kg)
C Permissibler ear axle load (kg)
D Paint code
E Model year( only for certain countries)
i The data shown on the vehicle identification
plate are sample data. The data are different
for every vehicle and may differ from the data shown here. You can find the data applicable
to yourv ehicle on the vehicle's identification
plate. Identification plates
249Technical data Z