2016 MERCEDES-BENZ CLA COUPE towing
[x] Cancel search: towingPage 311 of 345

X
When the vehicle is stationary, depress the
brake pedal and keep it depressed.
X Turn the key to position 2in the ignition lock
(Y page 133).
X Depress the clutch pedal fully, engage second
gear and continue to keep the clutch pedal
fully depressed.
X Release the brake pedal.
X Tow-start the vehicle.
X Release the clutch pedal slowly; do not
depress the accelerator pedal while doing so.
X When the engine has been started, immedi-
ately depress the clutch pedal fully and shift
to neutral.
X Pull over at a suitable place and stop the vehi-
cle safely, paying attention to road and traffic
conditions.
X Use the electric parking brake to secure the
vehicle and prevent it from rolling away.
X Remove the rigid towing bar or towing rope.
X Remove the towing eye (Y page 305).
X Switch off the hazard warning lamps. Electrical fuses
Important safety notes
G
WARNING
If you manipulate, bridge or replace a faulty
fuse with a fuse of a higher amperage, the
electric cables could be overloaded. This may result in a fire. There is a risk of an accident
and injury.
Always replace faulty fuses with specified new fuses of the correct amperage.
! Only use fuses that have been approved for
Mercedes-Benz vehicles and which have the
correct fuse rating for the system concerned.
Only use fuses marked with an "S". Compo-
nents or systems could otherwise be dam-
aged.
! Make sure that no moisture can enter the
fuse box when the cover is open.
! When closing the cover, make sure that it is
lying correctly on the fuse box. Moisture seep-
ing in or dirt could otherwise impair the oper- ation of the fuses. The fuses in your vehicle disconnect faulty cir-
cuits. If a fuse blows, all the components in the
circuit and their functions will fail.
Blown fuses must be replaced with fuses of the same rating, which you can recognise by the
colour and fuse rating. The fuse ratings are listed
in the fuse allocation chart.
The fuse allocation chart is in the fuse box in the front-passenger footwell (Y page 309).
If the newly inserted fuse also blows, have the
cause traced and rectified at a qualified special- ist workshop, e.g. a Mercedes-Benz Service
Centre. Before replacing a fuse
X Secure the vehicle against rolling away
(Y page 155).
X Switch off all electrical consumers.
X Vehicles without KEYLESS-GO: remove the
key from the ignition lock.
X Vehicles with KEYLESS-GO start-function
or KEYLESS-GO: open the driver's door.
The vehicle electronics now have status 0.
This is the same as the key having been
removed.
The fuses are located in various fuse boxes:
R Fuse box in the engine compartment on the
left-hand side of the vehicle, when viewed in
the direction of travel
R Fuse box in the front-passenger footwell
The fuse allocation chart is on the fuse box in the front-passenger footwell (Y page 309). Fuse box in the engine compartment
G
WARNING
When the bonnet is open, and the windscreen wipers are set in motion, you can be injured by
the wiper linkage. There is a risk of injury.
Always switch off the windscreen wipers and
the ignition before opening the bonnet. 308
Electrical fusesBreakdown assistance
Page 318 of 345
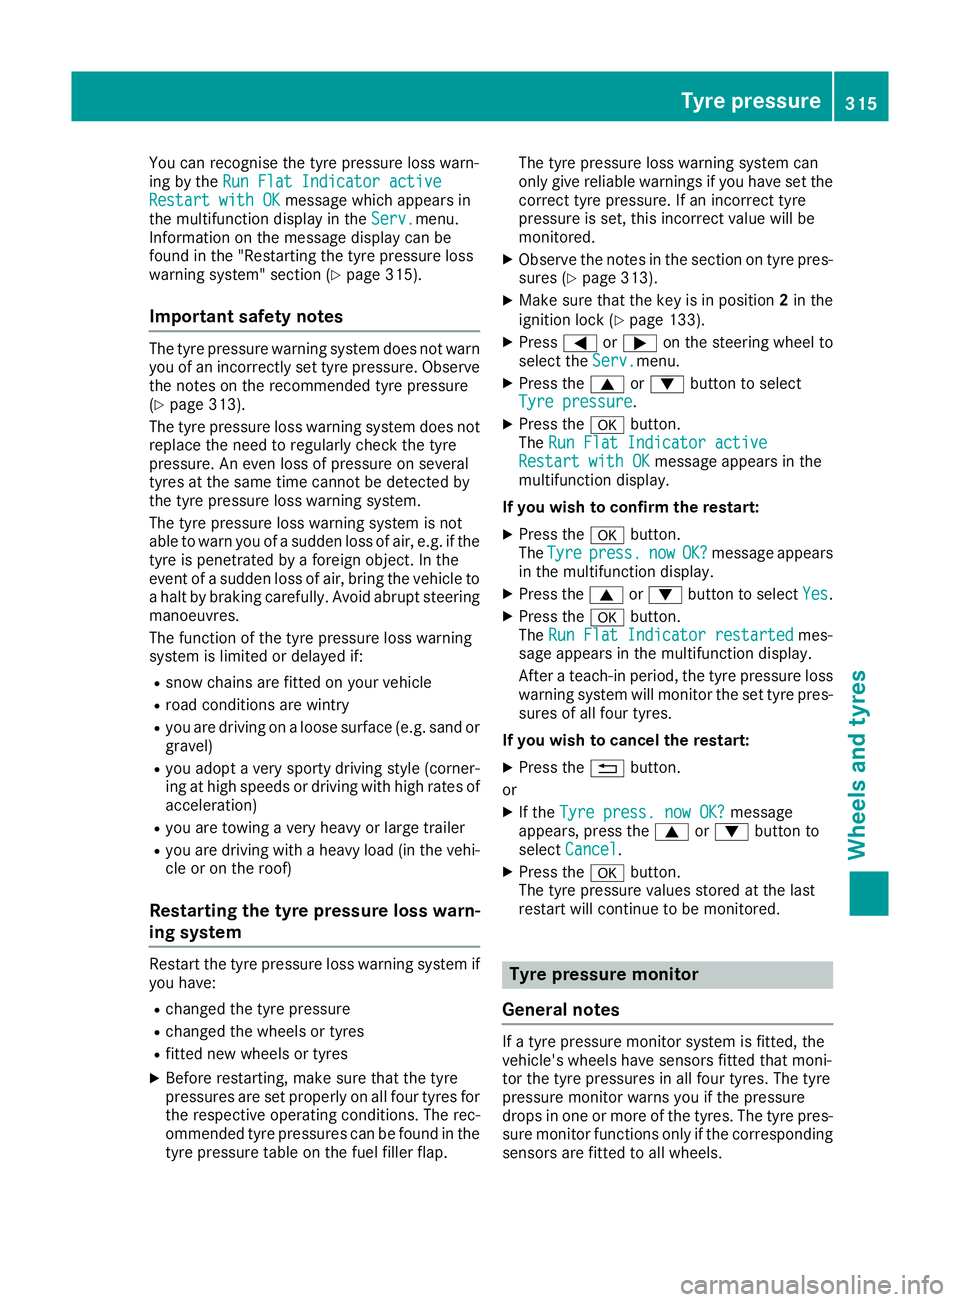
You can recognise the tyre pressure loss warn-
ing by the Run Flat Indicator active
Run Flat Indicator active
Restart with OK
Restart with OK message which appears in
the multifunction display in the Serv.
Serv.menu.
Information on the message display can be
found in the "Restarting the tyre pressure loss
warning system" section (Y page 315).
Important safety notes The tyre pressure warning system does not warn
you of an incorrectly set tyre pressure. Observe the notes on the recommended tyre pressure
(Y page 313).
The tyre pressure loss warning system does not
replace the need to regularly check the tyre
pressure. An even loss of pressure on several
tyres at the same time cannot be detected by
the tyre pressure loss warning system.
The tyre pressure loss warning system is not
able to warn you of a sudden loss of air, e.g. if the
tyre is penetrated by a foreign object. In the
event of a sudden loss of air, bring the vehicle to a halt by braking carefully. Avoid abrupt steering
manoeuvres.
The function of the tyre pressure loss warning
system is limited or delayed if:
R snow chains are fitted on your vehicle
R road conditions are wintry
R you are driving on a loose surface (e.g. sand or
gravel)
R you adopt a very sporty driving style (corner-
ing at high speeds or driving with high rates of acceleration)
R you are towing a very heavy or large trailer
R you are driving with a heavy load (in the vehi-
cle or on the roof)
Restarting the tyre pressure loss warn-
ing system Restart the tyre pressure loss warning system if
you have:
R changed the tyre pressure
R changed the wheels or tyres
R fitted new wheels or tyres
X Before restarting, make sure that the tyre
pressures are set properly on all four tyres for
the respective operating conditions. The rec-
ommended tyre pressures can be found in the
tyre pressure table on the fuel filler flap. The tyre pressure loss warning system can
only give reliable warnings if you have set the correct tyre pressure. If an incorrect tyre
pressure is set, this incorrect value will be
monitored.
X Observe the notes in the section on tyre pres-
sures (Y page 313).
X Make sure that the key is in position 2in the
ignition lock (Y page 133).
X Press =or; on the steering wheel to
select the Serv.
Serv.menu.
X Press the 9or: button to select
Tyre pressure Tyre pressure .
X Press the abutton.
The Run Flat Indicator active
Run Flat Indicator active
Restart with OK
Restart with OK message appears in the
multifunction display.
If you wish to confirm the restart:
X Press the abutton.
The Tyre
Tyre press.
press. now
nowOK?
OK?message appears
in the multifunction display.
X Press the 9or: button to select Yes
Yes.
X Press the abutton.
The Run Flat Indicator restarted
Run Flat Indicator restarted mes-
sage appears in the multifunction display.
After a teach-in period, the tyre pressure loss warning system will monitor the set tyre pres-
sures of all four tyres.
If you wish to cancel the restart: X Press the %button.
or X If the Tyre press. now OK? Tyre press. now OK? message
appears, press the 9or: button to
select Cancel
Cancel.
X Press the abutton.
The tyre pressure values stored at the last
restart will continue to be monitored. Tyre pressure monitor
General notes If a tyre pressure monitor system is fitted, the
vehicle's wheels have sensors fitted that moni-
tor the tyre pressures in all four tyres. The tyre
pressure monitor warns you if the pressure
drops in one or more of the tyres. The tyre pres- sure monitor functions only if the corresponding
sensors are fitted to all wheels. Tyre pressure
315Wheels and tyres Z
Page 337 of 345
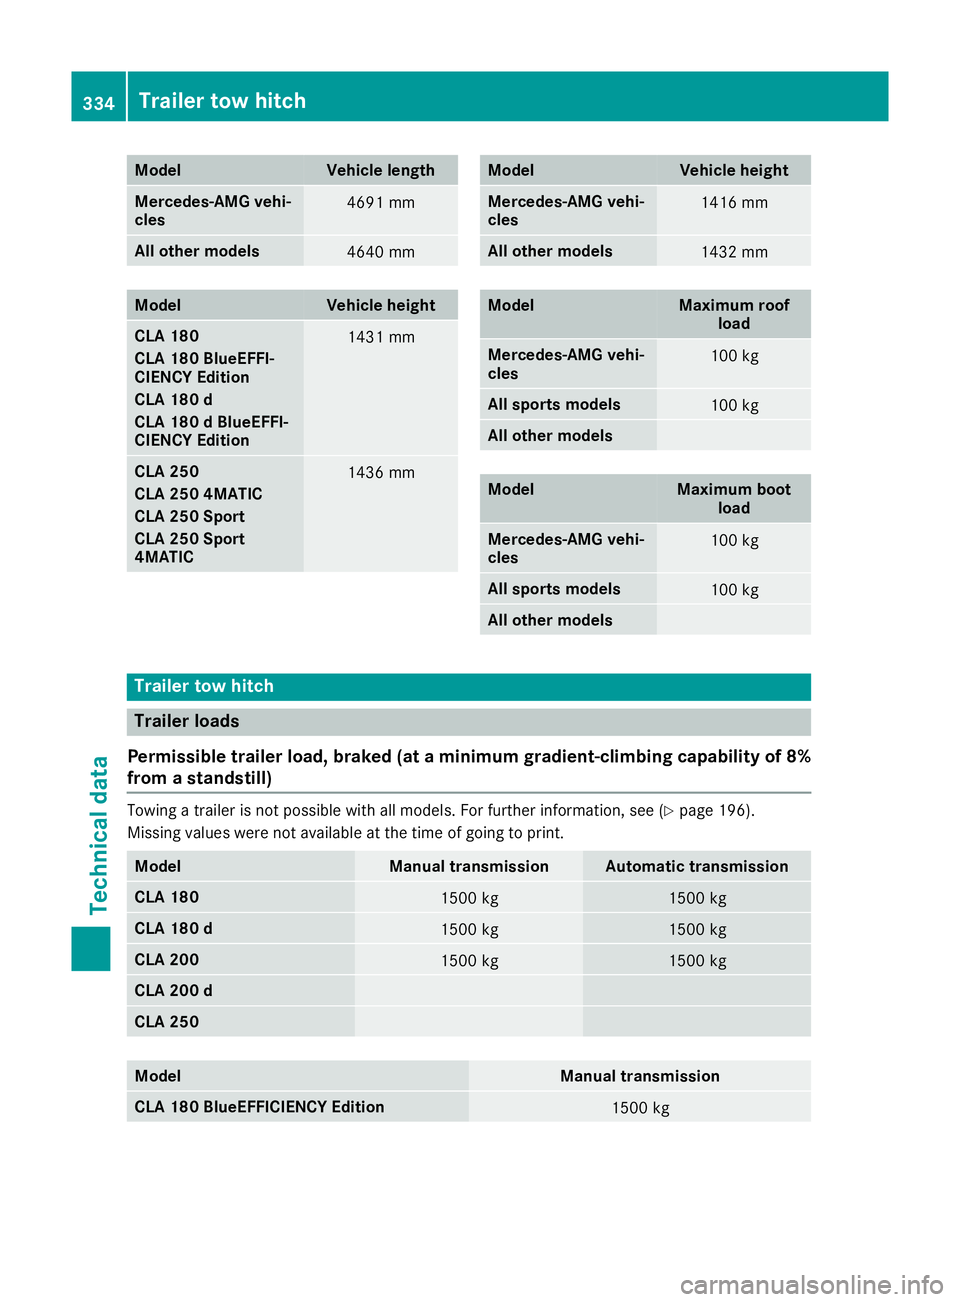
Model Vehicle length
Mercedes-AMG vehi-
cles
4691 mm
All other models
4640 mm
Model Vehicle height
CLA 180
CLA 180 BlueEFFI-
CIENCY Edition
CLA 180 d
CLA 180 d BlueEFFI-
CIENCY Edition
1431 mm
CLA 250
CLA 250 4MATIC
CLA 250 Sport
CLA 250 Sport
4MATIC
1436 mm Model Vehicle height
Mercedes-AMG vehi-
cles
1416 mm
All other models
1432 mm
Model Maximum roof
load Mercedes-AMG vehi-
cles
100 kg
All sports models
100 kg
All other models
Model Maximum boot
load Mercedes-AMG vehi-
cles
100 kg
All sports models
100 kg
All other models
Trailer tow hitch
Trailer loads
Permissible trailer load, braked (at a minimum gradient-climbing capability of 8%
from a standstill) Towing a trailer is not possible with all models. For further information, see (Y
page 196).
Missing values were not available at the time of going to print. Model Manual transmission Automatic transmission
CLA 180
1500 kg 1500 kg
CLA 180 d
1500 kg 1500 kg
CLA 200
1500 kg 1500 kg
CLA 200 d
CLA 250
Model Manual transmission
CLA 180 BlueEFFICIENCY Edition
1500 kg334
Trailer tow hitchTechnical data
Page 338 of 345
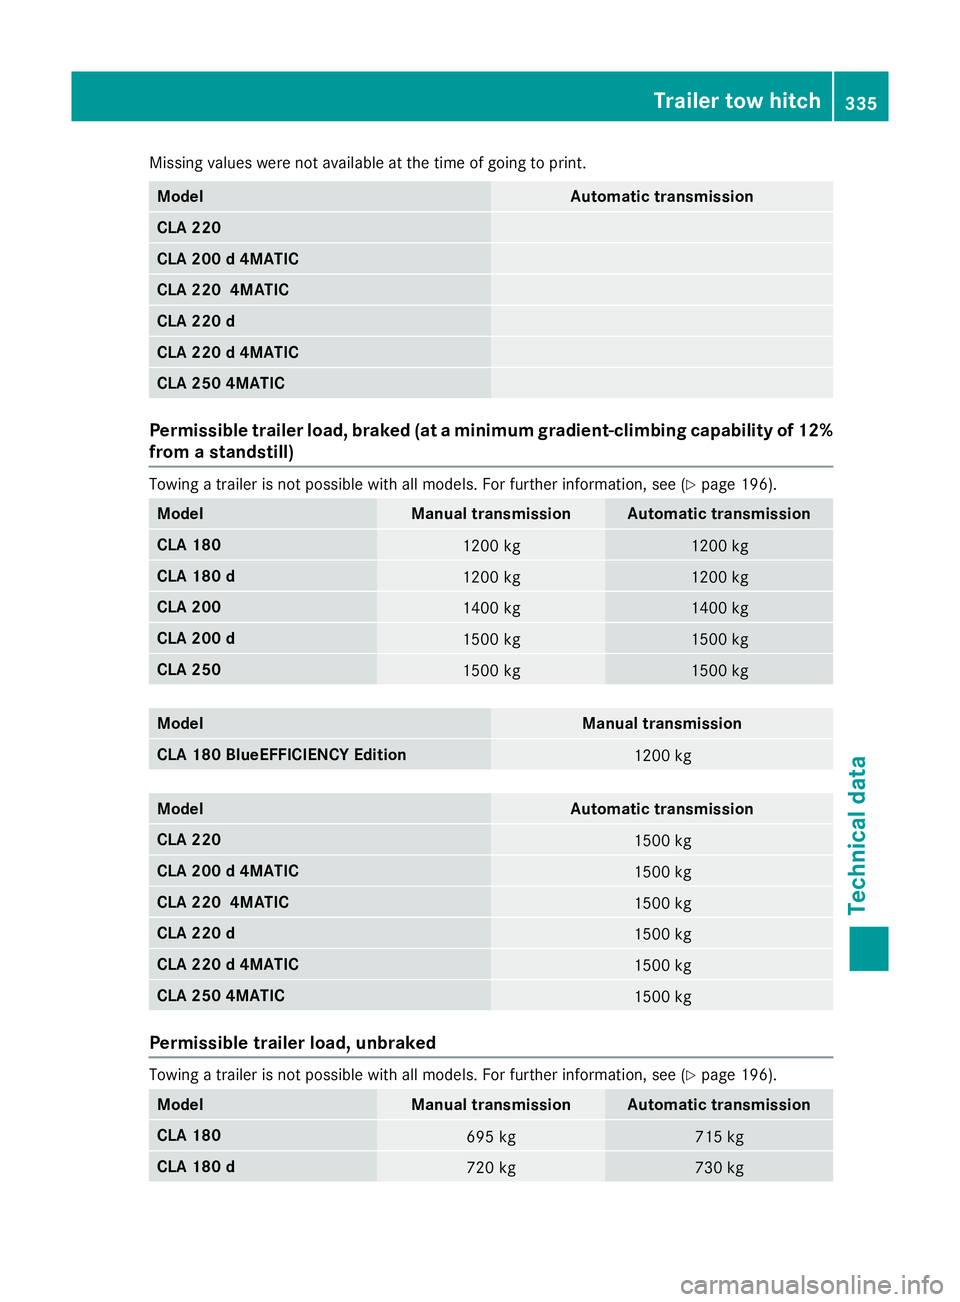
Missing values were not available at the time of going to print.
Model Automatic transmission
CLA 220
CLA 200 d 4MATIC
CLA 220 4MATIC
CLA 220 d
CLA 220 d 4MATIC
CLA 250 4MATIC
Permissible trailer load, braked (at a minimum gradient-climbing capability of 12%
from a standstill) Towing a trailer is not possible with all models. For further information, see (Y
page 196).Model Manual transmission Automatic transmission
CLA 180
1200 kg 1200 kg
CLA 180 d
1200 kg 1200 kg
CLA 200
1400 kg 1400 kg
CLA 200 d
1500 kg 1500 kg
CLA 250
1500 kg 1500 kg
Model Manual transmission
CLA 180 BlueEFFICIENCY Edition
1200 kg
Model Automatic transmission
CLA 220
1500 kg
CLA 200 d 4MATIC
1500 kg
CLA 220 4MATIC
1500 kg
CLA 220 d
1500 kg
CLA 220 d 4MATIC
1500 kg
CLA 250 4MATIC
1500 kg
Permissible trailer load, unbraked
Towing a trailer is not possible with all models. For further information, see (Y
page 196).Model Manual transmission Automatic transmission
CLA 180
695 kg 715 kg
CLA 180 d
720 kg 730 kgTrailer tow hitch
335Technical data Z
Page 339 of 345
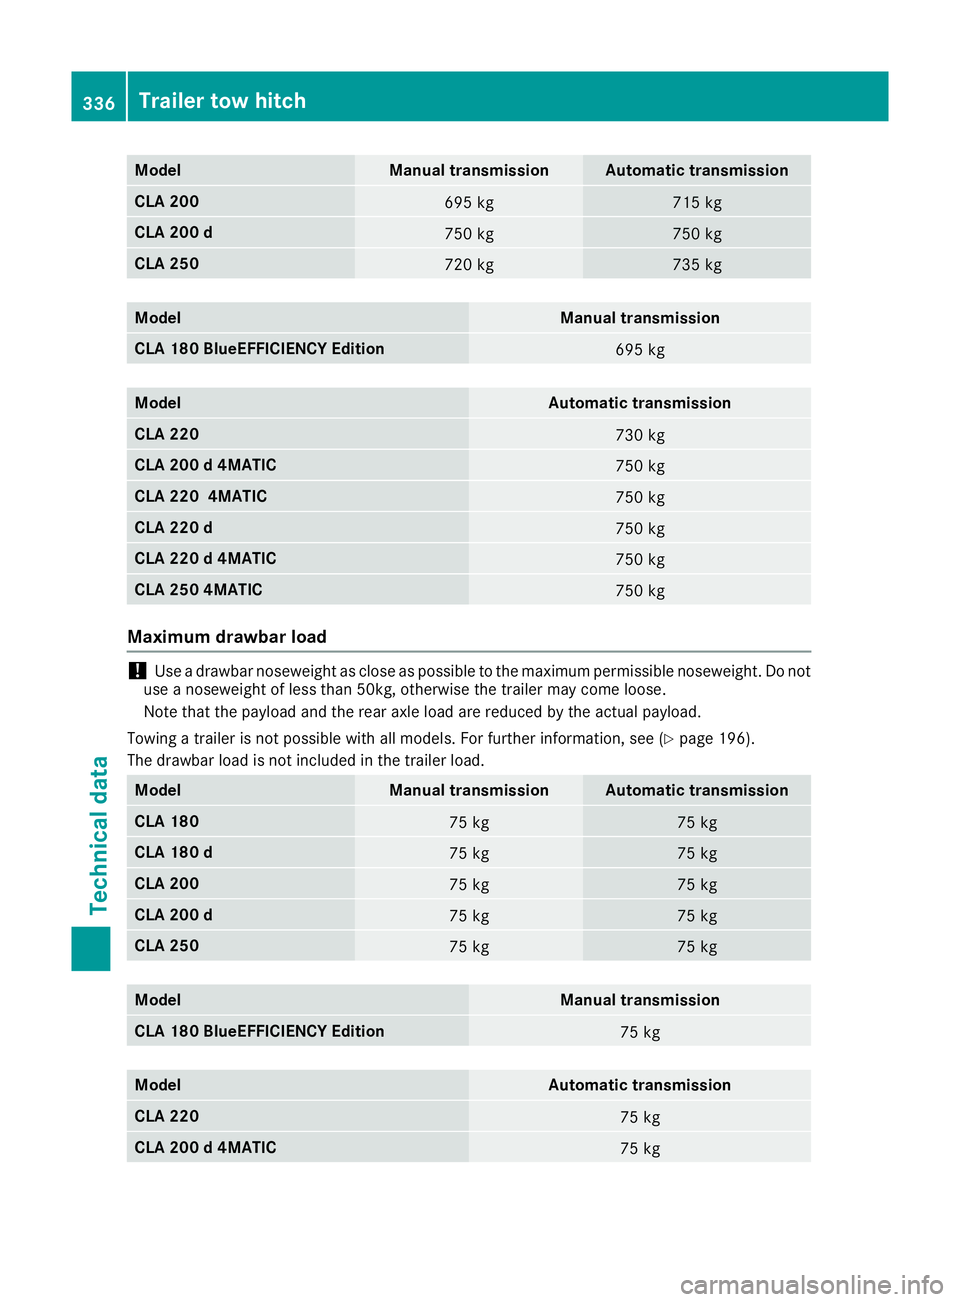
Model Manual transmission Automatic transmission
CLA 200
695 kg 715 kg
CLA 200 d
750 kg 750 kg
CLA 250
720 kg 735 kg
Model Manual transmission
CLA 180 BlueEFFICIENCY Edition
695 kg
Model Automatic transmission
CLA 220
730 kg
CLA 200 d 4MATIC
750 kg
CLA 220 4MATIC
750 kg
CLA 220 d
750 kg
CLA 220 d 4MATIC
750 kg
CLA 250 4MATIC
750 kg
Maximum drawbar load
!
Use a drawbar noseweight as close as possible to the maximum permissible noseweight. Do not
use a noseweight of less than 50kg, otherwise the trailer may come loose.
Note that the payload and the rear axle load are reduced by the actual payload.
Towing a trailer is not possible with all models. For further information, see (Y page 196).
The drawbar load is not included in the trailer load. Model Manual transmission Automatic transmission
CLA 180
75 kg 75 kg
CLA 180 d
75 kg 75 kg
CLA 200
75 kg 75 kg
CLA 200 d
75 kg 75 kg
CLA 250
75 kg 75 kg
Model Manual transmission
CLA 180 BlueEFFICIENCY Edition
75 kg
Model Automatic transmission
CLA 220
75 kg
CLA 200 d 4MATIC
75 kg336
Trailer tow hitchTechnical data
Page 340 of 345
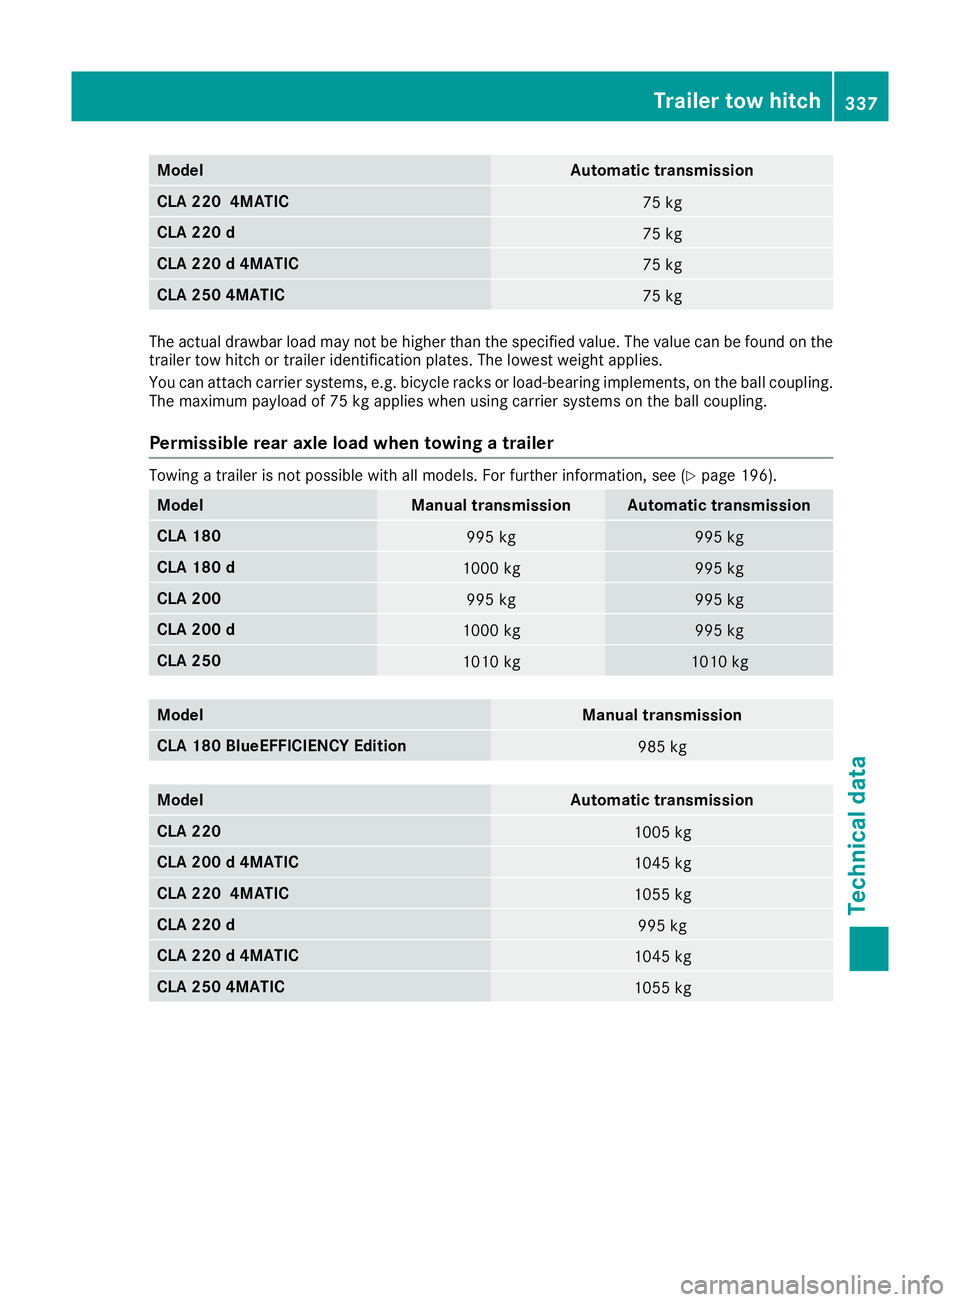
Model Automatic transmission
CLA 220 4MATIC
75 kg
CLA 220 d
75 kg
CLA 220 d 4MATIC
75 kg
CLA 250 4MATIC
75 kg
The actual drawbar load may not be higher than the specified value. The value can be found on the
trailer tow hitch or trailer identification plates. The lowest weight applies.
You can attach carrier systems, e.g. bicycle racks or load-bearing implements, on the ball coupling.
The maximum payload of 75 kg applies when using carrier systems on the ball coupling.
Permissible rear axle load when towing a trailer Towing a trailer is not possible with all models. For further information, see (Y
page 196).Model Manual transmission Automatic transmission
CLA 180
995 kg 995 kg
CLA 180 d
1000 kg 995 kg
CLA 200
995 kg 995 kg
CLA 200 d
1000 kg 995 kg
CLA 250
1010 kg 1010 kg
Model Manual transmission
CLA 180 BlueEFFICIENCY Edition
985 kg
Model Automatic transmission
CLA 220
1005 kg
CLA 200 d 4MATIC
1045 kg
CLA 220 4MATIC
1055 kg
CLA 220 d
995 kg
CLA 220 d 4MATIC
1045 kg
CLA 250 4MATIC
1055 kg Trailer tow hitch
337Technical data Z