2016 MERCEDES-BENZ CLA COUPE fog light bulb
[x] Cancel search: fog light bulbPage 19 of 345

Applying or releasing manuall
y...... 157
Display message ............................ 219
Electric parking brake .................... 157
Emergency braking ........................ 158
General information ....................... 157
Releasing automaticall y................. 158
Warning lamp ................................. 254
Parking lamps
Display message ............................ 229
Switching on/of f........................... 108
Parking Pilot
Cancelling ...................................... 184
Detecting parking spaces .............. 181
Display Message ............................ 235
Exiting a parking space .................. 183
Function/note s............................. 180
Important safety notes .................. 180
Parking .......................................... 182
Towing a trailer .............................. 180
PASSENGER AIR BAG
Display message ............................ 226
Indicator lamps ................................ 40
Problems (malfunctions) ................ 226
Petrol .................................................. 328
Pets in the vehicle ............................... 65
Phone book
See also Digital Owner's Manua l... 259
Plastic trim (cleaning instruc-
tions) .................................................. 290
Power socket
Boot ............................................... 276
Power windows
see Side windows
Pre-Crash Safety System
see PRE-SAFE ®
(anticipatory
occupant protection)
PRE-SAFE ®
(anticipatory occupant
protection)
Operation ......................................... 53
PRE-SAFE ®
(preventive occupant
safety system)
Display message ............................ 223
Protection against theft
ATA (Anti-Theft Alarm system) ......... 73
Immobiliser ...................................... 73
Interior motion sensor ..................... 75
Tow-away protection ........................ 74 Protection of the environment
General notes .................................. 24
Pulling away
Automatic transmission ................. 135
General notes ................................ 135
Hill start assist ............................... 136
Manual transmission ...................... 135
Trailer ............................................ 136 Q
QR code Mercedes-Benz Guide App ................. 1
Rescue card ..................................... 28
Qualified specialist workshop ........... 27 R
RACE START important safety notes ................... 174
RACE START (Mercedes-AMG vehi-
cles) .................................................... 174
RACETIMER (on-board computer) .... 214
Radio
Selecting a station ......................... 206
see separate operating instructions
Radio mode
See also Digital Owner's Manua l... 259
Radio-based vehicle components
Declaration of conformity ................ 26
Rain closing feature (panorama
sliding sunroof) ................................... 94
Reading lamp ..................................... 110
Rear bench seat
Folding the backrest forwards/
back ............................................... 271
Rear compartment
Setting the air vents ...................... 131
Rear foglamp
Changing the bulb .......................... 113
Display message ............................ 229
Switching on/of f........................... 108
Rear lamps
see Lights
Rear window heating
Problem (fault) ............................... 124
Switching on/of f........................... 124 16
Index
Page 115 of 345

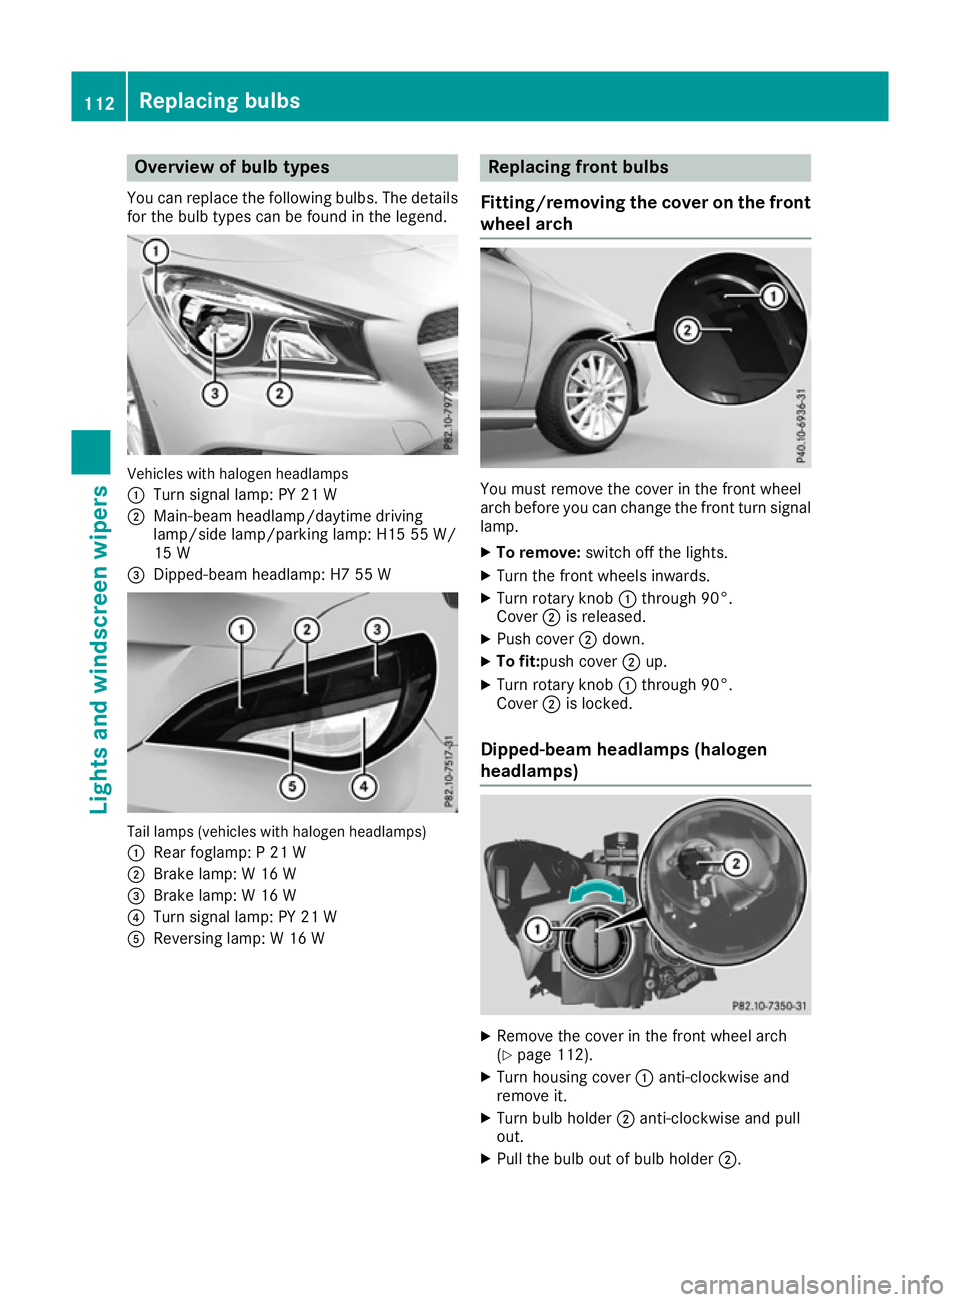
Overview of bulb types
You can replace the following bulbs. The details
for the bulb types can be found in the legend. Vehicles with halogen headlamps
:
Turn signal lamp: PY 21 W
; Main-beam headlamp/daytime driving
lamp/side lamp/parking lamp: H15 55 W/
15 W
= Dipped-beam headlamp: H7 55 W Tail lamps (vehicles with halogen headlamps)
: Rear foglamp: P 21 W
; Brake lamp: W 16 W
= Brake lamp: W 16 W
? Turn signal lamp: PY 21 W
A Reversing lamp: W 16 W Replacing front bulbs
Fitting/removing the cover on the front wheel arch You must remove the cover in the front wheel
arch before you can change the front turn signal
lamp.
X To remove: switch off the lights.
X Turn the front wheels inwards.
X Turn rotary knob :through 90°.
Cover ;is released.
X Push cover ;down.
X To fit:push cover ;up.
X Turn rotary knob :through 90°.
Cover ;is locked.
Dipped-beam headlamps (halogen
headlamps) X
Remove the cover in the front wheel arch
(Y page 112).
X Turn housing cover :anti-clockwise and
remove it.
X Turn bulb holder ;anti-clockwise and pull
out.
X Pull the bulb out of bulb holder ;.112
Replacing bulbsLights and windscreen wipers
Page 117 of 345

X
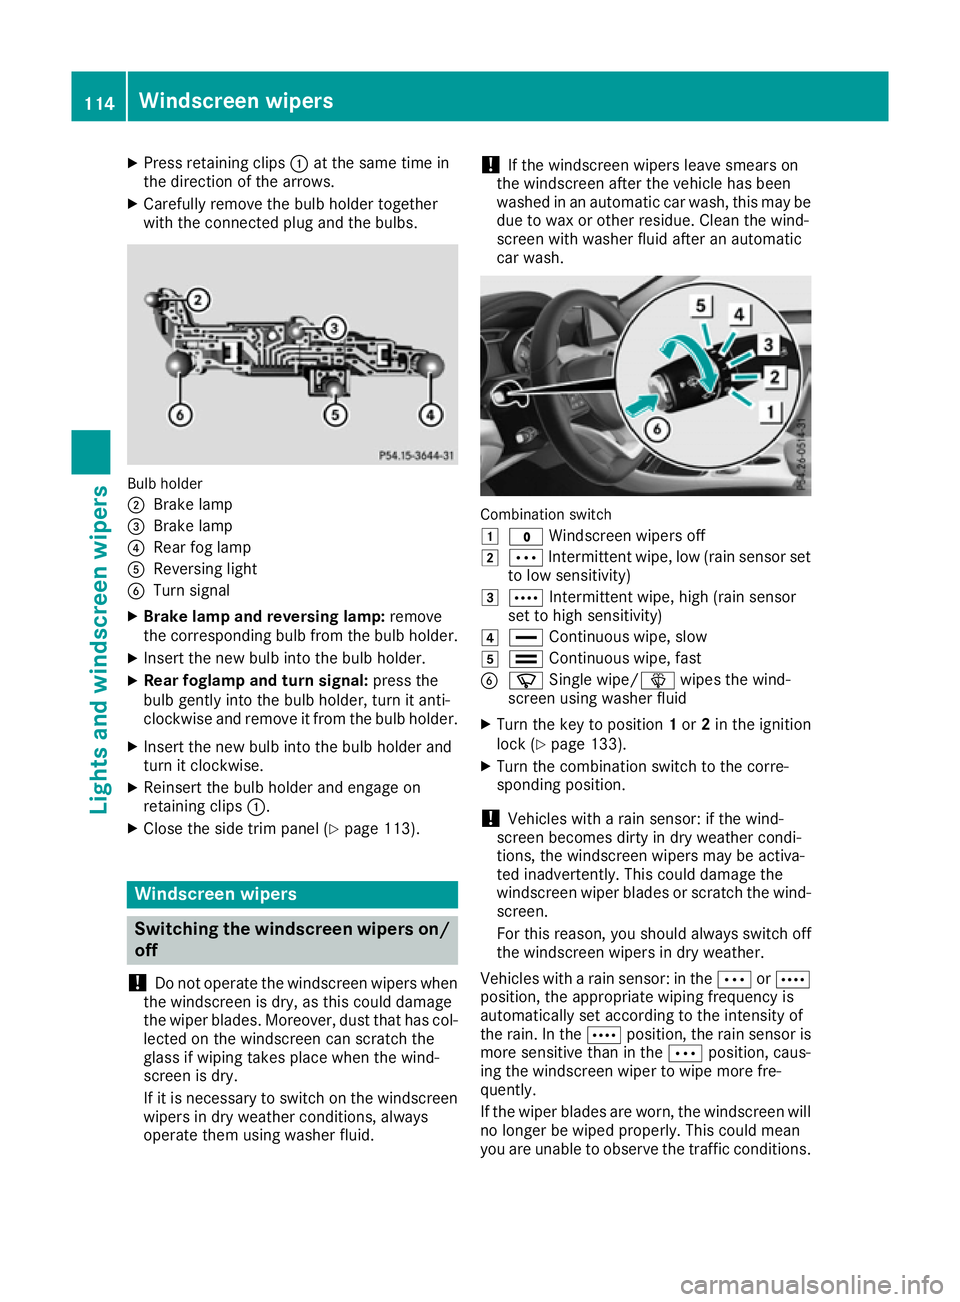
Press retaining clips :at the same time in
the direction of the arrows.
X Carefully remove the bulb holder together
with the connected plug and the bulbs. Bulb holder
;
Brake lamp
= Brake lamp
? Rear fog lamp
A Reversing light
B Turn signal
X Brake lamp and reversing lamp: remove
the corresponding bulb from the bulb holder.
X Insert the new bulb into the bulb holder.
X Rear foglamp and turn signal: press the
bulb gently into the bulb holder, turn it anti-
clockwise and remove it from the bulb holder.
X Insert the new bulb into the bulb holder and
turn it clockwise.
X Reinsert the bulb holder and engage on
retaining clips :.
X Close the side trim panel (Y page 113).Windscreen wipers
Switching the windscreen wipers on/
off
! Do not operate the windscreen wipers when
the windscreen is dry, as this could damage
the wiper blades. Moreover, dust that has col-
lected on the windscreen can scratch the
glass if wiping takes place when the wind-
screen is dry.
If it is necessary to switch on the windscreen wipers in dry weather conditions, always
operate them using washer fluid. !
If the windscreen wipers leave smears on
the windscreen after the vehicle has been
washed in an automatic car wash, this may be
due to wax or other residue. Clean the wind-
screen with washer fluid after an automatic
car wash. Combination switch
1
$ Windscreen wipers off
2 Ä Intermittent wipe, low (rain sensor set
to low sensitivity)
3 Å Intermittent wipe, high (rain sensor
set to high sensitivity)
4 ° Continuous wipe, slow
5 ¯ Continuous wipe, fast
B í Single wipe/î wipes the wind-
screen using washer fluid
X Turn the key to position 1or 2in the ignition
lock (Y page 133).
X Turn the combination switch to the corre-
sponding position.
! Vehicles with a rain sensor: if the wind-
screen becomes dirty in dry weather condi-
tions, the windscreen wipers may be activa-
ted inadvertently. This could damage the
windscreen wiper blades or scratch the wind- screen.
For this reason, you should always switch off
the windscreen wipers in dry weather.
Vehicles with a rain sensor: in the ÄorÅ
position, the appropriate wiping frequency is
automatically set according to the intensity of
the rain. In the Åposition, the rain sensor is
more sensitive than in the Äposition, caus-
ing the windscreen wiper to wipe more fre-
quently.
If the wiper blades are worn, the windscreen will
no longer be wiped properly. This could mean
you are unable to observe the traffic conditions. 114
Windscreen wipersLights and windscreen wipers