2016 MERCEDES-BENZ CLA COUPE fuel type
[x] Cancel search: fuel typePage 20 of 345
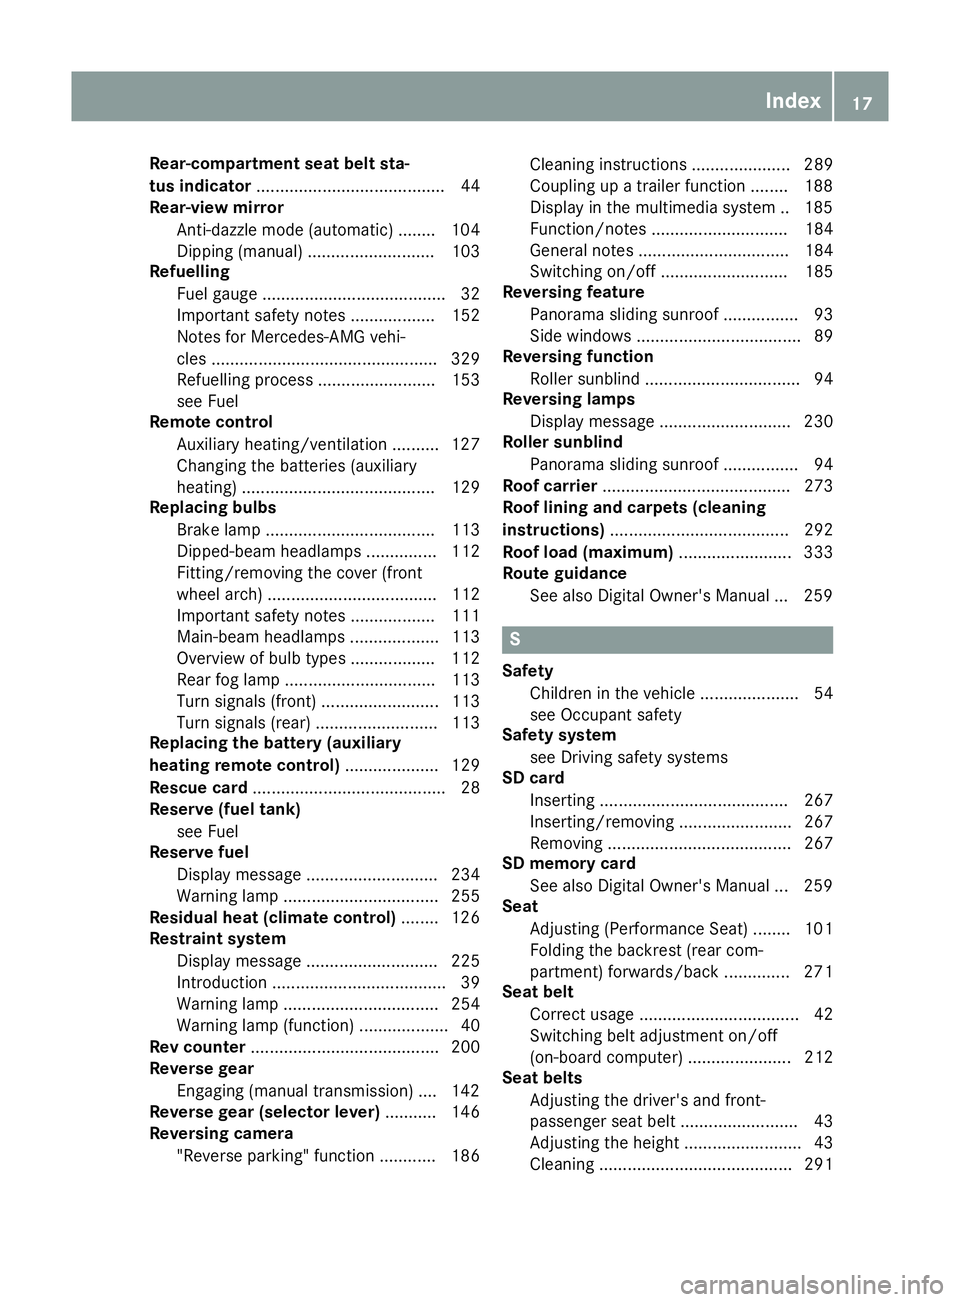
Rear-compartment seat belt sta-
tus indicator
........................................ 44
Rear-view mirror
Anti-dazzle mode (automatic) ........ 104
Dipping (manual) ........................... 103
Refuelling
Fuel gaug e....................................... 32
Important safety notes .................. 152
Notes for Mercedes‑ AMG vehi-
cles ................................................ 329
Refuelling process ......................... 153
see Fuel
Remote control
Auxiliary heating/ventilation .......... 127
Changing the batteries (auxiliary
heating) ......................................... 129
Replacing bulbs
Brake lamp .................................... 113
Dipped-beam headlamp s............... 112
Fitting/removing the cover (front
wheel arch) .................................... 112
Important safety notes .................. 111
Main-beam headlamp s................... 113
Overview of bulb types .................. 112
Rear fog lamp ................................ 113
Turn signals (front) ......................... 113
Turn signals (rear) .......................... 113
Replacing the battery (auxiliary
heating remote control) .................... 129
Rescue card ......................................... 28
Reserve (fuel tank)
see Fuel
Reserve fuel
Display message ............................ 234
Warning lamp ................................. 255
Residual heat (climate control) ........ 126
Restraint system
Display message ............................ 225
Introduction ..................................... 39
Warning lamp ................................. 254
Warning lamp (function) ................... 40
Rev counter ........................................ 200
Reverse gear
Engaging (manual transmission) .... 142
Reverse gear (selector lever) ........... 146
Reversing camera
"Reverse parking" function ............ 186 Cleaning instructions ..................... 289
Coupling up a trailer function ........ 188
Display in the multimedia system .. 185
Function/note s............................. 184
General notes ................................ 184
Switching on/of f........................... 185
Reversing feature
Panorama sliding sunroo f................ 93
Side windows ................................... 89
Reversing function
Roller sunblind ................................. 94
Reversing lamps
Display message ............................ 230
Roller sunblind
Panorama sliding sunroo f................ 94
Roof carrier ........................................ 273
Roof lining and carpets (cleaning
instructions) ...................................... 292
Roof load (maximum) ........................ 333
Route guidance
See also Digital Owner's Manua l... 259 S
Safety Children in the vehicle ..................... 54
see Occupant safety
Safety system
see Driving safety systems
SD card
Inserting ........................................ 267
Inserting/removing ........................ 267
Removing ....................................... 267
SD memory card
See also Digital Owner's Manua l... 259
Seat
Adjusting (Performance Seat) ........ 101
Folding the backrest (rear com-
partment) forwards/back .............. 271
Seat belt
Correct usage .................................. 42
Switching belt adjustment on/off
(on-board computer) ...................... 212
Seat belts
Adjusting the driver's and front-
passenger seat belt ......................... 43
Adjusting the height ......................... 43
Cleaning ......................................... 291 Index
17
Page 25 of 345
Vehicle dimensions
........................... 333
Vehicle emergency locking ................ 85
Vehicle identification number
see VIN
Vehicle identification plate .............. 326
Vehicle tool kit .................................. 294
Ventilation
Setting the vents ........................... 130
Video
Operating the DVD ......................... 206
See also Digital Owner's Manua l... 259
VIN
Seat ............................................... 327
Type plate ...................................... 326 W
Warning and indicator lamps ABS ................................................ 250
Active Brake Assist ........................ 257
Brakes ........................................... 249
Distance warning signal ................. 257
ESP ®
.............................................. 252
ESP ®
OFF ....................................... 253
Fuel tank ........................................ 255
LIM (cruise control) ........................ 163
LIM (Distance Pilot DISTRONIC) .... 168
LIM (variable limiter) ...................... 165
Overview .......................................... 32
PASSENGER AIR BAG ...................... 40
Reserve fue l................................... 255
Seat belt ........................................ 248
Tyre pressure monitor ................... 258
Warning triangle ................................ 293
Washer fluid
Display message ............................ 246
Weather display (COMAND Online)
See also Digital Owner's Manua l... 259
Wheel and tyre combinations
Tyres .............................................. 323
Wheel bolt tightening torque ........... 322
Wheel chock ...................................... 319
Wheels
Changing a whee l.......................... 318
Changing/replacing ....................... 318
Checking ........................................ 310
Cleaning ......................................... 288
Emergency spare whee l................. 323 Fitting a new wheel ........................ 321
Important safety notes .................. 310
Information on driving .................... 310
Removing a whee
l.......................... 321
Storing ........................................... 319
Tightening torque ........................... 322
Wheel size/tyre size ...................... 323
Windowbag
Display message ............................ 225
Operation ......................................... 46
Windows
Cleaning ......................................... 288
see Side windows
Windscreen
Demisting ...................................... 123
Windscreen washer system
Important safety notes .................. 332
Topping up ..................................... 284
Windscreen wipers
Display message ............................ 246
Problem (malfunction) ................... 116
Replacing the wiper blades ............ 115
Switching on/of f........................... 114
Winter driving
General notes ................................ 312
Winter operation
Slippery road surfaces ................... 162
Snow chains .................................. 313
Winter tyres
Limiting the speed (on-board com-
puter) ............................................. 211
M+S tyre s...................................... 312
Wiper blades
Cleaning ......................................... 288
Important safety notes .................. 115
Wooden trim (cleaning instruc-
tions) .................................................. 291
Workshop
see Qualified specialist workshop Z
ZONE function Switching on/of f........................... 123 22
Index
Page 56 of 345

on the front-passenger side deploys under the
following conditions:
- an occupant is detected in the front-
passenger seat or
- the seat belt buckle tongue is engaged in
the belt buckle of the front-passenger seat
R Windowbag on the side on which an impact
occurs, independently of seat belt usage and
regardless of whether the front-passenger
seat is occupied
R Seat belt tensioners, if the system determines
that deployment can offer additional protec-
tion for the vehicle occupants in this situation
i Not all airbags are deployed in an accident.
The different airbag systems work independ-
ently of each other.
How the airbag system works is determined
by the severity of the accident detected,
especially the vehicle deceleration or accel-
eration, and the apparent type of accident:
R frontal collision
R side impact PRE-SAFE
®
(anticipatory occupant
protection)
Introduction In certain hazardous situations, PRE-SAFE
®
takes pre-emptive measures to protect the vehi-
cle occupants.
Important safety notes !
Make sure that there are no objects in the
footwell or behind the seats. There is a risk
that the seats and/or the objects could be
damaged when PRE-SAFE ®
is activated.
Although your vehicle is equipped with PRE-
SAFE ®
, the possibility of injury in the event of an
accident cannot be ruled out. Always adapt your
driving style to suit the prevailing road and
weather conditions and maintain a safe distance from the vehicle in front. Drive carefully. Function PRE-SAFE
®
intervenes:
R in emergency braking situations, e.g. when
BAS is activated
R in critical driving situations, e.g. when physi-
cal limits are exceeded and the vehicle under- steers or oversteers severely
R when active Brake Assist intervenes power-
fully
PRE-SAFE ®
takes the following measures
depending on the hazardous situation detected:
R the front seat belts are pre-tensioned.
R if the vehicle skids, the side windows and the
panorama sliding sunroof are closed.
R vehicles with the memory function: the front-
passenger seat is adjusted if it is in an unfav-
ourable position.
If the hazardous situation passes without result- ing in an accident, PRE-SAFE ®
slackens the belt
pre-tensioning. All settings made by PRE-SAFE ®
can then be reversed.
If the seat belt pre-tensioning is not reduced:
X Move the seat backrest or seat back slightly
when the vehicle is stationary.
Seat belt pre-tensioning is reduced and the
locking mechanism is released.
The seat-belt adjustment is an integral part of
the PRE-SAFE ®
convenience function. Informa-
tion about the convenience function can be
found under "Belt adjustment" (Y page 43). Automatic measures after an acci-
dent
Immediately after an accident, the following
measures may be implemented, depending on
the type and severity of the impact: R the hazard warning lamps are activated
R the emergency lighting is activated
R the vehicle doors are unlocked
R the front side windows are lowered
R the engine is switched off and the fuel supply
is cut off
R vehicles with the Mercedes-Benz emergency
call system: automatic emergency call Occupant safety
53Safety Z
Page 157 of 345
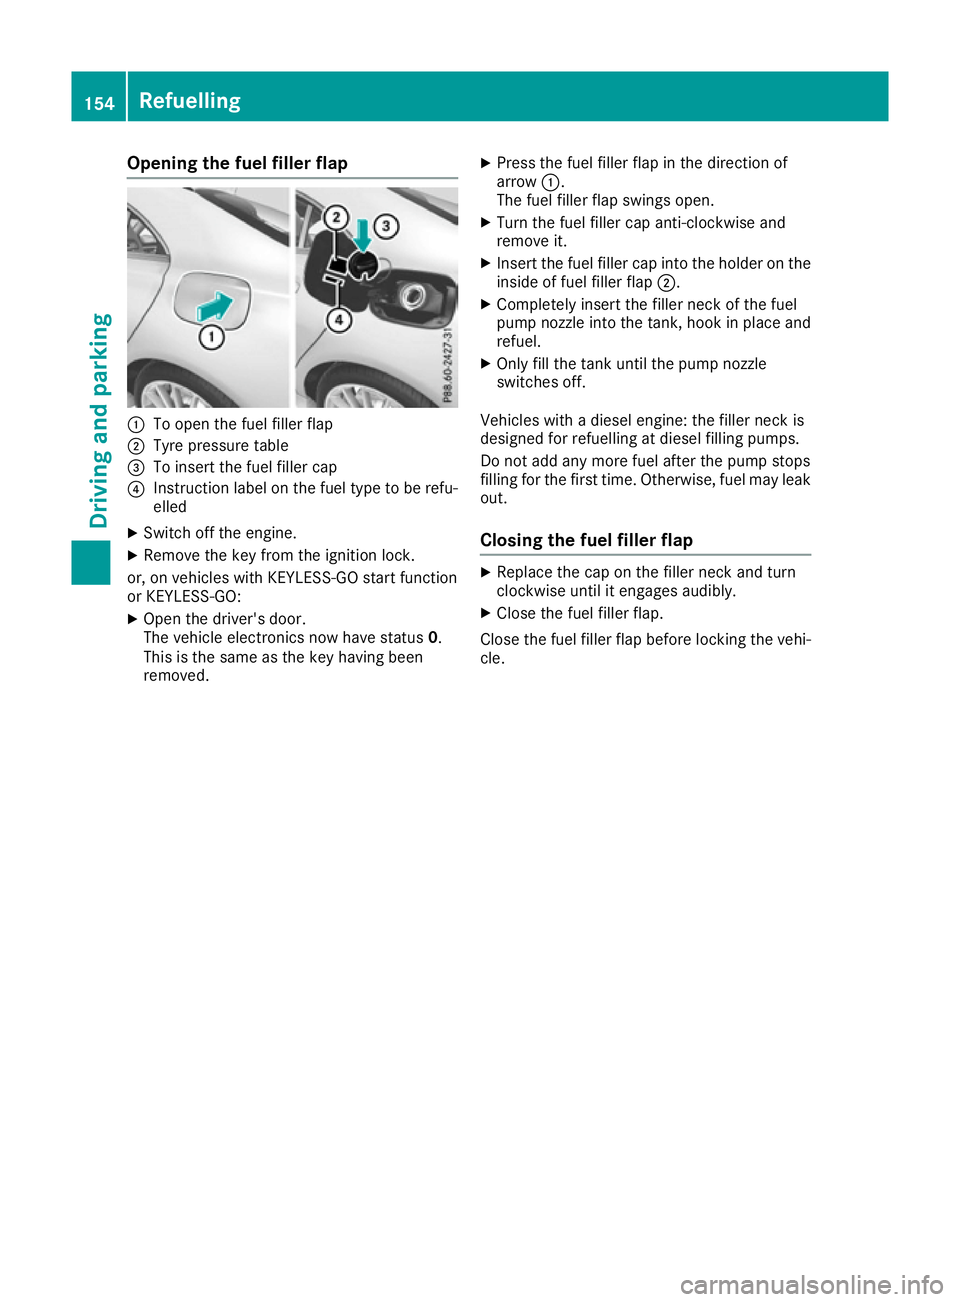
Opening the fuel filler flap
:
To open the fuel filler flap
; Tyre pressure table
= To insert the fuel filler cap
? Instruction label on the fuel type to be refu-
elled
X Switch off the engine.
X Remove the key from the ignition lock.
or, on vehicles with KEYLESS-GO start function
or KEYLESS‑GO: X Open the driver's door.
The vehicle electronics now have status 0.
This is the same as the key having been
removed. X
Press the fuel filler flap in the direction of
arrow :.
The fuel filler flap swings open.
X Turn the fuel filler cap anti-clockwise and
remove it.
X Insert the fuel filler cap into the holder on the
inside of fuel filler flap ;.
X Completely insert the filler neck of the fuel
pump nozzle into the tank, hook in place and refuel.
X Only fill the tank until the pump nozzle
switches off.
Vehicles with a diesel engine: the filler neck is
designed for refuelling at diesel filling pumps.
Do not add any more fuel after the pump stops
filling for the first time. Otherwise, fuel may leak out.
Closing the fuel filler flap X
Replace the cap on the filler neck and turn
clockwise until it engages audibly.
X Close the fuel filler flap.
Close the fuel filler flap before locking the vehi-
cle. 154
RefuellingDriving and parking
Page 199 of 345

not exceed the maximum permissible speed for
your vehicle/trailer combination. Notes on towing a trailer
General notes Trailer towing is not possible on the following
models:
R CLA 180 d BlueEFFICIENCY Edition
R CLA 250 Sport
R CLA 250 Sport 4MATIC
R Mercedes‑AMG CLA 45 4MATIC
When towing a trailer, set the tyre pressure on
the rear axle of the towing vehicle for the max-
imum load. Further information on the tyre pres-
sure table in the fuel filler flap (Y page 313).
Please note that when towing a trailer, the fol-
lowing driving systems have limited availability
or are not available at all.
R Parking Assist PARKTRONIC (Y page 177)
R Blind Spot Assist (Y page 192)
The height of the ball coupling changes with the
load of the vehicle. If necessary, use a trailer
with a height-adjustable drawbar.
You will find fitting dimensions and loads under "Technical data" (Y page 334).
Driving tips Observe the notes on ESP
®
trailer stabilisation
(Y page 72).
The maximum permissible speed for vehicle/
trailer combinations depends on the type of
trailer. Before beginning the journey, check the
trailer's documents to see what the maximum
permitted speed is. Observe the legally prescri-
bed maximum speed in the relevant country.
For certain Mercedes-Benz vehicles, the maxi-
mum permissible rear axle load is increased
when towing a trailer. See the "Technical data"
section to find out whether this applies to your
vehicle. If you utilise any of the added maximum rear axle load when towing a trailer, the vehicle/
trailer combination may not exceed a maximum speed of 100 km/h for reasons concerning the
operating permit. This also applies in countries
in which the permissible maximum speed for
vehicle/trailer combinations is above
100 km/h. When towing a trailer, your vehicle's handling
characteristics will be different to when driving
without a trailer and the vehicle will consume
more fuel.
Shift into a lower gear in good time on long and steep downhill gradients. For vehicles with auto-
matic transmission, you need to have selected
manual drive program M(Y page 150).
This also applies if you have activated cruise
control, SPEEDTRONIC or Distance Pilot
DISTRONIC.
This will use the braking effect of the engine, so
less braking will be required to maintain the
vehicle speed. This relieves the load on the
brake system and prevents the brakes from
overheating and wearing too quickly. If you need additional braking, depress the brake pedal
repeatedly rather than continuously.
Briefly depressing the accelerator pedal on
downhill gradients while the manual drive pro-
gram Mis temporarily activated (vehicles with
automatic transmission): the automatic trans-
mission may switch back to the last active auto-
matic drive program Eor S. The automatic trans-
mission may shift to a higher gear. This can
reduce the engine's braking effect.
Driving tips R
Maintain a greater distance to the vehicle in
front than when driving without a trailer.
R Avoid braking abruptly. If possible, brake gen-
tly at first to allow the trailer to run on. Then,
increase the braking force rapidly.
R The values given for gradient-climbing capa-
bilities from a standstill refer to sea level.
When driving in mountainous areas, note that
the power output of the engine, and conse-
quently the vehicle's gradient-climbing capa-
bility from a standstill, decrease with increas-
ing altitude.
If the trailer swings from side to side:
X Do not accelerate under any circumstances
X Do not countersteer
X Brake, if necessary 196
Towing a trailerDriving an
d parking
Page 258 of 345
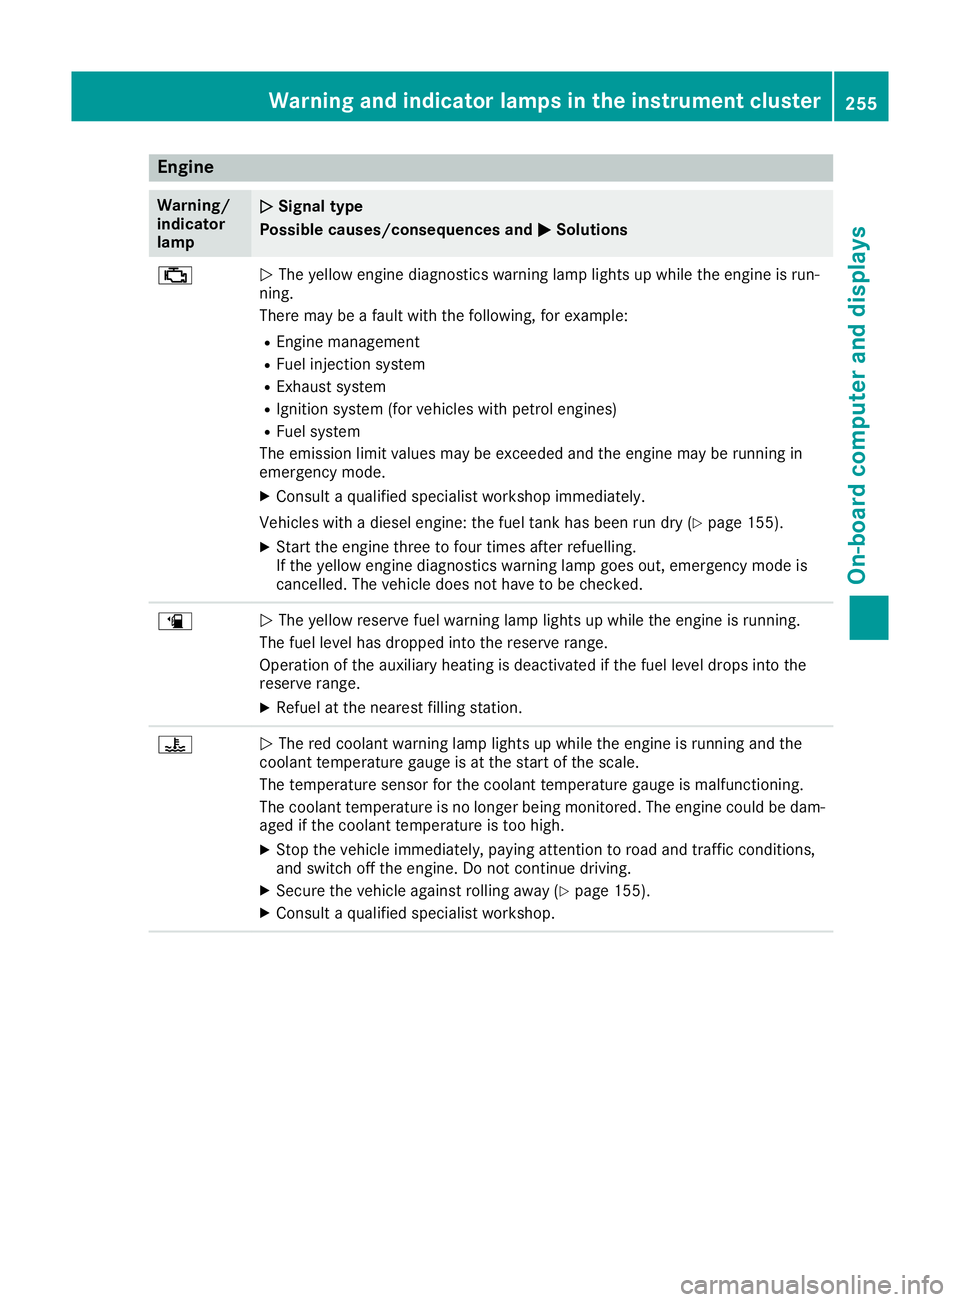
Engine
Warning/
indicator
lamp
N N
Signal type
Possible causes/consequences and M
MSolutions ;
N
The yellow engine diagnostics warning lamp lights up while the engine is run-
ning.
There may be a fault with the following, for example:
R Engine management
R Fuel injection system
R Exhaust system
R Ignition system (for vehicles with petrol engines)
R Fuel system
The emission limit values may be exceeded and the engine may be running in
emergency mode.
X Consult a qualified specialist workshop immediately.
Vehicles with a diesel engine: the fuel tank has been run dry (Y page 155).
X Start the engine three to four times after refuelling.
If the yellow engine diagnostics warning lamp goes out, emergency mode is
cancelled. The vehicle does not have to be checked. æ
N
The yellow reserve fuel warning lamp lights up while the engine is running.
The fuel level has dropped into the reserve range.
Operation of the auxiliary heating is deactivated if the fuel level drops into the
reserve range.
X Refuel at the nearest filling station. ?
N
The red coolant warning lamp lights up while the engine is running and the
coolant temperature gauge is at the start of the scale.
The temperature sensor for the coolant temperature gauge is malfunctioning.
The coolant temperature is no longer being monitored. The engine could be dam-
aged if the coolant temperature is too high.
X Stop the vehicle immediately, paying attention to road and traffic conditions,
and switch off the engine. Do not continue driving.
X Secure the vehicle against rolling away (Y page 155).
X Consult a qualified specialist workshop. Warning and indicator lamps in the instrument cluster
255On-board computer and displays Z
Page 313 of 345
Important safety notes
G
WARNING
If wheels and tyres of the wrong size are used, the wheel brakes or suspension components
may be damaged. There is a risk of an acci-
dent.
Always replace wheels and tyres with those
that fulfil the specifications of the original
part.
When replacing wheels, make sure to fit the
correct:
R designation
R type
When replacing tyres, make sure to fit the
correct:
R designation
R manufacturer
R type G
WARNING
A flat tyre severely impairs the driving, steer-
ing and braking characteristics of the vehicle.
There is a risk of accident.
Tyres without run-flat characteristics:
R do not drive with a flat tyre.
R immediately replace the flat tyre with your
emergency spare wheel or spare wheel, or
consult a qualified specialist workshop.
Tyres with run-flat characteristics:
R pay attention to the information and warn-
ing notices on MOExtended tyres (tyres
with run-flat characteristics).
Accessories that are not approved for your vehi-
cle by Mercedes-Benz or are not being used cor- rectly can impair operating safety.
Before purchasing and using non-approved
accessories, visit a qualified specialist work-
shop and enquire about:
R suitability
R legal stipulations
R factory recommendations Further information regarding wheels and tyres
can be found under "Wheel/tyre combinations"
(Y page 323).
You can ask for information regarding permitted
wheel/tyre combinations at a Mercedes-Benz
Service Centre.
Information on tyre pressures can be found:
R in the tyre pressure table in the fuel filler flap
(Y page 154)
R under "Tyre pressure" (Y page 313)
Modification work on the brake system and
wheels is not permitted. The use of spacers or
brake dust shields is not permitted. This inva-
lidates the general operating permit for the vehi- cle.
i Further information on wheels and tyres can
be obtained at any qualified specialist work-
shop. Operation
Information on driving
Check the tyre pressure when the vehicle is
heavily laden and adjust prior to a trip.
While driving, pay attention to vibrations, noises
and unusual handling characteristics, e.g. pull-
ing to one side. This may indicate that the
wheels or tyres are damaged. If you suspect that a tyre is defective, reduce your speed immedi-
ately. Stop the vehicle as soon as possible to
check the wheels and tyres for damage. Hidden
tyre damage could also be causing the unusual
handling characteristics. If you find no signs of
damage, have the tyres and wheels checked at a qualified specialist workshop.
When parking your vehicle, make sure not to
squash the tyre. If you cannot avoid driving over
obstacles, e.g. kerbs, do so slowly and at an
obtuse angle only. You could otherwise damage the wheel rims and tyres. Regular checking of wheels and tyres
G
WARNING
Damaged tyres can cause tyre inflation pres-
sure loss. As a result, you could lose control of your vehicle. There is a risk of accident. 310
OperationWheels and ty
res
Page 320 of 345
message is shown instead of the tyre pressure
display. The tyre pressures are already being
monitored.
After an emergency spare wheel has been fitted,
the system may still display the tyre pressure of the removed wheel for a few minutes. If this
occurs, note that the value displayed for the
position where the spare wheel is fitted is not
the same as the current tyre pressure of the
emergency spare wheel.
Warning messages of the tyre pressure monitor If the tyre pressure monitor detects a pressure
loss in one or more tyres, a warning message is
shown in the multifunction display. The yellow
tyre pressure warning lamp then lights up:
R If the Please correct tyre pressure
Please correct tyre pressure
message appears in the multifunction display,
the tyre pressure in at least one tyre is too
low. The tyre pressure must be corrected
when the opportunity arises.
R If the Tyre Tyre pressure
pressure Check
Checktyre(s)
tyre(s) mes-
sage appears in the multifunction display, the tyre pressure in one or more tyres has drop-
ped significantly. The tyres must be checked.
R If the Tyre pressure Caution Tyre mal‐
Tyre pressure Caution Tyre mal‐
function
function message appears in the multifunc-
tion display, the tyre pressure in one or more tyres has dropped suddenly. The tyres must
be checked.
Observe the instructions and safety notes in the display messages in the "Tyres" section
(Y page 239).
If the position of the wheels on the vehicle is
changed, the tyre pressures may be displayed in the wrong positions for a short time. After a few
minutes of driving, this is rectified and the tyre
pressures are displayed in the correct positions.
Restarting the tyre pressure monitor When you restart the tyre pressure monitor, all
existing warning messages are deleted and the
warning lamps go out. The monitor uses the cur-
rently set tyre pressures as the reference values for monitoring. In most cases, the tyre pressure
monitor will automatically detect the new refer- ence values after you have changed the tyre
pressure. However, you can also set reference
values manually as described here. The tyre
pressure monitor then monitors the new tyre
pressure values. X
Use the table on the inside of the fuel filler flap
to ensure that the tyre pressure is set cor-
rectly in all four tyres for the current operating conditions.
Also observe the notes in the section on tyre
pressures (Y page 313).
X Make sure that the key is in position 2in the
ignition lock (Y page 133).
X Press =or; on the steering wheel to
select the Serv.
Serv.menu.
X Press the 9or: button to select
Tyre pressure Tyre pressure.
X Press the abutton.
The multifunction display shows the current
tyre pressure for each tyre or the Tyre Tyrepres‐
pres‐
sures
sures will
willbe
bedisplayed
displayed after
aftera
afew
few
minutes of driving
minutes of driving message.
X Press the :button.
The multifunction display shows the Use
Use
current pressures as new reference
current pressures as new reference
values values message.
If you wish to confirm the restart: X Press the abutton.
The Tyre
Tyre press.
press. monitor
monitor restarted
restarted mes-
sage appears in the multifunction display.
After you have driven for a few minutes, the
system checks whether the current tyre pres-
sures are within the specified range. The new tyre pressures are then accepted as refer-
ence values and monitored.
If you wish to cancel the restart:
X Press the %button.
The tyre pressure values stored at the last
restart will continue to be monitored.
Radio type approval for the tyre pres-
sure monitor Country Radio type approval number
Argentina MW2433A
H-12337
GG4
H-12338
Brazil 2770-12-8001
Model: MW2433A
0381-13-8001
Model: GG4 Tyre pressure
317Wheels and tyres Z