2016 MERCEDES-BENZ CLA COUPE fold seats
[x] Cancel search: fold seatsPage 40 of 345
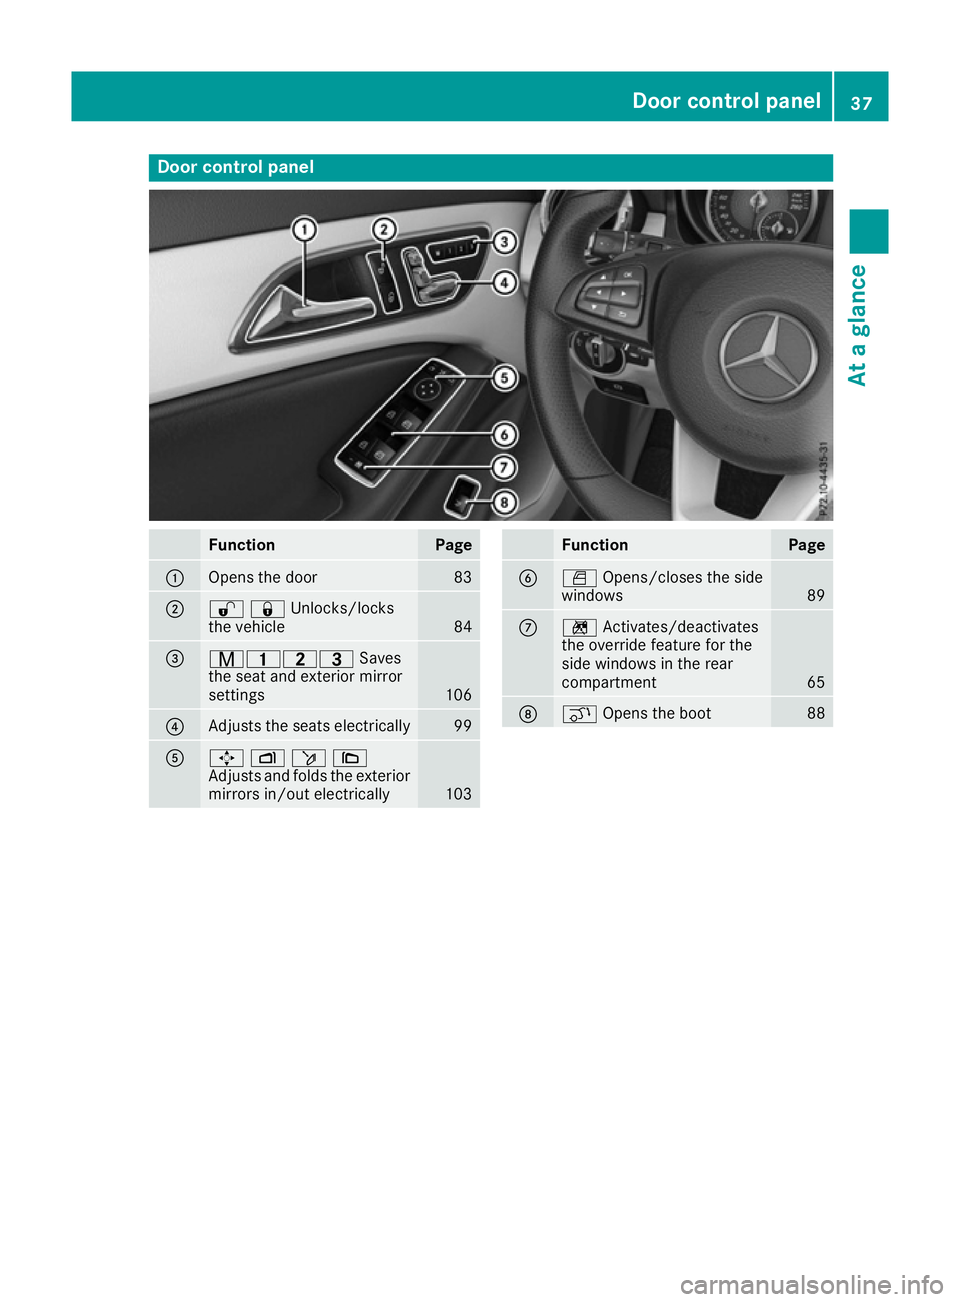
Door control panel
Function Page
:
Opens the door 83
;
%&Unlocks/locks
the vehicle
84
=
r45=
Saves
the seat and exterior mirror
settings 106
?
Adjusts the seats electrically 99
A
7
Zö\
Adjusts and folds the exterior
mirrors in/out electrically 103 Function Page
B
W
Opens/closes the side
windows 89
C
n
Activates/deactivates
the override feature for the
side windows in the rear
compartment 65
D
q
Opens the boot 88Door control panel
37At a glance
Page 57 of 345
Children in the vehicle
Important safety notes
Accident statistics show that children secured
in the rear seats are safer than children secured in the front seats. For this reason, Mercedes-
Benz strongly advises that you fit a child
restraint system on a rear seat. Children are
generally better protected there.
If a child younger than twelve years old and
under 1.50 min height is travelling in the vehi-
cle:
R always secure the child in a child restraint
system suitable for Mercedes-Benz vehicles.
The child restraint system must be appropri-
ate to the age, weight and size of the child.
R be sure to observe the instructions and safety
notes in this section in addition to the child
restraint system manufacturer's installation
instructions
R be sure to observe the instructions and safety
notes on the automatic front-passenger front airbag deactivation system (Y page 47).G
WARNING
If you leave children unattended in the vehi-
cle, they may be able to set the vehicle in
motion if, for example, they:
R release the parking brake
R shift the automatic transmission out of park
position Por shift manual transmission into
neutral
R start the engine
In addition, they may operate vehicle equip-
ment and become trapped. There is a risk of
an accident and injury.
When leaving the vehicle, always take the key with you and lock the vehicle. Never leave
children unattended in the vehicle. G
WARNING
If persons (particularly children) are exposed
to heat or cold for a prolonged period, there is a risk of serious or even fatal injuries. Never
leave persons (particularly children) unatten-
ded in the vehicle. G
WARNING
If the child restraint system is placed in direct sunlight, the parts could become very hot.
Children could be suffer burns by touching
these parts, in particular on the metallic parts
of the child restraint system. There is a risk of injury.
If you and your child leave the vehicle, always
make sure that the child restraint system is
not in direct sunlight. Cover it with a blanket, for example. If the child restraint system has
been exposed to direct sunlight, leave it to
cool down before securing the child in it.
Never leave children unattended in the vehi-
cle.
Always ensure that all vehicle occupants have
their seat belts fastened correctly and are sitting
properly. Particular attention must be paid to
children.
Observe the safety notes on the seat belt
(Y page 41) and the notes on how to use the seat
belt properly (Y page 42). Child restraint system
If you fit a rearward-facing child restraint system
on the centre rear seat, the rear seat armrest
must be folded back as far as it will go.
Be sure to observe the correct use of the child
restraint system (Y page 59).
For safety reasons, Mercedes-Benz recom-
mends that you only use a child restraint system recommended by Mercedes-Benz
(Y page 63). G
WARNING
If the child restraint system is incorrectly fit-
ted on the seat position suitable for this pur-
pose, it cannot perform its intended protec-
tive function. In the event of an accident,
sharp braking or a sudden change in direction, the child may not be held securely. There is an
increased risk of serious or even fatal injuries.
Observe the manufacturer's installation
instructions and the correct use for the child
restraint system. Make sure that the entire
surface of the child restraint system is resting 54
Children in the vehicleSafety
Page 59 of 345
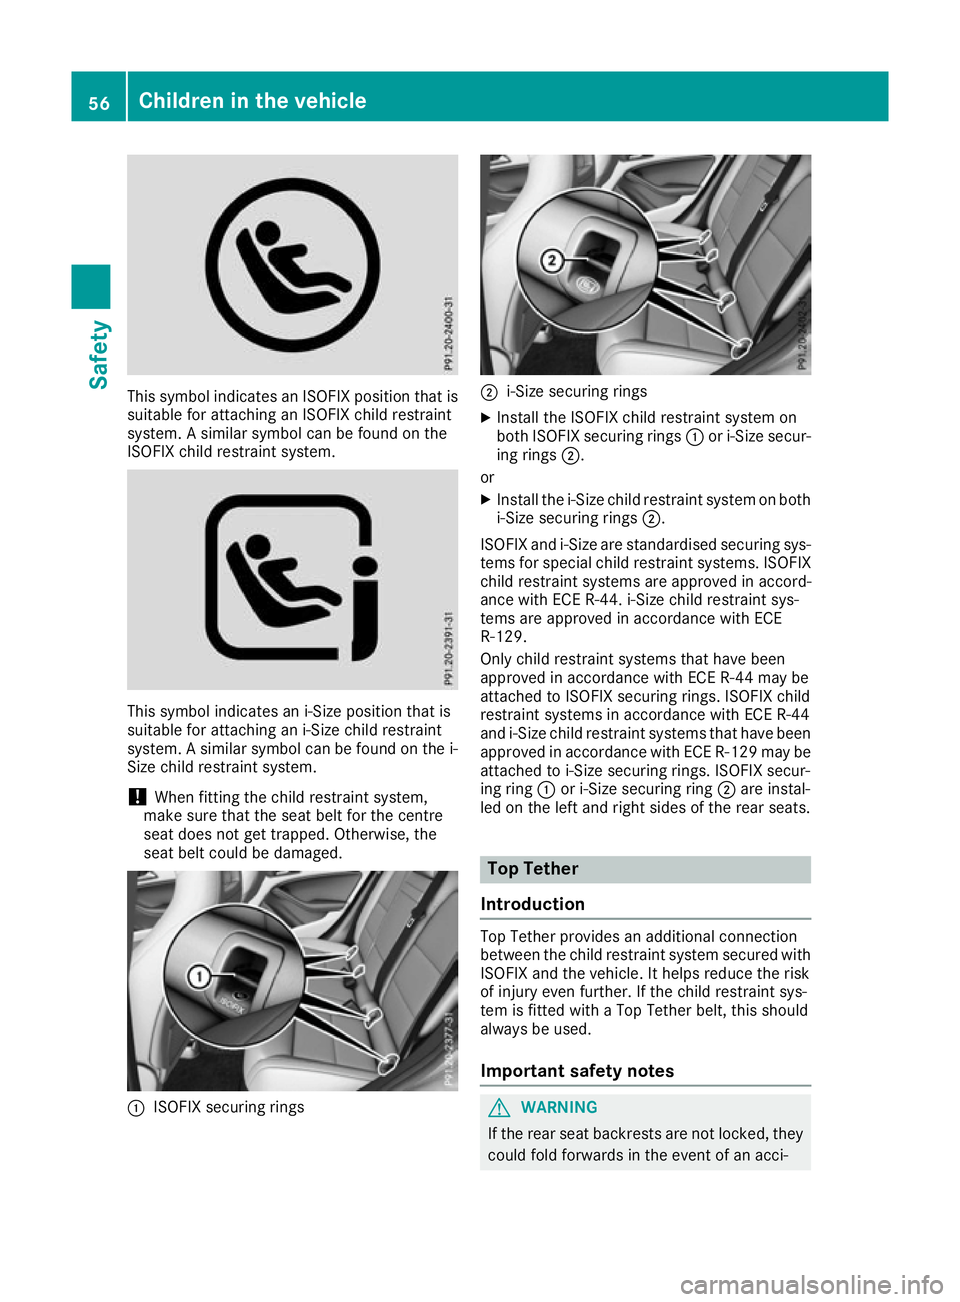
This symbol indicates an ISOFIX position that is
suitable for attaching an ISOFIX child restraint
system. A similar symbol can be found on the
ISOFIX child restraint system. This symbol indicates an i
‑Size position that is
suitable for attaching an i-Size child restraint
system. A similar symbol can be found on the i- Size child restraint system.
! When fitting the child restraint system,
make sure that the seat belt for the centre
seat does not get trapped. Otherwise, the
seat belt could be damaged. :
ISOFIX securing rings ;
i-Size securing rings
X Install the ISOFIX child restraint system on
both ISOFIX securing rings :or i-Size secur-
ing rings ;.
or
X Install the i-Size child restraint system on both
i-Size securing rings ;.
ISOFIX and i-Size are standardised securing sys-
tems for special child restraint systems. ISOFIX child restraint systems are approved in accord-
ance with ECE R-44. i-Size child restraint sys-
tems are approved in accordance with ECE
R-129.
Only child restraint systems that have been
approved in accordance with ECE R-44 may be
attached to ISOFIX securing rings. ISOFIX child
restraint systems in accordance with ECE R-44
and i ‑Size child restraint systems that have been
approved in accordance with ECE R-129 may be attached to i-Size securing rings. ISOFIX secur-
ing ring :or i-Size securing ring ;are instal-
led on the left and right sides of the rear seats. Top Tether
Introduction Top Tether provides an additional connection
between the child restraint system secured with
ISOFIX and the vehicle. It helps reduce the risk
of injury even further. If the child restraint sys-
tem is fitted with a Top Tether belt, this should
always be used.
Important safety notes G
WARNING
If the rear seat backrests are not locked, they
could fold forwards in the event of an acci- 56
Children in the vehicleSafety
Page 60 of 345
dent, heavy braking or sudden changes of
direction. As a result, child restraint systems
cannot perform their intended protective
function. Rear seat backrests that are not
locked can also cause additional injuries, e.g. in the event of an accident. This poses an
increased risk of injury or even fatal injury.
Always lock rear seat backrests after fitting a Top Tether belt. Observe the lock verificationindicator. Adjust the rear seat backrests so
that they are in an upright position.
If the rear backrest is not engaged and locked,
the red lock verification indicator will be visible
(Y page 271).
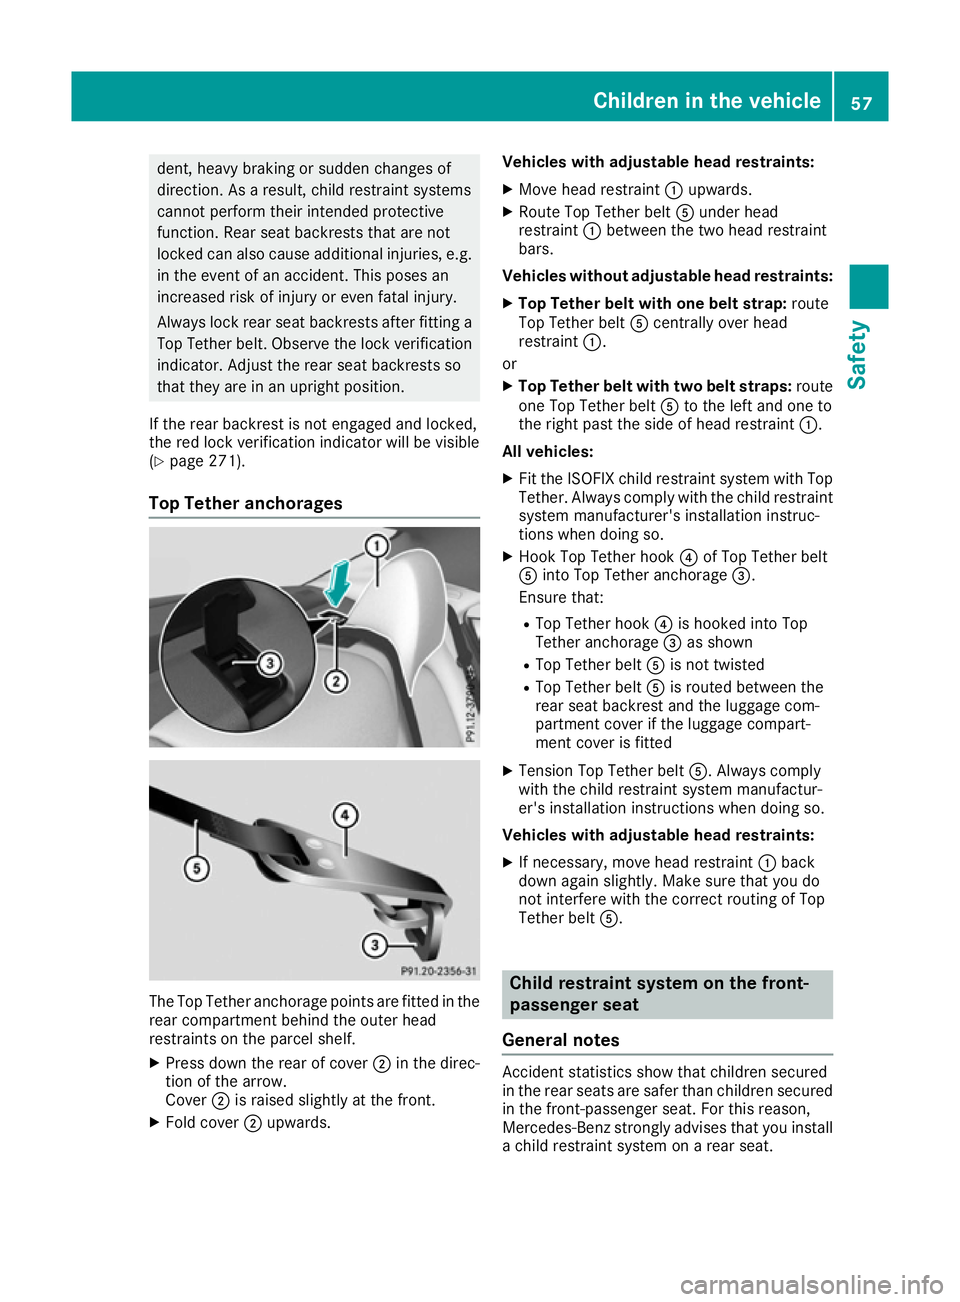
Top Tether anchorages The Top Tether anchorage points are fitted in the
rear compartment behind the outer head
restraints on the parcel shelf.
X Press down the rear of cover ;in the direc-
tion of the arrow.
Cover ;is raised slightly at the front.
X Fold cover ;upwards. Vehicles with adjustable head restraints:
X Move head restraint :upwards.
X Route Top Tether belt Aunder head
restraint :between the two head restraint
bars.
Vehicles without adjustable head restraints:
X Top Tether belt with one belt strap: route
Top Tether belt Acentrally over head
restraint :.
or
X Top Tether belt with two belt straps: route
one Top Tether belt Ato the left and one to
the right past the side of head restraint :.
All vehicles:
X Fit the ISOFIX child restraint system with Top
Tether. Always comply with the child restraint
system manufacturer's installation instruc-
tions when doing so.
X Hook Top Tether hook ?of Top Tether belt
A into Top Tether anchorage =.
Ensure that:
R Top Tether hook ?is hooked into Top
Tether anchorage =as shown
R Top Tether belt Ais not twisted
R Top Tether belt Ais routed between the
rear seat backrest and the luggage com-
partment cover if the luggage compart-
ment cover is fitted
X Tension Top Tether belt A. Always comply
with the child restraint system manufactur-
er's installation instructions when doing so.
Vehicles with adjustable head restraints:
X If necessary, move head restraint :back
down again slightly. Make sure that you do
not interfere with the correct routing of Top
Tether belt A. Child restraint system on the front-
passenger seat
General notes Accident statistics show that children secured
in the rear seats are safer than children secured
in the front-passenger seat. For this reason,
Mercedes-Benz strongly advises that you install a child restraint system on a rear seat. Children in the vehicle
57Safety Z
Page 101 of 345
G
WARNING
If the driver's seat is not correctly engaged, it could unexpectedly move while driving. This
could cause you to lose control of the vehicle. There is a risk of an accident.
Always ensure that the driver's seat is
engaged before starting the vehicle. G
WARNING
You could lose control of the vehicle while
driving if you:
R adjust the driver's seat, steering wheel or
mirrors
R fasten the seat belt
There is a risk of an accident.
Adjust the driver's seat, head restraint, steer-
ing wheel and mirrors and fasten your seat
belt before starting the engine. G
WARNING
If you adjust the seat height carelessly, you or other vehicle occupants could be trapped andthereby injured. Children in particular could
accidentally press the electrical seat adjust-
ment buttons and become trapped. There is a
risk of injury.
While moving the seats, make sure that your
hands or other body parts do not get under the
lever assembly of the seat adjustment sys-
tem.
! To avoid damage to the seats and the seat
heating, observe the following information:
R do not spill any liquids on the seats. If liquid
is spilled on the seats, dry them as soon aspossible.
R if the seat covers are damp or wet, do not
switch on the seat heating. The seat heat-
ing should also not be used to dry the seats.
R clean the seat covers as recommended;
see the "Interior care" section.
R do not transport heavy loads on the seats.
Do not place sharp objects on the seat
cushions, e.g. knives, nails or tools. The seats should only be occupied by passen-
gers, if possible.
R when the seat heating is in operation, do
not cover the seats with insulating materi-
als, e.g. blankets, coats, bags, seat covers,
child seats or booster seats.
! Make sure that there are no objects in the
footwell under or behind the seats when mov-
ing the seats back. There is a risk that the
seats and/or the objects could be damaged.
i Further related subjects:
R Luggage compartment enlargement (fold-
ing down the rear seats) (Y page 271) Adjusting the seats manually
Vehicles without the seating comfort
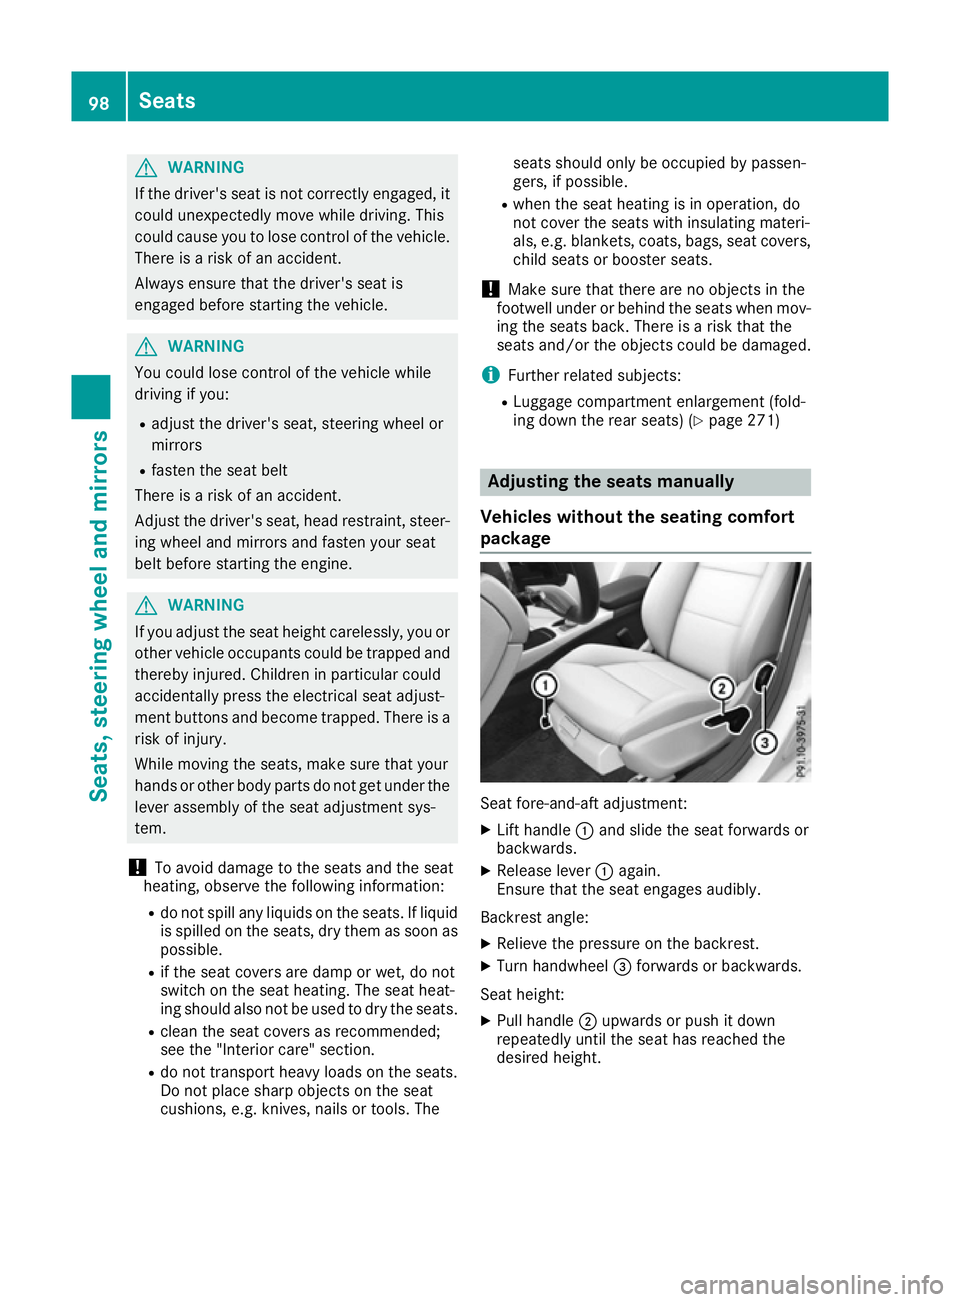
package Seat fore-and-aft adjustment:
X
Lift handle :and slide the seat forwards or
backwards.
X Release lever :again.
Ensure that the seat engages audibly.
Backrest angle:
X Relieve the pressure on the backrest.
X Turn handwheel =forwards or backwards.
Seat height: X Pull handle ;upwards or push it down
repeatedly until the seat has reached the
desired height. 98
SeatsSeats, steering wheel and mirrors
Page 104 of 345
X
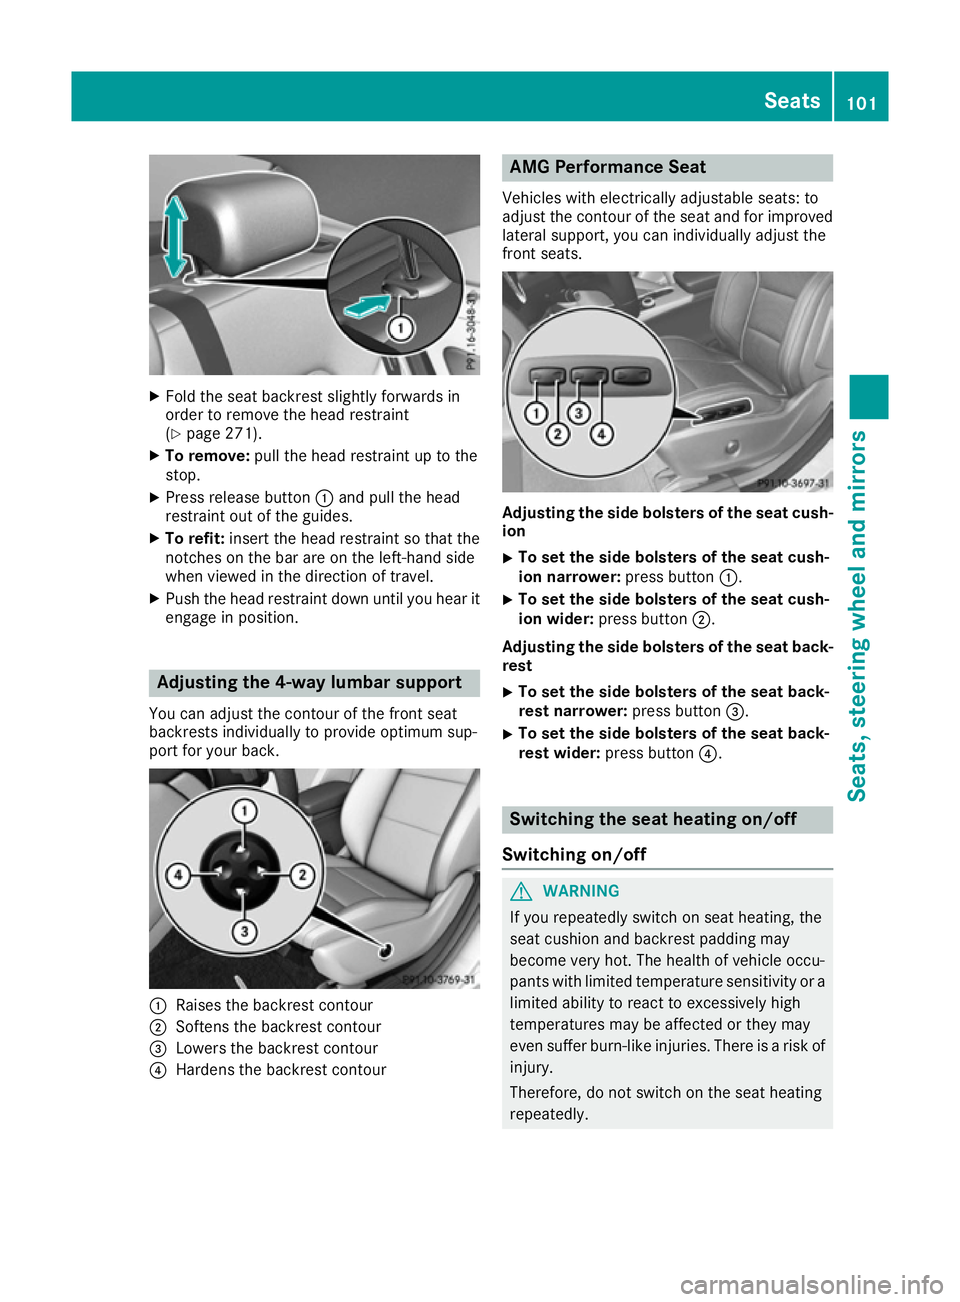
Fold the seat backrest slightly forwards in
order to remove the head restraint
(Y page 271).
X To remove: pull the head restraint up to the
stop.
X Press release button :and pull the head
restraint out of the guides.
X To refit: insert the head restraint so that the
notches on the bar are on the left-hand side
when viewed in the direction of travel.
X Push the head restraint down until you hear it
engage in position. Adjusting the 4-way lumbar support
You can adjust the contour of the front seat
backrests individually to provide optimum sup-
port for your back. :
Raises the backrest contour
; Softens the backrest contour
= Lowers the backrest contour
? Hardens the backrest contour AMG Performance Seat
Vehicles with electrically adjustable seats: to
adjust the contour of the seat and for improved
lateral support, you can individually adjust the
front seats. Adjusting the side bolsters of the seat cush-
ion
X To set the side bolsters of the seat cush-
ion narrower:
press button:.
X To set the side bolsters of the seat cush-
ion wider:
press button ;.
Adjusting the side bolsters of the seat back-
rest
X To set the side bolsters of the seat back-
rest narrower:
press button=.
X To set the side bolsters of the seat back-
rest wider: press button ?. Switching the seat heating on/off
Switching on/off G
WARNING
If you repeatedly switch on seat heating, the
seat cushion and backrest padding may
become very hot. The health of vehicle occu-
pants with limited temperature sensitivity or a limited ability to react to excessively high
temperatures may be affected or they may
even suffer burn-like injuries. There is a risk of
injury.
Therefore, do not switch on the seat heating
repeatedly. Seats
101Seats, steering wheel and mirrors Z
Page 107 of 345
mirror using button
=as long as the indicator
lamp is lit.
X Press button =up, down, or to the right or
left until you have adjusted the exterior mirror
to the correct position. You should have a
good overview of traffic conditions.
The convex exterior mirrors provide a larger field of vision.
After the engine has been started, the exterior
mirrors are automatically heated at low outside
temperatures. Heating takes a maximum of ten
minutes.
i The exterior mirrors can also be heated
manually by switching on the rear window
heating.
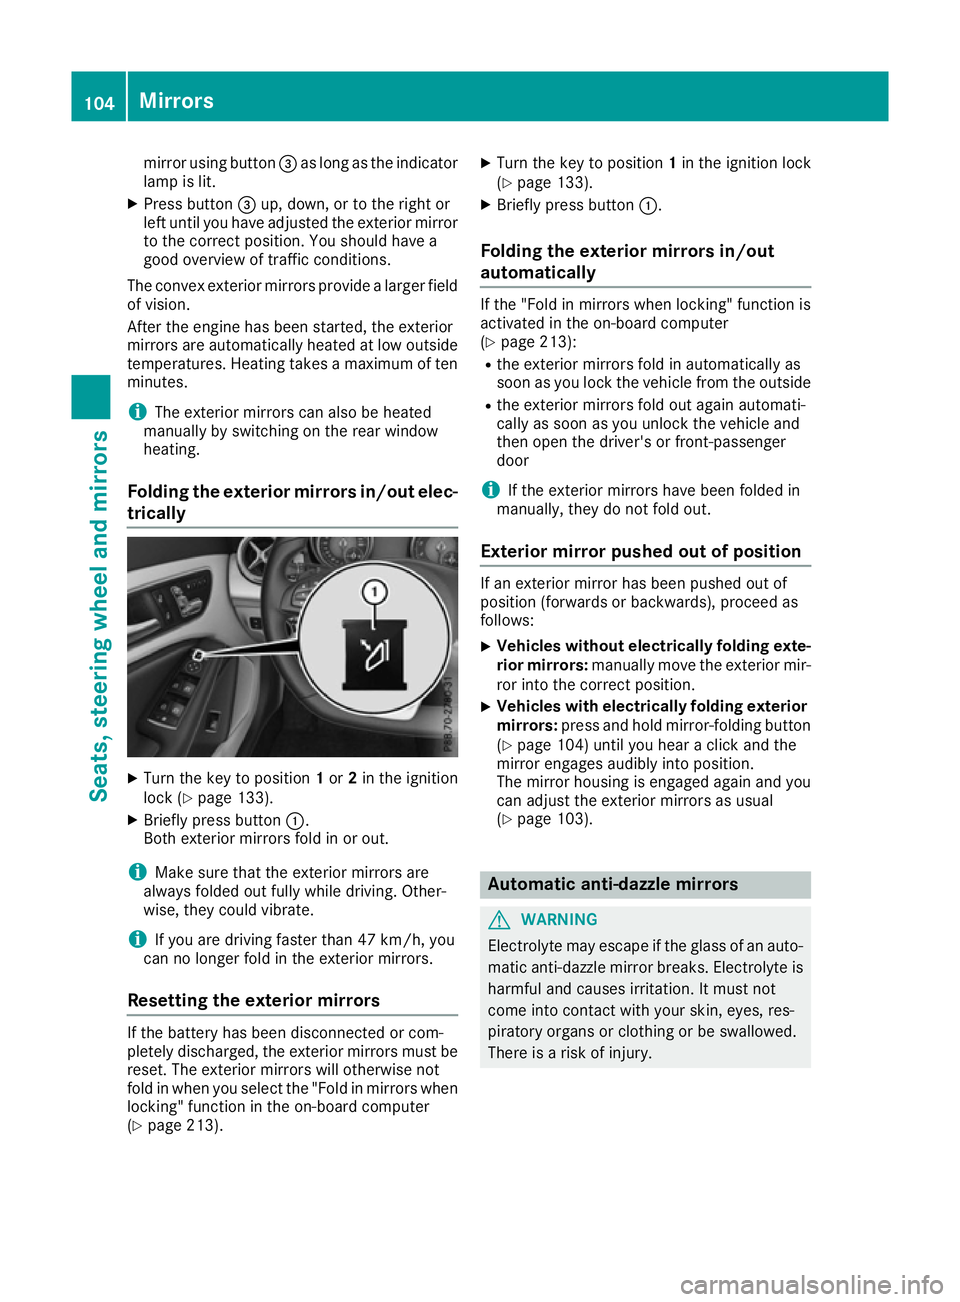
Folding the exterior mirrors in/out elec- trically X
Turn the key to position 1or 2in the ignition
lock (Y page 133).
X Briefly press button :.
Both exterior mirrors fold in or out.
i Make sure that the exterior mirrors are
always folded out fully while driving. Other-
wise, they could vibrate.
i If you are driving faster than 47 km/h, you
can no longer fold in the exterior mirrors.
Resetting the exterior mirrors If the battery has been disconnected or com-
pletely discharged, the exterior mirrors must be
reset. The exterior mirrors will otherwise not
fold in when you select the "Fold in mirrors when locking" function in the on-board computer
(Y page 213). X
Turn the key to position 1in the ignition lock
(Y page 133).
X Briefly press button :.
Folding the exterior mirrors in/out
automatically If the "Fold in mirrors when locking" function is
activated in the on-board computer
(Y page 213):
R the exterior mirrors fold in automatically as
soon as you lock the vehicle from the outside
R the exterior mirrors fold out again automati-
cally as soon as you unlock the vehicle and
then open the driver's or front-passenger
door
i If the exterior mirrors have been folded in
manually, they do not fold out.
Exterior mirror pushed out of position If an exterior mirror has been pushed out of
position (forwards or backwards), proceed as
follows:
X Vehicles without electrically folding exte-
rior mirrors: manually move the exterior mir-
ror into the correct position.
X Vehicles with electrically folding exterior
mirrors: press and hold mirror-folding button
(Y page 104) until you hear a click and the
mirror engages audibly into position.
The mirror housing is engaged again and you
can adjust the exterior mirrors as usual
(Y page 103). Automatic anti-dazzle mirrors
G
WARNING
Electrolyte may escape if the glass of an auto- matic anti-dazzle mirror breaks. Electrolyte is
harmful and causes irritation. It must not
come into contact with your skin, eyes, res-
piratory organs or clothing or be swallowed.
There is a risk of injury. 104
MirrorsSeats, steering wheel and mirrors